Types of street lamps
Street lamps that you plan to install on the territory of a country house or cottage must perform the following functions:
- illuminate the local area so that residents are not afraid to move around it at night;
- fit into the overall design concept of the yard and home.
Lamps for outdoor dachas are divided into the following types:
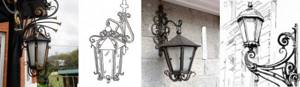
- wall lanterns. They are best suited as lighting fixtures at the entrance to the house and on the platform in front of it. As an option - lighting next to the gate or wicket. They can be different in shape and design; most often they choose “antique”;
- floor lamps - they are installed directly on the ground or on the veranda. A classic floor lamp is a flat stand with a round ball at the top, but there are more modernized models that differ from each other in height, shape and number of shades;
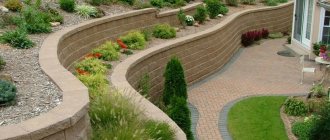
- ground lamps - they are mounted directly into the ground, and they can serve as illumination for green spaces, as well as illuminate pedestrian alleys in a summer cottage. In addition, they complement swings, summer pavilions and other buildings on the site well. Lanterns of this type most often have a rectangular or round shape;
- hanging lanterns - they are attached on verandas to ceiling beams or even to trees, if this does not impede the connection to the network. As a rule, they are a long and strong chain that ends in a lampshade.
In the photo you can see some types of country lamps, which can be purchased ready-made , or you can make them yourself.
Types of outdoor lamps
- Floor lamps. Such street lights are installed on the ground or mounted in the floor of the veranda. The classic Soviet floor lamp is a stand with a round ball on top; there are also more modern models, they differ from each other in height, number of shades, and shape.
- Wall lanterns. Such lighting fixtures are well suited as lighting at the entrance to the house and on the terrace in front of the house. This option is also suitable for illuminating the space next to a gate or wicket. The shape may vary. The “antique” option is often used to illuminate the area.
- Ground lights. Such lighting devices are mounted directly into the ground and can serve as lighting for landscape elements, lawns and other plantings. Such lamps are convenient for illuminating pedestrian paths and alleys in a summer cottage. They will look beautiful for illuminating swings, alpine slides, summer pavilions and other light buildings on the territory of a summer cottage. The shape is usually rectangular or round.
- Pendant lighting. Such lanterns are attached to the ceiling or to trees on verandas. Often pendant lights are a long and strong chain that ends with a shade.
DIY garden lamps that will hang outside must meet certain functions:
- illuminate the area near the house so that household members can move freely around it in the dark;
- fit harmoniously into the overall style of the summer cottage.
What can you use to make a street lamp with your own hands?
An outdoor version of a lantern for a summer cottage is a necessary decorative element for a summer cottage, but it is not always possible to buy a ready-made version. Such a purchase cannot be cheap, which means you need to learn how to make this important element yourself.
You can make a homemade street lamp
- glass jars and bottles;
- building materials;
- tin cans;
- wood;
- plastic;
- metal
Street lamp made from glass jars and bottles .
The main problem with a DIY bottle lamp will be the inability to diffuse light, so the main task on your part will be to ensure a high level of light diffusion from the bulb. A beautiful solution for a lamp made from a glass jar or a lamp made from a bottle would be to paint its inner walls with luminescent paint. Such paint will accumulate sunlight, and in the dark it will emit an unusual glow. Drawing depends only on your preferences and imagination. To give a lamp from a jar with your own hands a more noble and interesting appearance, you can fill it with broken glass or wine corks, shells or decorative beads, then in the daytime it will look like a beautiful decorative element. A lamp made from a can is a beautiful and elegant decorative element for a summer cottage. The glowing light will become a magical element of the exterior of the dacha.
Lantern made from tin cans . After regular get-togethers with friends over a can of beer, don’t rush to throw the empty container into the trash bin, put it aside, because some good can still come out of it. Using an empty tin can you can make a very unusual and beautiful garden lamp for your garden with your own hands.
To make a glowing street lamp from a tin can, you will need a hammer, several nails of different sizes, a round block of wood and a vice. Make a sketch on a piece of paper, and then transfer it to the jar itself. The drawing should not be too simple, but complex paintings are also inappropriate here; it is better that the drawing closes and repeats itself in a circle. Then you can paint the product, install the necessary light bulb in it and hang it in the right place.
Made of wood . This DIY version of a street lamp is one of the simplest, since to implement it you will need a minimum of materials and effort. Take wood twigs of the required size and a thick ball or ball. Twigs and twigs are glued onto the ball in a chaotic manner, tightly enough so that the structure does not fall apart, and then the ball is removed, a light bulb is placed in the resulting structure and hung in the required place. You will get a ball that glows in the dark. The garden is a great place for such a lamp.
From building materials . If after repair work you have some cement and plaster left, do not throw them away; now we will teach you how to make a street lamp from these construction remains.
Take a two-liter bottle, cut off one third from the edge, and close the neck tightly. Then take a small bottle up to 0.5 liters with a closed lid. Insert the small bottle inside the larger one and secure with two nails, crossing them. The neck of the small bottle should touch the neck of the large bottle. Fill the space between the bottles with cement. Once dry, you will have a concrete garden lantern, insert the cord and bulb and you're done!
Made of metal . The most reliable and durable street lamp should be made of metal. To do this you will need steel rods, a corner, a welding machine, handles and strips. This option is more labor-intensive, but also the most reliable in terms of durability. And a well-made forged lantern will fit into any interior and decorate it. The lantern can be hung at the entrance of the gazebo or in the center of the gazebo.
Made of plastic . A frequently used version of a DIY bottle lamp is made of plastic, but it is very unreliable and short-lived. It is worth approaching the work with patience once and making a high-quality decorative element, rather than constantly replacing street lamps with crafts made from plastic bottles or cans. But the choice is yours.
Light sources for street lamps
For country lamps, different light sources , for example:
- classic incandescent lamps. They are inexpensive, but as outdoor lighting they are not always economical, since they consume a lot of energy and are too bright;
- halogen lamps. Such light sources are more economical and will last much longer than conventional ones. They also differ from incandescent lamps in their reasonable light intensity. Their disadvantage is strong heating and sensitivity to sudden changes in voltage and dirt on the bulb;
- LED bulbs. They will save up to one hundred percent of electricity compared to previous options. Such lamps are not cheap, but they will last as long as possible. In addition, they do not contain mercury or other harmful components. And the durable body of such a lamp is almost impossible to break;
- solar panels. Lanterns based on them can be installed even where it is not possible to lay electrical wiring. They operate using a battery that absorbs natural energy. When fully charged, the lamp will operate continuously for 12 hours. However, they can only be installed where the sun provides maximum heat during most of the daylight hours.
How to do it yourself
First, think about what type of lamp will harmonize with the overall style of your dacha, and how safe such a design will be.
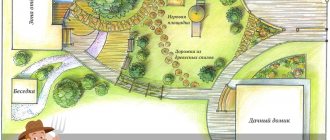
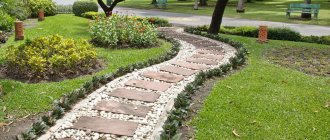
This is useful: original ideas for lighting paths in the country.
The most commonly required tools are:
- scissors;
- knife;
- glue;
- saw;
- drill;
- nails;
- wire or twine for fastening.
Let's look at the process of creating different lamps.
From a log
Log lamps look appropriate in almost any type of garden. This material gives a lot of scope for imagination. Let's look at the most popular options.
A shelf lamp can be made like this:
- Saw the log into “slices” 7–8 cm thick.
- Make a hole in the center of each cut and pass a plexiglass or transparent plastic tube through it.
- Secure the tube with glue.
- Insert the LED strip into the tube. You can release the wire through a specially prepared hole in the lower wooden ring. You can also install the lamp on the mesh and pass the wire through it.
Each material from which the lamp will be made has its own nuances.
Another option for the lamp is in the recess of a log. They do it like this:
- Remove the core from a log 20–30 cm long, not reaching about 7–10 cm from the bottom. To simplify the task, you can first split the log and then carefully glue it together.
- Drill several holes in the walls. Make four of them at the very top - a rope or chain will be attached to them.
- Insert the lamp inside. The wire can be routed through the top by carefully attaching it to one of the circuits.
You can make a solid hole in the log and put a garland in it.
Finally, one of the most effective ways to use stumps is to split them from the bottom, remove the core and put an LED lamp inside.
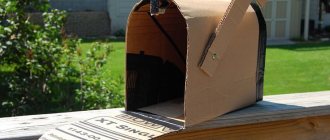
From a tin can
You can make either single lamps or a whole garland from cans. The scheme of work is as follows:
- Select a pattern to apply. You can print and cut out a stencil from paper in advance.
- Place the tin can on a thick wooden beam. It is desirable that it fits as tightly as possible. Place the stencil on the surface and trace it with a marker.
- Using nails and a hammer, punch enough holes to outline the outline of the design.
- Attach wire for hanging.
A subtle pattern on a jar can not only be marked with holes, but also cut out.
From glass containers
Beautiful homemade lanterns are made from glass jars and bottles. They can be decorated in many ways: painted, tied with ribbons or fishing line with beads strung, artificial flowers attached to them, etc. An interesting effect is obtained if you put a narrow jar into a wide one, and fill the space between the walls with Czech glass beads.
The jars can be hung individually on branches, hooks or wrought iron fences, or they can be tied together into a common garland.
A hanging chandelier made from a pallet and cans looks beautiful. They do it like this:
- If necessary, sand the pallet and coat it with varnish. You can also knock down a suitable wooden structure from planks.
- At the bottom of the pallet, secure several hooks with self-tapping screws. There should be 3-4 more of them than cans. Make sure they are held firmly. Just in case, you can add a drop of epoxy glue to each attachment point.
- Drill holes along the edges of the structure and attach a chain or strong rope for hanging.
- Pour sand into the jars. Wrap a thick wire around the neck of each to create a hanging handle. You can put several transparent beads on the wire.
- Place candles in jars and hang them on a pallet. Attach garlands of beads or shells to the remaining hooks.
You don’t need to use candles, just fill the jars with glow-in-the-dark pebbles.

Follow the instructions when creating lamps
Made from concrete
Unusual and stylish lamps are made from concrete. They are made like this:
- Prepare a strong concrete solution. It should have a consistency similar to cookie dough.
- Blow up the balloons. Their size must correspond to the future size of the lamps.
- Cover the balls with concrete, leaving one free area, and let them dry for a few days. Immediately after use, clean the container in which you mixed the solution, otherwise it will set and it will be impossible to remove it.
- When the concrete has dried and gained strength, puncture and remove the balls.
As a rule, candles are placed inside such lamps.
With a rope
Airy and romantic option. It is very easy to make a rope lamp:
- Inflate a balloon and wrap it with jute rope soaked in PVA glue.
- Paint the future lamp with spray paint.
- When the glue dries, puncture and remove the ball.
Such balls can be attached to hanging garlands or installed on posts with built-in lamps right in the middle of the flowerbed.
Solar powered options
Solar-powered lamps are very convenient because they do not require electrical wiring. In addition, this is one of the safest lighting options.
There are a large number of ready-made models on sale, but if you have skills in working with electronics, you can assemble a simple device yourself. They do it like this:
- As a base, you can purchase a 5.5 V, 90 mA solar cell, laminated with silicone, and a 3.6 V lithium-ion battery with a minimum capacity of 3000 mAh. The control unit is assembled from four resistors, two KT503 type transistors, and a Schottky diode 11DQ04. They must be placed on the same board.
- Assemble all these elements on a breadboard. The DIY PCB 42x25mm model works well. For installation, you can use stranded copper wire MGTF 0.2.
- Connect 3-4 LEDs, preferably 5 mm type 3H5 (helmet).
- Place the structure inside a small jar and secure it so that the LEDs are clearly visible.
Jars with solar panels can be mounted on small supports, hung on branches, or simply placed along paths. Just make sure that they are well lit during the day.
You can do it simpler: buy a ready-made lamp, carefully remove it along with the electronic components from the housing and transfer it to a beautiful container.
What can you make your own lamp from?
Very often, homemade street lamps are made of plastic , but this solution is not the best, since the plastic product is easily damaged and broken. It is best to make a metal lantern with your own hands:
- brass;
- copper;
- bronze
It is worth noting that the steel model will be maximally resistant to precipitation and other external influences, but its appearance leaves much to be desired.
But copper lamps will harmoniously complement the retro-style exterior, but do not forget that over time, copper on the street oxidizes and acquires an unsightly greenish tint. A bronze lamp tends to darken, so it will have to be cleaned regularly.
The most optimal material for a lamp is brass, which is durable and visually attractive.
What do you need for work?
Self-made lamps are good because you can use any materials when arranging lighting on your site: wood, glass, plastic, metal. However, with effort, you want to end up with a durable structure. A metal lantern fits this definition more than others.
Depending on the model of the lighting fixture, a different set of tools and materials will be used. You can consider the following two options: a lamp made from a tin can and a forged product with glass inserts. In the first case, there will be little work, but the output will be a device with an original glow shape.
The only tools you need are a hammer and a nail to make holes in the jar, or metal scissors, with which you can cut holes of the desired shape (stars, hearts, etc.).
Such designs can be used to decorate the local area, since in essence it is more of a decorative light source than a functional lamp. It cannot be used in conditions of high humidity, since the design does not provide for a sealed housing. However, in the evening such a lantern will create a cozy atmosphere.
If you want to make a forged lighting fixture, then you need to prepare for certain difficulties in the technology of its manufacture. The work will require a certain number of metal elements (rods, sheets), the dimensions and shape are determined by the model that was chosen for implementation.
In addition, you need to have a welding machine to perform spot welding of finished forged parts. But in the absence of such equipment, you can use improvised fasteners. The easiest way is to install the lantern on the wall of the house, on the veranda or in the gazebo.
Making a homemade lantern
To make a lantern using metal raw materials with your own hands, you will have to prepare the following tools:
- drill;
- drills;
- screws and so on.
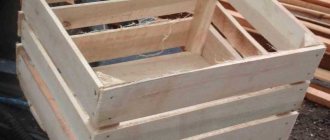
Very often, do-it-yourself lanterns are made from scrap materials , for example:
- wood chips;
- glass and tin jars;
- clay;
- plastic bottles and cups that serve as lampshades for the garland;
- PVC pipes;
- cardboard drink bags;
- old kitchen utensils;
- unused building materials.
Such products will be especially original, and making them with your own hands will not be difficult. However, they will be fragile and have a short service life.
Recent Entries
Chainsaw or electric saw - what to choose for the garden? 4 mistakes when growing tomatoes in pots that almost all housewives make Secrets of growing seedlings from the Japanese, who are very sensitive to the soil
When making a lamp for a dacha with their own hands, many do not hesitate to use their imagination to the maximum. Modifications can be quite varied. Below we will look at the manufacturing features of some options.
DIY glass bottle lantern
It is very easy to make a lampshade based on a glass bottle or jar with your own hands, while transparent glass will allow light to easily pass through the walls and create wonderful special effects.
To work you will need:
- bottle or jar;
- pliers;
- cartridge;
- insulating tape;
- knife for stripping insulation;
- indicator;
- decorative elements.
The work flow is as follows:
- install the electrical wiring, connect the wires in the socket and screw the light bulb into it;
- We take a bottle with a narrow neck, preferably an original shape and color, and put small beads, transparent balls that reflect color, or ground glass on its bottom;
- we wrap a thin colored wire around our finger so that it takes on a spiral shape, and also put it in the bottle;
- lower the socket with the light bulb into the lampshade and fix it with silicone.
DIY forged lantern
A forged lamp for a summer cottage is a more reliable and durable option . To make it you will need:
- steel rods;
- corner;
- stripes;
- welding machine.
The manufacturing work will look like this:
- from 4 steel frames we make a body in the form of a rectangle or trapezoid;
- We cover the outside of the frame with bars. They are made from steel rods;
- cover the body from above with an iron cap;
- We make a bracket from a square-shaped steel bar that will serve as a fastening to the wall;
- the lower curls are made of thin steel strips;
- the ends of the curls are welded and connected by interceptions.
How to make a garden lantern with your own hands from wood
There are many options for garden lamps made of wood that you can make yourself. For example, from a stump and LED strip. To do this, you need to make 4-5 small vertical cuts around the circumference of the stump and clean them. Then insert LED strips into them.
Alternatively, you can cut a hole in the center of the stump and insert a storage lamp or candle into it.
You can make a garden lantern with your own hands from branches or small boards, knocked together in the form of a standard lantern. If you wish, you can make a lantern with funny cut out faces. Candles are installed inside such lanterns.
Features of connecting the flashlight to the network
When you make lanterns for a summer cottage, you need to pay due attention to the wiring connection procedure. To connect the lamp to the network, we need:
- electric cable VVG;
- terminal blocks for fixing connections;
- metal hose or corrugated pipe for protection.
, a cable with two cores 1.5 mm thick is most often used . It is better to immediately purchase a bay where the length of the wire will be equal to 100 meters. And the diameter of the corrugated pipe should be from 18 to 25 mm. It will be needed to protect the cable from rodents or damage when digging in the soil.
The holes in the terminal blocks should have a diameter of 2.5 to 4 mm and consist of one or two strips, it all depends on the number of connections and lampshades. The pads must be selected based on the current strength from 5 to 10 A.
Installation involves the following steps:
- we dig a trench for laying the cable with a depth of about 80 cm and a distance from the ditch to the house of a maximum of 60 cm;
- When installing floor lamps, you first need to install metal knives and then pull the cable through them one by one. Where it is placed in the trench, we place it in a corrugated sleeve. After passing through all the devices, the cable is cut so that the length of its tail is a maximum of 15 cm;
- we prepare the second piece of wire and also pass it through the pipe and at the top of the device we connect the two cables with terminals;
- if the lights are placed on a wall or facade, you need to reliably insulate the junction boxes. It is best to connect the wires in the boxes with clamping nuts; you can also use pliers, but then each connection must be soldered. Wrap the twisted areas with electrical tape;
- installing the electrical circuit. Since it has two wires, one “zero” and the other “phase”, you need to make sure that the switch can open the phase wire. Then, in the off position when changing a burnt-out lamp, there will be no risk of electric shock. The phase wire is determined using a special indicator;
- A simple socket will also work as a connection point, then you can turn off the power to the entire system quickly by just pulling out the plug. The cables can also be connected directly to the terminals on the switchboard, which is equipped with an automatic fuse that cuts off the voltage in case of an emergency;
- when installing the switch, you need to check whether its specified power corresponds to the load in this network;
- Before digging a trench, make sure all lights are working and reinforce the posts by tamping around the clay or small crushed stone. If the soil is light, then it is better to fill the supports for the devices with concrete.