Nothing can decorate a home like flowers. But in a nondescript pot, even the most beautiful flower looks dull. Fresh flowers themselves, of course, create beauty and comfort in your home, but if you also make original flower pots for them with your own hands, there will be no limit to the admiration of guests and household members.
Such decorative inclusions in the interior of a room, created with your own hands, indicate a creative nature, give creative energy and fill the house with a very special atmosphere.
Which is the best flower pot to choose?
Indoor flowers, as an element of the interior, bring a variety of colors to it and complement the style of the room. There are many types of flower pots available in the market.
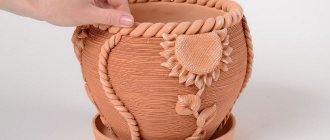
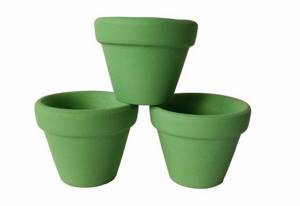
Clay or ceramics
Plants have been grown in ceramic or clay pots for several centuries. The advantage of earthenware, unless it is glazed, is that it is natural. Due to the presence of pores in this material, excess moisture evaporates through the walls of the pot, while the roots of the flower are saturated with oxygen.
However, now fakes made of gypsum have appeared on the market, which does not have such useful properties. You can distinguish products made from gypsum and clay by their sound: when you tap your fingernail on a plaster pot, the sound will be more dull than that of a clay pot.
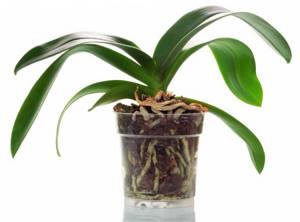
Glass
Glass pots have not yet become widespread, as this is not the most suitable material for growing indoor flowers. Glass breaks easily and does not allow air to pass through. However, due to the transparency of the material, such flowerpots are well suited for planting orchids and those plants whose roots participate in the process of photosynthesis.
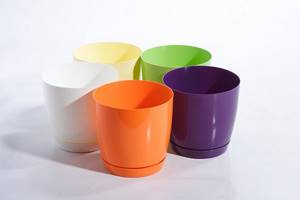
Plastic
Modern technologies make it possible to use plastic not only as a material for making a flower pot, but also to create flowerpots. Designer imagination has made it possible to turn ordinary, inconspicuous plastic pots into real works of art.
The advantage of plastic products is their lightness: in the process of growing large and heavy plants (for example, ficus) placed on the floor, they can be easily moved to another place.
Another advantage of plastic is that it can be given any shape if desired. With current technologies, plastic pots can be used as an element of additional lighting, making them glow brightly in the dark.
Plastic pots have a disadvantage - the possibility of rotting of the roots when water is overflowed, since it is an artificial material that does not allow air to pass through, which negatively affects the development of plants.
If you plant a very tall plant in such a light pot, it may lose stability.
Types of flower pots
The word cache-pot comes from the French cache-pot, which means “hidden pot.” It is a decorative vessel that does not have holes in the lower part - this is its main difference from flower pots.
Before choosing the appropriate option, you need to clearly understand where the flowerpot will be located and what kind of flower will be grown in it.
Today there are the following main types of pots:
- Indoor - classic type, simple or stylized. They can be made from polymers, wood, stone (natural or artificial).
- Street ones are larger in size. Plants in them are grown outdoors, outdoors. Plastic and concrete options are available.
- Decorative - more often used in areas of limited size.
- Flowerpots for decorating entrance areas are the most popular. They can serve as ground-based structures, and also appear on poles or pedestals.
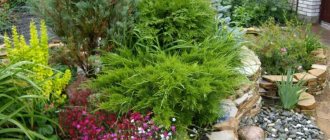
Decorative flower pots can be placed not only in an office or home, but also outdoors to decorate your garden.
High-tech plant pots
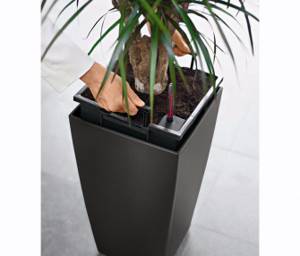
Some gardeners dream of flower pots with automatic watering: with such a system, you don’t have to worry about flowers when you go on vacation, since it eliminates the possibility of overwatering or underwatering.
A pot with an automatic watering system is a two-in-one system. The flowerpot has a special hole for watering, into which a pot with an indicator indicating the level of water filling is lowered. Thanks to this device, the number of waterings can be reduced to several times a year, which makes it possible for even the most forgetful owners to grow flowers.
When planting a young flower in such a pot, you must remember that its roots are located near the surface. and to obtain sufficient moisture they must be watered “the old fashioned way.”
Design options for pots for indoor flowers
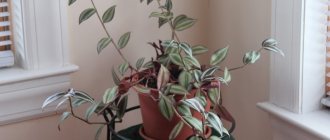
What is the difference between a flower pot and a regular flower pot? Translated from French, cache-pot means “to hide a pot.” Thus, a flowerpot is a decorative “wrapper”. Of course, the best home for flowers would be a clay pot, but it quickly loses its attractive appearance, since the ceramic allows water to pass through and stains appear on its surface that cannot be removed. Glaze is often used as a protective film, but over time it will crack and crumble, and then the pot will either have to be replaced or decorated. In this case, a flowerpot comes to the rescue - with its help you can easily hide unsightly places and create decor in the same style.
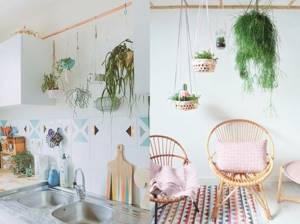
If you have a couple or three pots, then the easiest way is to arrange them beautifully on the windowsill. But if there are more than a dozen colors, then placement can become a problem. The most common way to hang flowerpots is to use ready-made hanging hooks or make holes for rope. But you can make the mounting method creative.
Such a pot will not go unnoticed
You can organize a simple crossbar or build an entire structure under the ceiling, on which, for example, hang several flowerpots using the Macrame technique.
Pots on the crossbar
Multi-tiered hanging planter
The design of a one-piece flowerpot does not provide drainage holes, and openwork ones do not retain excess moisture, so this must be taken into account when watering.
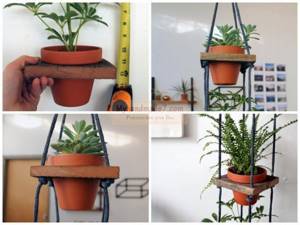
Or here’s an idea for hanging flowerpots, even those who don’t know how to weave using the Macrame technique can implement it:
If you need to place many flower pots in a small space, then this idea is for you!
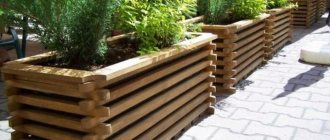
Using simple techniques from wooden blocks and rope, you can make an entire shelf for flowers with your own hands, arranging hanging structures. More detailed instructions in this video:
Imagine, combine different methods, the more colors you can place, the more comfortable your home will be.
What to make pots and flowerpots with your own hands
Almost everyone grows indoor plants or flowers in their garden. The market is replete with many bright and original types of flower pots, but every person wants to add some zest to their home or garden, to show their individuality.
For example, it looks very unusual if ordinary flower pots are placed in an unusual flower pot - a floor-standing (high) one. You can make your own flower pots. There are a huge number of design options; all you have to do is choose the material and create.
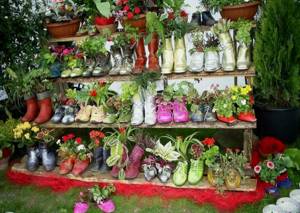
Old shoes
There are several ways to repurpose unwearable shoes into a stylish flowerpot. This must be done with caution, since any flowers need suitable soil, a special watering regime, fertilizing and quality lighting.
You need to choose:
- pot of the right size;
- disposable cup;
- a bottle or box suitable in size to the inner space of the shoe.
Creeping plants such as bindweed, ivy, and mouse peas will quickly camouflage these adaptations as they grow.
If you want to embody the idea “in the original”, you must:
- Line the inside of the fabric shoes with plastic wrap or insert a plastic bag. If it is rubber or plastic, you don’t need to invest anything.
- Next, use an awl to make through holes in the sole to allow excess moisture to escape.
- Then pour pebbles inside the shoes, followed by a layer of earth.
- Plant your favorite plants and place the container in the shade for a while to acclimatize.
It should be noted that the smaller the shoes are selected, the more drought-resistant the plant should be. The ideal option would be cacti, juveniles and other succulents.
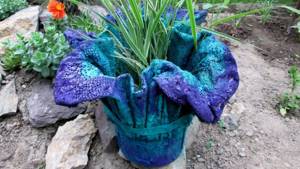
Cement, rag and burlap
Very original flowerpots can be made from unnecessary rags and cement.
To do this, you need to moisten an old unnecessary fabric in liquid cement mortar, level it on an inverted bucket or other object whose shape you want to give to a flowerpot, and leave to dry.
When the product is dry, it can be painted or left as is.
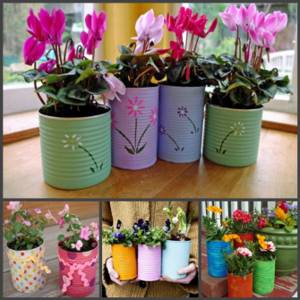
Tin can garden
Interesting pots for petunias can be made from small tin cans. To do this, the jar needs to be cleaned inside and outside of dirt and rust, and then decorated using acrylic paints, shells, buttons, eggshells, ice cream sticks and other available materials.
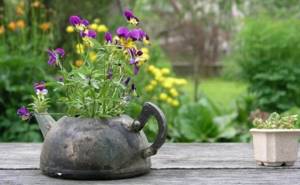
Kettle
If there is an old teapot in the house, do not throw it away - it can make a beautiful decoration for your garden plot. In addition, such an original pot made by yourself will save money.
You can return the teapot to its original appearance using a can of acrylic or aerosol paint, and you can also additionally apply various patterns to the surface using a stencil.
If you don’t want to bother with painting the kettle, you can leave everything as it is, since worn and tarnished metal also has a special charm. You can polish it - a cold metallic shine will look no less beautiful.
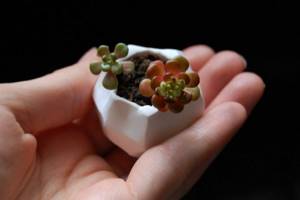
Polymer clay
To create a polymer pot you will need clay of any color, as well as a knife, a teaspoon or ice cream scoop and any plant.
Manufacturing process:
- Roll out a ball of clay and adjust its size.
- Mark the outline of the future hole with a spoon and carefully, little by little, pick out the clay from the middle.
- Turn the resulting product upside down and cut it on five sides with a knife, forming edges. If desired, you can leave it round.
- Flatten the bottom of the pot.
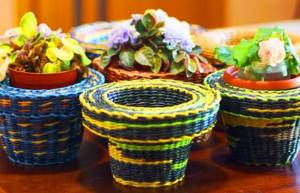
Wicker
You can weave a flower pot from ordinary rope. The shape of the product can be different - cylindrical, round or cone-shaped - the main thing is that the plant fits freely in it.
As a material for weaving, you can use threads of artificial rattan or thin branches of a vine.
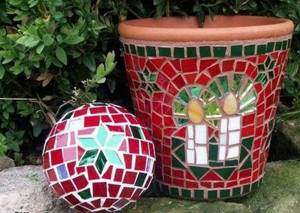
Mosaic flowerpot
Beautiful and original pots can be made using the mosaic technique. Shells, small pebbles, fragments of porcelain dishes or multi-colored glass are used as mosaics. They can decorate both small pots and large flowerpots.
In addition to the material for the mosaic, you will need:
- tin base (tin can or bucket);
- mounting grid;
- plaster;
- grout for tiles.
Manufacturing technique:
- Cover the tin can with plaster, and then wrap it with a mounting mesh, previously lowered entirely into the plaster mixture.
- Lay out the entire surface of the future pot, with the exception of the bottom, with the prepared “mosaic”.
- Leave the product until completely dry.
- Treat the surface with tile grout to make the pot smooth. This also removes cracks and gaps between mosaic elements.
- Remove grout residues from the surface with a soft cloth.
Tree
To turn an unsightly stump into an original flowerpot, all you need is a drill and a chisel.
Stages of making a wooden flowerpot:
- First you need to determine the size of the future pot. The best height for a floor flowerpot is 40 centimeters. Mark the surface of the hemp and cut off the excess with a chainsaw.
- Next, drill holes as close to each other as possible around the entire perimeter.
- Using a chisel, remove the inner wood until the depth of the flowerpot reaches the desired dimensions. The thickness of the walls will depend on the strength of the stump itself.
- Place a suitable sized plastic or ceramic pot inside. You can do it differently: use a paint brush to treat the inner surface of the workpiece with stain, and after drying, cover the recess with polyethylene.
- Now you can fill the soil and plant flowers.
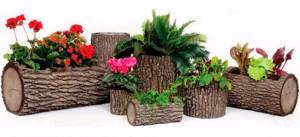
Using the same principle, you can make a flowerpot from an old log, only you need to make a recess along.
From one large stump you can create a whole composition of several flowerpots, which will resemble a flower garden:
- Cut the stump into several parts.
- Attach them to pre-treated stands.
- The sawn parts can be arranged in several rows, fastened from the inside, as well as the rows themselves, using a construction stapler. Each new row should be placed so that the seam appears offset.
- Place any container of a suitable size inside, then fill it with soil.
Coconut
Coconut is a fairly durable and reliable material for making flower pots. Coconuts are ideal for planting succulents and cacti in them, which do not require frequent watering, since high humidity can cause the nut shell to crack.
Coconut flowerpots can also be used for other indoor plants, if you drill not 2-3 holes in them for drainage, but several more, so that the water does not stagnate after watering.
To make a pot you will need:
- coconut;
- several medium-sized self-tapping screws or self-tapping screws;
- hacksaw for metal.
There is a small hole on one side of the coconut - you need to pick it out with a knife and pour out the milk. Then saw the nut - be sure to cross it, otherwise it may crack.
There are two cutting options:
- If you cut a nut exactly in the middle, you will get two identical halves - two pots. You can use any fancifully curved piece of driftwood as a stand, screwing the pots to it with screws. It is advisable not to twist them too tightly so that the shell does not burst.
- If you cut off just the top of the coconut with a grinder, it will serve as a stand for the pot. Then you need to make a hole in the center of the cut off top, place it with the cut side down and screw the pot to it with a screw - you will get a goblet-shaped shape.
If desired, the outside of the shell can be cleaned of protruding fibers and treated with sandpaper, and then varnished. Be sure to pour broken brick or expanded clay onto the bottom of the pot for drainage. Sprinkle substrate on top. Now you can plant the plants.
Such interesting compositions will look good in any interior. Large coconuts can be made into hanging baskets and used as planters.
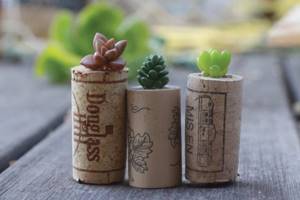
Felt and wine corks
You can create a whole mini-cactus garden from wine corks. In general, cork pots are suitable for growing any slow-growing plants.
To implement a non-standard idea for decorating a flower pot, you need to select the core of the cork with a knife, pour soil into it - and the mini-pot is ready. Its beauty is that such a flowerpot can be attached in any, even the most unexpected, place - for example, on the refrigerator. But to do this you need to glue a powerful magnet to it.
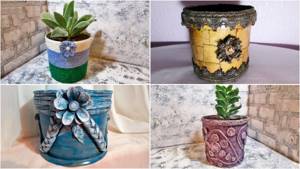
Decor of pots
Very often, indoor plants and flowers are found in boring, uniform flowerpots. The same plastic pots and flowerpots are what are sold in the store. But you can make original decor for flowerpots with your own hands, giving them individuality and originality.
Marine theme
Marine style in the design of a flower pot is simple in execution and looks harmonious in the interior. It will remind you of your vacation if you use pebbles or shells brought from the sea during your work. Bright rich colors will allow you to create a truly sunny and original decor for the pot.
In the process of creating a marine design, shells and pebbles are glued to the surface of the container with glue, and acrylic paints are also added to create a small background landscape. Depending on the amount of applied material, you can make a whole picture on the wall of the pot.
When creating a seascape, you need to follow an important rule - wash and degrease all elements before use - this will allow them to be securely fixed to the surface.
If paints are used, acrylic varnish should be applied over the image - it will protect the bright, saturated colors from fading and washing out.

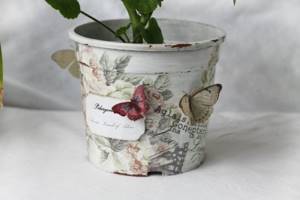
Decoupage
Bright, beautiful napkins can be used not only during meals - needlewomen began to use them to decorate the surfaces of chests of drawers, tables, boxes and even flowerpots.
To decorate pots using decoupage technique you need to prepare:
- a napkin with a design you like;
- PVA glue;
- light acrylic paint for the general background of the pot
- wide brush;
- acetone;
- clear acrylic varnish.
Sequencing:
- Wash the surface of the flowerpot and treat it with acetone. When dry, paint with light paint. It is better to choose a tone that will match the picture.
- Carefully separate the top layer with the pattern from the napkin so as not to damage the picture. Excess edges can be trimmed.
- Mix PVA glue with water in a 1:1 ratio.
- Carefully place a dry cloth on the dry surface of the pot and, using a wide brush, carefully apply the diluted glue onto it. There should not be too much glue, but enough so that the napkin is firmly fixed to the surface.
- When the glue has dried, coat it with acrylic varnish to give the surface of the product shine and finally fix the entire design.
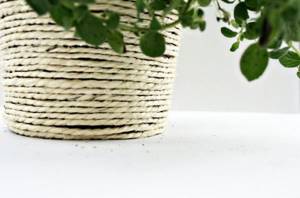
Textile
You can also use various ropes and threads to decorate flower pots.
You can issue:
- Using twine: coat the pot in a circle with glue and tie it with threads, pressing them tightly against each other - you get an unusual base that can be decorated with different decorations or left as is.
- Knitting threads - such bright flower pots will add a cheerful touch to the garden and protect plants from hypothermia and overheating.
Ropes and threads can be used to decorate a pot “in its pure form”, giving them different shapes, making curls and braids. They are fixed with glue. A pot that is completely wrapped in rope looks beautiful.
Such a flowerpot can be decorated with aerosol paints: before painting, cover some parts of the pot with adhesive tape, paint the non-glued areas and let dry. Then remove the tape - and the pot is ready!
Pencils and cereals
A very good idea for decorating pots is to decorate them with cereals - cheap and cheerful.
You need to prepare:
- pot;
- glue ;
- millet cereal;
- acrylic paint (for example, gold and silver);
- brush;
- wooden stick;
- napkins;
- sponge;
- varnish
To give the surface an extraordinary relief, you need to decorate it with paper and glue:
- Dilute glue with water in a 1:1 ratio.
- Tear the napkin into small pieces.
- Using a brush, apply glue to scraps of napkin and glue them to the surface of the vessel.
- Use a stick to make small raised folds. Leave to dry.
- After the surface has dried, apply undiluted glue to the folds and sprinkle cereal on top.
- Blot with a sponge and leave to dry again.
- Now you can start painting. Use a brush to completely paint the pots silver and let them dry.
- Then decorate the flowerpot with golden paint, painting only the part covered with millet.
- Finally, coat the pot with varnish.

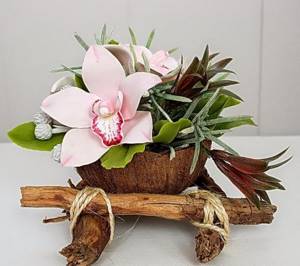
Plant pots made from branches: step-by-step manufacturing instructions
First of all, we make the base of the flowerpot: cut the oasis into pieces and cover the bottom of the container with it. There is no need to press it in forcibly; it is better to cut it into small pieces and add it. The main thing is that they fit together as tightly as possible and do not fall out.
Now let's start laying the branches:
- We select the 3 strongest and thickest rods, cut them so that they are the same length.
- We install the branches in three corners, sticking them into the oasis, and from above - we collect them together and firmly fix them with wire so that they do not fall apart. It turns out something like a cone-shaped wigwam. For reliability, we coat each branch with hot glue.
- We also cut the remaining twigs to approximately the same height and install them along the edge of the “wigwam”, forming its walls. At the top they must be collected in a pile and securely fastened with wire. In this case, another 15 cm of the branch height should remain above the wire.
- When all the branches are installed, cut out the middle at the top of the resulting bunch - the pot will stand there. The outer branches should remain - they will hold it. We try to cut evenly, at the same height, so that the flower stands evenly.
All that remains is to decorate our flowerpot. We place the flowerpot with the flower in the recess that was created after trimming. We cut the branches into short twigs (no more than 2 cm in length) and begin to cover all the bald spots at the top with them. It is necessary that the pot is not visible. We close the remaining holes from the inside with moss. We add a little moss to the inside of the lower part of the flowerpot.
Finally, we fill the oasis with river pebbles. If desired, you can glue decorative elements, also made from natural materials, onto the flowerpots. These can be wooden or thread balls, cones.