How to convert a walk-behind tractor into an all-terrain vehicle. Diagrams, photos, videos.
Table of contents:
- How to make a homemade all-terrain vehicle from a walk-behind tractor
- Homemade all-terrain vehicles from a walk-behind tractor video
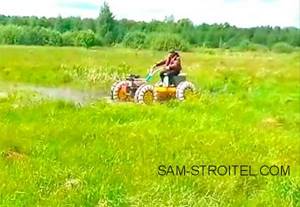
Let's consider one of the types of popular modifications - a homemade all-terrain vehicle from a walk-behind tractor. The functionality of the all-terrain vehicle coincides with the features of a tractor from a walk-behind tractor, only you can get anywhere with it.
How to make a homemade all-terrain vehicle from a walk-behind tractor
An all-terrain vehicle is understood to mean various means of transportation. These include tractors, snowmobiles, SUVs, and tanks. Today, most of the roads running through rural areas do not have asphalt surface. That is why those who have encountered such a problem are so interested in a homemade all-terrain vehicle from a walk-behind tractor. Having a walk-behind tractor, you can independently make a wheeled all-terrain vehicle that would have high cross-country ability, both over water obstacles and through snow.
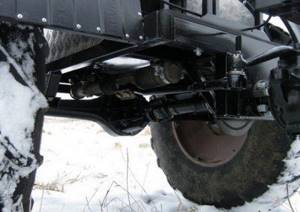
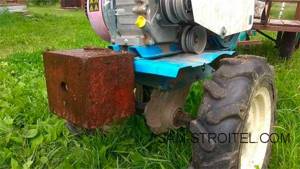
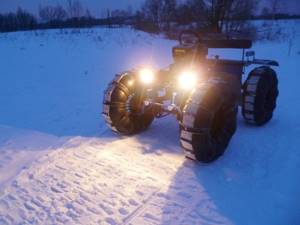
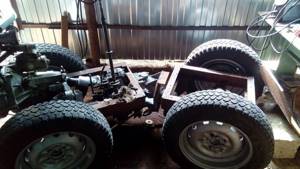
We are assembling an all-terrain vehicle, the power unit of which will be a walk-behind tractor. This is the main idea: we remove the steering wheel and wheels from the walk-behind tractor, insert it into the frame, and the driveshafts of the walk-behind tractor go to the axles. One of the key requirements is to prevent a radical alteration of the walk-behind tractor. In other words, I installed the walk-behind tractor into the frame - it turned out to be a floating all-terrain vehicle. I took it off the frame and collected the parts and returned the walk-behind tractor. Here is the result of this idea.
Dimensions and dimensions of a homemade all-terrain vehicle
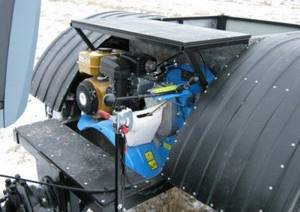
Overall dimensions of the all-terrain vehicle: length 3100 mm, width 1760 mm, height 1820 mm. Load capacity 200 kg. The maximum speed is from 8 to 12 km/h. The weight of the equipment is 530 kg. The single-level frame is made of profile pipe (60x40x2). The power unit is a MB-3 “Neva” walk-behind tractor with a 7 hp engine.
It also allows you to change three forward gears and one reverse gear. Installed M-412 bridges. Closed discs with bolted fasteners are used. Tires from KAMAZ all-terrain vehicle, tube version, are installed. Steering knuckle from UAZ with CV joint M-2141. Column steering is used - VAZ-1111 "Oka". A transmission and mechanical braking system is installed.
To manufacture the all-terrain vehicle, an MB-3 Neva walk-behind tractor was purchased. I was selected because of the three-speed gearbox, which has a very quiet first gear. The engine is also not very powerful.
Another reason for choosing a walk-behind tractor is the ability to disconnect one of the wheels from the transmission. As a result, we get the ability to disable one of the bridges on a homemade all-terrain vehicle.
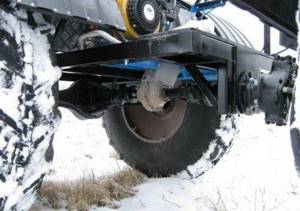
The design of the all-terrain vehicle is very simple. All parts of the walk-behind tractor control are located on the rear semi-frame. This allows you to use the walk-behind tractor without modification. As a result, walk-behind control parts were used, which were installed entirely on the frame of the all-terrain vehicle. The exception is the cable and clutch control pedal. The cable along with the lever is removed from the walk-behind tractor, and the clutch cable from the all-terrain vehicle, which is connected to the pedal, is attached.
The principle of operation of the clutch remains the same as on a walk-behind tractor: the all-terrain vehicle drives after pressing the pedal, and stops when it is released. The engine has enough power to drive in third gear to climb steep hills.
In first gear, at minimum speed, maximum traction is achieved, thanks to which the all-terrain vehicle idling can overcome difficult obstacles without straining the engine too much. To increase the maximum speed of the all-terrain vehicle, you need to increase the diameter of the drive pulley by 50%, which will not damage the traction capabilities of the walk-behind tractor.
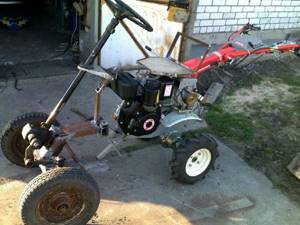
I made myself an all-terrain vehicle from a walk-behind tractor: I show you the design
I made a homemade all-terrain vehicle from a Neva walk-behind tractor, for fishing trips and to the forest to pick mushrooms and berries.
Greetings! The question arose about annual plowing of the garden, so I was wondering what to buy, a cultivator or a walk-behind tractor?
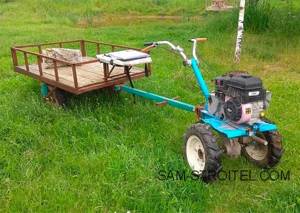
After much thought, I finally chose a walk-behind tractor. Not at all because, in addition to cutters, you can hang a plow or hiller on it. It’s just that a walk-behind tractor is an opportunity to use a purchased unit not only in the garden, but also to convert it into a vehicle or even an all-terrain vehicle.
After purchasing a walk-behind tractor, I made a trailer-trolley. It turned out to be a great truck. It can easily handle the transportation of up to 500 kg of cargo. Our record is 0.7 m3 of raw birch logs.
You just need to weigh down the front of it with a cast-iron piece weighing 30 kg, otherwise it will slip when starting to move.
And also strengthen the clutch, otherwise its standard one will quickly become unusable (due to broken holes).
Hay, manure, whatever you want can be transported without problems with very little gas mileage.
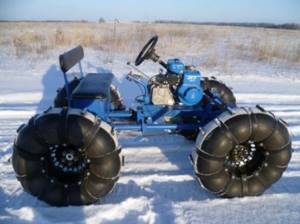
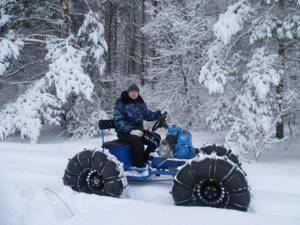
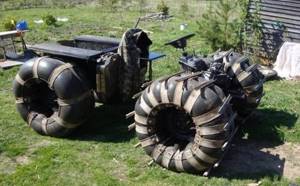
One day we wanted more from him. We have no roads here at all. Those old primers that remained from collective farm times are completely overgrown, fell into disrepair and have lost the right to be called roads. My wife and I decided to make an all-terrain vehicle out of a walk-behind tractor. On low-pressure tires, so that swampy areas are not an obstacle to travel.
We are not inventors; similar designs have been described many times on the Internet. We just got a little creative with the design.
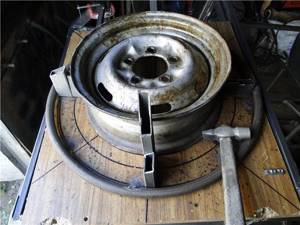
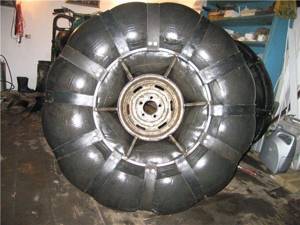
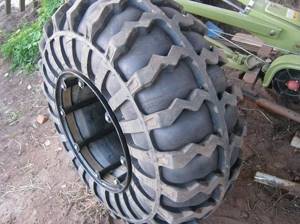
The wheel rims are cut from 3 mm thick sheet metal. Two such circles are connected into a disk with M6 studs in the amount of 16 pieces for each wheel. The cameras are from UAZ, and the camera protection is made from an advertising banner. Wheel band made of nylon sling 30 mm wide, lugs made of reinforced high-pressure hose, cut lengthwise.
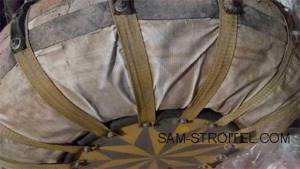
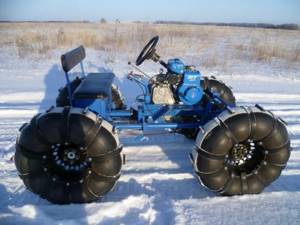
The result is these low-pressure wheels for an all-terrain vehicle.
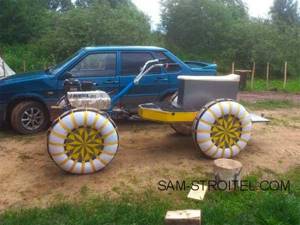
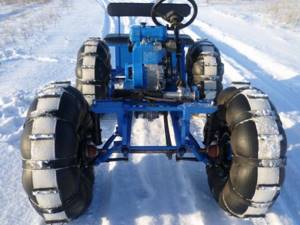
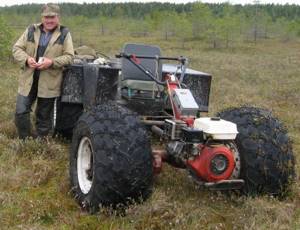
Our “all-terrain vehicle” drives on any terrain and on any off-road without any problems. It is even capable of swimming, but very slowly; its wheels have nothing to rake in water. But it does not drown with two riders.
A trailer with a motorcycle seat-stool allows you to create various luggage compartments and glove compartments under the seat itself and under your feet. A plastic container with a capacity of 200 liters fits in the back. Type of box.
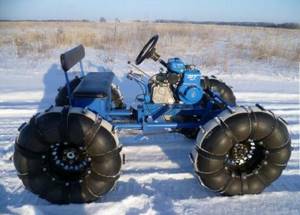
We haven’t tested it in snow yet. But I’m sure that a “chubby” 30 centimeters will not be an obstacle for him.
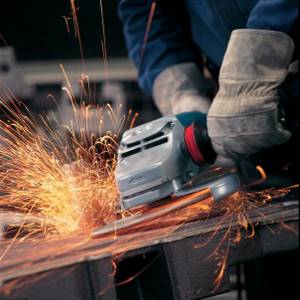
The entire construction of the all-terrain vehicle took less than a week. Welding, grinder and tool set from the machine.

If we bought a cultivator, we would use it two days a year - one in the spring and one in the fall to plow the garden. And the walk-behind tractor turned out to be useful and multifunctional almost all year round. Maybe over time we’ll make something else out of it, if an idea comes up and we have time for it. Good luck everyone!
Features of a homemade all-terrain vehicle made from a walk-behind tractor
An all-terrain vehicle in the classical sense is a vehicle designed for off-road and on-road travel, regardless of their surface. The all-terrain vehicle made from a walk-behind tractor is small in size and lightweight.
Before you start making a mini all-terrain vehicle with your own hands, you should perform the following steps:
- Prepare a running gasoline or diesel engine with a traction potential sufficient to move the unit and transport the driver;
- Determine the chassis - tracked or wheeled type. Mini all-terrain vehicles on wheels are less passable, but making them with your own hands is much easier than tracked models.
You need to purchase or make your own key structural components:
- Frame for fastening all parts;
- Rear axle for rear wheels;
- The driver's seat, which must be protected from water and dirt flying from under the wheels;
- Lighting for mobility at night.
Technical characteristics of the finished all-terrain vehicle:
- Load capacity – 200 kilograms;
- Engine with power from 10 hp. With.;
- Average speed – 10 km/h.
Design
The main components used for the manufacture of all-terrain vehicles, in addition to the walk-behind tractor itself, are represented by the following elements:
- frame, which is necessary to create the base;
- rear axle, which is used to install the second pair of wheels;
- the driver's seat, which is recommended to be protected from dirt from the road;
- lighting devices that allow you to move safely in the dark.
Such all-terrain vehicles are vehicles designed for one person. The average load capacity of the units is about 200 kg. The width of the frame is determined by the required stability before tipping, but it is recommended to make it at least 1.1 meters. For walk-behind tractors with an engine, it is recommended to use products from Neva, Ugra or others with a power of 10 hp. With. and more. Such power indicators are enough to drive faster than 10 km/h. When driving off-road on slippery or viscous soil, it drops to 2-3 km/h.
Be sure to read: Technical characteristics of the Vityaz DT-30 swamp vehicle
How to make an all-terrain vehicle from a walk-behind tractor?
An all-terrain vehicle with an engine from a walk-behind tractor is manufactured following a certain scheme:
- The base of the device is created. Ready-made frames are most suitable. You can take them from old Ural and Izh vehicles. Such frames are durable and maneuverable;
- Rear axle. Includes rear and front suspensions, which are assembled from a strut, strut and steering bushing;
- Wheelbase of the unit. You can use an old spare tire from trucks. The walk-behind tractor with low-pressure chambers is easy to operate and quite maneuverable;
- A prefabricated motor structure is installed to allow the all-terrain vehicle to perform its functions;
- If the installation of the motor system is completed, the transmission, exhaust elements and brakes are installed. The latter can be taken from an old car or motorcycle.
All-terrain vehicle made from a walk-behind tractor
Every fisherman or hunter, and even just a villager, dreams of an all-terrain vehicle so that he can go fishing in both winter and summer, pick mushrooms in the forest and pick berries. The only way to get along a country road into muddy roads is with a tractor, but not everyone has one, and all-terrain vehicles are as expensive as a Mercedes. What can a simple man do if he can’t get anywhere, and show his ingenuity and resourcefulness at all times. Nowadays, a walk-behind tractor is very popular in rural areas, since basically everyone is engaged in private farming and has this unit. They are used for all types of work, be it plowing, cultivation, or transporting goods. No matter how good the iron horse is, it is not up to par with the all-terrain vehicle, so in the village the men are constructing all-terrain vehicles from walk-behind tractors. In terms of cross-country ability, it will outshine factory developments, and most importantly, as the designer transferred the engine to the Pasha Cultivate block, it is necessary to take it off into the forest again, put the engine on the all-terrain vehicle and move on. It can even swim due to rollers made from GAZ 53 cylinders. It is very good during winter fishing in case of hitting a hole in the water. So our author, inspired by the ideas of rural men, decided to make such an all-terrain vehicle
So what did the author need to assemble the all-terrain vehicle
? Tools
: welding machine, drill, grinder, set of keys, hammer, screwdriver, wire cutters.
Materials
: walk-behind tractor, square and round pipes, angles, bolts, screws, GAZ 53 inner tubes, Lada wheels, steering column, hubs, rods, fittings, steel wire.
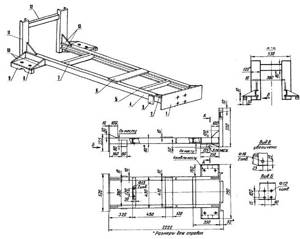
So what guided our author in the development of this unit - these are, of course, drawings and sketches
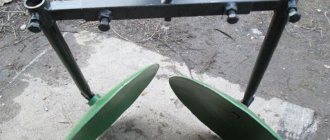
The frame is ready, then the rollers are made; disks from Lada cars are taken as a basis; steel reinforcement and wire are welded onto the disk as shown in the photo
After the discs are ready, the author puts cameras on them from a GAZ 53 car
And in the end we get such a wonderful skating rink that is not afraid of our roads
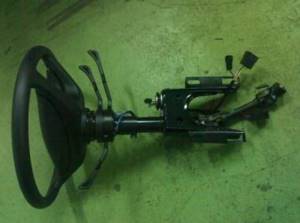
Next, the steering was installed, which the author had once removed from an old Lada and was carefully stored in the garage
Then the entire structure was sanded, primed, and painted.
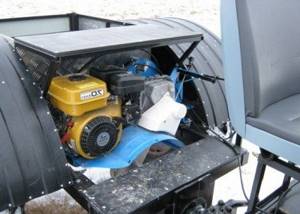
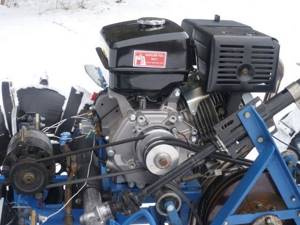
Then the wheels, the brake drum from the Voskhod motorcycle were installed, all the drives were connected. The last stage, the author installs the engine from the walk-behind tractor, screwed it onto the all-terrain vehicle, and, if necessary, threw it back within ten minutes, very convenient.
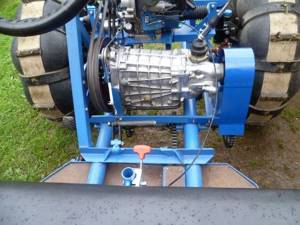
Also, later the author installed a four-speed gearbox from an old Lada car, for even distribution of traction forces
I installed a generator and a battery in order to install the headlights, now you can drive at night without fear
And as expected, after assembling the all-terrain vehicle, you need to test what it is capable of, and the author saddles the iron horse and rides into the forest
Source
Become the author of the site, publish your own articles, descriptions of homemade products and pay for the text. Read more here.
Homemade karakat based on a walk-behind tractor
Karakat performs the same functions as the all-terrain vehicle, but there are distinctive features:
- Oversized wheelbase with belt clutch;
- Large unit size;
- Wide application conditions. Pneumatic vehicles can reach speeds of up to 70 km/h.
This modification most of all concerns tires, the creation of which requires special emphasis.
It is necessary to highlight the key nuances:
- Lightweight design. Two metal disks are aggregated onto the sleeve. On top of the chambers, which are secured by a conveyor belt. The device is stable and durable;
- The disc is fixed to the sleeve. Jumpers with rings are also welded;
- A central disk with an additional spoke, for the manufacture of which a metal blank or pipe is suitable;
- You can use rims from an old scooter; they will be mounted on a hub.
Karakat from a walk-behind tractor has the following design features:
- A frame made of a metal profile or pipe is welded;
- Rear and front drives are installed. Differential and solid elements are suitable;
- Front axle and steering, parts can be taken from the chassis of the car;
- “Native” motor and gearbox, which can be replaced by a multi-speed gearbox for easy speed control;
- At the final stage, the ramps are installed and the caracat is tested.
How to make low-pressure wheels with your own hands?
Regardless of the type of equipment being manufactured, driving on wet and unstable soils requires lugs that provide high traction. Low pressure wheels are most suitable. A walk-behind tractor with pneumatic wheels has minimal impact on the soil.
On the rear axle, homemade special wheels are used, which can be installed on a swamp vehicle, motor sleigh (air sleigh), snowmobile or motorized towing vehicle from a walk-behind tractor. You can purchase ready-made elements or buy parts separately (tires, tubes, wheels).
Wheel assembly diagram:
- Conventional disks and mounting plates are welded together with metal tubes. This creates larger cameras with improved fixation;
- A camera is placed on the finished expanded disk. It can be purchased or used from trucks;
- An air valve is inserted into the hole of the disk;
- Inflate the wheel with air;
- Install the finished tires on the pneumatic track from the walk-behind tractor.
The cross-country ability of a conventional wheel is increased by an additional tread. To secure the cameras, chains, conveyor belts, and homemade tracks are used.
To make all-terrain vehicles/caracats on a pneumatic track, you need to prepare the necessary materials and tools in advance. The described action diagrams and video instructions will help you understand the process.
We create an all-terrain vehicle from a walk-behind tractor with our own hands
It is worth noting that the very concept of “all-terrain vehicle” implies a vehicle with high cross-country ability. An important fact: all-terrain vehicle, karakat and pneumatic vehicle, swamp vehicle are synonyms, differing only in a few minor modifications. If a person manages to create a homemade mini-all-terrain vehicle, he will receive a real masterpiece that will become his pride.
Before starting construction work, it is necessary to decide whether the device will be on tracks or on pneumatic wheels. An important point: creating a tracked unit is much more difficult, and operating it requires special knowledge and physical effort. You should also prepare a powerful engine for installation. It doesn’t matter what it will be, diesel or gasoline, the main thing is that the part is powerful and equipped with forced water or air cooling.
The working process
- First you need to choose a base for the structure. A frame from an old URAL or IZH motorcycle can be used. Thanks to these options, the car will be more maneuverable and will be able to easily overcome any obstacles;
- The next step consists of creating the suspension and rear axle. The independent rear and front suspensions are connected using a strut, steering bushing and mowing;
- Wheels for installation should be taken from powerful trucks. Excellent, but not mandatory, options would be chambers with low pressure (from KamAZ and URAL cars). Having made the right choice, the driver can be confident in his own safety and enjoy easy control;
- Installing a motor is one of the most serious steps in creating an all-terrain vehicle based on a walk-behind tractor. Finally, the owner must securely attach the engine, clutches, brakes and exhaust system.
Only after a thorough check of the newly-made off-road vehicle can you begin testing and further operation.
Swamp vehicle based on a walk-behind tractor
All-terrain vehicles converted from walk-behind tractors are fairly light and compact vehicles.
An all-terrain vehicle, or, as it is also called, a swamp vehicle, is a type of transport that is suitable for moving both off-road and on roads with any surface.
In this article we will look at how to make such a vehicle with your own hands.
In this video you will learn about the capabilities of the swamp vehicle: Before you begin converting the equipment, you must complete the preparatory steps:
- Provide an engine (diesel or gasoline) with sufficient power to move the vehicle and its operator.
- Choose a chassis - wheeled or tracked. Tracked all-terrain vehicles have higher off-road capability than a conventional wheel, but wheeled vehicles are easier to assemble.
- Purchase or manufacture key components:
- frame for connecting parts;
- rear wheels and axle for them;
- a seat for the driver (if there is already a seat, it must be protected from dirt and water from below);
- headlight - if it is not included in the walk-behind tractor configuration.
Karakat from a walk-behind tractor: specifics
In fact, the carakat performs almost the same tasks as an all-terrain vehicle, but its peculiarity is manifested in large wheels, tightened with strong belts. At first glance, such a device may seem rather bulky and clumsy, but in fact, this vehicle can be easily operated on terrible roads at speeds of up to 70 km/h.
How to create powerful wheels yourself?
There are 4 ways:
- The first method is relatively simple: 2 sheet metal disks are used, which are attached to the sleeve. Afterwards, the camera is put on, secured with pieces of a special conveyor belt;
- The second involves securing one disk to the sleeve and attaching a jumper. Then the side rings must be welded to them;
- The third option is very similar to the second, only for the central disk a spoke made of pipe or sheet metal is used;
- The fourth principle involves mounting two disks on a hub, which are very similar to the wheel disks of a scooter.
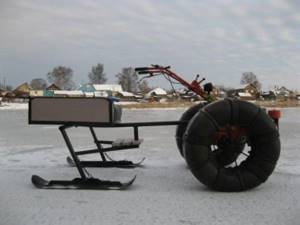
Features of creating a homemade snowmobile from a walk-behind tractor with your own hands
Many craftsmen know that an agricultural machine such as a walk-behind tractor can easily be transformed into a snowmobile, allowing you to successfully move off-road even on the snowiest days.
Moreover, the remodeling process itself is quite simple and uncomplicated. The main thing is to choose the right engine. Experienced owners of such “helpers” advise giving preference to a device that has manual control and a towing device. In most cases, a class of walk-behind tractors is used, the design of which involves the use of a 4-stroke, 1-cylinder gasoline engine with air cooling.
Before you begin the process of working on your future snowmobile, you need to prepare:
- powerful wheels (or tracks with snow hooks);
- frame;
- power unit;
- drive unit;
- runners;
- shock absorbers;
- steering column.
Some parts you can create yourself, and some you can purchase. For example, the frame is suitable from an old motorcycle, and the longitudinal pipes of frames from old bicycles should be used as rotating ski racks.
How to make a snowmobile from a walk-behind tractor: step-by-step instructions
- To begin with, an engine from a walk-behind tractor is installed on the caterpillar drive;
- Then two rods are attached to it, joining the cross beam (where the handlebars and skis are already attached);
- The front pillar and seat are mounted in the space between the two rods;
- Now the caterpillar mover needs to be attached to the specified transverse beam;
- All other parts should be attached using pins and bolts.
The result should be an excellent motorized vehicle that can transport a person (and a small load) in difficult weather conditions.
Let's get acquainted with the pneumatic walker from a walk-behind tractor and the swamp walker from a walk-behind tractor
As mentioned earlier, the pneumatic vehicle and the swamp vehicle are slightly modified analogues of the all-terrain vehicle and the carakat. The first option is considered a simple mobile vehicle, which appeared in the 60s and in modern modifications is supplemented with 3-6 wheels for better maneuverability.
A special feature of both the pneumatic walker based on a walk-behind tractor and the swamp walker is the operation of special low-pressure wheels. The fact is that in this case the tires are light in weight, elastic and exert little pressure on the ground. Along with a large rolling radius, the device is characterized by maneuverability and endurance.
A pneumatic fracture vehicle and a swamp vehicle are created using a similar scheme as an all-terrain vehicle, so many experts often use the three terms in the same context. On our website, anyone can find a video with the practical use of the devices and evaluate their similarity with the specified modification options.
Self-production of a wheeled all-terrain vehicle
First of all, it is recommended to equip standard power units with a reduction gearbox. This is due to the fact that the optimal torque for both gasoline and diesel engines is achieved at 80% of the maximum crankshaft speed.
All-terrain vehicle frame
Additionally, the engine should be equipped with forced cooling. The reason is that the movement will be carried out at low speeds, and the oncoming air flow is small to ensure the operating thermal conditions of the power plant.
All-terrain vehicle frame
First of all, you need to make a frame that will be located between the front and rear axles. For this purpose, profiled pipes with a square cross-section are taken. Such elements have a high level of rigidity. When using heavy walk-behind tractors such as MTZ or Neva, the frame is often rigidly joined. Thanks to this, the all-terrain vehicle will be single-volume.
Another option is to use a breakable frame, which is preferable for using the unit in hilly areas. In this case, the articulation will be made using a pivot. In this case, both bridges will be equipped with independent suspension.
To move through the forest for hunting, you can create a swamp vehicle based on a walk-behind tractor, equipped with a breakable frame. Compared to all-terrain vehicles with a rigid frame, it has greater maneuverability.
Rear axle and suspension
The easiest way to create a rear axle is to use ready-made elements from an old passenger car, for example, Moskvich 412. This is due to the small mass of such parts, which allows them to be used to create an all-terrain vehicle. To ensure a smooth ride, the suspension is made with shock absorbers, which also reduces body vibration.
To reduce fuel consumption and resistance when driving over rough terrain, it is recommended to create an independent suspension for each rear wheel separately. But this creates a greater level of wobble. Hardened bolts are required to secure the frame to the rear axle, and rubber inserts are required to make the joints flexible.

All-terrain vehicle with skis
To drive on snow, skis are installed on the rear axle.
Be sure to read: Metelitsa tracked platform
Wheels
To increase wheel traction, especially in swampy areas, a walk-behind tractor with low-pressure tires is used. Such wheels, due to the slight pressure on the ground, make the movement of the all-terrain vehicle on the cameras as smooth as possible. For this purpose, special wheels from large swamp vehicles are used.
You can also assemble them yourself from components, which is done as follows:
- To create homemade disks, you need to weld classic disks with special mounting plates.
- Next, a large chamber is put on the expanded disk and inflated.
- The finished wheels are mounted on the all-terrain vehicle.
To increase the maneuverability and traction of such wheels with the ground, it is necessary to cut special lugs from the tires and install them on the tubes.
Learning to create an ATV from a walk-behind tractor
I wonder if the designers of walk-behind tractors could have imagined what craftsmen would turn their creations into? Hardly! Moreover, the masters are not going to stop there, and a clear proof of this is the ATV created on the basis of a walk-behind tractor.
It differs from a standard motorcycle in the presence of four wheels, allowing you to easily drive through the most mountainous areas. The ATV is also known for its relative safety, because if it gets into a hole on the road, it is much easier to fly out of a two-wheeled motorcycle than from a four-wheeled one.
General stages of transforming a walk-behind tractor into an ATV
- Wheelbase extension;
- Proper arrangement of the frame;
- Installation of suitable wheels.
Detailed stages of transformation
- First, you need to spread the wheels using special bevels, which are turned on a lathe or purchased in a store;
- Then you need to take care of creating the frame. These parts are often “borrowed” from a bicycle or motorcycle, but the possibility of welding them from classic water pipes is not excluded;
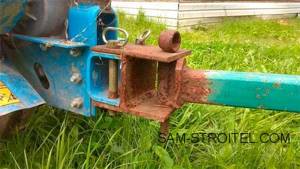
- Now you should attach this same frame to the walk-behind tractor at the swivel joint, using two pins;
- Afterwards you need to deal with the wheels. Naturally, car tire wheels (with a low profile) are considered the best option. They are distinguished by a fairly wide stock and an excellent rubber chamber that will fit perfectly to them;
- Cameras should be selected from trucks, then there will be no doubt about the practicality and endurance of the device.
Thanks to this simple modification method, you can get an excellent ATV that does not need a well-trodden road and is not afraid of sharp turns and slopes.
In total, it can be noted that if you have additional tools, materials, drawings, video tutorials and other things, the walk-behind tractor can be completely retrained and “breathe new life into it”!
ATV from a walk-behind tractor - features of creating the unit

At its core, an ATV is a 4-wheeled motorcycle that is designed for riding in the most inaccessible places. To do this, the unit must be light in weight, have a large power reserve, and also be as easy to operate as possible. A do-it-yourself ATV made from a walk-behind tractor will have all these qualities.
Choosing an engine for a homemade unit
The capabilities of a homemade ATV largely depend on the engine you choose to assemble the unit. The first requirement for the motor is that it must be as powerful as possible. A good option would be to use an engine from a Chinese walk-behind tractor. Such motors have already proven themselves to be fairly reliable designs that can withstand long-term loads well.
When choosing, be sure to pay attention to the initial torque of the motor. The higher this indicator, the faster the ATV will overcome swampy terrain.
If we talk about the brands of walk-behind tractors whose engines are suitable for mounting on a homemade ATV, then, in addition to Chinese units, motors from agricultural machines of the Neva, Zarya and Salyut brands can be used for production. A motorized towing vehicle made from a walk-behind tractor of one of these brands will overcome any obstacle and will not let you down at the most inopportune moment.
How to assemble an ATV with your own hands - procedure
Making an ATV with a walk-behind tractor engine is a little easier due to the fact that you do not need to make wheels. As in the case of the carakat, before making an ATV from a walk-behind tractor, you need to study the drawings, which will tell you the correct procedure for assembly.
The algorithm for making an ATV is as follows:
- First of all, you will need to widen the track. Since in the design of all modern walk-behind tractors the wheels are located directly under the engine, you will need to slightly widen the distance between the wheels, which will give the ATV stability, especially when making sharp turns. To increase the track, use special inserts - you can turn them yourself, or order the production of parts in a turning workshop. Another option is to purchase special adapters at an agricultural equipment store. The disadvantage of this method is the high cost of finished elements;
- The next step is to make a frame for the ATV. It can be welded using a bicycle or motorcycle frame as a basis, or made from scratch using steel pipes. Remember that the frame is the most vulnerable part of the ATV, since after installing the motor and other parts on it, the structure will be subject to heavy loads. The frame should be secured using two fonts and a rotary hinge;
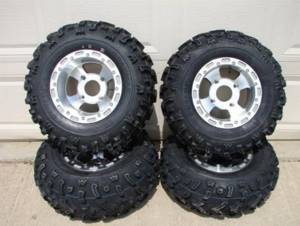
- The third stage is the installation and fixation of the wheels. Before doing this, determine the size of disks you need. Remember that the larger the diameter of the parts, the lower the speed will be, and the more effort the motor will need to accelerate. The best option would be to use car wheels with a wide bed, 15 inches in diameter. Next, thick fabric is wrapped around the discs, and a rubber bladder is put on top;
- At the last stage, the engine, clutch, ignition system, brakes and exhaust are mounted on the ATV frame. It is not necessary to use all these mechanisms from the same walk-behind tractor. The main thing is that each element is truly reliable and fully operational. Don't forget to install and connect control buttons and switches. It is best to place them next to each other to make it more convenient to control the ATV.
A homemade ATV is practically in no way inferior to market analogues - it develops approximately the same speed and quickly overcomes any obstacles.