Many people are thinking about making a decorative well in their country house with their own hands. This solution allows you to get a spectacular structure that emphasizes the style of the site and gives it an amazing atmosphere. The ability to work with fairly simple tools will help you quickly achieve what you want without turning to specialists.
You can make a decorative well for the garden with your own hands from different materials.
What can you make a decorative well from?
A decorative well on a summer cottage can be built from a variety of materials. Most often, profiled or galvanized timber, boards and various types of dies are used. The size of the initial blanks depends on the scale of the future structure, but the thickness of the material should always be at least 40 mm.
Attention! Since the structure is constantly in the open air and exposed to external influences, it is best to select beech, ash or larch as the main species. These materials tolerate moisture best and are extremely resistant to rotting.
Skillfully made wood products look very impressive and do not require a large number of specific tools. The shell is created in the form of a small log house that can withstand almost any load. The main disadvantage of wood is its fragility. Even the most durable material, coated with all kinds of varnishes and protective compounds, quickly ages and loses its strength properties. From a decorative point of view, such features are sometimes assessed, on the contrary, as an advantage, since they try to stylize the buildings on the sites as antique.
The service life of a wooden structure can be extended by using a special concrete base on which the racks rest.
Slightly less common are decorative elements made of natural or artificial stone. Even the use of ordinary bricks helps to create a beautiful structure that pleases the eyes of all garden guests. It is somewhat more difficult to use natural stone for finishing, but the result is truly amazing. Moreover, all the work can be done independently without the help of construction crews.
Types of structures
Companies that sell construction products offer ready-made versions of decorative wells, but such designs are usually not cheap, and their appearance is not very original.
A landscape design specialist can give professional advice on how to wisely choose such objects and how to decorate them in harmony with the appearance of the garden area, but you can cope with this task yourself, and we are talking not only about choosing a well, but also about construction.
Decorative wells differ in design features - there are several different options. Let's list the most popular:
- towers with a gable roof;
- crane wells that do not have a canopy;
- a column located above the ground (objects with this design are called Abyssinian).
Decorative wells most often mean structures that resemble houses.
The decor of a well on a summer cottage should be in harmony with the style direction in which the plot is decorated and the architectural style of the country house.
Lighting will help give a decorative well a luxurious look. Such an object will look especially advantageous in the dark. An illuminated well is a great opportunity to create additional lighting that makes it easier to navigate and move around the site.
The presence of a decorative well at the dacha makes it possible to turn an ordinary plot into a magnificent estate. Such an object fits perfectly into the country style direction - just build a well in your garden area, similar to a mansion with unusual carved details.
Against the backdrop of a rural landscape, such a structure looks very organic.
For areas with an oriental-style landscape, a small well with a tiled roof with corners bent upward would be an excellent solution.
In modern design (modern, minimalist style), wells are appropriate, the designs of which are in harmony with other objects available on the territory (household, utility block, bathhouse - all buildings must be created from identical materials using the same technique).
Types of decorative wells
There are many types of decorative wells. Everything here is limited only by the imagination of the designer, who comes up with the shape and finishing of the structure. The most popular are 8 main types, to which, if desired, you can make your own individual changes.
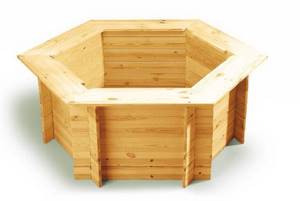
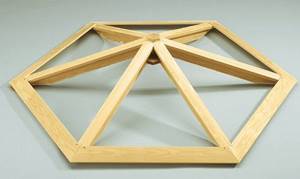
Hexagonal
Hexagonal structures are solid structures that easily fit into any style of the site. It’s not uncommon for structures to be coated with various kinds of varnishes, thanks to which you can get almost any shade. They are usually made of wood and have a classic gable roof.
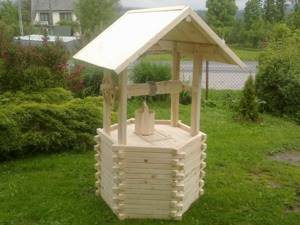
Hexagonal wells can be created entirely from wood without the use of other materials
Mill
A very unusual option, suitable for lovers of bold decisions. The product in this case has the appearance of a mill with movable blades. The use of such a structure will make the garden original and give a touch of antiquity.
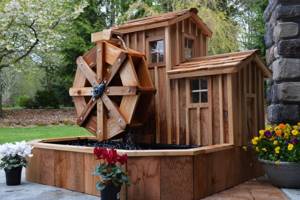
Well-mills can amaze the imagination with their design
Small product
Not all sites have the opportunity to build an element of classic sizes. In this case, special compact models that will not take up much space will come to the rescue. But, even taking into account their size, such structures will be able to transform the estate beyond recognition. It’s easy to create a small decorative well with your own hands, even from a photo without any drawings.
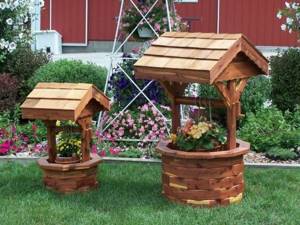
Small decorative wells are often placed in small areas
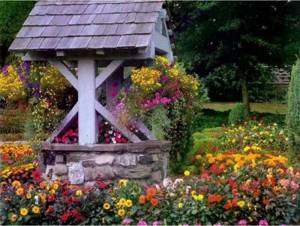
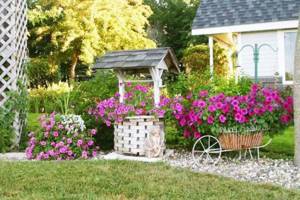
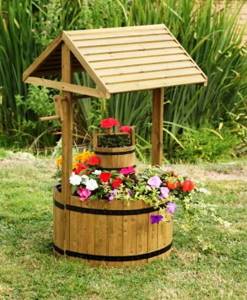
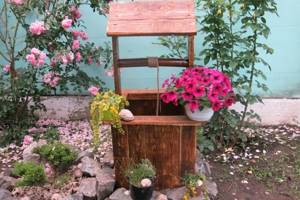
With a flowerbed
Wells in the form of a flower bed combine several functions at once and represent a fairly large decorative ensemble for the garden. The bottom row of the structure can be made of timber or durable boards. Then everything is covered with a specialized slab with places for growing flowers. This option is ideal for a bright garden, which the owners strive to fill not only with flowers, but also with decorative elements.
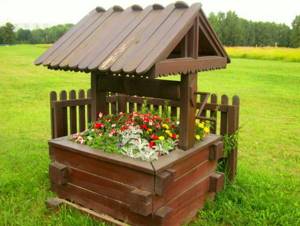
Decorative wells are great for growing flowers
Important! When creating a well-flower bed, it is advisable to design the roof in such a way that it does not interfere with sunlight reaching the plants.
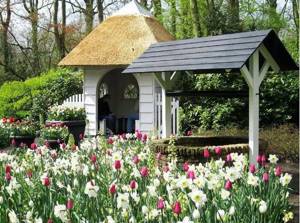
Country style
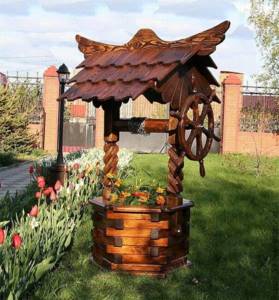
Wells in a rural style have carried the traditions of the Slavic peoples through the years and still remain in demand. Quite simple and at the same time spectacular designs look great next to shrubs, trees and flowers. So it is best to place them in the garden.
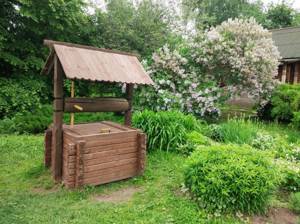
Decorative wells in a rustic style are most similar to traditional designs for water intake
Vintage style
Antique-style structures look equally good both on a small plot with a compact house and on large areas of various villas or cottages. A true classic does not in the least spoil the appearance of the site; on the contrary, it gives it an individual, sophisticated atmosphere. Guests will definitely not remain indifferent.
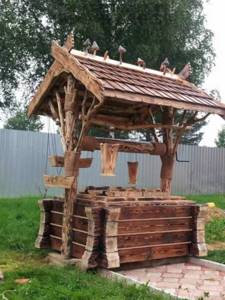
Wells in the old style are massive and impressive
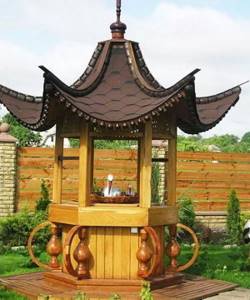
Japanese style
Fans of original solutions should definitely not pass by Japanese-style buildings. And if you supplement the design with traditional plants and other decorative elements, you can completely recreate the amazing atmosphere of Japan on your site. The Sakura tree will look great next to it, as if concentrating the spirit of the land of the rising sun.
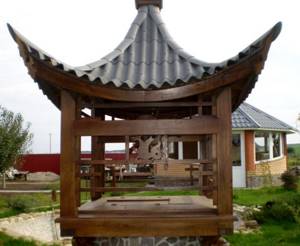
Japanese-style wells have a characteristic curved roof, giving a very unusual atmosphere to the entire area
With a crane
A product with a crane is a common decorative element that significantly transforms the entire garden area. Such decoration has not only visual significance, but is also associated with the ancient traditions of our ancestors. The Slavs believed that the crane helps to maintain well-being in the family and drives away all troubles.
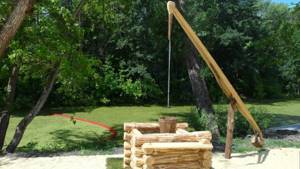
Using a crane as a decorative or functional element helps change the look of the entire area
Installing a water collection tank
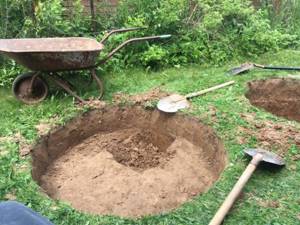
Excavation
Before you make a decorative well in your dacha, you need to mark it.
It is better to entrust digging a sufficiently large hole to a team of professional builders with an excavator. The earth is dumped next to the pit. Its perimeter is made according to the size of the container, and 25 cm should be added on each side to make it easier to compact the soil around the container.
A 20-centimeter layer of sand is poured at the bottom of the pit, which reduces soil moisture and reduces its mobility.
Tank equipment
It is best to use a 3,000 liter liquid fuel tank, thoroughly clean it and degrease it, following safety regulations. The top cover of the hatch must be removed and a hole with a diameter of 100 mm for the overflow pipe must be made on the side in the upper part.
The container is placed at the bottom of the pit and strengthened with sand poured on both sides, which is compacted with a board. The distance from the metal top to the ground level should be approximately 30 cm.
You can buy a special plastic tank for rainwater, equipped with hatches, inlets and outlets. Such products can have different sizes and shapes.
Rainwater from the drainage system will flow into the cistern. A hole is made in one of its sides at the very top, to which a PVC overflow pipe is connected. Tightness is ensured by silicone sealant applied to the surface on both sides of the wall. The overflow channel is installed with a slight slope (about 3 cm/m) and is discharged into the sewer system.
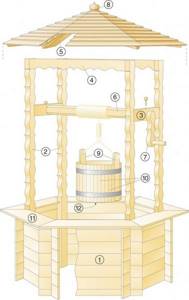
Schemes, projects and drawings with dimensions of garden decorative wells
Now you can easily find a variety of ideas for creating a decorative well with your own hands for your dacha. There are already many projects and drawings, according to which you can easily implement your plans without contacting builders.
Important! To build a decorative element, it is advisable to use the most detailed drawings, which indicate all the necessary dimensions. Only in this case can various inconveniences be avoided at each stage.
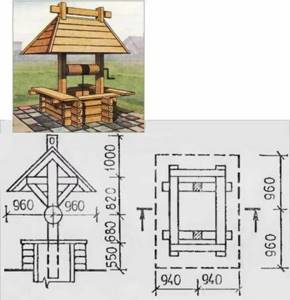
The drawing of a decorative well must contain all the necessary information about the dimensions of the future structure
How to make a decorative well from wood for the garden with your own hands
You can decorate a well in your country house with your own hands using ordinary carpentry tools. The process involves creating a base as well as forming a canopy like roof.
Making a well
Step-by-step instructions for creating a decorative well with your own hands include the following tools:
- carpenter's square;
- fine-tooth saw;
- chisel;
- file;
- cutter;
- fasteners (glue, screws).
A decorative well from scrap materials is created with your own hands as follows:
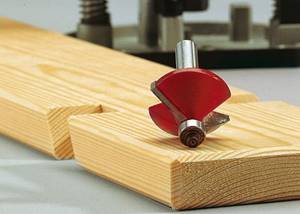
- Using a square, the positions of the cutouts are marked on the boards.
- In the marked places, two identical cuts are made with a fine-toothed saw.

- A chisel is used to remove gaps between cuts.
- The grooves are cleaned with a file, and rounded shapes are created using a cutter.
- The body is assembled by connecting the boards with appropriate grooves.
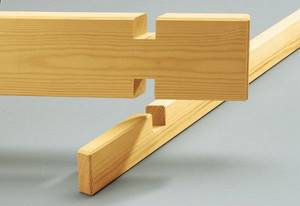
- Additional pads are attached to the top boards using screws or glue.
- Grooves are created in the parapet boards to secure the frame post.
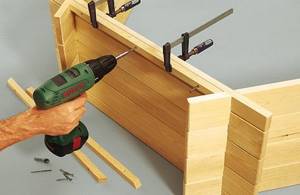
After this, you can install racks made of durable boards. Sizes may vary depending on specific dimensions.
Advice! Transverse connecting elements placed in the spacer between the posts help to significantly strengthen the structure. All parts are connected with bolts in the corners of the walls.
How to make a roof for a decorative well
The canopy is supported by two posts located one opposite the other. Also attached to the posts is a lifting mechanism for buckets of water, which is also called a collar. In some cases, the racks may not be fixed to the building itself, but rather dug into the ground next to the structure.
Before installation, the canopy must be assembled. In most cases, it is a structure of two triangles connected to each other. Their size depends on the specific purposes of the canopy. When installing racks directly behind the casing, the length of the triangles will naturally be greater. The main function of the canopy is to protect the building from rainwater. For this reason, it is advisable to always make the spread at least 20 cm larger than the dimensions of the frame.
The main material for canopy of a decorative well for a well can be:
- galvanized profile;
- metal pipe;
- wooden beam.
The timber canopy is assembled using self-tapping screws and pre-cut grooves.
Attention! To strengthen the structure at the joints, it is advisable to use reinforcing bars or metal corners.
When installing racks on a concrete ring, the order of creating a canopy may change. In this case, the frame surrounding the ring is first assembled. It is often made from boards with a thickness of 30 mm. Racks made of the same material are fixed to the frame and reinforced with special overlays, which perform reinforcing and decorative functions. The choice of timber for the frame is influenced by the weight of the assembled canopy and the planned load.
The roof is mounted on installed racks in assembled form. In some cases, assembly directly on the structure is possible, but this process is associated with a huge number of difficulties and is not always convenient.
DIY master class
There are very simple types of wells that even a child can make. But we will consider step-by-step how to make a wooden decorative well with six corners with your own hands. Such as in the picture below.
Materials, tools, drawings
The main raw materials used are timber or boards. Parts cut from them will need to be coated with special protective compounds, paying special attention to the ends.
Tools you will need:
- jigsaw;
- saw;
- chisels;
- drill or screwdriver;
- fastening elements - dowels and screws;
- square and tape measure;
- cutter
To save time and material, it is advisable to make the most detailed drawing possible. Step-by-step production according to pre-thought-out instructions will go faster. Below is an approximate diagram of a well. The sizes and proportions can be any - it all depends on your imagination.
Bottom assembly
Wooden materials are marked, leaving marks for cutting grooves, according to the drawings. The wood should be sawed perpendicular to the grain, and the grooves should be knocked out parallel to avoid the formation of burrs. In the lower part of the well, slots are made on the lowest and upper parts on one side, and on the rest - on both sides, in order to conveniently connect with each other. In order for the edges to be beautifully processed, the boards are chamfered, as well as all excess, so that the joints do not have gaps. To stiffen the head, another board or beam is screwed to the top - this is where the “collar” will be attached. In the places where they plan to attach the racks, grooves are cut out.
How to build a decorative brick well with your own hands
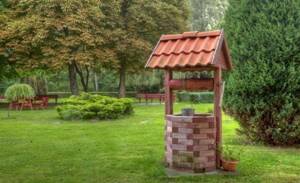
Brick decorative wells can be round, rectangular or hexagonal.
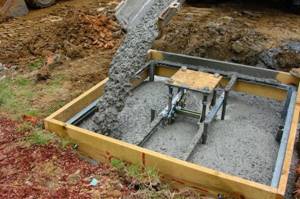
A decorative well in most cases serves as a decoration and does not require functional equipment. So a shaft is usually not dug for it, but a concrete foundation is poured under the brickwork.
The easiest way to do this is as follows:
- Remove the turf layer of soil using a special shovel.
- Fill the resulting hole with sand and gravel.
- Place a mesh of reinforcement on top.
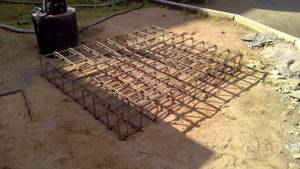
- Fill with concrete mortar.
Important! Before laying bricks, it is advisable to take care of covering the surface with roofing felt, which will prevent moisture from being drawn out of the soil.
It’s really not difficult to create a decorative well out of brick step by step with your own hands. The walls are formed in the same way as when building houses. Moreover, in this case, less attention can be paid to the strength of the structure.
After creating the main body, you can begin building a roof with any number of slopes. It all depends on the imagination of the creators. Structures of this type can be used to hide a well, design a flower bed and other purposes. It is easy to build a decorative well for flowers with your own hands.
Required tools and materials
- Water reservoir.
- Pump with a capacity of approximately 3000 l/h.
- Facing brick (1.5 m2).
- Plaster mixture (5 kg).
- Spruce or oak timber 7,070 mm (approximately 15 m).
- Bars (for sheathing), tiles and accessories.
- PVC pipes.
- Metal corners and plates.
- Sand, gravel, cement.
- Hollow wall blocks 10x20x50cm and 20x20x50cm.
- Fittings and welded grating.
- Waterproof 16A electrical outlet.
- Mason's tool.
- Concrete mixer or container for mixing the solution.
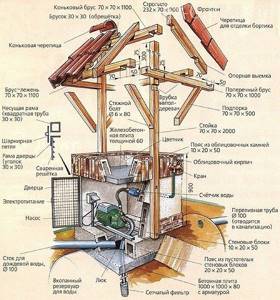
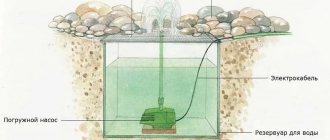
The photo shows a detailed diagram of the connection to the tank and the upper decorative part of the structure.
How to design a decorative well
Creating a garden decoration includes one important step that distinguishes this process from ordinary construction. It consists of decorative design of a well in the country.
Often such structures are equipped with a collar or a crane - a decorative lever for raising water. The gate operates on a more common principle and includes a special roller on which a rope with a bucket is wound. Thus, it becomes possible to quickly raise water from the bottom of the well without touching its walls.
A protruding element on a frame or concrete foundation is called a cap. It can be open or have a special upper structure in the form of a house. The second option is used much more often for decorative purposes.
Attention! When creating a decorative well with your own hands for a kindergarten, it is important to take into account the specific features of this place. It is advisable to create an interesting and bright design that will evoke only positive emotions in children.
For many people, a well is an integral attribute of rural life. For this reason, it is the rustic design that has become most widespread. It includes the use of wood and various available materials of natural origin. Cornices and protruding elements are often decorated with carvings. Instead of a standard iron bucket, traditional crinkles and tubs are used.
Concrete wells are very easy to plaster and paint. They can be given almost any look. Images of plants, animals or flowers look best on such designs. It is better to make such a decorative beautiful well in the garden.
What is a decorative well used for?
These structures are most often used as an original decoration of the territory of the dacha, but sometimes a decorative well has the following functions:
- the well house hides various engineering communications - sewer hatches, pipes, cables, etc.;
- there is a well with drinking water in it;
- barrels of water are hidden inside so that dirt and debris do not get into them;
- used for storing gardening equipment and tools;
- it could be an original flowerbed;
- if you place a bench nearby, you will get a kind of canopy from the sun;
- the building is able to hide the imperfections of the landscape.
The well should fit well with the other design of the site, not be superfluous in it, and not clutter up the space. The scenery surrounding it should create a single ensemble.
Recommendations
When finishing the well, it is advisable to stick to one chosen style. Mixing genres works well only in the most exceptional cases. A decorative well flower garden is perfect for oriental motifs. Japanese style means matching the surroundings, sophisticated features and curved canopy elements.
Concrete bases suit antique style and modern minimalism. Antique style can also be complemented with forged parts, and minimalism is emphasized with inserts made of modern polymers.
Rustic or medieval trends are easily recognizable in antique decorative wells.