Film base
Read also: Practical do-it-yourself fencing: installing a chain-link fence (Photo & Video) + Reviews
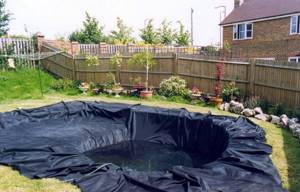
Film as a base
The use of waterproofing film as a basis provides great opportunities for recreating a reservoir of various shapes, even the most unusual.
PVC film is also not afraid of exposure to ultraviolet rays and temperature changes. Its color lasts for a very long time. The service life is up to 10-15 years.
Butyl rubber film is more reliable. It is more expensive in price. It is used to create deep ponds.
The material is purchased with a reserve (+50 cm on each side) to ensure that its edges are well secured along the banks.
PVC film for pond
The work is carried out in the following order:
- The outlines are marked with lime or sand
- A shallow ditch is dug. Excavated soil is not thrown away
- New outlines are indicated. The bottom should be the deepest
- Using string and measuring tape, calculate the required footage of waterproofing material
- The bottom is covered with a layer of sand. Then non-woven fabric or geotextile is spread to protect the film from possible contact with roots or stones
- The film is spreading. The bottom and ledges are pressed down with pebbles
- The pond is slowly filling with water. It is important that the base material settles gradually
- After 2-3 days, the shores are drawn up. The edges of the cellophane are tucked in. Tiles and stones are placed on top, filling the resulting gaps with sand.
Installing a pond on the site: making your dream come true!
On a hot afternoon, it’s so nice to plunge into the cool waters of a pond at the dacha, sit with a book in the shade of trees on the shore and watch goldfish play in the sun. The dream of having your own pond is quite feasible, even if there is very little space on the site and finances. Experts and FORUMHOUSE participants prove this from their own experience and share the secrets of creating a beautiful artificial pond.
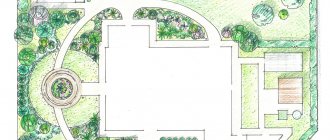
Step 1. Planning
When creating a reservoir on your site, you should immediately consider its further use: will you just contemplate the mirror-like surface of the water, decorated with water lilies, or will you breed fish in the reservoir so that you can go fishing from time to time. A pond in your country house can be an alternative to a swimming pool, and you can use it to escape the heat. By correlating the selected set of functions with the size of the land plot, it is easier to determine the geometry of the future reservoir and calculate its width and depth.

According to Ivan Stepanov, landscape designer at the Greentime bureau, when planning a reservoir, it is important to choose the right location on the site. Ideally, it should be protected from strong winds, illuminated by the sun 6-8 hours a day, and be in partial shade during the hottest afternoon.
Ivan Stepanov , landscape designer:
– It is not advisable to place a garden pond under trees - falling leaves will pollute it, and the pond will have to be cleaned more often. If it has a film, plastic or concrete base, powerful roots can destroy the bottom over time. Therefore, it is better to maintain a distance from the reservoir to the trees equal to the length of their trunks.
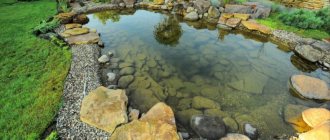
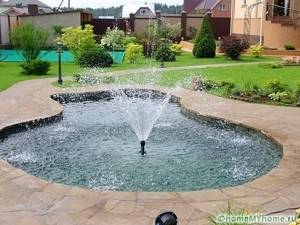
The size and configuration of an artificial reservoir can be any - it all depends only on the imagination of the pond builders and the size of the site. But still, it is better if the area of the water space is more than two square meters. A pond that is too small will heat up quickly, creating conditions for active algae growth.
Frank Wolfram, author of the book “Ponds in the Garden,” believes that the design of a pond on a site should follow the examples created by nature. Do not make “funnels” - too deep reservoirs with a small water surface, and arrange a flat bottom - this way aquatic plants will take root better, and silt will not accumulate in the center of the pond. The most favorable slopes are at a ratio of 1:3. That is, with a pond length of 3 m, the deepest place, 1.5 meters away from the banks, should be only 50 cm. Although, you cannot swim in such a pond.
Think about style. You can create a pond in a free landscape style, as if created by nature itself. Or make an emphasized geometrically correct layout, inspired by the types of ponds in formal gardens. And if there is absolutely no space on the site, you can create a small pond in the Japanese style: due to the lack of free space, full-fledged ponds in private gardens of the land of the rising sun are often replaced by miniature stone pools.
Step 2. Digging a pit
The construction of a pond at the dacha should take into account the characteristics of the site. Namely: soil type, proximity to groundwater, location of underground communications. Then, when you start digging a pit, you will not accidentally damage a gas pipeline or underground cable. And you won’t build a pond on a site with sandy soils without waterproofing, in the hope that the water won’t drain away.
The contour of the future reservoir should be marked using a hose or pegs with a rope. You can dig a pit either using a good old shovel or using special equipment (if the pond is planned to be not the smallest).
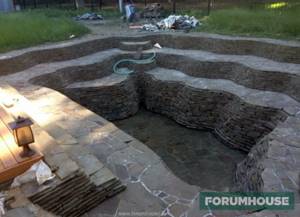
FORUMHOUSE member Andreevev had been nurturing the idea of a decorative pond at his dacha for a long time, and approached its design thoroughly. I decided to make the pond three-level, with a volume of 6 cubic meters.
The dimensions of the pit dug for the country pond were 3.1×2.6 meters. They also made three terraces 0.45 m wide and deep, resulting in a reservoir depth of 1.35 m.
The terraces of the pond are designed to accommodate aquatic plants and make it easy to enter the water when swimming.
Think in advance about how you will use or remove the excavated soil, so that in the future the earthen mound does not become your headache and a hindrance when landscaping the area around the pond.
Step 3. Install waterproofing
Most summer residents who decide to make a pond hope to do without waterproofing.
It all depends on the type of soil: if the pond is built on heavy clay soils that hold water well, you can take a risk and try to do without waterproofing. Although such an experience is not always successful.
FORUMHOUSE participant NikA 9 decided to experiment:
“My husband and I are supporters of the most environmentally friendly approach; we wanted to do without welded film. What we decided to do: dig a hole and drill wells so that the idea would not be a gamble, make sure there is a sufficient layer of clay and loam to organize a water seal in the dam and the bottom of the pond (it would be better if there was more clay/loam here). Among other things, we chose the technology of digging the pond with a bulldozer instead of an excavator in order to evenly stretch the water-barring layer of clay along the bottom of the pond.
In the spring, after the snow melts, pond NikA 9 is filled almost to the brim, but then within a month most of the water goes underground, and by autumn the pond completely looks like a drying up puddle. Additional waterproofing is needed.
An environmentally friendly and budget-friendly option for waterproofing is to lay an additional layer of clay on the bottom. The thickness of the clay castle should be at least 20-50 cm.
Another way is to use a special film. The cheapest option is ordinary polyethylene, but it is short-lived and quickly deteriorates when exposed to ultraviolet radiation. A slightly more expensive, but also higher quality material is PVC film. To save money, FORUMHOUSE members came up with the idea of using used advertising banners instead of PVC film.
But our hero Andreevev decided not to save money and used an elastic butyl rubber film 1 mm thick as a waterproofing material. According to a forum member, such a film is protected from high and low temperatures, ultraviolet rays and tenacious roots of aquatic plants. Andreevev purchased a single piece of material 6x7 m.
Andrey Smirnov , leading specialist in civil engineering, Moscow:
– One of the new modern options for waterproofing a pond is using liquid rubber. This material is a two-component mastic based on bitumen and polymers. It is applied by spraying. This waterproofing is resistant to punctures, temperature changes (including the ability to withstand frosts down to -50-60 degrees) and is durable.
Adherents of traditional construction and landscaping technologies can opt for labor-intensive concrete waterproofing. However, it must be taken into account that concrete is sensitive to soil subsidence and sudden temperature changes.
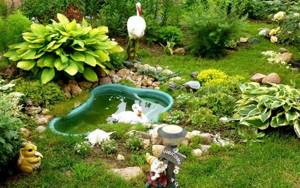
And one of the popular options is the use of ready-made molds made of plastic and fiberglass. All the work: dug in - and the pond is almost ready. The form does not have to be purchased. FORUMHOUSE participants even use old cast iron bathtubs to create mini-ponds.
Step 4: Install additional equipment and filters
Installing equipment for a pond is an additional option that allows you to solve the issue of maintaining cleanliness in the pond and bring your design ideas to life.
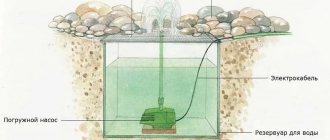
Our hero Andreevev decided to decorate his pond with a small artificial waterfall. To create a hill, the homemade designer sewed ten bags of geotectile 60 by 100 cm. The bags filled with sand became the base of the waterfall. The forum member put waterproofing and stones on top, and fixed a hose between the stones.
To supply water to the top of the waterfall, Andreevev used an electric pump with a power of 40 W and a capacity of 330 l/h. And to purify the water in the garden pond, a forum member installed a flow-through canister filter with a pump and a built-in ultraviolet lamp, which destroys single-celled algae and helps protect the pond from blooming. Filter materials: coconut fiber, polypropylene balls and porous ceramics.
In the long term, filters will reduce the risk of pond siltation - one of the biggest problems of garden ponds. We talked in detail about the fight against siltation.
Additional equipment for the pond is also devices for illuminating the pond, allowing you to create a unique design of the pond in the evening and at night.
Step 5: Landscaping the area and decorating the pond
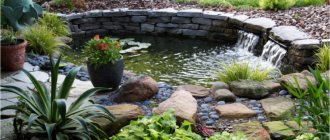
And now, when the reservoir is almost ready, there remains the last, but very important step - landscaping. Use natural materials in your pond design: large stones and pebbles, picturesque driftwood and wooden bridges.
Moisture-loving plants will help create a green oasis around: marsh irises, astilbes, loosestrife, cattails and others. The real decoration of the pond will be goldfish - decorative koi carps.
Read about the experience of forum member Andreevev in constructing a mini-pond with a waterfall. And if you have already created the pond of your dreams, tell us about your project on FORUMHOUSE!
Rules of care and use
The plastic construction is also attractive because in winter there is no need to drain the water. Modern materials can withstand low temperatures. This type of bowl can withstand frosts down to -30°C. In addition, deep troughs in mid-latitudes do not freeze at all.
Care consists of the following:
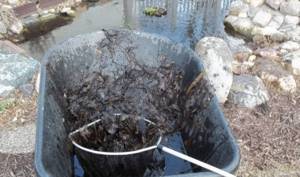
- Sometimes you need to clean off duckweed, algae or silt. This is done without draining the water. But in case of severe contamination, it is recommended to drain the water using a pump, thoroughly clean the container and fill with fresh, clean water.
- To prevent water from stagnating or blooming, install a small pump and filter that will ensure circulation.
- Leaves, branches or petals from trees or bushes can fall into the pond. They need to be cleaned as often as possible. In the fall, it is better to completely cover the structure with a net.
Did you know? In China, river and lake fish are grown in artificial ponds, since there are very few of them left in natural conditions. The most popular is the koi carp.
Since the plastic form is quite frost-resistant, it does not need to be dismantled and hidden in a warm place for the winter. It can withstand down to -30°C. In most cases, there is no need to drain the water, but in colder climates it is better to do this or, as experts recommend, pour sand into plastic bottles and place it in a container. When water freezes, it expands, and sand can slightly prevent a lot of pressure on the walls of the mold and take some of this pressure onto itself.

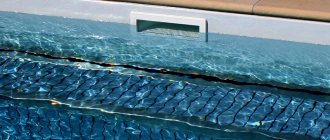
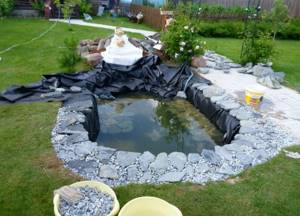
Film pond as the cheapest, most practical option
This structure actually has many advantages. Firstly, it is the cheapest, since the construction of a reservoir with a capacity of 5 cubic meters will cost you only 400-500 rubles and a few days of time. Even this amount can be significantly reduced if you use used film. The main thing is that it is intact and does not allow water to pass through, however, it can be folded in half even if there is visible damage.
To manufacture it, you will need to spend a lot of time, however, no more than for the construction of any other type of reservoir. A pit of the required shape is dug out, and various geometric shapes can be specified - the film will take on the required shape in a matter of seconds. Next, steps are made, if any are provided, and control measurements are taken with the level (if, of course, you want a perfectly flat body of water without any bends in the bottom). It is necessary to ensure that all shapes are smooth, without right angles, as well as any depressions, otherwise, when a lot of water accumulates, it can tear the film, filling the resulting spaces.
After you “plan” the entire relief, you need to lay the film, this must be done evenly so that the material is not overly stretched anywhere. In order to evenly distribute the load and give the shape of your future pool, you need to press the material in a circle with stones, and on each tier. Only in this way will it be possible to properly tension the polyethylene. Pour water evenly . The edges of the black film (you can also use blue or white material - they look good) just need to be wrapped and covered with earth so that it does not slide off when filling. Then you can lay sandstone, a wooden path or tiles on it - at the request of the owner.
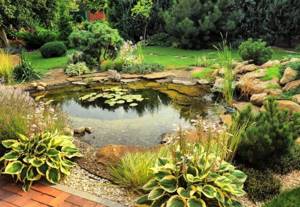
Do-it-yourself pond at the dacha: landscape photo ideas and decoration
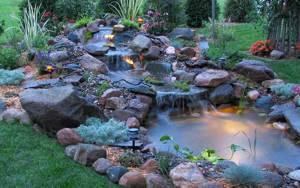
Do-it-yourself dacha ponds require special design. The photo shows the best design techniques. Figurines, stones and beautiful trees can be used as decoration. Changes and uneven terrain make it possible to build a reservoir with a cascade and a waterfall. An original solution would be a bridge or an artificial slide.
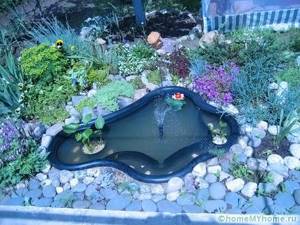
You can decorate a pond using plastic plants
The finished structure can be decorated with the following elements:
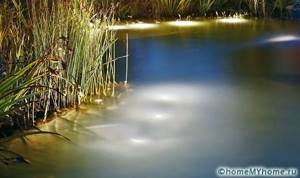
- Underwater lighting looks fascinating; mini spotlights are installed for this purpose;
Options for such lighting require certain skills
- overwater lighting is installed next to the reservoir; halogen and LED lamps are used for this;
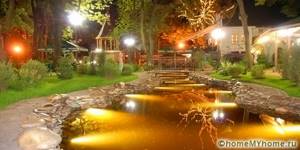
The lighting looks fabulous from all sides
- To install fountains, different types of pumps will be required.
Fountains can be calming or, on the contrary, energizing
Vegetation is considered an important decoration. It can be planted in baskets filled with soil and placed on the surface of a reservoir. Tall varieties of plants will look good nearby.
Helpful information! Before purchasing fish, you need to clarify the conditions for keeping them. Some types of fish are at enmity with each other, so you need to choose ones that get along with each other.
Stone laying
Five days after concreting, we began laying the flagstone. The stone was ordered in such a way that it was 5 cm thick for the bottom and walls of the first tier, 3 cm for the second tier, 3 cm for the horizon of the third tier, and 2 cm for the vertical and facing of the coastal zone. For ease of work, we purchased diamond blades for a powerful grinder in advance, but thanks to a happy accident, the dusty and loud cutting process was reduced to a minimum.
aboba
Once I accidentally hit the center of the plaster with a small sledgehammer, and it split into even pieces that looked like they were made for masonry. And so it went - they chopped the stone with a sledgehammer, very precisely, you just need to select the point and force of the blow, they sawed the stone only to fit it in place. In the masonry I used waterproof stone adhesive in its pure form, without adding cement. I liked the quality, the solution is plastic, dries quickly, holds tightly.
Carried away by the masonry process, Aboba made his first mistake - he forgot to put a filtration pipe in the first and second tiers, and remembered it in the third.
After finishing the bowl with plaster, the stone was mechanically cleaned of dirt, the effect was pleasing.
It was time to improve the coastline - to strengthen the structure along the entire perimeter, a reinforced tape, 10 cm deep and 15 cm wide, was poured. As soon as the concrete gained primary strength, the outer wall was lined, and the cavity between the outer and inner walls was filled with mortar. We did without glue, since the DSP is quite sufficient for the surface part. Large pieces of flagstone were laid on top.
The craftsman ordered enough stone to be enough for both the pond and the landscaping of the site - they started with the gazebo and the adjacent area, and from there it wouldn’t be a problem with the paths. It turned out that it was more profitable to order delivery of such a volume from the field (Rostov region) than from local dealers. The stone was laid on the same brand of glue, but for the corresponding work.
Mechanically, it was only possible to remove the remains of glue and dirt from the stone; if you “bite” deeper, the stone deteriorates, but no special effect is observed. A special product helped bring beauty and cleanliness, but it must be used with extreme caution.
aboba
A concentrated solvent for lime and concrete, it’s a good product, but you need to use it carefully, because during the application process there is a real chemical reaction with the release of heat. It was applied with a brush to avoid the substance getting into the seams between the stones, so as not to destroy the masonry, left for 10 minutes and washed off with plenty of water from a high-pressure washer. A 10 liter canister was enough for the entire pond, paths, and a 5x4 meter area. The cleaning result is good, in the photo on the bottom all the washed out dirt is in liquid form.
Advantages and disadvantages of a garden pond made of HDPE
A self-made pond will decorate any garden plot. But, like everything in this world, a garden pond made of HDPE also has its pros and cons.
- Disadvantages include:
- it is impossible to change the shape;
- high exposure to sunlight will cause cracks to appear;
- complex elimination of mechanical damage;
- the shallow depth does not allow nymphs and fish to overwinter;
- not durable;
- It is almost impossible to make a pond as natural as in nature.
- The main advantages include:
- ease of installation;
- affordable price;
- a large assortment;
- good conditions for aquatic and coastal plants;
- frost resistance;
- doesn't rot.
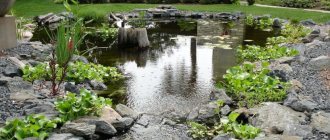
Artificial ponds are an excellent solution for decorating a garden. Decorated with greenery, stones and other decorative elements, the pond will become the center of attention. And the fish swimming inside will not leave anyone indifferent. Lightweight, affordable and practical containers of various shapes and sizes will change the area beyond recognition. Thanks to their unpretentiousness and proper care, they will last for many years, delighting owners and guests.
Choosing the location and shape of the reservoir
The shape of the pond is not regulated by any requirements. It all depends on the design and style of the summer cottage. It can be square, round or asymmetrical, the main thing is to maintain the overall concept of landscape design.
The choice of style is influenced by the terrain. Sharp hilliness requires the construction of waterfalls or cascades, and the flat area allows you to choose any configuration of the reservoir
A good location is one of the key factors in the safety of an artificial reservoir. Its selection must be approached very carefully. You should first assess the terrain of the area, soil characteristics and groundwater level.
If the site has pronounced hilliness, the right solution would be to arrange a cascade type waterfall. For flat areas, it is recommended to choose small single-level ponds.
The possibility of expansion of the reservoir should be foreseen in advance. The large area of the site allows you to create additional waterfalls or fountains in the future. The size is selected based on the free area and the wishes of the owner. The golden mean is considered to be 3% of the estate area. For example, for a plot of 8 acres, the ideal size of an artificial reservoir is up to 24 m2.
It is imperative to take into account the location of trees and large shrubs relative to the planned reservoir. Before designing a pond, the approximate amount of growth of the root system of the plantings must be taken into account.
In addition, falling leaves will pollute the pond, contributing to the processes of water decay. Because of this, additional cleaning will be required. The best thing to do is to choose a place away from large vegetation.
Small pine trees and large-leaved shrubs are the best solution for decorating the perimeter of a pond. They will eliminate the need for daily cleaning of the pond from fallen leaves.
An important aspect is lighting. A location in a shady area will slow down the growth of green spaces, and prolonged exposure to active sun will contribute to the development of mud. A well-chosen place, alternating sun and shade, will protect the pond from seasonal flowering.
Exposure to sunlight for 5-6 hours a day is considered optimal. This will be the key to maintaining the correct microclimate inside the water body.
Which stone is better to choose for a pond?
To decorate a pond, you can use a variety of natural and artificial stones.
Important! If your artificial pond was created using film materials, you should not place boulders with pointed edges or too heavy specimens into it.
It is worth remembering some nuances:
- When decorating a pond, large boulders that are 1/2 in the water look very aesthetically pleasing. The presence of moss on such a stone looks very picturesque. However, for moss to grow, it requires shade.
- When limestone is used as a finishing material, water becomes alkalized. If there is still intense lighting, the water in the pond will bloom and take on a green tint.
- The edge of the reservoir should not be laid out exclusively with massive boulders. This will create a painful, intrusive impression. Stone edging looks best when it is interspersed with islands of plants and mounds of sand.
- The material used to decorate the reservoir should be consistent with the decoration of buildings on the site. For example, if the house is decorated with wild stone, then it is advisable to line your pond in the same style.
Video: how to choose stones for a pond

Ready-made plastic molds
This type of artificial reservoir has become very popular. The cost will be a little more expensive than the first option, since instead of polyethylene you use high-quality anti-corrosion plastic. The shelf life of such products is unlimited, since the polymer does not rot, does not crack, and has high strength. Before you build an artificial pond with your own hands, you need to dig a large pit, 15-20% larger in size than the garden pond, in order to compact it well on all sides with bulk materials.
The bottom must be concreted, since any “subsidence” of the sole will cause the vessel to crack. As a result, there will be water losses and the missing level will have to be constantly replenished. It is very difficult to break even on the top line. This is one of the most common problems that arise when installing this type of artificial pond. Therefore, if you do not know how to make a pond from a plastic mold with your own hands, then it is better to hire a team that will make everything level, level the plastic, and properly concrete the base. If you fill without measuring the level along the top line, then you will have a crooked pond on the site; you will not be able to level it with your own hands without deep excavations. You will have to completely remove the form from the ground and fill it in a new way.
Proper compaction is done like this: spill 15-20 centimeters of sand around the container, fill it with water, then fill it again with 20 centimeters and fill it with water, all the way to the top. It is imperative to monitor the water level in the pool and add it to the level at which the sealing material is poured. If this is not done, the pool may be flattened inward or lifted by water, since the material is highly buoyant.
Beach
To the right of the gazebo, observant forum members noticed a round platform, and the assumption arose that this was a future dance floor. In fact, this is a branch of the Mediterranean on a separate site.
aboba
The idea to create this miracle arose when the pond was filled with water for the first time. There is somewhere to swim, but there is no beach with sand where to sunbathe! Disorder! At foreign resorts there is water, sand, sunbeds, and umbrellas, in general, a complete Eden! Are we worse? So I thought in the evening, and came up with a certain concept of a beach holiday on the shores of the Moscow region.
For implementation, a fertile layer was selected from a circle with a diameter of five meters, a sand cushion was made, compacted, and EPS was laid. Brick was used as formwork, reinforced with mesh, and concreted. When the concrete had set, we cut out a hole for the umbrella using the indispensable sledgehammer and grinder, and installed the umbrella. White sand purchased in winter is waiting in bags for its time.
The craftsman plans to lay out the circle with cobblestones according to the season, cover it with sand and relax on sun loungers or directly on the sand.