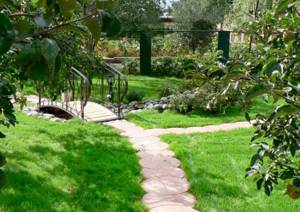
The arrangement of garden paths plays a significant role in the design of a suburban area. After all, they greatly facilitate the movement of residents within the boundaries of the allotment. In addition, beautifully meandering through the garden, they serve as its decoration. But that is not all. Paths can be called a kind of strings that connect all the individual parts of the site into an inextricable whole, being the finishing touch to the design of its appearance. In order to equip them, it is not at all necessary to buy expensive paving slabs and hire a team of professional builders for the work. It’s not too difficult to make garden paths yourself, using various materials. You can also lay them out using special forms. This method is quite popular today. You can buy a mold for making garden paths in a store or make it yourself, especially since it is not so difficult.
Benefits of using walkway molds
Of course, some people prefer a more traditional approach, laying out their paths with tiles or paving stones.
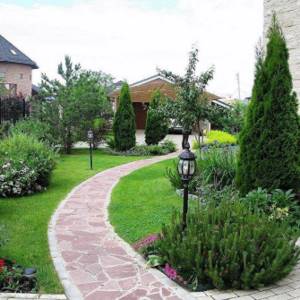
But this design looks somewhat standard, and it will be quite expensive. Therefore, many owners of dachas and country houses solve the issue differently, making paths on their site using special forms. This allows you to show all your imagination in arranging the surrounding space. Paths in the garden, laid out using shapes, usually turn out very elegant. And, compared to traditional methods, they have such significant advantages as:
- low cost of construction work;
Shaped tracks are quite inexpensive and beautiful
- the ability to manufacture tracks of any size and configuration;
- simplicity of the entire work process.
By laying paths on the site using forms, it is possible to supplement them with almost any material - marble chips, pebbles or something else that will give the appearance of the paths special attractiveness and originality. But before you start making a garden path, you need to do some preparatory work.
Concrete paths: strengths and weaknesses
The choice in favor of concrete paths, poured with your own hands in the garden, should be considered through the prism of the advantages and disadvantages of the main material used for their construction. It is the characteristics of the concrete mixture that determine how the path will manifest itself during operation. For example, its strengths include the following factors:
bdda3aacb90acc25c86f5d6cab1082b9.jpe
— low capital costs for the purchase of raw materials and tools for construction;
— durability of the constructed garden path;
— the possibility of reinforcing concrete with metal elements to achieve greater rigidity and stability of the path;
- the prevalence and availability of materials for the implementation of the project yourself - all necessary purchases can be made at any construction supermarket;
— the possibility of safe construction of paths in areas with high groundwater levels, since concrete poured to a sufficient depth is optimal for use on problem soils;
— unlimited possibilities for design: the owner of the site can fill the garden with paths of any shape and width, guided by his own taste or inspired by the projects of famous landscape architects presented on thematic construction sites;
- the use of special additives makes it possible to improve the properties of concrete - increase its resistance to moisture, frost, temperature changes and premature destruction due to high loads.
The disadvantages that a concrete garden path will have should also not be overlooked. These include the following factors:
— the risk of cracks appearing on the trail caused by soil movement or flooding as a result of floods and rains;
- the construction of permanent paths from dry concrete mixture does not provide for a simple dismantling process, therefore, if the need arises, the owner of the hacienda will not be able to move them from place to place or remove them without the use of special equipment;
- pouring concrete requires certain weather conditions - no rain, positive air temperature, and the mixture must dry well before the path is ready for use;
- the process of mixing the components of the mixture - concrete, sand, gravel and additives - is very labor-intensive, it will be difficult to carry it out with a shovel, so the construction project may involve the use of a special machine - a concrete mixer;
- in order to achieve the ideal appearance and high strength characteristics of ready-made concrete paths in the country, during their construction the installation of formwork is required. For this, the individual developer will need to allocate additional time and funds to purchase formwork boards.
Preparing the base of the future path
Using a special shape, you can make a very attractive looking path. Perhaps such a coating is somewhat less durable than that made by some other methods. But it has a right to exist and is quite popular among summer residents and owners of country real estate due to the ease of manufacture and the low cost of the entire process.
Attention! When arranging a path, you need to think about drainage. To do this, you can place it on elevated places or make it at a slight angle to drain water. Otherwise, cracking of the coating may occur during frosts.
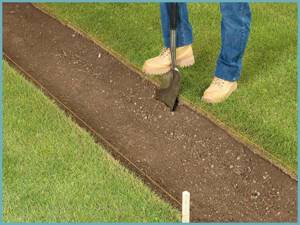
But in order for the garden path to serve for a really long time, it is necessary to make a high-quality foundation for it:
- First you need to outline the boundaries of the planned path. For this, twine or nylon cord and pegs are usually used;
Before laying the path, remove the top layer of soil
- if the soil at the site where the path is laid is weak or has been previously disturbed, you will need to cut off its top layer to create a path. But if the soil on the site is strong enough, then you don’t have to remove it, just add additional bedding on top of it;
- After excavating part of the soil and leveling the area for the path, it is necessary to make bedding to strengthen the base. First, a layer of sand is poured, and gravel is placed on top of it. The next layer will again be sand. At the same time, each layer is well compacted. Such a base usually withstands fairly heavy loads and has a long service life.
Advice. When preparing the base for the path, compacting the layers of bedding is mandatory. If there are no special devices for compaction, you can use something that is at hand, for example, a log, or simply spill the layers with water so that they settle and become denser.
Criteria for selecting finished products
Construction stores sell a wide range of paving elements: paving slabs of various shapes, sizes and colors, clinker bricks, paving stones, natural and artificial stone.
Materials for constructing paths on a personal plot are selected taking into account:
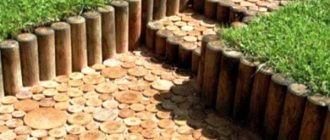
- terrain - a hilly area needs to be equipped with steps;
- garden style - wooden cuts are suitable for country, paving slabs and borders will help to recreate the classics;
- soil condition - clayey, loamy soils become mobile when there is excess moisture; to construct a path you need to buy a geogrid;
- future load - a hard surface is chosen for vehicle access, a pedestrian path can be made of plastic or pebbles;
- architectural features - the color and style of the road surface should be in harmony with the facade of the house.
The elements for road surfaces sold in stores are hard (natural stone, decking, clinker bricks, paving slabs) and soft (an embankment of pebbles, gravel, crushed stone, sand, tree bark). Rubber plates and plastic modules are available for sale.
Preparation of solution for filling molds
To cast molds to create a track, you need to prepare a solution. It is made from cement and sand in a ratio of 1:3. The grade of cement can be M300-500, but for a higher quality coating it is better to take at least M400. Water is added gradually while preparing the solution. The consistency should not be too thick, but not runny either. If significant loads are planned for the future path, you can additionally add reinforcing fiber or a small fraction of crushed stone or gravel to the solution.

Strengthening the future path with gravel and sand
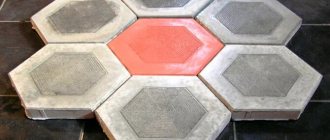
Varied mosaic
Creating original and durable tiles with a unique pattern is a labor-intensive process. But the result will delight the home owners and surprise the guests.
To work you will need:
- remnants of old tiles and porcelain tiles of different colors and textures;
- pebbles, any stones, glass, rhinestones, large beads, old keys and any other items;
- rectangular or round baking dish, greased with Vaseline;
- sheets of adhesive tape;
- everything to prepare the solution.
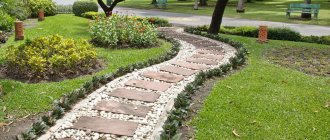
Laying a garden path
Step-by-step instruction:
- Place all available mosaic items in a bag and crush with a hammer.
- Sort by shape, color and size.
- Cut a rectangle or circle from sticky tape that matches the size of the baking dish. Place the tape in the mold and peel off the paper so that the sticky side is up.
- Place any design on the bottom of the pan, face down.
- Prepare the solution and pour it into the mold about halfway (1-1.5 cm).
- Place a metal mesh cut to the required size for strength.
- Fill with a layer of solution.
- After final drying (1-2 days), you need to pull out the tile and remove the layer of adhesive tape from the front side.
- Wipe the design with a damp cloth, sand it and varnish it to add shine and durability.
If you use a special mosaic (1x1 cm) of different shades of the same color scheme, you will get a stunning picture.
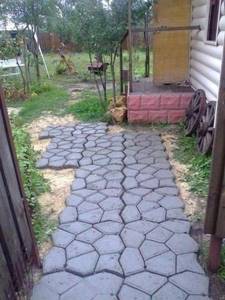
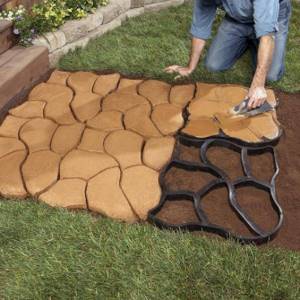
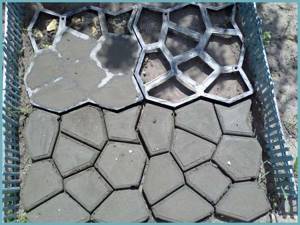
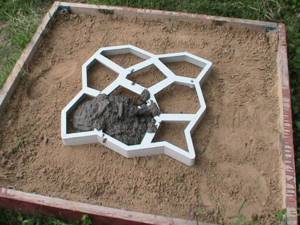
Making a path using a do-it-yourself mold
Using new molds that can be found on the market today, paving tiles are cast directly on site. Sometimes just one mold is enough, which is enough to cast a large number of such homemade tiles. There is no longer any need to wait until the solution has completely set. The form can be released almost immediately to fill another fragment.
Work on the manufacture of a track on a prepared base using a special form is carried out in the following sequence:
- first you need to determine the location of pouring the first part and moisten the base where the tiles will be laid;
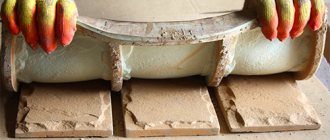
- place the form in the chosen place, fill it with solution, evenly distributing it over all cells, compacting it so that there are no voids;
Making a track using a mold
- Level the solution laid out over the cells on top with a wide spatula. To do this, you can use some other object, the main thing is that it is smooth and flat. It is better if the tile being made is slightly convex on top, this is convenient for removing sediment from its surface in the future;
- The form filled with the solution is kept for 15-20 minutes, then carefully removed, lifting it up, and placed next to it, repeating the whole process again. Before each use, the mold is cleaned of any remaining solution. At the end of the work, it needs to be washed.
This way you can lay out the entire track in a fairly short period of time. If some tile elements were accidentally deformed, they can be corrected a little later. You just need to wait until the solution dries slightly. The gaps between the tiles can be filled with small pebbles or lawn grass can be planted there. Moss looks very interesting in the grooves of the tiles. To make it appear there, the seams are spilled with kefir or yogurt.
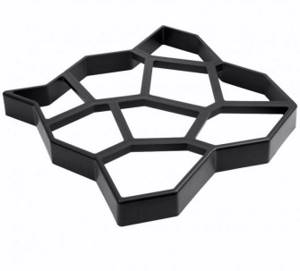
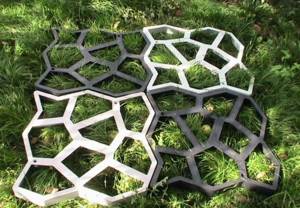
Forms for the path: how to make them yourself?
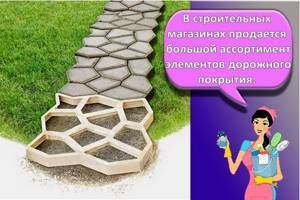
Special molds for making garden paths today can be found in retail or purchased online. Despite the low cost, many people make them themselves, especially since making such forms is not at all difficult.
To make the mold, a wide variety of available materials are used - wooden blocks, hoops removed from barrels, metal sheets and more. Some craftsmen even make them from appropriately sized non-stick baking pans.
One of the common options for making a mold frame is wooden blocks. To create a framing frame, it is convenient to use bars with a section of 50 by 50 mm. After securing the joints of the beams, jumpers are installed inside the frame. For them, it is better to take bars with a section of 30 by 30 mm. The internal jumpers themselves are placed randomly.
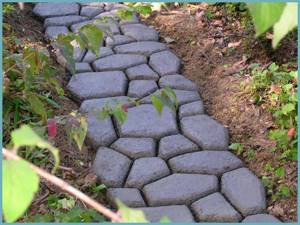
Any shape can be adapted to make a track
Those who prefer irregularly shaped tiles for the garden path can use metal sheets or hoops removed from an old wooden barrel to make the frame. If this option is chosen and it is decided to make a mold from a flexible material, then the sheet of iron must be cut into strips, giving them the preferred shape, securing the joints by welding. In the case of hoops removed from the barrel, they are first straightened and then bent, giving the desired shape.
Creating a path with your own hands using a mold that you also made yourself is an exciting activity that allows you to bring your fantasies to life. In addition, the cost of such a path will be minimal, which is also important when designing your suburban area.
Varieties of forms
To date, several types of sidewalk forms have been developed. They differ in design and material.

Polymer plastic stencils
They are squares of different shapes. There are additional partitions here that provide a unique pattern.
Plastic forms have minimal weight. They allow you to get the desired result within 1 hour after pouring the building composition.
To speed up the crystallization process, chemical additives are used. They contribute to the rapid hardening of the cement-sand mixture.
How to make a smokehouse with your own hands - drawings, diagrams, projects and features of building a smokehouse (145 photos and videos)- Fabrics for curtains: types, features, popular options for sewing curtains (photo)
Do-it-yourself decking: types of decking boards, installation technology. Step-by-step installation of WPC decking. Laying errors
Metal forms
Products weigh from 0.5 to 1 kg. They have some similarities with plastic models. Such stencils are intended for creating decorative tiles.
Individual forms
They are neat stencils with clear angles and lines. These models are designed to create tiles that resemble natural stone and paving stones.
As a rule, such stencils are sold as a separate form. There are many sizes and geometric shapes available for sale.