Types of roofing for house extensions
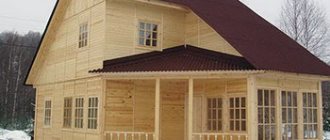
The roof over the terrace can be very different, it depends on its size and design nuances. The unity of the design with the main building is also important, so you can choose almost any type of roof for the attached rooms. You can choose a single or double slope option for classic houses.
Additional Information!
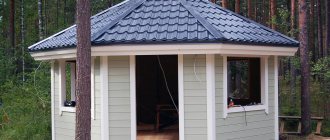
For large extensions, a hipped structure, also called a hip structure, is suitable.
A common roof can also be built, but it will be less secure and will require replacing the roof over the main building. In any case, if the roof is not uniform, the roof must be properly joined so that moisture does not pass into the joints.
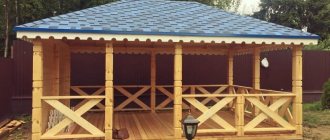
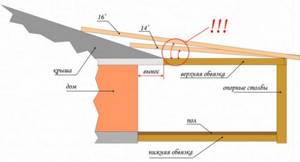
Shed roof
A roof that has one slope is made in a single structure, but requires the construction of walls of different heights, which is least suitable for a one-story house. This is done in such a way that the roof is at an angle of about 40 degrees, this allows precipitation to drain and snow not to linger on the roof.
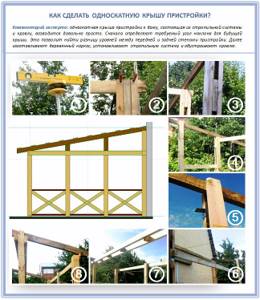
This variety does not have the ridge usual for other roofs, which simplifies its creation within the framework of both a frame extension and from foam blocks.
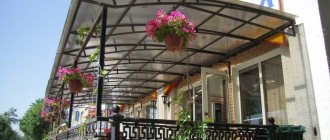
These types of roofs over an extension have an unusual appearance and are at the same time cheap to create, because the sheathing does not require a large amount of materials, and the roof itself will require less than in other cases. But there may be problems with snow melting, despite the slope.
The space will narrow as the roof slopes, although for a veranda roof these disadvantages are not significant. The pitched roof of extensions to the house looks organic and, if the joints are well equipped, can last a long time.
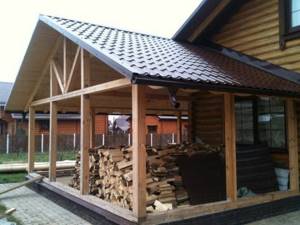
Gable roof
This is the most common type of roof over a veranda, which is found both in residential buildings and outbuildings. It consists of two inclined parts, which are united by a ridge at the top point.
An attic space is usually installed in the space between the beams, but it is also possible to create an attic, which will require additional insulation.
A gable roof is the easiest to install, because the procedure has long been known and worked out to the smallest detail by craftsmen, which also contributes to its low price.
The attic area will also be an additional air layer that retains heat, but the equipment of the attic can lead to the concealment of space in the places where the sheathing adjoins the floor.
Three-pitched roof
This is not the most popular option for installing roofs, especially in rooms attached to the wall, because it requires more materials and effort. Externally, the three-slope type is more related to the gable type, but on one side, instead of a pediment, an inclined part is made, that is, another slope.
In the process of arrangement, it will be necessary to create an additional connection for the third slope, and for this everything will need to be carefully calculated.
Among the advantages of such a roof:
the opportunity to arrange an attic with a corresponding window in the roof, making it open, and an unusual appearance.
But there are also disadvantages
, in particular, additional loads require strengthening the structure, especially if the building is made of blocks, and the work will require an order of magnitude more materials. But with a gable roof, terraces become unusual, although there are more profitable options.
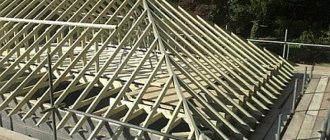
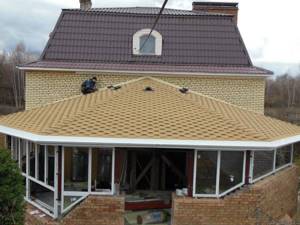
Hip roof
A hip roof is called a hip roof, and therefore is considered a complex system that can only be installed after preliminary calculations.
The design consists of two wide parts - slopes, and two triangles located in place of the pediments - hips. At the same time, there is only one ridge, it connects wide zones, and the hips are combined with them.
In order to build a roof on an extension, the house will need to prepare a large-scale system, and it is the rafters that will be the main problem in the arrangement. They will require large financial investments, and large areas must be well insulated and soundproofed; this will also not be cheap.
But there are also advantages, in particular, the structure’s resistance to strong winds and the ability to create a large and comfortable attic under the slopes.
Half hip roof
This roofing option for a terrace is something between two- and four-slope structures, although it is more reminiscent of the latter. The hip is still in the end part, but only reaches the floor window.
Interesting!
Structurally, this differs from the gable type insignificantly, but it makes it possible to think through and arrange a normal second floor.
Strengthening the rafters is the main task of builders, because although a half-hip roof looks simple, when laying the material, heavy loads arise, especially if it is a frame extension. If you do not take care of the solidity of the structure in advance, it will quickly become unusable.
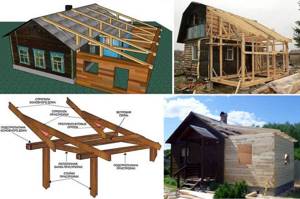
Do-it-yourself construction of a pitched roof on a frame house
After successfully completing the design documentation, builders receive detailed instructions on how to make a pitched roof for a house with their own hands. For greater clarity, you can look at an example of installing a pitched roof on a garage with your own hands step by step.
In this case, the top trim will be used as support for the rafters. Calculation of the installation step for the rafter legs is not required, because in this case it is the same as the distance between the posts of the frame wall. They are usually made from 50x150 mm boards. Let’s take 2.5 m for the height of the front wall, 2.2 m for the back wall.
We make a pitched garage roof in this order:
- The board is cut into pieces of 265-270 cm. Their number should match the number of supports of the front wall.
- The racks for the rear wall are made in the same way. Their length is taken to be 235-240 cm.
- When installing ready-made racks, fastening to metal corners is used. For temporary fixation of the outer elements, jibs are used.
- To check the correct horizontal and vertical position of the racks, you will need a building level: any irregularities noticed should be corrected immediately. To set the horizon on the front elements, a height of 250 cm is taken, and on the rear elements – 220 cm.
- The resulting marks are used to install the side board.
- Excess sections on the racks protruding over the side boards are cut off locally.
- Installing side boards over end walls. Before this, fitting is carried out by applying the board to the place of future fixation.
- Precise dimensions will be required to make the side wall posts. When installing them, the same step is used as on the front and rear walls. As for the doorway, it can be left at this stage, or cut out along with the windows after the shed rafters are made.
- After installing the trim over the end posts, the side board is removed.
- Another one is made above the existing harness, with the obligatory bandaging of the corners.
- The rafters are cut from 50x150 mm boards. Their length includes the parameters of two eaves overhangs, with a margin of 10-15 cm.
- The installation of a pair of rafter legs must be carried out strictly along the side walls. To fix them, use corners, with an installation frequency of 70-100 cm. To install the wind board, take a board 50x100 mm.
- To build a continuous sheathing, you will need sheets of moisture-resistant plywood. A gap of 2-3 mm is provided between them. The top of the lathing is equipped with waterproofing.
- Before laying the covering, you need to cut a hole for the chimney pipe. An additional waterproofing layer is laid around it and along the roof overhangs.
Insulation of the roof of an extension (terrace, veranda)
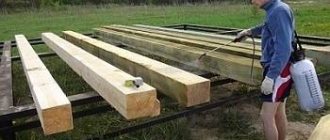
Like the main building, the extension should be properly insulated so that it is not cold and damp. Any materials can be suitable for this, including bulk and rolled materials.
Mineral wool will be placed directly into the sheathing, and is inexpensive, but it will be problematic to plug all the cracks with it. And unreliable insulation of the roof of the extension can damage the house, because the cold will penetrate into all rooms.
Among the loose insulation materials, you can use expanded clay, which practically does not burn and, in addition to insulating the roof of the extension, also improves sound insulation. But it will require a large layer, and if there is no extra 50 cm under the roof on the veranda, it is better to choose a more heat-saving material.
Penoplex
Among the listed options, which have already become traditional, penoplex stands out. On the one hand, this is ordinary foam plastic, differing from it only in structure, but it is supplied in ready-made blocks with grooves and does not crumble when cut.
The panels have a high density, so they do not collapse under loads, and the range includes options of different thicknesses, which makes it possible to insulate a roof made of corrugated sheets.
For this insulation, as for others, you will need waterproofing, which can be placed both above and below the material. Penoplex has its advantages:
- high moisture resistance, in comparison with polystyrene foam and mineral wool;
- low weight of products;
- grooves are made for proper docking;
- blocks do not deform due to temperature changes;
- the material contains no harmful substances.
But there are also negative aspects, for example, in the event of a fire, penoplex will melt and produce toxic substances that can poison a person. If the roof of the extension is non-standard, it will take a lot of time to fit the blocks to it.
Important!
Penoplex can only be placed under a sun protection layer or covered with other materials, since the material will lose its strength from ultraviolet rays.
When creating an extension, a number of nuances related to the roof should be taken into account. There can be a lot of options; they relate to both the format of the roof of the extensions of private houses, and the type of coating and even insulation. Only competent selection can be the key to successful completion of the extension and comfortable living in it.
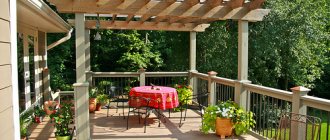
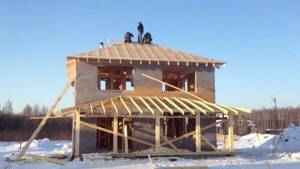
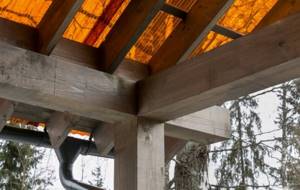
How to build a roof for a house with a veranda with your own hands
With the help of a pitched roof it is very convenient to design various architectural combinations. The most common situation is when a house and an attached veranda or terrace are covered in this way.
Step-by-step instructions on how to make a pitched roof on a house with a veranda:
- When making rafters, provision is made for the eaves overhangs.
- As they are laid, the distance between the racks of the frame structure is taken as the step distance.
- The length of the side boards coincides with the length of the wall, with the addition of two eaves overhangs.
- The extensions of the side cornices are also attached to the side elements.
- The ends of the outriggers are equipped with a wind board.
- To make the supporting posts of the veranda, 100x100 mm timber is used: they need to be made shorter by 50-70 cm than the posts of a high wall. As for the pitch of the supports, it is selected based on your own preferences.
- To connect the top of the racks, a 100x100 mm beam is used. In this case, screws or nails are used for fastening.
- Stuffing on a high wall in a horizontal position is carried out with a distance of 30-40 cm from the mating line.
- When cutting veranda rafters, their length is oriented along one eaves overhang.
- The finished rafters are mounted on top of nailed boards and trim. To do this, use corners and nails.
- A continuous sheathing is installed on the slopes, for which moisture-resistant plywood is used. A layer of waterproofing is laid on top of it. Laying suitable roofing material completes the description of the procedure on how to properly build a pitched roof on a house with a veranda.
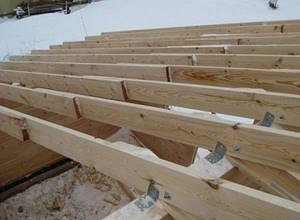
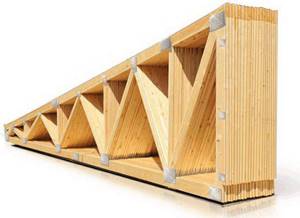
Why are roof trusses needed?
According to the technical documentation, for laying single rafters of a pitched roof, the supporting walls must have different heights. However, there are often situations when the height of these walls is the same: in such cases, it is most convenient to use special construction trusses of wooden or metal type. For example, you can take the construction of a roof with one slope with trusses on a veranda or porch attached to a dacha.
We build a pitched roof in this case in this way:
- When manufacturing the components of roof trusses, it is important to keep in mind that in this triangular structure, the short leg is used for fastening to the wall of the house. In this case, the hypotenuse of the structure acts as a cornice overhang. To make a long leg and hypotenuse, you will need a 25x45 mm board. The short leg is made from a 120x45 mm board.
- To fix the truss elements, perforated metal plates and anchors are used.
- To attach the short leg to the wall you will need dowels and screws. The long leg is fastened with nails to the harness.
- The ends are equipped with drain boards.
- A continuous plank sheathing is installed on top of the trusses. We should not forget about compensation gaps of 2-3 mm.
- In the area where the pitched roof connects to the wall, a corner trim is installed.
- When sheathing the ceiling, a little of the eaves overhang should be left free to allow fresh air to enter. It is advisable to decorate this opening with a mosquito net to prevent insects from entering the room.
- After laying the roofing, the perimeter is equipped with a metal profile strip.
It is advisable to decorate the front end of the roof with a gutter, leading its ebb outside the building.
Drawing up a project and rafter diagram
If you decide to extend the main room by adding a veranda, then even when using the simplest design, the first thing you should do is draw up a drawing. The drawing should show the main building on a certain scale. Then the veranda and roof.
When designing a roof, it is important to determine the slope angle. This parameter directly affects the time frame of operation and the efficiency of the structure, as well as the amount of materials. The higher the angle, the larger the volume of elements required for construction. The parameter is adjusted depending on the weather conditions of a particular region and the type of roofing material. Everything is clear with the first influencing factor: more precipitation means a stronger slope. Regarding the second, you will have to study the optimal parameters for each material separately.
Minimum values for the angle of inclination depending on the type of roofing elements:
And another factor according to which this parameter is selected is aesthetics.
Further, when designing, the following parameters should be taken into account:
- the length of the rafter legs based on the weight of the roofing material;
- the same indicator for reinforcement elements;
- roof slope area.
The easiest way to make calculations is in special programs, of which there are quite a lot on the Internet. Some provide a special calculator into which you only need to enter the values and the result is ready.