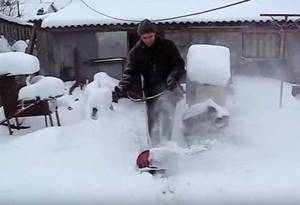
Small-scale mechanization in the private sector today brings great benefits. Therefore, a homemade snow blower will help you remove snow in your yard quickly and with little effort.
If you choose a successful design and are able to skillfully implement it, then even the weaker members of your family will be able to clear snow.
Design and principle of operation of an electric snow blower
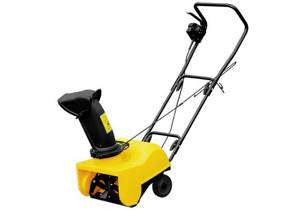
Compact household snow blowers come in gasoline and electric versions . They differ from each other only in the way they are powered: the first ones run on gasoline, the second ones, respectively, on electricity. Read the article about electric snow blowers.
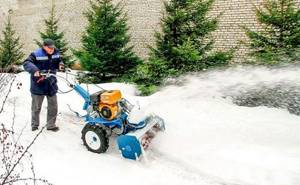
The essence of the work of a snow blower is as follows: using a specially rotating device, collect snow, and then, using an outlet chute, forcefully push it in a given direction to the required distance.
Based on this, snow blowers are divided into single-stage and two-stage . The former use only the force created by the auger to push out snow, rotating at high speed. The design of the latter includes a special rotor, which stands at the entrance of the outlet chute and, rotating, pushes out the snow.
This allows the auger to spin at a lower speed, which prevents rapid wear and frequent breakdowns when hit by stones or other hard objects.
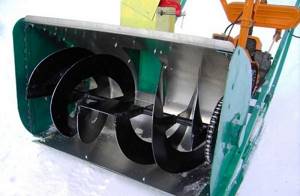
An auger is a device that crushes snow and “throws” it inside the snow blower . It is located in the front of the machine, at the bottom and is closed at the top and sides with a bucket body so that the snow is directed directly into the snow blower. The screw is usually made of metal.
It is a durable monolithic device that looks like a drill rig or a screw thread enlarged. Rotating around its axis, it grinds the snow and feeds it inside the snow blower.
If the rotation speed is high (as in single-stage types), then a solid object getting into the auger is likely to cause its breakdown. Therefore, in such cars it is covered with rubber on top (sometimes it consists entirely of rubber).
This feature allows the snow blower to move slightly independently . In two-stage machines, the auger rotates at a lower speed, since it is not the rotor that throws the snow over long distances.
Such snow blowers can not only clear fresh snow, but also cope with compacted and frozen snowdrifts. The surface of a metal screw can be either smooth or serrated.
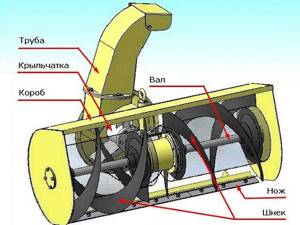
In addition, the snow blower has an engine, an outlet chute that regulates the direction and distance of snow throwing, wheels (sometimes tracks are used), handles for moving the snow blower by a person and, in the most complex models, a control panel.
More details about email. snow blower, watch the video below:
Snow blowers are divided into self-propelled and non-self-propelled . In the first case, movement is carried out with the help of an engine (more details here), in the second - with the help of the person himself (see Forte QI-JY-50).
We have compiled a rating of the largest bulldozers in the world. Read the article about them here.
This article will help you calculate the performance of a bulldozer, depending on the soil and technical characteristics of the bulldozer.
And from this article you will learn about the features of the B10M bulldozer, produced at the Chelyabinsk plant.
How the device works
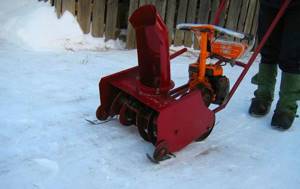
Based on the cleaning method, homemade snow removal devices can be divided into single-stage (screw) and two-stage (screw-rotor).
The operating principle of a single-stage or auger device for snow removal is that raking, crushing, and dumping of snow takes place by rotating the auger. There is a serrated and smooth working edge of the auger : smooth - for removing loose snow from the area; jagged - for denser and icier snow edges.
Screw machines are most often much lighter than rotary screw machines and can be not only non-self-propelled. They are shovels on wheels that need to be pushed forward, as a result of which they collect all the snow and throw it to the side. The snow removal auger is started using a special electric or gasoline engine (two-stroke or four-stroke). Such devices are good because they are quite easy to operate, compact, mobile and inexpensive.
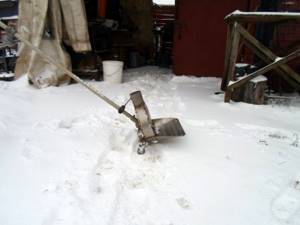
How to make a self-propelled snow blower with your own hands
Step 1
First, you need to decide whether the auger or auger-rotor mechanism of the snow blower is more suitable for the intended work. It depends on how much snow needs to be removed.
Of course, it is much more difficult to make a snow blower with a rotor, but after heavy snowfalls it will cope with the task better. Read how to make a rotary snow blower.
Step 2. Auger
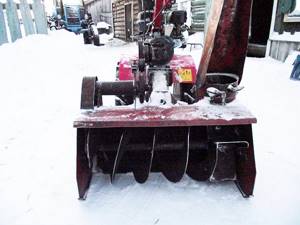
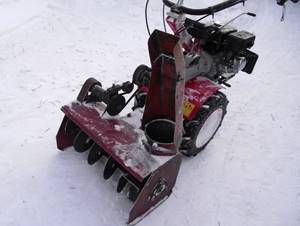
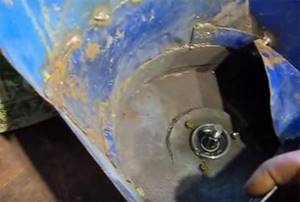
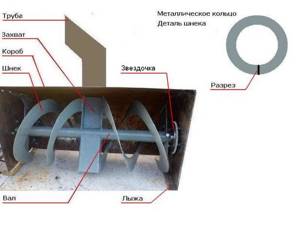
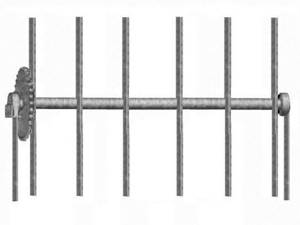
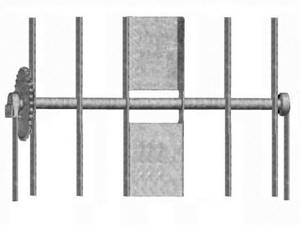
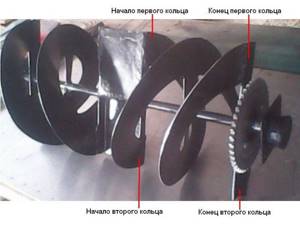
The main working part of a snow blower is the auger. It consists of a drive shaft and “cutting” rings attached to it. The shaft is usually made from ¾ inch pipe. Its length should correspond to the length of the bucket. Trunnions are welded to its ends, which will later serve to install the shaft into bearings.
In the case of two-stage snow blowers, a metal plate (usually 12 cm by 27 cm) is attached to the center of the pipe. She transfers the snow into the discharge chute. On the sides of it, rings are attached to the pipe, which are usually made from a 10 mm thick conveyor belt.
They can also be cut from two-millimeter sheet steel .
Often they make four rings of a certain diameter. The diameter depends on the size of the bucket and shaft. The rings are sawn in half and bent into a spiral.
They are then welded to the shaft in the form of a continuous spiral. If the machine is auger-rotor, then to the sides from the central plate.
It turns out two solid spirals - to the right and to the left of the plate . In two-stage electric snow blowers, the spiral must angle toward the center so that when the snow is raked, it falls onto the plate and then into the discharge chute.
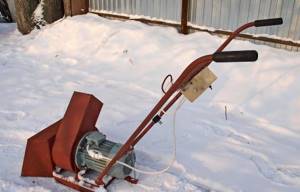
Features of a homemade electric snow blower
The simplest DIY snowplow with an electric motor uses the following equipment:
- Electric motor.
- Bucket with auger and outlet chute.
- Frame with handles.
- The wire.
However, as mentioned above, the auger can be made according to different principles. The supporting mechanism can be wheels or skis.
Engine – removable or non-removable. Despite this, the equipment of all homemade snow blowers is very similar, since it is almost impossible to make additional equipment yourself .
Drawings and diagrams
To assemble snow blowers, you can use drawings that are easy to find on the Internet, or start developing your own version based on local conditions.
There are four types of snowblowers:
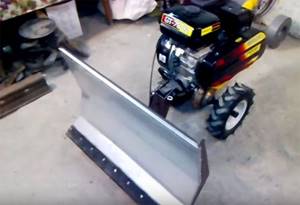
- Bulldozer. Wheels with a blade mounted at the front.
- Auger. In it, snow is gradually captured by rotating belts and moved to a pipe through which it is thrown out.
- Fan-blade. Using special blades, the sticky snowflakes are directed to the fan, lifted by the blades to the pipe and flew out.
- In air-fan . It works like a vacuum cleaner. The snow mass is drawn in by a strong stream of air and thrown out into the street.
Read also: How to press in a silent block without an outer ring
In cities, all these types of cleaning equipment are used, but in rural areas it is difficult to make the air-fan type, since a very powerful engine is needed to suck up snow. Therefore, the article discusses the creation of only the first three options.
Helpful Tips and Warnings
- Large solid objects getting into the auger is the main danger when using a homemade snow blower. This entails not only breakage of the auger, but also jamming of the engine. In order to avoid engine breakdowns, special fuses are made.
- Use safety bolts or bushings. With their help, the finished screw is attached to the rotating shaft. If the permissible load is exceeded, they simply break, but the engine remains operational.
- The electric motor provides for a cable that will be exposed to the cold. Most regular cables are not designed to withstand extreme temperatures; they will freeze and perform poorly. For work in cold weather, wires of the KG-KhL, PGVKV, SiHF-J, SiHF-O types or their analogs are used.
- The width of the bucket is adjusted depending on the width of the working surface. Most standard buckets may not be suitable for clearing very narrow paths, so dimensions must be provided in advance.
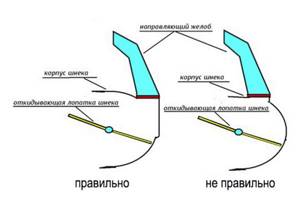
- Single-stage snow blowers conveniently place the discharge chute on the top and side of the bucket so that the snow has less distance to travel. In this case, the auger spiral should be inclined at a slight angle in the direction where the chute is located.
So, making a snow blower with your own hands is quite easy . At the same time, the costs will be small, and the operating efficiency will exceed all expectations. Using an electric snow blower is much cheaper and easier than using a gas blower, but it is limited by the length of the lead cable. Read the instructions on how to make a gasoline snow blower with your own hands.
Having weighed all the pros and cons, we can say that for clearing snow from medium-sized areas, it is very convenient and at the same time cheap to have your own snow blower.
Source
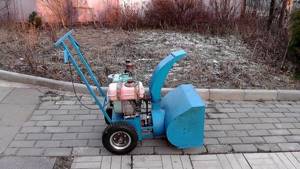
Construction of snow blowers
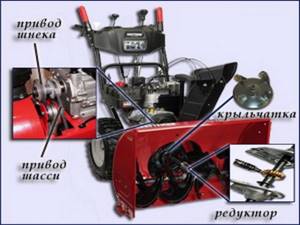
All designs of electric snow blowers are equipped with:
- engine;
- auger;
- outlet chute;
- protective bucket;
- support wheels;
- handle and switch.
The work of snow blowers is based on capturing the snow mass and throwing it to the side. Depending on the gripping method, screws can be divided into:
The helical rotor is vaguely similar in appearance to the auger of a home meat grinder. The cutting edge of the auger can be absolutely smooth, without grooves or notches (these are used in models for removing loose, recently fallen snow) or with sharp teeth reminiscent of circular saw discs. Snow blowers equipped with such a rotor are able to easily bite into compacted snow layers covered with an icy crust.
Based on the material used, rotors are divided into:
- metal;
- plastic-rubber;
- rubber.
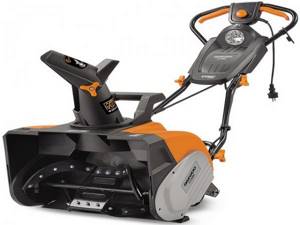
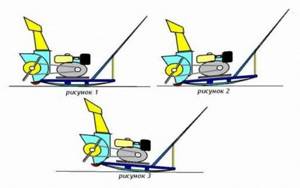
model Daewoo Dast 3000E
A stone or branch stuck between the blades can jam the rotating mechanisms and damage the engine. To reduce the likelihood of expensive snow blower components burning out, the augers are secured with shear (safety) bolts, which break first when the machine is stopped unexpectedly by foreign objects. The impeller in two-stage systems is also attached using a similar method. It is quite possible to replace a broken bolt with your own hands without involving service center technicians.
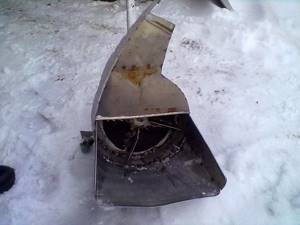
Through the outlet chute, snow is thrown to the side. The materials used to make it are metal or plastic. In the instructions, the manufacturer usually indicates the maximum possible tilt length. Under normal conditions, this distance may differ slightly, it all depends on the height of the snow cover, its consistency and density, as well as on the strength of the wind. Thus, a layer height of about 5 cm may not be enough to throw back a significant distance, and too strong a headwind can throw the flying snow mass back. The upper part of the chute is equipped with a visor with which the height of the snow ejection is adjusted. The switch handle makes it possible to adjust the direction of the ejection. It is very convenient when, regardless of which direction the device moves, all the snow is collected from one side of the area being cleared. In household electric snow blowers, such settings are made manually.
Important. Plastic samples are less susceptible to corrosion during operation, however, the lighter the machine, the higher its level of vibration.
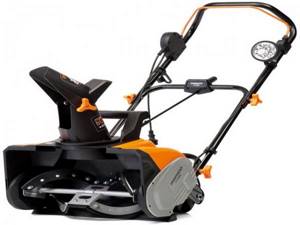
Daewoo Dast 2600E
The protective bucket covers the rotating mechanisms located at the front of the machine. Its dimensions determine the size of the snow mass capture. It is not difficult to guess that the larger the bucket, the more powerful the engine must be installed on the snow blower, and at the same time the thickness of its walls must increase. Thin, fragile bucket structures are subject not only to partial deformation during work, but also to breakdowns. The movement of the snowplow is facilitated by equipping it with a metal trimming knife located in the lower part of the bucket. Some machines are equipped with skis on which the bucket rests. The adjustment mechanism allows you to independently set the distance from the ground surface to the cutting edge of the auger. This design is convenient when cleaning the base from compacted screenings; the machine will not grab individual fragments and scatter them to the sides. This will save not only the paths, but also nearby objects: the force of the ejection is sufficient for a falling stone to break glass or injure a person. The knife and skis quickly fail; to increase their service life, they are made double-sided. When abrasion occurs on one side, it is quite easy to turn them over to the other and screw them on with your own hands.
Design options for homemade snow blowers
The main task of a snow blower is to capture and throw away snow masses from the place where they accumulate, for example, from the sidewalk. Snow blowers made by folk craftsmen have different designs. But according to the type of snow capture, models differ into auger and rotary.
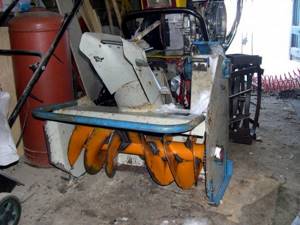
Auger unit
The main part of the snow removal unit is an auger, reminiscent of a screw from a meat grinder.
There are two types of screw units.
- Single stage. They are equipped with one screw in the form of spirally arranged knives. The spiral knives consist of two parts and converge in the center where the tossing vanes are located. When the mechanism moves with a bucket, a layer of snow is cut, which immediately falls under the rotating knives. The latter crush the snow and move it to the central part of the body. Since the blades are located in the center of the auger, they capture crushed snow and throw it into a nozzle installed at the rear of the bucket. The higher the rotation speed of the shaft with blades, the further the snow is thrown. Auger knives can be either with a smooth edge or with a serrated one. Smooth edged knives are used for clearing freshly fallen snow and are often made from conveyor belt. A toothed auger is used if it is necessary to remove icy and compacted snow.
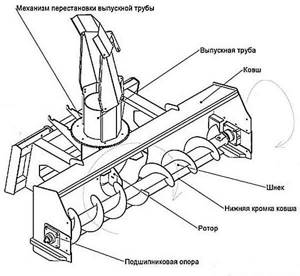
- Two-stage. This is a modernization of an auger-type snow blower. Its design also includes a screw. But for better snow ejection, a rotor with 2 or more blades is installed at the rear of the bucket. A rotary auger snow blower works on the same principle as a single-stage unit, but thanks to the rotor blades, the snow is better crushed and thrown over a long distance (up to 15 meters). The following figure shows the structure of a two-stage type snow blower.
Rotary unit
A rotary snow blower has the simplest design and consists of a round “snail” body and guide blades . In the upper part of the body there is a sleeve through which snow is thrown out.
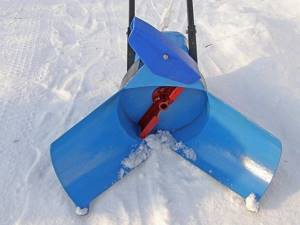
A rotor with blades is installed in the central part of the cochlea. This impeller is driven by a motor (gasoline or electric). The rotor, rotating at high speeds, captures snow, crushes it in the snail body and throws it out through the sleeve.
Snow throwers made by craftsmen for the home can be of two types.
- With stationary drive. The motor is installed in the unit, after which it becomes a full-fledged snow blower.
- As a supplement for other units (mini-tractor or walk-behind tractor). Therefore, a motor is not installed on these mechanisms. The transmission of rotational motion from the engine to the rotor occurs through a chain or belt drive.
Choosing a snow blower design
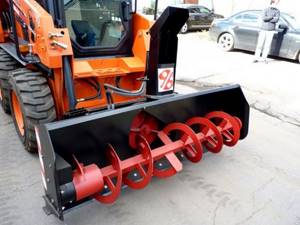
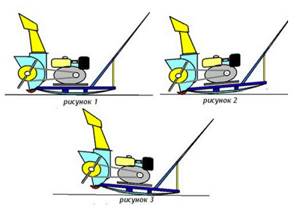
1.Screw-rotor type.
Most small snow blowers have an auger-rotor arrangement, in which a rotating auger feeds snow to a rotor with blades (impeller), which throws it away from the cleaning site.
According to this scheme, both independent machines with gasoline engines and electric motors, as well as attachments for many walk-behind tractors and mini tractors, have been created. It has shown its efficiency and fairly high productivity, but its greatest drawback, in our opinion, is not so much the abundance of parts as the need to ensure rotational motion on two mutually perpendicular shafts, and even with different but consistent frequencies of their rotation. This is precisely what determines the rarity of implementing such a scheme with your own hands: the selection of two gearboxes, one of which must transmit rotation at an angle of 90°.
The auger speed should be in the range of 500 – 800 rpm, and the impeller speed should be 1000 – 1500 rpm, so that it has time to throw out the snow fed by the auger. And the diameter and dimensions of its blades must be consistent with the diameter and width of the auger. This calculation is quite complicated, therefore, if you decide to use just such a scheme for your snow blower, then it is better to take as a basis the parameters of one of the industrially produced devices, where everything has already been calculated and copy it.
This snow blower is quite heavy, so, as a rule, it is combined with a self-propelled device. This means that the need for one more thing is added to the previous approvals - the speed of movement of the power plant.

Among the biggest problems with snow blowers of this configuration, according to user reviews, is the impossibility of rationally choosing the speed of movement with the operation of the snow thrower itself. And the point here is not so much in the installation itself, but in the heterogeneity of operating conditions:
- fresh or compacted snow;
- its point seals from the wheels of cars and people walking on it;
- different snow humidity;
- the presence of lumps and ice inclusions;
- foreign objects in the snow cover - from bottles and cans to frozen animal feces.
The latter cause the greatest damage to rotary auger snow blowers. After all, the efficiency of their work directly depends on minimizing the gap between the box and the auger, and solid inclusions falling into this gap with enviable consistency cause damage to such snow blowers, sometimes difficult to repair.
2. Auger snow blower
A screw snow blower is much easier to manufacture, in which the blades located in the center of the shaft act as an impeller. But the augers themselves can be structurally different, as well as the blades themselves. Sometimes they are made spring-loaded to minimize the consequences of solid foreign objects getting into the device.
To enlarge the picture, click on it.
In this case, the snow is forcefully directed straight into the ejection mouth. True, the design of the latter changes somewhat. It has a larger diameter and is open on one side, which means that the cloud of snow dust in such units is larger than in the previous ones.
There are known designs where the blades are on one side of the auger.
The justification of such a scheme raises some doubts about the directional stability of the snow blower.
If the tendency to pull it to the side during work is not great or is compensated by the weight of the walk-behind tractor or an autonomous engine, then you can do this.
3. Design of a rotary snow blower.
The easiest to make yourself, but no less effective, is a rotary snow blower.
The shape of the housing and the diameter of its impeller can be different. When manufacturing it, the main thing is good balancing of the rotor.
And the connection of such a snow blower to the power unit is the simplest - direct. If the parameters of the engine allow its use without reducing the speed, then it is enough to simply connect the shafts. The only thing we would recommend is to do this through a rubber coupling or using crushable pins, so that if the rotor jams due to a hard object getting into it, the engine will not be damaged. And so that you have no doubt about the performance of such a device, watch the video:
Selecting the engine type
Before you make a manual snow blower, you need to understand which type of engine is better to choose - electric or gasoline.
Electric motor
Electric units are characterized by silent operation and are very easy to maintain. They also do not require any consumables. The only inconvenience of electrical devices is the electrical cable that constantly interferes with movement. Of course, you can use a battery-powered engine, but the operating time of such a cleaner will be limited by the battery charge level. Therefore, if you are going to make an electric snow blower, know that it can only work within the yard, that is, the range of movement of the unit will be limited by the length of the power cable.
Gasoline internal combustion engine
Gasoline snow blowers are powerful and quite noisy units. They cope with thick snow covers, including icy ones. Gasoline devices have an advantage over electric ones, not only in power, but also in mobility, since they do not depend on the electrical network. Thanks to this, the units can be used to clear snow drifts over large areas, for example, near private courtyards, in the courtyards of high-rise buildings, on sidewalks, on certain sections of the road, etc. But despite the listed advantages of gasoline devices, they also have disadvantages:
- engine maintenance required;
- Regular refueling is required;
- presence of exhaust gases;
- high noise level when the engine is running.
Based on the above, you can understand that if you need to clear the yard of a summer house or small private property from drifts, then it is better to focus on making an electric snow blower. If you plan to regularly clear large areas of snow, then a gasoline drive will cope with this task better than an electric one.
Engine options from other units
To make a snow blower with your own hands, you will need to select a motor that will rotate either the auger or the rotor of the unit. If you are going to make a device with an electric motor, then any asynchronous electric motor with a power of at least 2 kW and a rotation speed of 1500 to 3000 rpm will be suitable as a drive component. If you take an engine with less power, it will not cope with thick layers of snow and will stop all the time. In this case, clearing drifts with a shovel will be much more effective.
As a drive component, some craftsmen use motors from electric trimmers and chain saws. It is not uncommon to see homemade snow blowers made from a lawnmower. But the power of these units is only enough to clear freshly fallen and loose snow.
A more powerful version of the driving part of the drive for a snowthrower is an internal combustion engine (ICE). It can be taken from a chainsaw or gasoline trimmer. Also, a snow removal unit can be made from a motor-cultivator or walk-behind tractor.
DIY homemade snow blowers for home
You can save significant money by making your own snow blower. In this case, the drawings can be found on various specialized sites or you can choose one of those offered by us. Assembling a useful unit is not so difficult if you understand the principle of operation of the equipment and its structure.
If you need to clear snow from a small area, you can make a rotary or auger model. Before you start working, you should decide on the type of engine. The motor can be selected from a chainsaw or trimmer.
You can make quite complex models with your own hands
How to make your own auger for a snow blower
An important component of a snow blower is the auger. These are cutting blade rings attached to the drive shaft. A pipe 80 cm long is suitable as a shaft. You need to cut a hole in the center where a shovel will be placed to supply snow. The snow is thrown back thanks to the rotation of this pipe.
In this case, you will need to make your own friction ring for the snow blower. In this case, it is worth using ready-made drawings according to which you can cut out the rings. The blades are made of sheet steel. In this case, 4 disks are cut out, which are pulled out in the form of turns. Then the finished spirals are welded to the spiral. Metal spacers are fixed along the edges of the pipe. Below are detailed stages of the work.
Screw-rotary cleaner
DIY snow blower using a chainsaw
It is worth noting the advantages of the chainsaw design:
- low cost of elements;
- remarkable equipment performance;
- making main components from improvised materials.
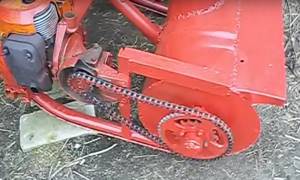
A chainsaw motor is used as a driving element. The engine is disconnected from the frame. In addition to the engine, you will need an auger body, a shaft and a screw surface of the auger. The body is made of sheet metal. For the shaft, you can take a pipe with a diameter of 20 mm. The screw surface is made of sheet iron.
You can start making the body from the sides. In this case, two circles are cut out of metal. A sheet of metal bent into a semicircle is welded to the side parts. Holes are made in the side parts where the screw mechanism is inserted. The frame is made by welding profile pipes to the frame. In this case, the power unit must move along the frame and also be fixed in the desired position. A handle with the throttle control removed is fixed to the frame part. Taking into account the type of terrain, runners or wheels are attached to the frame.
Homemade chainsaw design
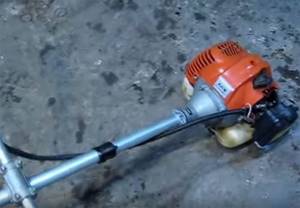
How to make an electric snow blower from a trimmer with your own hands: video with explanations
You can also make a unit from a trimmer, but not any electric scythe will do. Do not use a trimmer with a curved shaft. Devices with a straight rod are more powerful.
Model from trimmer
To make a unit from a trimmer, you will need a special tool - an angle grinder, a drill and a welding machine.
Here is the sequence of work:
- the body is made from a metal barrel, which is cut off at a distance of 15 cm from the bottom. A hole is made in the center where the protruding gearbox will be placed;
- a hole is made on the sides;
- the hole for snow exit should be located in the center of the structure;
- To make a rotor you will need 4 blades. In this case, 4 plates are cut from a piece of metal, which should be cut into the shape of a blade. They need to be welded to the trimmer disc;
- snow removal can be made from different parts of the barrel. To do this you need to cut a rectangular strip. The blank should be bent and the side parts welded;
- a blade is made from sheet material;
- a snow drain is made in the place where there is a hole for throwing out snow. The blade is attached at the bottom. The gearbox is bolted, and the rotor is mounted like a trimmer blade.
Option from a lawn mower
Electric models
When starting to work independently, you need to study the following recommendations:
- to prevent foreign objects from getting into the auger, you need to use bolts and safety bushings;
- when arranging a single-stage design, the gutter must be placed on the side and top of the body.
You can see how to make such a design in the video below:
Also, the main stages of assembling a snow removal device are clearly presented in the table below:
| Illustration | Description of work |
| To make a device for removing snow, such a trimmer will be useful. |
| A disk is made and the blades are welded to it. The blades are placed at a certain angle. |
| The body is made from sheet material. |
| There is a hole in the middle for fixing the trimmer gearbox. |
| At the top there is a device for throwing out snow. It can be adjusted. |
| The trimmer's protection should be removed. To do this, remove the security screw. Then the gearbox and protection are removed. After this, the gearbox can be secured back. |
| The handle and lower part should be rotated 180 degrees. |
| The snow blower housing is installed on the gearbox. |
| A disk with blades is mounted on top of the gearbox. |
| The pinned element looks like this. |
| The completed design is in progress. |


Manufacturing a rotary snow blower
To make your own rotary snow blower, you will need the following elements:
- fuel tank;
- throttle control cable;
- motor with muffler.
To complete the work you will need a lathe. It is necessary to fit all the parts. It is worth considering the main stages of constructing a snow blower:
- installation of a screw device;
- rotor assembly;
- housing installation;
- arrangement of the frame.
Homemade rotor design
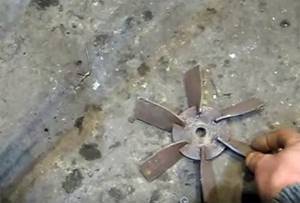
First, the units are made separately and then assembled into a whole unit. The rotors are made of sheet metal. On the sheets you need to draw circles using a compass. To make the blades, you need to take a part from an electric motor as a basis. The blades are welded to a steel disk. To assemble the frame, you need to weld pieces of metal corner. All frame elements are fixed using bolted connections.
DIY snow blower for walk-behind tractor
The use of walk-behind tractors for equipping a snowplow is also popular. Installing a homemade snow blower to a walk-behind tractor involves attaching the engine to a quick-release platform.
Model from a walk-behind tractor
In the table below you can clearly see how to install a snow blower for a walk-behind tractor:
| Illustration | Description of work |
| Snowblower made from the Pegasus walk-behind tractor. |
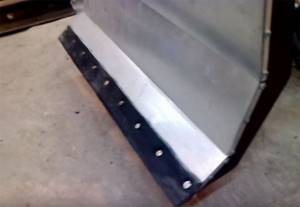
| The shovel is made of a tubular frame. For the frame, a round pipe from the water supply system with a diameter of 16 mm is taken. The frame is made from a square pipe 30x16 mm. |
| The sides are cut from sheet metal, the thickness of which is 2.5 mm. All elements are covered with galvanized steel, the thickness of which is 2.5 mm. The galvanized sheet is fixed with self-tapping screws. |
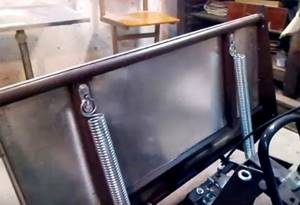
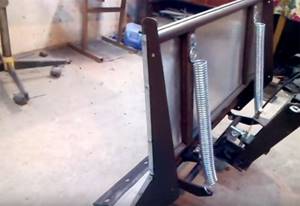
| A rubber band is attached to the bottom of the shovel, which is secured with special bolts. Shock-absorbing springs are installed. |
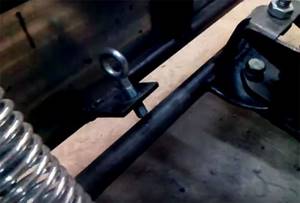
| An adjusting bolt is mounted, which can be fixed in the required position. |
| The shovel is mounted on a mounting frame, which is made of metal 5 mm thick. |
| To adjust the rotation, a special fixing element is used. |
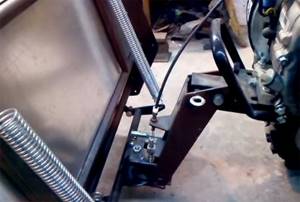
| The rotating device is made of a lever and two rods. One rod is for the control handle, and the other is for the rotating frame. |
| The rod is attached to the equipment handle and the lock control handle. |
| A weighting material is fixed in the rear part of the walk-behind tractor. In this case, transformer iron is used. The element is secured with two spacer bolts. |
| A magnet is attached to the surface of the walk-behind tractor. You can attach bolts and cotter pins to it. This allows you to keep them at hand. |

If you follow the instructions exactly, clearing snow using a homemade walk-behind tractor will be a pleasure.
Making your own screw
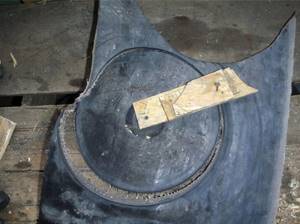
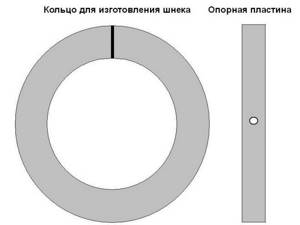
The auger for a snow blower is the main moving part of the unit, the manufacture of which does not cause difficulties. It is best to use a rubber belt from a conveyor with a thickness of 10 mm and a length of 1.5 m to make the auger . It is necessary to cut 4 rings from the rubber strip with a diameter of 28 cm. The parts are easily cut out using an electric jigsaw.
Below are drawings of all screw parts.
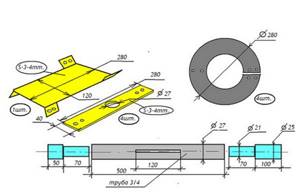
A metal pipe with a diameter of 27 mm is used as a shaft. Adapters are attached to its ends, onto which bearings are installed. A 120 mm long cut is made in the central part of the pipe, into which a central plate will be installed, designed to throw away snow. Also, 4 plates are put on and welded onto the pipe. Rubber rings will be attached to them and to the central plate. How this is done can be clearly seen in the next photo.
Screw option
A device with a blade has drawbacks, and the main one is the waste of time and effort to remove the layer of snow picked up by the blade. Often it is left right next to the road, creating high snowdrifts, which is not always acceptable.
The version of the snow blower with an auger will allow you to get rid of even roadside sediment, because its design provides for the throwing of the captured mass over a distance of several meters. This will help clear the yard or street completely, leaving the piles next to the fence.
This option is welded or screwed from the front to a frame with wheels, which can be removed from an old wheelbarrow, for example.
Another design is a wheelless version, controlled by a tube. The body is mounted on a frame made of angles, from the bottom of which skis are screwed.
Main components and materials of both options:
- box - welded from sheets of metal;
- central shaft - is a ¾-2 inch pipe;
- gripper (scapula) - iron plates or pieces of channel;
- supporting elements;
- auger - made of rings or tape;
- motorcycle sprocket;
- ski made of plates or pipes;
- frame made of corners;
- bearings;
- a pipe for throwing out snow - you can take it from the stove.
Screw assembly sequence:
- 4 rings and 6 support plates are cut from roofing sheets or other metal.
- Six strips are placed on the shaft and welded to it at an angle of 90°. Then the sprocket is strengthened and the bearings are pressed in.
- Two blades made of plates are inserted between the middle guides. They are welded to the shaft and to the supporting elements. If pieces of channel bars are used as gripper blades, they are rotated 180° relative to each other.
- The rings are cut, bent and welded so that two intersecting spirals are obtained.
You can straighten them in two ways:
- Clamp the middle part in a vice, grab one edge with pliers and pull it to the side. Do the same with the other end.
- Weld one edge to the support element at the blade and stretch it.
Read also: Drilling machine safety precautions
If the rings are made of thick material and it is difficult to grasp them with pliers, then you can use two clamping devices, such as a vice.
After making the auger, a sheet of metal is laid out and the box is welded. A hole is cut out in its middle part for a pipe to throw out snow. You can make it yourself or use one already prepared from an iron stove. Some craftsmen use plastic ones.
Then a rectangular hole is cut in the body opposite the sprocket to allow the chain to pass through. The box is installed on a frame with runners or wheels and the chainsaw is strengthened.
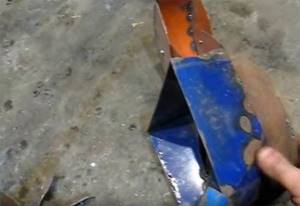
Making a bucket for an auger
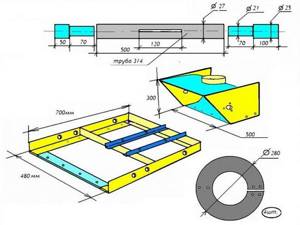
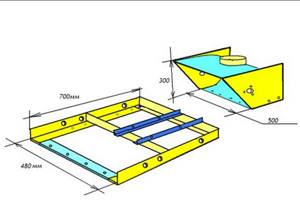
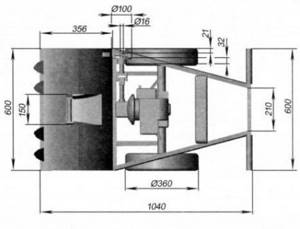
Making your own bucket, which will serve as a housing for installing the auger, is also easy. Roofing iron is usually used for this purpose. The drawing below shows the dimensions of the bucket.
For the sides of the bucket, you can use plywood or a piece of OSB board 10 mm thick. The latter option is more suitable for this purpose, since it is more moisture resistant than plywood. Bearings are installed on the sides of the housing (205s, closed), and the auger shaft is inserted into them. The bearings must be covered with cups.
Important! When assembling the snow removal unit, it is necessary to make a small gap, about 2 mm, between the bucket and the auger so that the latter does not touch the body.
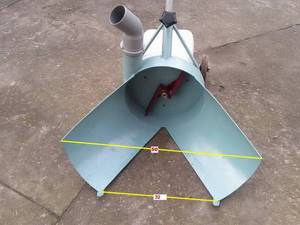
To remove snow from the bucket, a hole is cut in its upper part. A plastic sewer pipe with a diameter of 150 mm or another can be used as a drainage chute. The main thing is that the diameter of the chute exceeds the width of the auger tilting blade.
To direct the snow thrown out by the shovel to the side, you can put a plastic outlet on the pipe.
The bucket with the auger is installed on a frame pre-made from metal corners (50 x 50 mm) (see drawing above). To fix the engine on it, 25 x 25 mm corners are used.
But this unit can be improved a little more. A modification to the snow blower involves adding small wheels to the back of the sled. In this case, it will be more convenient to pull the snow blower back and transport it.
Construction of Electrical Assembly
The electric design of the snow collector is most suitable for summer cottages where snow needs to be removed rarely and in small quantities. Most often, instead of a screw, such machines are equipped with one rotor running on a fan. After capturing the snow with special blades, the fan blades begin to mix the snow with air, and then, under pressure, throw it in a certain direction using a hose. A rotary snow blower can only cope with loose and newly fallen snow.
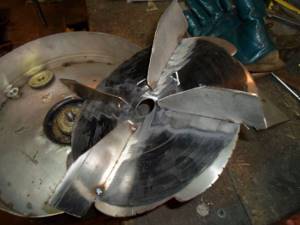
This rotor design is simple, so anyone can make it following the main drawings. Creating a device:
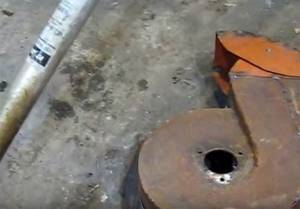
- A special metal disk is used for the impeller; steel strips are welded onto it onto the blades. Their number can vary from 2 to 5 pieces. The shaft is turned on a lathe from a steel rod. Along with the hubs, several bearings are placed on it.
- For the snail body, a part of a metal barrel with a height of 150 mm is cut off. On the side you need to cut a small hole where the pipe for mounting the sleeve will be placed. A hole is drilled in the center of the bottom, and a special rotor shaft is inserted into it so that it moves inside the cochlea. A special impeller is put on it. The bearing hubs are attached to the bottom with bolts from the outer surface of the volute. On the back side of the structure body, two rectangular sheets are welded. The guide vanes will efficiently capture excess snow, the fan will suck in, grind and throw it to the sides, thereby cleaning the area.
- The finished device with a rotor is placed on a frame, combined with a belt drive by an electric motor, and special wheels from a wheelbarrow are used as the running gear.
Assembling an auger snow blower
Snow blowers that use an auger are the most powerful and can handle even icy snow. In addition, the auger is most often used in self-propelled snow removal machines.
Based on a chainsaw
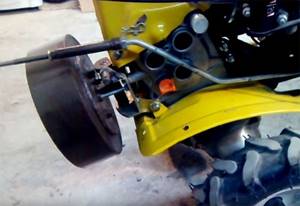
Making this snowblower with your own hands is quite simple. Since it will be powered by a chainsaw engine, several additional parts will be required for the chain drive. For these purposes, you can use the front and rear sprockets from a motorcycle, as well as a chain from it.
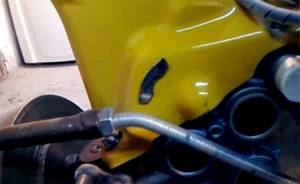
How the frame and auger are made was described above. A long handle is attached to the frame. A large sprocket from a motorcycle is installed on the auger shaft on the right side, and a small one is installed on the chainsaw engine shaft. Next, the chainsaw is installed on the frame, after which the chain is put on the sprockets and tensioned. To control the engine, the throttle cable is routed to a handle attached to the frame.
Below are drawings of a homemade chassis, where a chainsaw is used as the main part of the drive.
Trimmer based
To make an auger snow blower from an electric trimmer or from a lawn mower, you will need to install a gearbox: it will serve to transmit rotational motion from the trimmer shaft to the auger shaft.
But there is one nuance here. The gearbox for this type of unit is quite expensive, and it is not practical to buy it to make an attachment for a trimmer. Therefore, based on the latter, rotary-type snow blowers are manufactured, which will be discussed below.
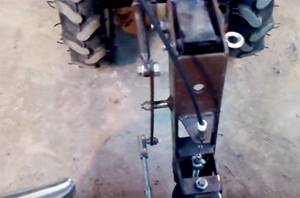
Based on a motor cultivator (motor block)
The simplest addition to a walk-behind tractor is a snow blade.
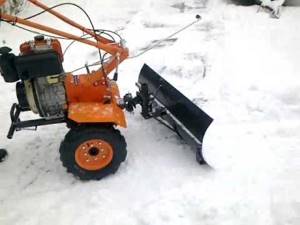
A homemade snow removal attachment (shovel) on a walk-behind tractor is screwed to the frame of the unit, after which it turns into a small bulldozer.
Below is a diagram that clearly shows the design of a snow blower based on a cultivator.

The scheme is deciphered as follows.
- A snow blower drive that connects the engine to the auger.
- Caterpillar drive.
- Drive belt.
- Roller (parasitic) to provide reverse gear.
- Intermediate shaft.
- Belt tension roller. Thanks to it, the unit moves forward.
A self-propelled snow blower greatly facilitates snow removal, especially in large areas where using the machine on skis, pushed by the operator, requires a lot of physical effort from the operator.
Device creation
If you have a walk-behind tractor at home, then it is best to create a snow blower as an attachment. Such a device without a motor is much easier to assemble than a machine on which you will have to create a special stationary drive.
The principle of assembling the screw consists of the following steps:
- The shaft is created from a special pipe, welds on the ends of the journal for bearings, and two rectangular steel plates are placed in the center. These will be the blades of the device.
- Four discs with a total diameter of 280 mm are cut from thicker rubber or steel with a thickness of about two millimeters.
- You can make a hole in the center of each workpiece that will correspond to the thickness of the shaft, after which you need to saw one side of the resulting ring.
- You need to bend a special part from the cut disk and attach it to the shaft. On the left side, several disks are placed with turns directed towards the blades. The same must be done on the other side of the shaft.
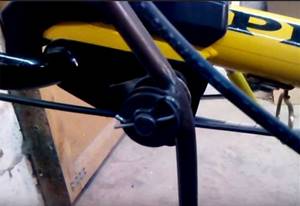
You need to attach a bearing number 203 or another suitable size to the axles. To ensure high-quality fastening of the auger, a special hub made from separate parts of the pipe is mounted under the bearing. The blanks are bolted to the side shelves of the snow clearer structure.
Read also: Whisk for mixing plaster
The snow receiver bucket is made of sheet steel. To do this, take a strip with a total width of 500 mm and bend it with an arc to a diameter of 300 mm. The sides can be trimmed with metal or plywood. In the center of the upper part of the snow receiver you need to cut a special hole 160 mm), to which a sleeve is attached to throw the snow in the other direction. The finished product is installed on the frame. It is created from the corners of metal.
Now you just need to create a special drive for the snow receiver. That is, you need to make the auger rotate. There are several methods for creating a special drive:
- Some snow blowers can be equipped with a special gearbox. It is installed in place of the blades, and the auger shaft itself is created from two halves.
- The belt drive occurs through two pulleys. One is located on the PTO of the motor, and the second is mounted on the auger shaft.
- The chain drive has the same design as the belt drive, only in place of the pulleys are sprockets from a bicycle or moped.
- If the machine for clearing snow from the site is assembled as a walk-behind tractor or attachment, you need to create a special combined drive. In this case, the shaft will be combined with the intermediate gearbox via a belt drive, and the torque of the gearbox shaft will be transmitted to the auger via a chain drive.
Of all the possible methods, belt transmission is considered the easiest, which is why home craftsmen most often create it for their designs.
When designing a machine with a chainsaw motor, it is very important This model will use a sprocket as well as a chain.