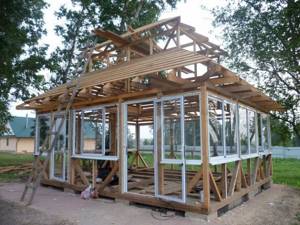
- Wooden gazebo: step by step we build a lightweight structure with our own hands
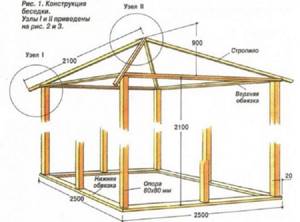
- Drawings and dimensions of a wooden gazebo
- Do-it-yourself gazebo made of wood: we build a simple structure step by step
- Basic tools and materials for building a gazebo
- Construction of a wooden gazebo foundation
- Construction of a floor for a wooden gazebo
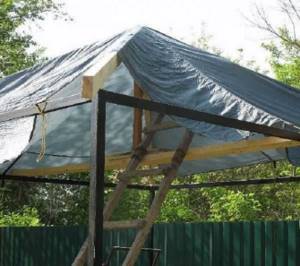
- Installation of a wooden gazebo roof
- Laying bitumen shingles
- Features of the hexagonal gazebo design
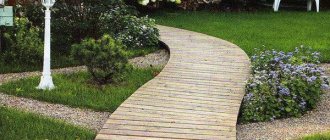
- Arranging wooden gazebo fencing with your own hands. Photos of finished structures
- Decorative design of a wooden gazebo
- Video: simple wooden gazebo with your own hands
Wooden gazebo: step by step we build a lightweight structure with our own hands
Many residents of country and holiday villages dream of decorating their garden with an elegant gazebo. They review the pages of virtual magazines in search of an interesting solution. And there it is, this is a simple wooden gazebo. By following the construction technology step by step and adhering to the recommendations of experienced professionals, you can build a unique pavilion with your own hands, which will become a favorite vacation spot for the whole family and your guests. Self-construction will not only save your budget, but will also allow you to get a lot of pleasure from the process.
Gazebos for summer cottages: photo design ideas (read more)
Building a wooden gazebo with your own hands is quite simple.
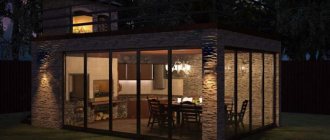
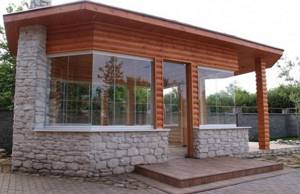
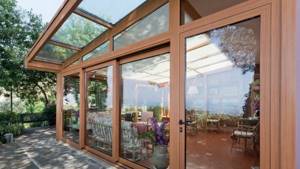
Gazebo made of wood and glass. Covered glass gazebo
Now you know how to build a gazebo using wood. But to protect from winds and rain, it is recommended to glaze the structure. There is nothing complicated about this, so almost every person can cope with this task.
If you want to make a glass roof, then the place for the gazebo should be shaded to avoid sunlight, otherwise, on hot days, it will be impossible to stay indoors.
The gazebo can be glazed with a warm or cold option.
- Warm glazing. If you are going to use the structure not only in summer, but also in winter, then you need to reduce heat losses. In this case, experts recommend using an aluminum profile.
- Cold glazing. This option is suitable if you are going to spend time in the gazebo only during the warm season.
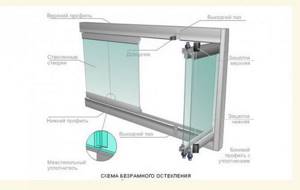
To glaze the structure, you can use various systems.
Aluminum
This method has many advantages:
- Can be used for glazing structures of complex shapes.
- The profile allows you to create a convenient opening system.
- Large selection of double-glazed windows.
- Reliability.
- Possibility of installing large windows.
- Retains heat well.
Solid or frameless glazing
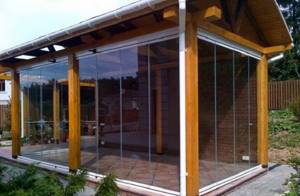
In this case, the walls of the wooden gazebo will be completely transparent. The advantages of this option:
- Attractive and lightweight design.
- Wide panorama.
- Combines with any style.
- Possibility of ventilation at any time.
Glazing can be ordered from specialists, but if you have experience working with glass, then it is better to do all the work yourself.
Video with examples of wooden gazebos:
Thus, if you have the necessary tools and materials, you can independently build a beautiful and reliable structure where you can meet friends or relax alone.
Author of the publication
offline 4 years
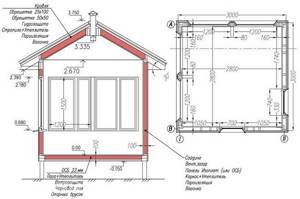
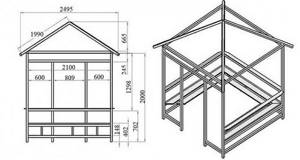
Drawings and dimensions of a wooden gazebo
The designs of gazebos are very diverse and interesting. Some buildings have non-standard shapes; they can be open or closed, equipped with barbecues and barbecues. But if you decide to build for the first time, it is better to choose an open structure of a simple shape, for example, square or hexagonal. The drawings and sketches in the project of such a gazebo will not be complicated and are quite amenable to independent development.
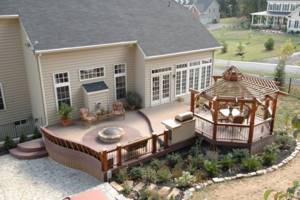
Original arrangement of the terrace with a wooden gazebo and grill.
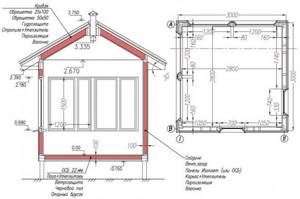
First of all, you must decide on the design of the structure and choose a place for future construction. Project development includes two stages: creating a sketch and design drawings in profile and frontal projections. The drawings of the gazebo show the dimensions, the height of the posts, the shape of the roof, the location of the entrance, and the height of the fence. If a stationary installation of a table and benches is planned, their location must be shown in the plan.

Scheme of arrangement of a simple gazebo with a gable roof.
Separately, a working diagram of the foundation and a drawing of the roof are made, indicating its shape, height, and angle of inclination. The project contains diagrams of technical components (roof, rafters, steps), construction technology, specifications for materials of the foundation, walls, partitions, floor, roof. The consumption of a special composition for effective processing of wood from the influence of external factors is also taken into account.
If it is planned to equip the structure with lighting, the installation location of the lamps and the electrical wiring diagram are recorded on the drawing. This also applies to the possible supply of water to the pavilion.
Drawing for the arrangement of a closed gazebo with a foundation.
A well-designed project is the key to successful construction. Accurate calculations of the number of required bars, boards, fasteners, roofing, hardware and other necessary elements will make it possible to purchase a complete set of materials for construction and avoid unreasonable costs.
On a note! You should purchase materials with a small margin, taking into account that some parts may be mistakenly damaged during the installation process or defective elements may be found in the purchased materials.
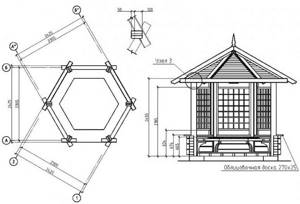
Drawing of a hexagonal gazebo with dimensions.
If you doubt your engineering abilities, and developing a project seems difficult for you, you can use ready-made drawings of wooden gazebos with your own hands. Photos and sketches of such buildings are available in large quantities on the Internet.
Gazebo only made of wood (wooden) - instructions and drawings
Wood structures can be very different. If you decide to build a structure for the first time, it is better to choose the simplest shape - square. The drawings of such a gazebo are quite simple, so everyone can figure them out.
d39d5aad1bc98a520d7f8cea1d21f929.jpe
First you need to choose a suitable place, and also decide on the appearance. After this, create drawings of the structure or use ready-made solutions. The diagram must indicate all dimensions, shape of the structure, entry location and other parameters. If you plan to build benches and a table into the structure, then they also need to be indicated in the sketch.
You also need to prepare a separate drawing of the roof and foundation, with its specifications. In addition, you need to take into account the consumption of wood processing products. The diagram must indicate the water supply, as well as electrical wiring and installation locations for lighting fixtures, if any are expected.
If you doubt that you can prepare a sketch yourself, you can use the services of professionals.
It is recommended to buy consumables with a reserve, since during the work process, some of them may be damaged, and it is also possible that some parts will be defective.

You need to understand that building a structure is a labor-intensive process, so you need to stock up on time and patience. It is recommended to strictly adhere to the prepared project. Provided that all stages of construction are carried out consistently, you can make a gazebo with your own hands in a couple of days. To do this, you need to purchase all materials in advance and prepare the necessary tools.
Foundation
After you decide on the location of the future structure, you need to clear it of debris and, if necessary, level it.
At the next stage, it is necessary to make markings by driving wedges into the corners, between which the lace is pulled.
If you want to build a small gazebo, then a columnar or strip foundation is best, since the square structure will have little weight.
To prepare the base, it is necessary to dig a pit, the depth of which does not exceed 80 cm. Then fill it with a 5-centimeter layer, followed by a 10-centimeter layer of cement mortar.
When the mixture hardens, you need to install vertical posts, which are temporarily fixed with special jibs. First, you need to place small metal pipes of the same size in the pit, pour concrete into them, and then secure the anchors. After about two days, the racks are attached.
Floor construction
At the next stage, using a 50X150 timber, make the strapping below the posts. Then the logs are laid out in increments of 45 cm, which are attached with horizontal strapping to the beam with special corners.
To attach the top trim, you need to install intermediate posts, which are fixed to the joists using ordinary nails
It is important to note that the racks must be strictly vertical. They are also needed so that the structure can support the weight of the roof.
As a floor covering, it is recommended to use edged boards, which must be pre-treated with special means to increase its service life. The material is attached on both sides. It is better to use self-tapping screws, as nails can split the board.
8823b8df303d15754908cd9db469959b.jpe
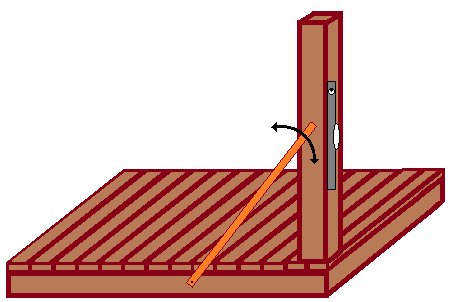
The next step is to make the top trim. To do this, you need to prepare a beam with a cross-section of 10X10 cm. The image below clearly shows an example of how this should be done.

Roof
Since the structure has a square shape, it is recommended to make a hipped roof. For manufacturing, you need to prepare inclined rafters from beams and secure them with nails. One edge of the strut needs to be secured to the rafter legs, and the other to the horizontal strapping.
The roof is covered with edged boards and fastened with self-tapping screws. Some experts recommend using plywood. Flexible tiles can be used as a covering.
At the final stage, all wooden elements must be coated with a double layer of varnish. This completes the construction of the square gazebo. If necessary, you can arrange furniture inside the room for a more comfortable stay.
You can also watch a video on this topic:
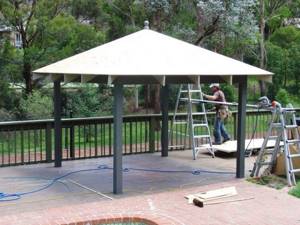
Do-it-yourself gazebo made of wood: we build a simple structure step by step
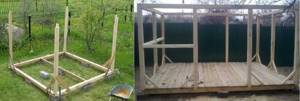
Construction of a gazebo is a painstaking process that requires attention, adherence to installation rules and strict adherence to the project. If all the work is carried out in a certain sequence, the process will go smoothly and the structure will be ready in just two to three days. It is recommended to check in advance the availability of all tools and purchase all the required materials according to the calculations, so that due to the lack of any part the matter does not stall.
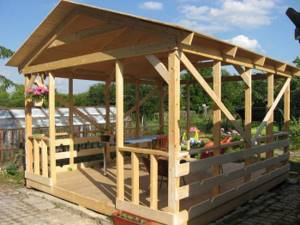
A simple wooden gazebo in the courtyard of a private house.
Basic tools and materials for building a gazebo
Wood processing requires special equipment and tools. Check your availability and serviceability. To work you will need:
- shovel or drill - for constructing a pit or pits for the foundation;
- building level, tape measure, square;
- rule;
- chisel, hammer, wrenches, roofing knife;
- hacksaw, jigsaw or circular saw;
- drill or screwdriver;
- Bulgarian;
- construction hair dryer;
- electric plane;
- construction cord - for marking;
- sandpaper, paint brushes, spatula;
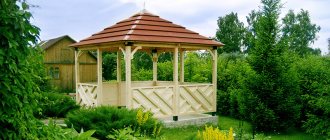
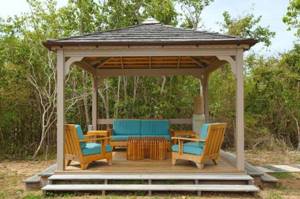
An original round gazebo with cozy sofas.
The amount of materials required for the construction of a gazebo is taken based on the specification:
- sand, crushed stone, cement - depending on the type of foundation: columnar or strip;
- board for formwork - if a strip base is intended;
- timber with different sections - 50x150 mm is used for the bottom trim, the center beam of the frame and the floor joists; 100x100 mm - for vertical posts, top trim; 50x100 mm - used for corner, auxiliary and short rafters, as well as for fence railings; 50x50 mm - for fencing balusters;
- board for flooring;
- roofing - plywood panels 12 mm thick;
- roofing felt - for insulation work;
- flexible (bitumen) tiles, bitumen glue;
- fasteners - screws, corner brackets, metal corners, self-tapping screws, roofing nails;
- primer, wood putty;
- paint, varnish.
Gazebo with columns and rich carved ornaments.
DIY gazebo made of wood and polycarbonate
Once the location for the future structure has been selected and a reliable foundation has been prepared, you need to begin installing the frame. It is recommended to use timber with a cross section of 60X60 mm as racks, which are fastened with wire and then with corners on self-tapping screws.
At the next stage, proceed to the lower, upper and middle trim. Horizontal bars are fixed with metal corners. On the side where the door will be installed, the middle trim is not needed.
If the structure is small, then you can make a pitched roof. The height of the highest point should not exceed 40 cm. This will be enough to ensure that water rolls off the roof and does not accumulate a lot of snow during the winter. The tilt should be directed in the opposite direction from the doorway.
For rafters, you can use beams with a cross section of 60x40 mm. First of all, the side rafter legs are attached, in the center there is a beam, and then the inclined beams. As a result, you should get five bars.
Now comes the most important process of constructing a gazebo - attaching polycarbonate. To do this, you need to drill holes in the sheets at a distance of 30 cm for self-tapping screws, which must be carefully screwed in.
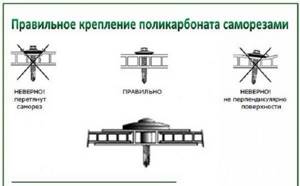
If you need to cut sheets, it is better to use a hacksaw with fine teeth. You need to install a special profile on the sides.
For such a roof you will only need a few sheets, so you will not spend much time. Only the work must be done very carefully.
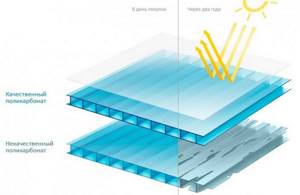
If necessary, carbonate sheets can be fixed to the walls of the gazebo if it is intended to be closed. There shouldn’t be any difficulties with the covering, the main thing is to buy high-quality polycarbonate.
Construction of a wooden gazebo foundation
As an example, a small square-shaped wooden gazebo with a hipped roof will be used.
Having chosen a suitable place for the gazebo, they begin to prepare the site. It is necessary to remove all debris, remove any bushes and tree roots there. If there are bumps or depressions, they are leveled.
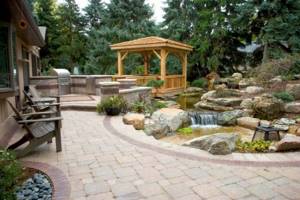
On a note! If possible, do not install the gazebo close to the roadway or a neighbor’s fence; try to place the gazebo in a place where it offers a beautiful view of the garden, alpine hill or pond.
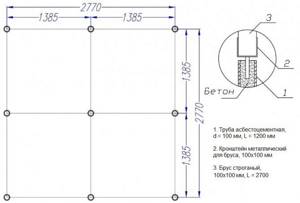
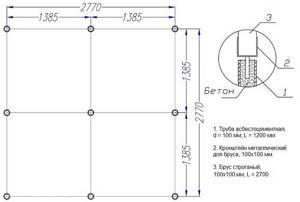
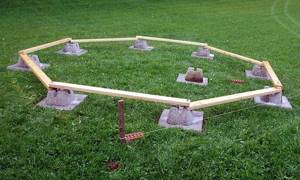
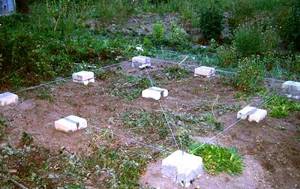
Scheme for arranging a columnar foundation for a wooden gazebo measuring 2.77x2.77 m.
Next, markings are made for the future structure. To do this, drive in the first wedge and mark the entire perimeter of the structure from it, fixing the corners with wedges. A construction cord is pulled between them. At this stage, it is very important to maintain the correct angle, as this will subsequently affect the strength of the entire structure. To make sure of this, you need to check the diagonals of the resulting square. If they are the same, then the markings are correct and the angle of 90 degrees is maintained.
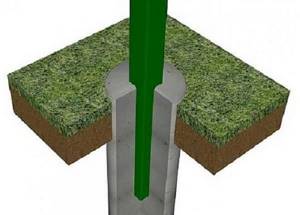
Mostly for small wooden structures, strip or column foundations are used. Since the construction of a wooden square gazebo is quite easy, a columnar foundation is chosen as its base. To do this, make holes up to 80 cm deep, lay a layer of sand (5-6 cm) on their bottom and fill it with a layer of concrete approximately 8-10 cm deep.
When the concrete mixture hardens a little, the posts are lowered into it. They must be installed vertically. After the vertical alignment of the supports has been made with a level, their position is fixed with temporary jibs.

An example of constructing a gazebo foundation using a metal profile.
You can secure the support bars using adjustable anchors. To do this, pieces of metal pipes of suitable size are placed in the pits, a solution is poured into the cavity of the pipe, and after the solution has slightly set, fasteners (anchors) are installed. When the concrete has completely set (at least 48 hours), the vertical posts can be secured. After installing all the supports, you need to make sure that their position is correct: the distance between adjacent supports must be strictly the same along the entire height of the supports (bottom, middle and top).
The right foundation for a wooden gazebo
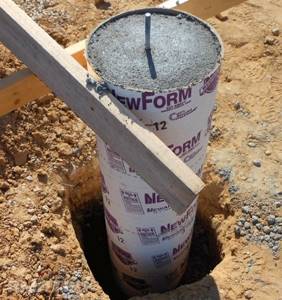
A wooden gazebo is considered quite light, and a regular columnar foundation can be made for it. But not in our case. We will go the other way and make a monolithic foundation, which will act as the main floor in the gazebo. Basically, a monolithic foundation is intended for the construction of heavy and massive buildings. But, do not forget that the monolithic foundation can be different. The construction of a simple gazebo made of boards does not require a deep foundation. For a wooden gazebo, you need to make a foundation with a thickness of 5 to 10 cm. This will be quite enough to support the weight of the gazebo.
STEP 1: site preparation. To make a monolithic foundation flush with the ground, you need to make a recess (3 - 5 cm, depending on the thickness of the future foundation) over the entire area of the space being poured. A bayonet shovel is exactly what will be useful to you in this matter. The dimensions of the gazebo made from boards can be completely different. It depends on your desire to build and the final result. Our gazebo is designed for 10 people, but if you really want it, you can squeeze 20 people in there.
STEP 2: waterproofing the foundation. Before you start pouring a monolithic foundation for a gazebo made of boards, you need to make waterproofing. Waterproofing is made from polyvinyl chloride film or roofing felt. This is done so that the solution does not soak into the ground. If this is not done, the solution may be absorbed into the ground, and the strength of the monolithic foundation will be significantly reduced.
STEP 3: pouring the solution. We begin to pour the solution into the prepared pit. In this case, you should not pour the solution in layers. If you fill it in layers, then you definitely need to do reinforcement. And you can do without it. The poured monolithic solution will adhere firmly to the ground.
Note : To make a reliable monolithic foundation for a summerhouse gazebo from boards, you need to use cement grade 100 and higher. To reduce cement consumption and give greater strength to the mortar, you can add rubble stones.
STEP 4: plan the surface . After the solution has been poured into place, we begin to plan the surface strictly according to the level. We arm ourselves with an ordinary trowel, or whatever is convenient for you. It is necessary to ensure that the poured solution is level with the ground. In this situation, the monolithic foundation will serve as the floor of the gazebo. Yes, we decided that a concrete floor is the best thing you can come up with for building a budget gazebo with your own hands. It is possible to sheathe the whole thing with boards, but we will not do this, since savings are paramount.
It will take a lot of time for the foundation to fully set and become strong, and to continue building the skeleton of our gazebo from boards. Over the course of 3 days, the solution will harden by 50%. You may think that this is enough, but it is not. If you start drilling/boring the formwork, it will begin to crack and crumble. For this monolithic foundation to completely solidify, it takes 5 to 7 days, after which further construction of the gazebo can begin.
Construction of a floor for a wooden gazebo
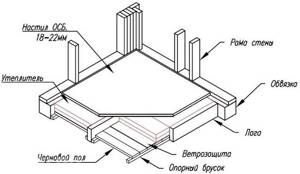
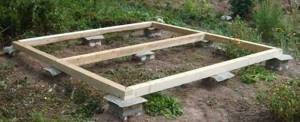
The next step after installing the supports is the bottom trim of the vertical posts. To do this, use a beam with a cross section of 50x150 mm. The floor frame is made by installing logs, which are placed at a distance of no more than 45 cm from each other. This will allow the frame structure to support the weight of the wooden platform. The logs are attached to the horizontal strapping bars using corner fasteners, having previously drilled mounting holes for self-tapping screws.
Scheme of arranging the floor of a closed gazebo with insulation.
Next, proceed to the installation of intermediate racks. They will subsequently take on the weight of the wooden roof structure and will be used to secure the upper horizontal frame. The posts are attached to the joists with nails. The same rule applies here as for corner supports - all racks must be installed strictly vertically.
As soon as the floor frame is assembled and intermediate supports are installed, proceed to the installation of plank flooring. For the floor, a board suitable for outdoor use is used, which can withstand the effects of natural factors well. Then you won’t have to discover after a short period of time that the boards have rotted in some places.
The floor of the gazebo is made of wood treated with moisture-repellent compounds.
Nails or self-tapping screws are used to attach the board to the sheathing. Fix the board using two nails or self-tapping screws at each end.
On a note! If nails are used to fasten the boards, it is necessary to make holes for them in advance. This will help prevent the wood from cracking.
After laying the plank floor, proceed to the upper horizontal connection of the gazebo supports using 100x100 mm timber. Do-it-yourself tying of wooden gazebo posts (photo examples provide visual information) is carried out by sawing locks from the ends of the timber, which are connected to each other and secured with two nails.

Gazebo with stone base and metal railings.
Classic wooden gazebo
If you wish, you can arrange a more substantial stationary gazebo of the desired size and shape. The principle of constructing a structure remains virtually unchanged from changes in its dimensions and configuration. Follow the guidelines below and make changes as needed as you see fit.
Classic wooden gazebo
Foundation
Start by laying out the foundation. The finished structure will have a fairly large mass, so approach the event of arranging the foundation with all responsibility.
You cannot lay wood directly on the ground - this will cause it to rot very quickly. The optimal base option for a wooden gazebo is a columnar foundation.
Foundation for a gazebo
Foundation for a gazebo
We advise you to study: Timber or log: what is better to build from?
First step. Remove debris and any objects that interfere with construction from the construction site, and then get rid of the top fertile layer of soil.
Second step. Mark the area in accordance with the selected size and shape of the gazebo.
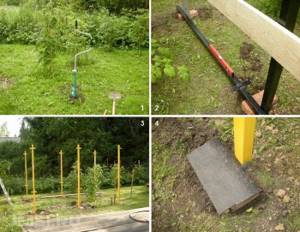
Third step. Start preparing the holes for installing the posts. Select the depth of the holes taking into account the depth of soil freezing and, in general, the characteristics of the soil on the site. In the case of sandy and loose soils, the pillars need to be dug in at a depth of 40-50 cm, but if the soil is forest, dig in the supports at least 70-80 cm.
Columnar foundation
This example examines the arrangement of a foundation using asbestos-cement pipes.
Fourth step. Install the pillars in the designated places. Fill the space in the holes around the pillars with a cement-sand mixture to about a third of the height of the hole. Fill the remaining space with concrete. Also fill the pipes themselves with concrete mixture.
Columnar foundation
Place the posts strictly according to level. The base must be perfectly level. Otherwise, the gazebo will very quickly warp.
Finally, waterproof the foundation. To do this, it is enough to use a sheet of roofing felt.

Construction of a wooden gazebo. Bottom rail and racks
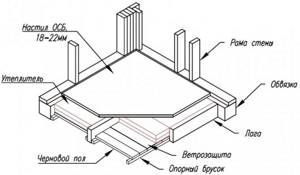
Floor
Start arranging the floor of the gazebo. The optimal option for installing the floor is a scheme in which the walls of the gazebo rest against its foundation, and because of this the floor seems to hang on vertical support pillars. If necessary, such a floor can be disassembled much faster and easier without damaging the main walls.
Assemble the base of the floor from long beams 10x10 cm. Carefully treat the structure with an antiseptic. Nail high-quality wooden boards with a thickness of 4 cm or more to the logs made from long beams. The boards must also be pre-treated with antiseptic impregnation. At this point the floor is ready.
Frame posts
Construction of a wooden gazebo. Bottom rail and racks
You can equip the racks both at the stage of building the foundation and after. The simplest option for installing racks is to install them in driven-in metal supports. It is recommended to fill the holes for the support posts with concrete during installation. Thanks to this, the risk of pillars deflecting will be minimized.
The most convenient option for performing this work involves the simultaneous installation of three racks and their connection with a long, flat board. In this case, all supports will be placed in a single plane.
Installation of pillars
If you wish, you can cover the walls of the gazebo with the selected material. In this case, you will have to additionally nail horizontal jumpers to the vertical supports.
In general, when arranging the frame of the gazebo, focus on the specifics of your situation. If you plan to use the gazebo in cold weather, the walls must be made and, of course, insulated.
Roof
In conclusion, all that remains is to equip a reliable roofing structure. Multi-pitched systems look very beautiful, but a simple shed roof is also quite suitable for a gazebo.
The assembly procedure is standard: you attach the Mauerlat to the drains of the frame, fix the rafters to it, stuff the sheathing on top of the rafters, and attach the selected roofing material to it. Before finishing, the roof should be waterproofed (plastic film will do) and, if necessary, insulated.
Wooden floor in the gazebo
Wooden floor in the gazebo
You can cover the inside of the gazebo ceiling with clapboard or other material of your choice. The finish looks very beautiful and goes well with the design of the wooden gazebo.
Video - Gazebo roof
https://youtube.com/watch?v=5qLbYAArQ9o
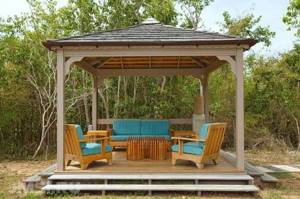
At this point the gazebo is ready. Place a table, chairs and other planned accessories in it. You can even install a grill or a full-fledged barbecue oven. In terms of internal arrangement, focus solely on your needs and preferences.
Good luck!
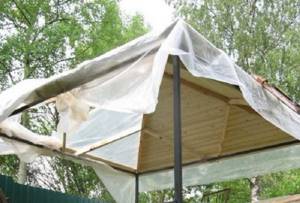
Installation of a wooden gazebo roof
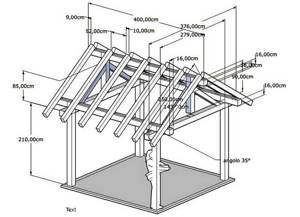
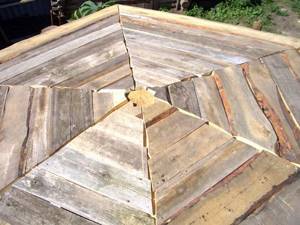
For a square gazebo, the most attractive would be a roof consisting of four slopes. The construction of a roof begins with the construction of a frame. Inclined rafter legs are cut out of timber and fixed in pairs with nails at an angle. Auxiliary struts are symmetrically attached to each of the main inclined legs. They are fixed with one edge to the framing beam, and the other to the main rafters.
On a note! To work on the roof installation, invite an assistant, since it is impossible to cope with the installation alone.
To arrange the roof of the gazebo, you can use sheets of moisture-resistant plywood.
Next, they begin to cover the roof. For this you can use either a board or a plywood sheet. The plywood panels are fastened along the surface of the rafters in increments of 20-25 cm, using self-tapping screws. The surface of the plywood sheets is covered with roofing insulating material - roofing felt, and then with soft (bitumen) tiles.
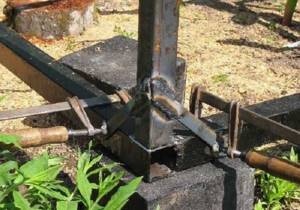
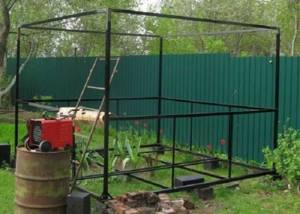
From metal and wood: how to make a gazebo with your own hands?
If you decide to build a metal structure, then it is better to use a profile pipe, the wall thickness of which should be at least 2 mm. This is because round pipes are more difficult to weld.
If you intend to use a roof made of lightweight material: flexible tiles, corrugated sheets or slate, then a profile with a cross-section of 50x50 cm is suitable for the racks. And in the case of tiles, it is recommended to use a pipe with a cross-section of 75x75 cm. As jumpers, you can use a metal profile, the cross-section of which is not exceeds 50X50 cm.
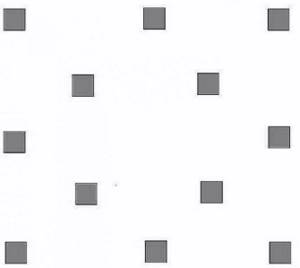
The selected area must be cleared of debris and grass so that it does not rot under the floor. Then dig a hole and cover it with a layer of sand. Pipes can be installed directly into the ground.
Using a drill, make shallow holes, about 90 cm. Pipes are inserted into them and filled with crushed stone or construction waste, after which everything is carefully compacted. The stand must be filled with cement mortar.
Vertical posts must be checked using a plumb line.
If you need to raise the structure a little, it is recommended to use foundation blocks. Then place them over the entire area, as shown in the image below.
At the next stage, the lower piping is done; for this, pipes with a cross-section of 50X50 mm are laid on concrete blocks. The coals are welded by a machine. A profile with a cross section of 40x20 mm is suitable for the lintels; boards will be laid on them.

The profile must be coated with a primer, especially at the joints. The height of the racks should be slightly more than two meters. To strengthen them, the jibs should be welded.
The middle harness should be at a height of about one meter. For this, a pipe with a cross section of 40x20 mm is used. To add rigidity, it is recommended to fix the vertical posts, as shown in the image below
If bitumen shingles are used as a roof, then the roof rafters should be made of wooden blocks with a cross-section of 75X40 mm. The sheathing can be made from wooden lining. At the top, the rafters are fastened with self-tapping screws.
Secure the board in the middle and nail a beam to it, on which the rafter system will rest.
The image below shows how to secure wooden jibs made of timber with a cross-section of 75X40 mm.
After this, you need to lay out the bitumen shingles.
A board with a section of 70X40 mm is used for the floor, and a board with a section of 70X20 mm is used for the walls.
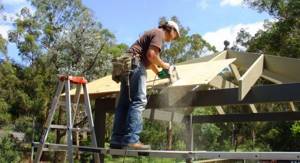
In this way, you can build a structure using two types of materials in a few days. To install the structure, you need to have experience working with a welding machine, and at other stages, difficulties should not arise.
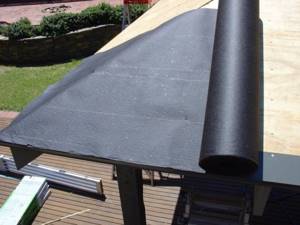
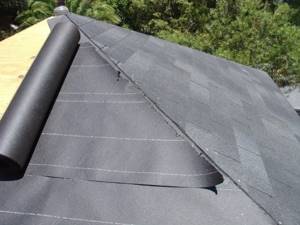
Laying bitumen shingles
Flexible tiles are lightweight and quite easy to install. Fix the flexible roofing to the decking with nails with a wide head. Eaves tiles are installed to the roof overhangs on all sides. For ease of installation and good flexibility of the material, a construction hair dryer is used. Next, the laying of ordinary flexible tiles begins. When fixing the first row, it is necessary to choose such a length of nails that they can pass through the eaves and row tiles and reach the wooden base of the gazebo roof.
Waterproofing the gazebo roof with rolled materials.
Before using the tiles, remove the protective film from them. The sheets are laid overlapping. When laying each row of material, the sheets are positioned so that the cutouts of the previous row are covered by the protrusions of the next one. When fixing flexible tiles, it is necessary to ensure that the nails reach the roof sheathing in places where there is a double layer of material. Otherwise, the nails will subsequently be forced out and cause the tiles to peel off.
When the material reaches the break of the slope, the excess edges of the tiles are cut off flush with the line of the slope. In these places, the material is additionally coated with bitumen glue.
Next, they begin laying the ridge tiles. To do this, a sheet of tile is cut into three parts and each resulting plate is laid with the adhesive side across the ridge with an overlap of 5 cm. Fix each plate with nails in four places. All kinks in the slopes are processed in this way.
Flexible tiles are an excellent option for arranging the roof of a gazebo.
A roof made of bitumen shingles for a wooden gazebo with your own hands (the photo illustrates this) looks quite attractive due to the variety of shapes and colors. One of the advantages of such roofing is that it is silent in rain and hail.
On a note! When purchasing flexible tiles, make sure that all packages correspond to the same batch. Material from different batches may vary in color.
Work on covering the roof with tiles is carried out very carefully, trying not to damage the material with nails.
An open wooden gazebo with a bitumen roof.
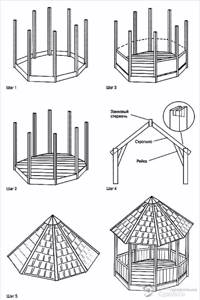
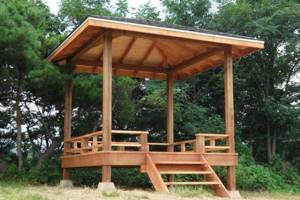
Features of the hexagonal gazebo design
All stages of self-construction of a hexagonal gazebo are similar in installation to a square structure. The foundation, floor and pillars of the gazebo are made according to the available drawings. As for the roof of six slopes, it is recommended to install it on the ground and the finished structure is lifted and attached to the frame of the gazebo.
Due to the absence of a central supporting element in the structure, it is very difficult to connect all the rafters together. Therefore, it is recommended to give the timber a hexagonal shape, each side of which should correspond in size to the thickness of the rafters. The ends of the rafter boards are cut at an angle and alternately fixed with nails to a cut beam with a hexagonal cross-section. The other end of the rafters is inserted into the grooves, which are pre-cut in the strapping beam.
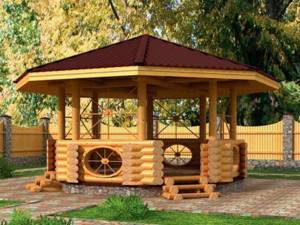
Hexagonal closed gazebo made of logs.
Then the roof frame is sheathed with boards or plywood, and the finished structure is lifted and mounted to the support posts of the gazebo.
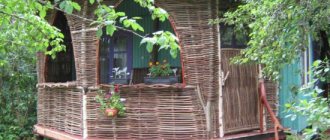
Arranging wooden gazebo fencing with your own hands. Photos of finished structures
The appearance of the gazebo largely depends on the type of fencing. It can be made solid or lattice. Depending on your preferences, the fence can consist of railings and balusters, two or three horizontal wooden elements located along each side of the gazebo, as well as diamond-shaped elements installed between the vertical supports of the structure. Some people prefer to build a fence from a carriage plank or a block house. It all depends on your creativity and availability of free time.
A gazebo with a low wooden fence.
The height of the fences is traditionally 75-85 cm, but this value can be changed according to your wishes. The horizontal parts of the fence are fixed using screws or corners. Moreover, the screws should enter the tree at an angle. It is not recommended to use nails driven into the ends of balusters through the railing to fasten horizontal beams. This can lead to cracking of the timber. To attach balusters to railings, it is recommended to use dowels.
Balusters can be installed vertically, at an angle, or in the shape of a diamond. To fix inclined balusters in horizontal bars, grooves are arranged at the top and bottom at a certain angle. The ends of the balusters are also cut out at the appropriate angle, which are then inserted into the grooves.
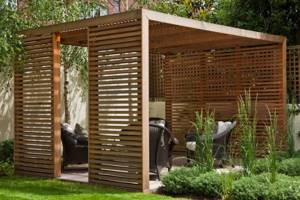
Partially enclosed gazebo with walls made of wooden slats.
In addition, to give the gazebo an openwork look, place a horizontal decorative border on top. The height of the curb is one third of the height of the fence itself. The border pattern usually follows the configuration of the lower fence, but you can make them different. The main thing is that they do not contradict the general style of the wooden gazebo.
How to choose a gazebo style?
Depending on the style of landscape design and the residential building on the site, you can choose the appropriate gazebo option:
- Classic style: symmetry, proportionality, 4- or 6-gonal shape, regular geometric lines. The roof is predominantly 2-, 4- or 6-slope with a tile covering. The domed shape looks harmonious.
- Oriental style: the central accent of the design is a domed or unusually shaped roof. The second characteristic feature is unusual ornamental compositions as decoration. Interior decoration should match the exterior design. Options for oriental buildings are a pagoda gazebo or a structure in the Japanese minimalist style.
- Victorian aesthetics: an English-style gazebo combines features of classic and country forms. Timber is the most popular material for Victorian buildings and is usually painted white. Semi-closed or open light structures are typical; the perimeter is decorated with climbing plants. Features: symmetry, regular and clear forms, lattice walls, light colors.
- Rustic style allows the use of rough, untreated wood - this is the very beauty and uniqueness of the gazebo. Such an unusual, “uncouth” design creates a feeling of comfort and homely warmth. The shape and design depend entirely on your desire. Stylizations like a chalet, a forester's house or a bird's nest will look harmonious on the territory of a personal plot.
- Country gazebos combine the features of rustic and classic. Made only from wood! It is recommended to use carved ornaments as decoration. Design options: stylization of a log house, a fairy-tale hut on chicken legs and others - you can fully show your creativity. The structure can be closed or open.
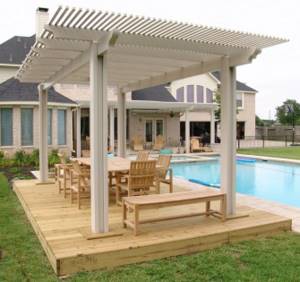
- Mediterranean design of a gazebo and a pergola are almost identical concepts. A light, open pergola, entwined with exquisite plants, is typical for areas with a subtropical, Mediterranean climate. To create the structure, wood is used in combination with stone and brick. The floors are laid with ceramic tiles or finished with solid boards.
Do-it-yourself summerhouses are represented by two of their distant relatives:
- Belvedere is a lightweight, open structure designed for installation on a hill. Provides excellent all-round visibility in a picturesque area.
- A pergola or “canopy” is a light, open gazebo used in the warm season. The structures are openwork, arched, and are used as a support for climbing plants. The most popular material for constructing a pergola is natural wood: oak, spruce, pine.
We advise you to study - Thread curtains in the interior
Decorative design of a wooden gazebo
As soon as all the work is completed, we begin processing the wooden surfaces. If there are small cracks in some of the wooden elements, they need to be filled with wood putty. After the putty has dried, begin sanding all the elements. For these purposes, sanding paper with a medium-grain coating is used. Next, all wooden surfaces are treated with varnish in two layers, with the second layer applied after the previous one has completely dried.
Near the pool there is a gazebo mounted on a small wooden platform.
On a note! Varnishing is carried out by uniform movements of the brush, first along the fibers and then across. The varnish layer should be distributed thinly and uniformly over the surface, without the formation of drips.
The service life of a wooden gazebo largely depends on how well the wood is processed.
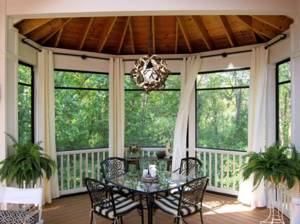
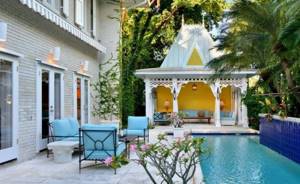
Inside the glass gazebo there are forged chairs and a table.
The internal filling of the gazebo can be very diverse. This can be a wooden table and benches, made independently and permanently fixed in the structure. Many people prefer to install comfortable portable furniture in the gazebo in the form of sun loungers or rattan chairs. You can supply electricity to the gazebo and install beautiful lanterns around the perimeter. Some people supply water to the gazebo structure. Beautiful climbing plants are often planted along the fence of the gazebo.
A symbol of calm and tranquility in your garden is a do-it-yourself wooden gazebo. By following all the recommendations step by step, assembling the structure yourself is not at all difficult. And handmade products are always distinguished by their special comfort and warmth.