Why is this needed?
Paths perform an important function in improving the surrounding area. They play a particularly important role when organizing a garden. And if you decide to make a thoughtful landscape design, then the paths will harmoniously fit into it. So, gravel design will give your site elegance and well-groomed. Plus, well-groomed and neat paths are evidence of the neatness and cleanliness of the owners.
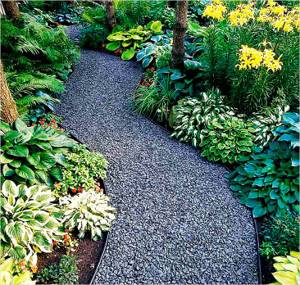
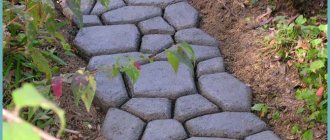
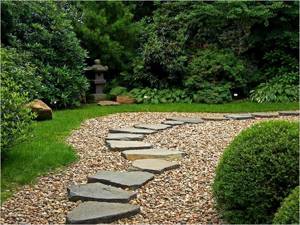
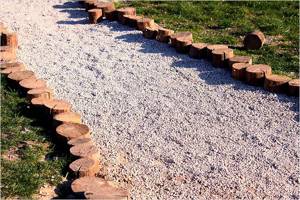
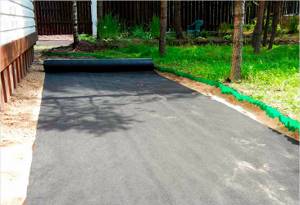
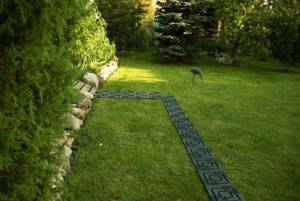
Winding path in the garden limited by plastic guides
But there is another important function of the tracks - practicality. Their presence creates a certain ensemble, connecting various architectural elements and individual areas of landscape design. They can delimit flower beds and other flower arrangements and help focus attention on individual elements of the garden.
A decorative path around a flower bed accents attention and serves as a beautiful decoration for landscape design.
Well, the main purpose of the paths is comfortable movement. You can move freely on them even in rainy weather. Dirt from the street will not be brought into the house, and accordingly, your shoes will remain clean.
Classification

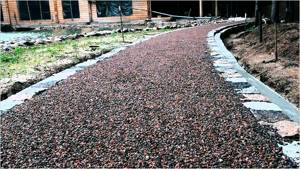
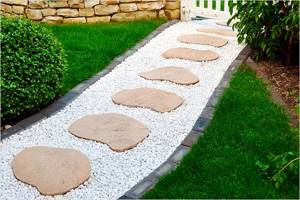
The main path made of crushed stone is wide; by moving it to the side, the space visually expands
All paths in the garden have their own classification, the following types are known:
- The main ones are those that take on the main load in terms of the number of movements per day. This could be a path connecting the house with a gate, summer kitchen, etc.
- Secondary and connecting - those that, like a circulatory system consisting of vessels, branch off from the main one. Some of them permeate the garden area, heading towards a less significant object. As a rule, their configuration is simple.
So, regardless of the classification of the paths, they should create a convenient pedestrian area in the country.
Optimal width
The path is wide enough for movement
The width of the path depends entirely on its purpose. For example, the main ones will have a large width, for example those that connect the house with a gate, a seating area, etc. The width should be such that 2 people can easily move around on it, so here the optimal size is considered to be from 0.9 to 1.5 m.
If the path leads to outbuildings, then its width cannot be less than the width of a garden wheelbarrow. The ideal parameter is 60–90 cm. It is better that the width is greater than the width of the garden cart.
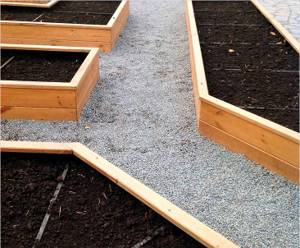
If you have a greenhouse, then the width of the path can be up to 50 cm. This size will also be enough to easily drive up with a cart. If you are planning to make a path between the beds, then the optimal width is 30–50 cm. Such passages will not take up much space and at the same time will contribute to high-quality plant care.
Basic principles of pedestrian zone design
The location of the paths between the beds. This makes caring for plants easier
If the surrounding area is still at the design stage, then the formation of paths is carried out last. First you need to plan where there will be outbuildings, a recreation area, a garden, greenhouses, etc. The decision about where and how to lay them will come on its own.
When forming a path, it is important to understand that its embankment types to some extent imitate streams. Therefore, it can have many turns that look as natural as possible. Look at ready-made options for garden paths made of crushed stone in this article. You can take original ideas as a basis and use your imagination to make it even better. You may want to combine the main material with others, such as wood, large stones and more. But here it is important to take into account one point: the choice of additional material should not create inconvenience when walking.
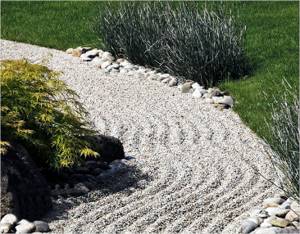
Decorative path made of natural stone and gravel, a great combination
It is also important to decide on the scale. Making garden paths shouldn't take much time. Therefore, their number cannot be large, otherwise the entire area will be filled with paths. This, among other things, is bad from an aesthetic point of view.
How to visually expand, narrow and reduce an area
An oblong path on the site visually lengthens a small area
When forming a path, it is also important to take into account that they can visually expand, reduce or lengthen the area. So, if it is necessary to visually expand the area, then the passages must be shifted to the side and narrowed. Low bushes are also planted on either side of the curve, which increases the sense of width.
If the area should, on the contrary, be reduced, then the paths should be of medium width with a small number of them. Another technique is used for lengthening. To do this, the width of the path gradually narrows, but not so much that it becomes uncomfortable to walk at the end.
Design Features
Making tracks is a creative process. There are no special rules and regulations regarding their form. These can be symmetrical, asymmetrical, having smooth bends or sharp turns. At the same time, the shape of garden paths should be in harmony with the overall landscape design.

The path between the flower beds sets accents in the landscape design
Relief when constructing paths
The location and direction of garden passages is formed based on the prevailing topography. If the garden plot is flat, then the paths can be located as desired. If the relief is “saucer-shaped,” then the location may resemble the shape of the sun. For example, in the lowest place there is a pond and paths will go up from it. If there are differences in the area, the paths should go in a zigzag, connecting all sections of the territory with smooth lines. In some places it may be necessary to build small steps.
Installation of garden paths made of gravel - step-by-step diagram
Step 1: Marking
This stage is no different from the installation of paving slabs or cement-plastic blocks. Using pegs (hammered into the ground) and string (stretched between the pegs), we mark the boundaries of our future path made of gravel, crushed stone, with the addition of pebbles, slate, etc. For the first time, it is better to limit yourself to straight-line installation - it is simpler and compatible with purchased borders.
Step 2: Digging and processing the trench
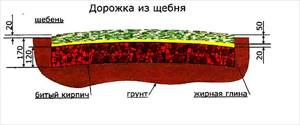
Under the gravel path, a shallow trench is enough - about 20-25 cm. They dig on the sides with a sharp bayonet shovel, and remove the soil in the middle with a sharpened shovel. After completing the excavation work, they move on to preparing the soil.
First you need to select all the sprouts, rhizomes and roots, and uproot all the shoots. Then the entire road bed is covered with anti-vegetative chemicals (their choice in hardware stores is more than wide) and dug up to the depth of a shovel bayonet - that is, 20-25 cm. The dug up soil on top is once again treated with antiseptics and covered with a film to keep children and pets away. Be sure to thoroughly wash your shovels and shoes after this chemical step!
Step 3: Installing curbs
We place curb stones on the sides of the ditch strictly level and plumb. Their top point may coincide with the level of the gravel, but it is better to make it 3-8 cm higher so that the bulk material does not spill over the grass and adjacent areas when walking. Curbs are concreted on both sides with a mixture of cement, fine gravel and sand. The next day you can begin the finishing stage of the “road works”.
Step 4: Tamper and pour
A mixture of gravel and clay (the same one that was removed at stage 2) is poured onto the bottom of the trench.
This mixture must be evenly distributed over the bottom of a flat ditch and compacted thoroughly. The height of the clay-gravel layer is from 10 to 15 cm after compaction. If desired, you can use a mixture of gravel and sand instead; this composition has even better drainage qualities. But the extra purchase of sand increases our repair budget. We pour crushed stone, gravel or pebbles onto the compacted base between the curbs. We level it with a rake. We take the first step along the man-made path under the admiring glances of loved ones and neighbors, smiling at the lenses of movie cameras and cameras. The completion of any renovation always contributes to a surge of positive emotions.
- Author: Manager Andrey
Rate this article:
- 5
- 4
- 3
- 2
- 1
(5 votes, average: 3.6 out of 5)
Share with your friends!
Crushed stone paths: advantages and disadvantages
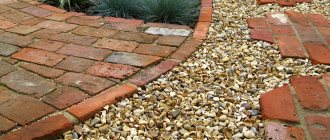
Crushed stone combines well with other materials, in this case with natural stone
Before you decide to make paths from this material, you should weigh the pros and cons. To do this, a table of comparative characteristics will help you:
| Advantages | Flaws |
| Simplicity in arrangement, do not require highly qualified craftsmen. | For some, walking on such a surface is difficult. |
| Possibility to combine with other materials, such as paving stones, wood, large stones, etc. | If you prepare the base incorrectly, although no special action needs to be taken, you will have to constantly fight weeds. |
| Water does not linger, which means that even in rain you can move freely on them. | Some people think that they do not have much charm and look rustic. |
| It will not take much time to make the path, since there is no need for special preparation of the soil and pouring concrete. | If you are used to walking barefoot at your dacha in the warm season, then you won’t be able to walk on crushed stone so easily with bare feet. |
| Low cost. | Gray color can get boring very quickly. |
| Using special dyes will add bright colors to your garden. | If you have children, they may be injured if they fall. |
| Virtually no wear, which means a long service life. | It is problematic to remove snow due to the uneven surface; in addition, there is a risk of cleaning off the snow along with frozen crushed stone. |
| There is no need for special care. | Shifting gravel will cause sinkholes and potholes to form. |
| There is no need to arrange drainage. | They create a lot of dust, especially after a car passes. |
| Crushed stone does not need to be washed or cleaned before laying. | |
| It is easy to repair after a while. If a small hole has formed, then simply filling it up is enough. | |
| Even after a lot of time, you can modify the paths: give them a special shape or change the direction. |
Path care
At the beginning of spring, when the snow has already melted, it is recommended to level the surface of the path. Often there is a need to add fine-grained material. This may be a consequence of load redistribution under snow pressure. However, often the deformation of the coating is the result of destruction of the base. If depressions regularly form on the path, it is recommended to restore its base. To do this, you will have to remove layers of bulk material. Large litter, leaves are removed using a fan rake. If weeds appear, they need to be pulled out regularly before they become established. Otherwise, the base of the track will be severely deformed.
Selecting the type of material
The choice of appropriate crushed stone, which differs in fraction size, also plays an important role. There are also several varieties of it, including:
- slate;
- granite;
- gravel.
The choice depends on the type of soil, the topography of the site and the purpose of the path. Let's compare all these types of crushed stone:
| View | Characteristics |
| Slate crushed stone | There is shale screening, the smallest fraction is 5 mm. It is often used as decoration for sites, etc. The largest fraction reaches 20 mm, it is mainly used for the production of concrete mixtures. It cannot withstand heavy loads as it is prone to splitting. For the construction of paths, it is better to purchase quartzite shale crushed stone. It contains mica, which gives the material sufficient strength. |
| Granite crushed stone | Fractions can be of different sizes, for example, crushed stone 5–20 mm is used for decorative finishing. This type of crushed stone is the most durable. It consists of hard rocks. The material is resistant to low temperatures and high humidity. Ideal for covering paths with frequent traffic. |
| crushed gravel | Due to its irregular shape, such crushed stone has good adhesion and does not require the manufacture of a drainage layer. |
For the construction of paths, the material fraction can be from 5 to 70 mm. If traffic is provided, then the fraction should be larger. If it is intended only for pedestrians, then smaller. If the path will serve only a decorative function, then screening with a fraction of up to 5 mm is used.
Types of stones for paths
A path on a summer cottage can be built from stone of various types and fractions. Depending on the rock and fraction, stones differ from each other in appearance and hardness. Let's consider popular and suitable varieties of breeds that are suitable for our purpose.
Gravel
Gravel paths are pleasant to look at and practical for walking. Gravel is considered one of the best options when building a path. Fractions of gravel vary in size and color, so by combining fractions of different sizes and colors, it is possible to create a decorative work of art that will please the eye and complement the picture of a blooming garden in the warm season.
Gravel is usually divided into several varieties, which have certain characteristics of appearance and structure.
Pebble
Pebbles, or, as people often call them, pebbles, are small round-shaped pebbles. The pebbles acquire their smooth round shape due to many years of exposure to river or sea water on the surface. The surface of the pebble path should be made thin, no more than five centimeters in thickness, since the smooth shape of the stone does not allow the pebbles to fit tightly together and stay in one place, which is why the pebbles spread in different directions and shoes will fall into the surface . Because of this, it becomes difficult to move along the path and transport dacha equipment.
Mountain
Mountain gravel is gravel that has a rough surface due to the influence of natural conditions on it - wind, rain, temperature changes. This type of stone contains a large amount of impurities in the form of clay and dust. Due to its shape and impurities, mountain gravel, unlike pebbles, compacts well. Therefore, the surface assembled from gravel reliably retains its shape. This variety is actively used for the construction of country paths.
See also
How to make wooden paths at your dacha with your own hands
Ozerny
Lake gravel is a type of natural gravel mined from the bottom of lakes. Just like pebbles, due to exposure to water it has a very smooth surface. The surfaces are poorly bonded to each other, and the stones quickly move apart under pressure, so this type of stone is not the most comfortable for walking. However, this is compensated by its appearance, which can decorate any summer garden.
Therefore, this variety is usually used for decorative purposes. A path made of lake, river or sea gravel will pleasantly complement the picture of a blooming garden.
Crushed stone or crushed stone
Crushed stone, or, as it is popularly called, crushed stone, is a loose inorganic stone material of a fine fraction, made up of pieces larger than five millimeters in size. Created by crushing gravel, boulders and various rocks into fragments. Unlike solid gravel, this material fits better and holds its shape more firmly without falling apart under pressure.
Granite crushed stone does not crack under load and can withstand moisture and temperature changes. The material is suitable for building a durable path. The only drawback is that the sharp surfaces of the fraction can cause injury if it falls onto the path. It is also difficult to walk on this material in summer shoes with thin soles, and even more so barefoot - you can easily injure your feet on sharp corners.
Slate
Natural slate has a structure of many layers that are divided into plates. The material comes on sale in the form of tiles of various sizes and thicknesses. These plates are easy to work with by hand. By choosing tiles of suitable thickness, you will create a smooth and even surface that will be comfortable to walk on and will reliably withstand any pressure. However, slate includes highly porous materials that are not strong enough to be used as a walking surface.

Quartzite slate, which contains mica, is suitable as a material for the construction of a walking path. It is much stronger, however, due to the complexity of the processing process, it will cost more.
Granite screening
Granite screening is an artificial material that is obtained by mining natural rocks by crushing. The fractions are smaller than those of crushed stone. To build a path, it is best to use a fraction of less than five millimeters. This material will be convenient for walking along the path in summer shoes.
See also
Step-by-step instructions and rules for installing a toilet with your own hands
The material does not absorb liquids and is resistant to low temperatures in the winter season. Durable and does not deteriorate over the years. Granite screenings are sold in different color variations, depending on the rock deposit. The most affordable color is gray. There is gravel in red, blue, green and other colors, the use of which will help make your path decorative.
Cobblestone
Natural cobblestone combines parameters such as strength, durability and affordable cost. Cobblestones are sold in different shapes and sizes, so you can create the surface design that suits your summer cottage. Paving paths with cobblestones is now popular in landscape design, since the process itself is relatively simple, and the path is durable and aesthetically pleasing. You can also use cobblestones to decorate flower beds and build decorative walls, thereby decorating the area in a single style, where all the elements will combine with each other and create a complete landscape together.
Plastushka
Plastushka is a popular and inexpensive material for building paths in a summer cottage. This is one of the most affordable materials that have become widespread in landscape design. It consists of plates of various shapes, sizes and thicknesses. The material is durable and easy to use.
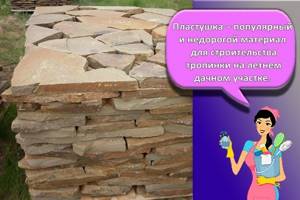
It is a symbol of prosperity and success in life, as well as a symbol of good taste. The stone is sold in several colors: from gray-green to white.
Manufacturing stages
Path made of crushed stone and fenced with wooden posts
All work consists of several sequential processes:
- marking;
- trench preparation;
- installation of curbs, if necessary;
- making a “pillow”;
- backfilling of crushed stone.
Scheme for laying a crushed stone path
Necessary materials and tools for work
To carry out all work you will need to prepare the following:
- Rake.
- Shovel.
- Tamping.
- Clay, sand and coarse crushed stone to create a “pillow”.
- Container for mixing components.
- Geotextiles.
- Small crushed stone for the path.
- Curbs.
- Nylon thread.
- Pegs.
Territory marking
Marking the future path using rope and pegs
First, it might be a good idea to draw a small project on a piece of paper. After this, everything is transferred on an enlarged scale to the site. Pegs and nylon thread are used for marking. The distance between pegs should be no more than 1 meter. This will allow you to more accurately convey the shape of the future track.
As for the pegs, they should be small. They are driven into the ground, and a thread is tied to them. If the path is winding, you can use a rubber hose to mark it. When marking, be sure to take into account the size of the geofabric.
Digging a trench
After marking, you should dig a trench for laying crushed stone. There's no need to dig too deep. Here it is enough to remove the top fertile layer or turf - the depth of the pit will be up to 20 cm. The easiest way to do this is to dig along the contours of the path with a bayonet shovel, and select the middle with a pointed shovel. This method is relevant if the soil on the site is free of solid impurities.
The pit should be cleared of all kinds of debris, roots and weeds. The bottom is carefully compacted and a layer of sand of 5–10 cm is added, which is also tamped.
Features of laying geotextiles
Laying geotextiles under the path, it is important to avoid folds and wrinkles
Lay geotextiles on top of the sand. At the edges it should protrude up to 10 cm above the ground level, after completion of the work it will simply need to be cut off with scissors or a sharp knife. This fabric does not have a front side, so it can be laid on either side.
When installing geofabric, avoid folds and wrinkles. Each subsequent sheet of geofabric must be overlapped by more than 15 cm.
The choice of fabric for the track and its role
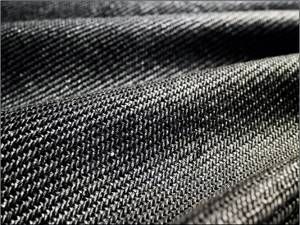
Geotextiles for paths should not be organic based
The main function of geotextiles is drainage, separation of building materials and protection of gravel from mixing with soil, preventing the germination of weed and shrub roots. Given the low loads, for a gravel path it will be enough to use geofabric with a density of 150–200 g/m2. The material used is predominantly polyester or polypropylene.
It is not recommended to use organic based fabric. This material is not durable.
If we talk about the role of geotextiles in the construction of paths, here we can highlight the following:
- the service life of the trail increases;
- eliminates the possibility of weed germination;
- the track surface is protected from the ground;
- geofabric in combination with crushed stone also serves as excellent drainage.
Installation of curbs
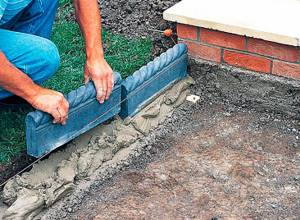
Installing curbs for a walkway on a cement pad
To prevent the gravel from extending beyond the edges of the path, a curb must be installed that will serve as a limiter. Can be used:
- concrete curb;
- brick;
- a natural stone;
- wooden posts or boards;
- plastic, etc.
The curb should rise up to 7 cm above the ground level. If you plan to use brick or stone, it is recommended to prepare a cement-sand cushion. If wooden pegs or boards are chosen, they must be treated with a special antiseptic against rotting.
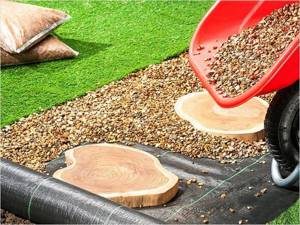
Making a “pillow”

Making a cushion for the path, for this purpose gravel is mixed with clay or sand
Under laying the face layer, you should definitely put a “cushion”, which will consist of clay and coarse crushed stone. After pouring the mixture over the geotextile, it should be watered. After this, compaction is carried out. You can also not mix these materials, first fill the trench with crushed stone, and then with clay, while each layer is filled with water and compacted.
Instead of clay, you can use sand, this will increase the drainage properties of the gravel path. In this case, the work looks like this: geotextiles are laid, then coarse crushed stone, then, again, fabric and finally sand. The simplest option is to fill the trench with crushed stone, compact it and cover it with geotextile so that the coarse fraction does not mix with the fine fraction.
Gravel filling - the final touch
Gravel is poured on top of the geotextile in an even layer
The final stage is backfilling the trench with the prepared “cushion” of gravel. On average, per 1 m2 the consumption will be up to 50 kg, this is provided that the layer thickness is up to 3 cm. Accordingly, as the layer increases, the material consumption also increases. When you have completely filled the crushed stone, it must be leveled with a rake and compacted.
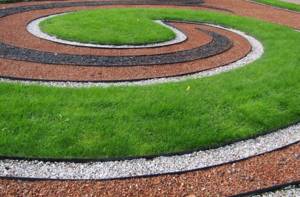
Garden path design
They can have different shapes. There are straight and winding paths. The choice should be made taking into account the landscape and location of objects. Flower beds are planted along the edges. A common combination option is when concrete slabs or natural stone are placed in the center of the path and a circular backfill with fine gravel is performed. Different types of fractional material may have different colors, but they all represent a gray-brown color scheme. Taking this into account, fractions with different characteristics are combined.
Decorative path made of colored crushed stone
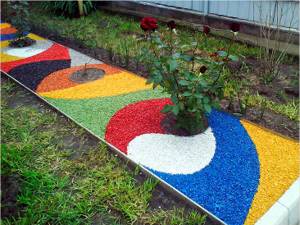
The path can be decorative from colored crushed stone
If you want to make a decorative path that will decorate the overall appearance of the landscape design, then you can use colored crushed stone. Of course, it is sold ready-made, but, on the other hand, you can paint this material yourself. The whole process consists of several stages:
- preparation of material;
- painting;
- drying.
Video
Preparing the material before painting
The fraction of purchased crushed stone can be varied, since its manufacturer does not sort it for your needs. For sorting, a “screen” device is often used, thanks to which the fine fraction is separated from the large one. It’s clear that you won’t have it, so you can use a metal mesh. The desired fraction will slip through the mesh, and the larger fraction will remain on its surface.
It is worth noting that for painting it is best to use pebbles of a 10 mm fraction. This size will be ideal for making garden decorative paths.
Video
Painting crushed stone

Crushed stone can be painted in any desired color
After this, the crushed stone is poured into a concrete mixer. With this device it will be easiest to mix the material with the dye evenly. For painting you should use acrylic or polymer paint. For uniform coloring, the concrete mixer should be left on for one hour.
Drying the painted material
After the allotted time has passed, the crushed stone is unloaded into the container. It may happen that paint remains on the bottom. It should be filtered through a sieve, and the sifted crushed stone should be spread out in the open air. Already painted material can be used to make a decorative path or decorate a flower bed.
So, in this article, we looked at the main points on how to design paths in a garden plot so that they ultimately last for more than one year. If you know other ideas or subtleties of making paths from crushed stone that are not voiced in the article, then be sure to leave comments at the end of this article.
What crushed stone is best to use for paths in the country
Crushed stone is assessed by fraction - the size of its particles. It depends on this in which area it will be used more successfully. Let's look at the fractions and places of use of crushed stone :
- 0-5 mm. The so-called screening, the smallest fraction.
- 5-20 mm. The most common type, great for garden paths.
- 20-40 mm. A large fraction, the use of which is recommended when constructing the lower base of paths.
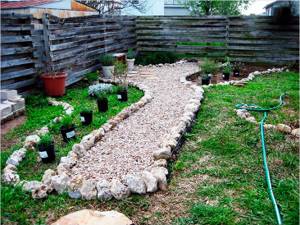
Pedestrian and walking paths lined with crushed gravel become an excellent decoration for a dacha. In addition, they are laid using accessible technology, and you can do it yourself.
Advantages of using crushed gravel
The use of crushed gravel for the construction of embankment paths in gardens and parks opens up wide opportunities for design creativity. The following arguments can be given in favor of its use:
- A simple technology for creating tracks in a short time.
- Easy maintenance of gravel surfaces. To maintain natural beauty, you just need to periodically remove debris from the surface and water the green spaces on time.
- The attractiveness of gravel pavement does not depend on the time of year.
- Gravel paths and platforms can be located anywhere in the garden or park, even the most inconvenient place.
- Gravel paths will help you easily hide utility lines.
Artificial materials
If natural materials are good because they are natural and the way they look, then artificial materials have other advantages.
Concrete
He has this:
- Price . Among cheap materials, it is perhaps the cheapest.
- Simplicity . Concrete looks discreet and can be completely lost in the garden.
- Reliability . Not afraid of moisture, temperature changes, insects. It does not crack if you drop something heavy on it or try to drive a vehicle over it.
Concrete looks discreet and simple
Its disadvantages are mainly related to the filling process:
- Difficulty of manufacturing . It will be difficult to pour a concrete path for a person who has never done this the first time - after all, you need to prepare the base, make a curb, mix it correctly...
- Difficulty of repair . If the concrete cracks, it will have to be replaced entirely.
- Boring look . Concrete is mostly gray; it can only be diversified if you use additional materials for decoration.
Advice Filling paths with concrete makes sense in cases where aesthetics do not concern you, but whether you can drive a tractor along the path is a big concern.
Concrete is difficult to repair
Plastic
Plastic tiles have been produced for a long time and cost practically nothing. It is made from polyvinyl chloride and given different shapes.
Its advantages are the following:
- Variety . Plastic tiles come in different colors and textures. You can choose from it endlessly.
- Easy to install . The process of laying a path made of plastic tiles is similar to the process of laying a mosaic. One element is placed, another is attached to it, and so on until the entire path is completed.
- Texture . Plastic tiles are specially made so that even during rain it is impossible to slip on them.
- Drainage . As a rule, special holes are made in the tiles to drain water.
Plastic tiles for paths
Plastic is not afraid of moisture, temperature changes, and does not suffer from insects. You don’t need to take special care of it, just spray it with water from a hose.
But it also has disadvantages:
- Simplicity . Plastic tiles look worth their price and not every dacha will be able to fit them into the overall concept.
- Fragility . Despite the fact that plastic is not afraid of anything, over time it wears out and becomes unusable. This happens in about five years.
- Loss of color . If the path is located in the sun, over time it will fade and become faded.
Wood-look plastic
This will be interesting to you: REVIEW: Catalog of flowers for the garden (240+ Photos with names): All the rules for creating incredible beauty
Features of choice
There is nowhere in the country without garden paths, and sooner or later the inhabitants will trample narrow paths to the toilet, to the vegetable garden, to the barbecue. Only the quality of these paths will be much worse than any made by yourself. They:
- quickly overgrown with grass - once you return to the dacha after a long winter absence, you will find that the paths can no longer be found in the green thickets;
- are washed away by rain - as soon as the weather turns bad, and instead of paths you will have grooves filled with water, which are impossible to walk along.
DIY garden paths
Even with a small budget, it is necessary to make comfortable paths. There are many ways to do this.
Paths made of wood and other unexpected materials
You can build garden paths with your own hands at low cost using completely waste material. An example is paths made from tree slices. To make them, logs are sawed into stumps 10–15 cm high. The blanks are treated with any antiseptic agents so that they can last at least 3–4 years.
Then a foundation pit is prepared for the path. To do this, remove the turf and pour in sand, which is compacted. The stumps are installed close to each other or at some distance. The gaps are filled with sand or fine gravel.
An original path using wood.
On a note! The gaps between the stumps can be filled with turf or planted with lawn grass. This will give additional naturalness to the path.
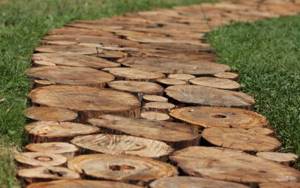
Homemade path from wooden stumps.