Construction rules
Before you figure out how to make a slide for children with your own hands, you should study the rules for its construction and installation. You need to remember the following:
- the design should be comfortable for the child;
- there must be a “brake pad” on the descent. This is the area where the slope should be parallel to the surface of the earth. If the descent speed is not reduced, there is a risk of injury;
- The length of the homemade slide should be twice the height of the structure. For example, with a ramp length of 5 m, the height of the launch pad should not exceed 2.5 m;
- there should be no other structures a meter from the descent so that the child does not hit himself during acceleration;
- in the descent area there is a special covering (for example, a rubber mat);
- a swamp should not form under the structure;
- For the construction of the structure, use only safe and environmentally friendly materials. No matter what you choose, they should not contain harmful ingredients. This also applies to the paints and varnishes with which you will cover the slide;
- if the slide is made of wood or plastic, it must be resistant to fire;
- When constructing, be sure to use fences and railings. Thanks to these elements, the child will not only maintain balance when climbing up, but will also not fall during active movement. These structures must be present on the slide no matter how old the child is;
- the structure should not have cracks or openings so that the child does not get injured or get stuck during play.
The slide must certainly be stable, functional, durable and have an attractive appearance. Its base can be concreted or metal supports can be used . All structural elements should be sanded and varnished.
Be sure to take into account the age of the child; if we are talking about preschoolers or primary schoolchildren, then the height of the slide should be a maximum of 3.5 m.
Creating a Project
Nowadays you can find a lot of ready-made drawings, diagrams, and 3D projects on the Internet, so you don’t have to “reinvent the wheel” yourself. Three-dimensional models with detailed installation instructions and a list of necessary materials will help you create designs for children of all ages. They may differ in the material for the descent, the type of stairs, supporting structures, height, etc. When developing a project for a wooden children's slide, the following factors should be taken into account:
- Child's age. If you need to build a slide for a child aged 1-3 years, then it is better to take on the project of a low, gentle slide. Thanks to the convenience, low height, and increased safety, the child will be able to independently climb the steps and descend the ramp. Older children will love the design with intricate turns, curves, and additional play areas;
- Child's height. Depending on his height, the height of the stairs is selected. The taller the child, the greater the distance between steps is allowed, the steeper the march can be. In addition, this factor is decisive when installing stair handrails;
- Installation location. There should be no other elements of the playground, wires, etc. nearby. It is important to secure the process of sliding down the slide by freeing up the nearby space.
In addition, the dimensions of the structure are taken into account, which will help to correctly calculate the width of the ramp and the angle of inclination of the trigger element. When making a wooden slide at the dacha with your own hands, you should take into account the child’s opinion and his wishes.
Types of children's slides
You need to choose the sizes and materials for a homemade slide depending on where exactly it will be installed. For example, if you need to make it not for the street, but for the room, then it should be small, and for production they use materials such as:
- laminate;
- plywood;
- chipboard;
- wood and more.
The principle of their manufacture does not differ from the work on the construction of street slides, but we are talking about much smaller dimensions.
And if we are talking about making an option for the street, then you should decide on the material, since working with each of them may differ. And the properties of this or that material also differ; they have their pros and cons. Their characteristics are:
- PVC-based inflatable structures - they are suitable for very young children. They are easy to inflate using an electric pump or manually, they are compact, but do not last long;
- plastic - for children from 3 to 5 years old. Slopes can have different shapes - waves, spirals, pipes and more. The structures are easy to maintain, safe, compact, and the surface of the slope is sliding. You can go down the slides at any time of the year, since the plastic slope will not cool in winter and will not overheat in summer. It’s easy to assemble such a slide with your own hands - you need to connect the parts according to the drawings. Its key disadvantage is the fragility of the material. Plastic can easily crack
- metal - these structures are reliable and durable. If you care for them correctly, the slides will last for several decades and will serve not only your children, but also your grandchildren. They can be made with different heights and different lengths of descent. But there are also disadvantages: metal has high thermal conductivity, the slope will be hot in summer and cold in winter, in addition, the steel slope is subject to corrosion;
- wooden - wood is the most affordable material. This is an environmentally friendly raw material, a wooden product can be installed anywhere, it is comfortable and lightweight. But wood is prone to deformation and rotting; this must be remembered.
Using the last option as an example, you will learn how to build a slide with your own hands for the street. After all, it is wooden slides that are most often installed in dachas.
Required tools and materials
To build a wooden children's slide with your own hands, you need the following materials :
- 4 wooden beams measuring 100×100×600 mm;
- 1 beam measuring 500×500×800 mm;
- 3 floorboards measuring 40x130x600 mm;
- 5 planed boards measuring 40×130×600 mm;
- 2 round slats measuring 30x120 mm;
- for finishing you will need 2 sheets of fiberboard or wooden lining;
- for fastening - anchors, screws;
- nails.
Tools for building a slide:
- Hammer
- Electric drill
- Electric planer
- Electric saw or wood saw
- Roulette
- Angle cutting machine
- Drill
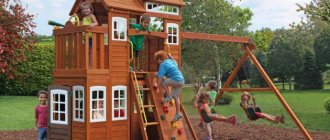
DIY wooden slide
Since wood is the most affordable material, it is used for DIY construction. In addition, a wooden structure is easier to repair and easiest to install. Unlike metal structures, you do not need to use a welding machine or other complex equipment.
Work on the construction of a wooden slide begins with preparatory activities. How successful the result will be depends on how correctly you perform them. At this stage you will need to do the following:
- at the site where the slide is installed, remove the fertile soil and level the soil;
- fill the area with sand and let it settle, compact the soil;
- prepare wooden blanks (for example, boards for feet, timber for the base, railings or stringers and more), dry them, saw them according to the drawing and sand them well. Then saturate them with the protective mixture;
- paint the steps, handrails and boards for the “tunnel” in two layers of enamel, taking into account intermediate sanding;
- prepare the side elements for lining the tunnel and side and treat everything with impregnation.
When the preparation is completed, you can create the basis for the future structure and perform subsequent actions. The algorithm is like this:
- build a foundation: for this purpose, use a garden mound to make holes and place the reinforcement level, then fill it with concrete;
- weld the corners to the reinforcement;
- make cuts in the pillars for the base and install the timber on the corners, securing it with self-tapping screws;
- connect the pillars to each other with jibs;
- to make a staircase, secure stringers and fill steps on them;
- install a launch pad for the stairs;
- make a base for the descent based on timber and install a curved metal profile for the slope;
- a plywood panel is placed on the base under the slope, and a flooring is made based on galvanized iron;
- parts of the face need to be folded along the perimeter and attached to a metal profile at the bottom;
- a slot is cut in the boards and the iron flooring is wrapped there, and a tunnel is made under the slope based on the boards;
- The side parts are sewn up with plywood;
- place bumpers on the slide and railings on the stairs;
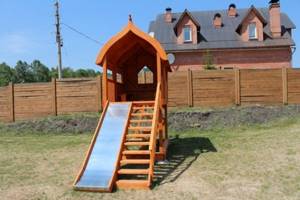
- install a hipped roof, which will need to be covered with pre-treated plywood;
- the side parts are sewn up with sheets of plywood.
Naturally, there are different manufacturing options. It all depends on what kind of design it will be. Perhaps it will consist of two slides of different sizes and additional elements. It will be more difficult to do this on your own.
Work order
- First you need to draw a plan diagram of a children's slide. You can use a ready-made layout as a basis or create your own. According to the drawn up drawing, saw the wooden beams, plan and sand the logs. It is imperative to remove the chamfers (the beveled edges of the corners of the parts), since children may be injured if they are careless.
- Next, you need to make markings for the future building. Select an area approximately 200x200 cm in size. If desired, you can have a larger one if you are going to further complete the structure. We make a depression of about 60 mm in the ground. The ends of the wooden beams must be coated with a special waterproofing mastic and inserted into the ground. Using a router, make grooves in the racks. The depth should be 20 mm. Connect the supports with a planed board, insert them into the grooves and tighten the racks with self-tapping screws or bolts. The end result should be a frame.
- Cut a groove of approximately 20x40 mm in two wooden posts at the end and screw it to the frame.
- We carry out floor installation. To do this, connect the pre-painted boards with self-tapping screws, leaving small gaps between them. If it starts to rain, water will flow into these gaps. The boards that connect to the floor beams must be well secured with metal corners.
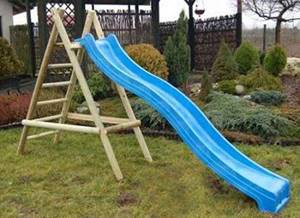
- Making the descent . The width of the slope should be no more than 80 cm. The frame of the slope is made by covering it with boards from the top to the bottom. There should be sides at a height of 30 cm on the side. Usually the slope is trimmed with a plastic sheet, covered with galvanized plaque or simply covered with linoleum. Plastic does not rust and bend, unlike plaque, and linoleum will cost less. You can also purchase a ready-made slide, you just need to install it into the structure.
- Installation of stairs. For production, boards measuring 50 mm are used. The stringer is installed as follows: take 2 boards and lay them in a layer, then fasten them with self-tapping screws. We make the next strings in the same way.
- Installation of the side part of the stairs. Attach the board cut at an angle of 45 degrees to the posts with screws. Strengthen the bars at the same distance. Next, place steps on them, first measure the same distance and attach them through the sides with self-tapping screws. Then we install the baluster for the stairs. Its height should be 500 mm. We screw the railings to them. Attach the upper parts of the railing to wooden posts. Even if the stairs are not steep, railings still need to be done. According to the drawing, the process of performing the work will be more clear.
- grooves in the side of the posts . They should be no higher than 200 mm from the floor level. We cut out the walls from plywood or fiberboard sheets and install grooves in them. Next, install cylindrical slats in the middle of the wall and floor. Then we screw a sheet of plywood to the back.
- Next, a parapet to prevent the child from falling. It is made of slats measuring 20 cm and 80 cm, which are attached to the side beams. The parapet can be covered with plywood.
The children's slide is almost ready, all that remains is to remove the protruding corners, heads of screws and nails, carefully sand the boards and coat them with a special protective varnish.
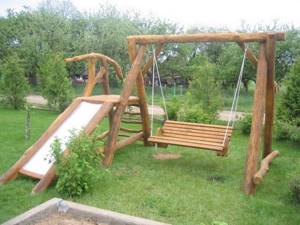
In addition to the slide, you can also install a swing, horizontal bar, rings and other elements for children. Over time, it can be complicated by adding a house, sports sectors, etc.
Materials for the ramp
Even the ramp itself can be made using various materials. In addition to plywood, the following may be suitable for it:
- a sheet of plastic (has the best sliding characteristics, but may crack);
- galvanized sheet 0.5 mm thick;
- linoleum.
In addition, the wood can be polished with wax. Some people line the slope with laminate, but this is not recommended, since laminate tends to deform under load or moisture.
Plastic slides
You won’t be able to make a plastic structure yourself; you can only buy it in a store. Such slides are produced in one piece and in collapsible ones. The owner can only install the slide on the site. Collapsible models are better suited for dachas. They are convenient to disassemble for storage during the winter. This will prevent theft and vandalism while the dachas are left unattended by the owners.
Plastic models use different gutters, which children really like. They come in screw, tubular, straight and other shapes. If a child still wants an unusual slide, but the parents don’t have enough money to buy it, you can make a combined version of the slide for your dacha or home. The fact is that gutters are sold separately. They are also made to order in any shape. All you have to do is make a metal or wooden frame and attach a plastic slide to it.
A children's playground built independently for a dacha or at home will decorate the yard and provide children with entertainment in the summer.
Material for metal slide
- square pipe 3*50*50 or round pipe with a diameter of 50 mm. for slide supports;
- square pipe 2*50*50 - for the construction of the upper platform, as well as the frame for the stairs, ramp and fences;
- metal sheet, 2-3 mm. for stingray;
- anti-corrosion primer;
- dye.
Note. The length of the blanks is determined by the parameters (dimensions) of the future slide, taking into account the fact that the support posts must be dug in followed by concreting.
Tools: grinder, welding machine or drill, level, grinder.
How to fill with water correctly?
We have already figured out how to properly make a snow slide. All that remains is to strengthen it and make it more slippery. This way you will develop speed and will not slow down with your nose! Filling with water is considered the final stage. The descent is filled in 3-4 stages.

You can fill the slide using a watering can
Take cold water; watering cans, ladles and sprayers are recommended from available means:
- Use a broom. It ensures uniform spraying over the entire surface.
- To avoid the formation of pits and bumps, lightly smack the crust of ice with a broom.
- At the second stage of pouring, the ice crust will become much denser. But it’s better to fill it 3-4 times. Once you have been able to build a snow slide, pouring it multiple times will make it strong and smooth.
- You can also use other available tools: a sheet of plywood, a wide shovel. Some craftsmen stretch the fabric directly over the trigger, using it as a blotter. The rag evenly passes moisture onto the snow.
- There is another alternative option. They put a rag on the mop as if they were going to wash the floors. Then dip it in hot water and move it evenly over the surface.
The optimal temperature for rapid ice formation is from 10 degrees below zero. Otherwise, all your efforts will be useless. If everything was done correctly, and the winter turned out to be cold and frosty, the entertainment device will last until the end of March.
Ideas for creating slides
Creative design of a wooden slide
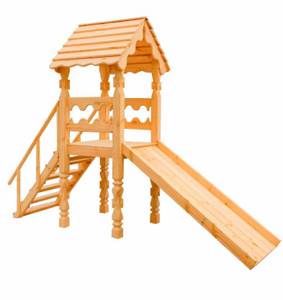
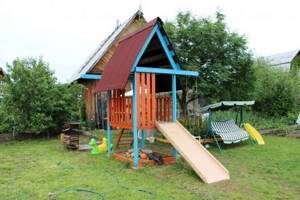
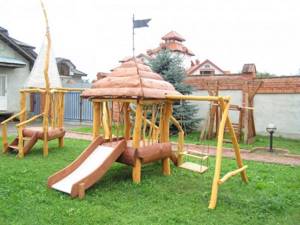
Wooden slide under the roof
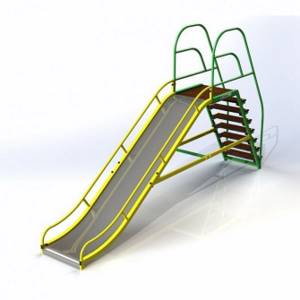
Wooden slide with metal slope
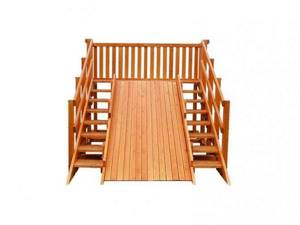
Wooden slide with a large platform and stairs on both sides
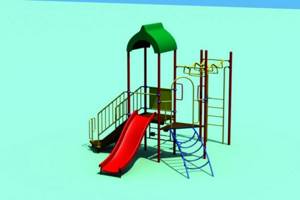
Metal slide under the roof
Low metal slide for young children
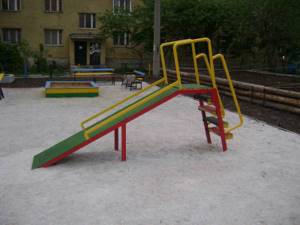
Simple metal slide
This structure has a simple wooden slope
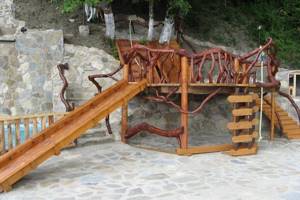
Thanks to the curved bars, this slide looks unusual
How to make a children's slide with your own hands, winter version: 2 comments
Thank you very much for the detailed drawing and instructions for building the slide! We wanted to contact people who are involved in construction so that they could make it for us. But by chance we found your site and my husband and I decided to try to build it ourselves. We succeeded!
The fun slide captivates children from two to almost ten years of age. Of course, you want to have your own slide in a private yard or in your country house. The samples that are displayed near high-rise buildings cost a lot. For this reason, I decided to make a ramp with my own hands, and in the size and design I needed.