Selection of stones for an alpine slide
There are many types of stones that will look great in your garden. This may include:
- granite;
- wild stone;
- limestone;
- tuff;
- sandstone and others.

Planting perennial plants.
By following these simple rules, it’s easy to create an alpine slide with your own hands. Step-by-step photo locations of stones will help you choose the optimal design for any site. So:
- the selected stones should not be the same size;
- it is preferable to select specimens that are uneven in shape and structure;
- the finished flowerbed should be asymmetrical as possible;
- the selected stones must be of the same type.
Planting coniferous plants.
Stone elements can be arranged in different ways, it all depends on the owner’s imagination. Professional designers offer several schemes for laying boulders. The large stone blocks located throughout the entire area of the rock garden, with smaller fragments scattered between them, look quite original.
Some will prefer to place the most beautiful and interesting-shaped boulder at the very top of the hill, while others, on the contrary, will place large specimens closer to the bottom. Any options have the right to be implemented.
When creating a rock garden from solid stone, try asking family and friends for help. It is quite difficult for one person to master such a structure with his own hands. A photo of an alpine slide with stones demonstrates the scale of these compositions.

Adding small stones, final formation of the composition.
When installing large and medium stones, care should be taken to ensure their stability. In places invisible to the eye, they can be fixed with cement mortar to give the entire structure greater strength. Lightly buried boulders look good. This move allows you to simulate the rupture of the soil by rocks and strengthen the entire rock garden.
On a note! An alpine meadow looks good in a garden plot. This is a bright green meadow strewn with meadow flowers. For its construction, stones are usually not used, and the effect of a slide is created by arranging the plants in height.

Watering the finished rock garden.
After arranging the base, after a couple of months you can begin planting plants. You can use any type of plant that does not require particularly careful care and can tolerate bright sun and heavy rainfall.
On a note! In order for your rock garden to delight you with its beauty all year round, you need to know the flowering times of various plants. Bulbous plants bloom in the spring, in the fall, mostly perennial specimens, and in the winter, conifers keep the alpine hill empty.
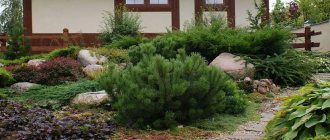
It is better to select slow-growing specimens for arranging an alpine hill in your dacha with your own hands. Photo-ready compositions show how original and beautiful, for example, coniferous evergreens can look in such unusual flower beds.
Looks good:
- thuja;
- some varieties of fir trees;
- juniper;
- mountain pine.
Such plants can be given any intricate shape. With their original appearance, they will ideally complement an alpine flower garden. Gardeners give such representatives of the fauna a conical shape or trim them into other interesting shapes when creating an alpine slide with their own hands. Step-by-step photos showing options for correct pruning will help you cope with this task yourself, without inviting a landscape specialist.
Suitable herbaceous plants include:
- periwinkle;
- low growing carnation;
- thyme;
- nasturtiums;
- marigold;
- bell and many others.
How to make and decorate a small mini alpine slide: diagram, description, photo
Mini alpine slide
We start creating an alpine slide in early autumn . Before spring, when plants are planted, the stones and soil must settle.
The mini alpine slide will be about 1 m high.
Let's start making a mini slide:
- We mark the boundary of the future slide on the ground using pegs.
- We stretch the twine between the stakes.
- We tear off the grass and dig a pit 30-35 cm deep throughout the entire area, secured with twine, and cover it with a metal mesh with small cells and geotextiles.
- We make drainage: fill the bottom of the pit 10 cm with crushed stone and small pieces of broken brick.
- Pour coarse sand, 10 cm thick, on top of the drainage and water it so that there are no voids left.
- We install large stones, fill the space between them with crushed stone, and let it sit for about 1 month.
- We install smaller stones.
- Preparing soil for plants. We sort out the soil taken out of the pit, throw out the roots, and add to it an equal amount of river sand and expanded clay.
- We fill all the spaces between the stones with soil, water them with a watering can so as not to wash out the soil, and leave them for the winter.
- In spring we plant plants.
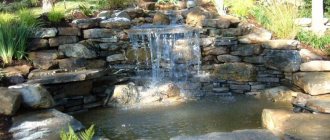
Form and types of cascades
The shapes and types of waterfall cascades in a country house can be completely different. The simplest options can be made from scrap materials. Fans of grandiose structures will appreciate multi-stage large structures with fountains, streams and canals.
The choice of cascade type depends on your capabilities and strengths. Calculate in advance how much space you can allocate for the composition and how much money you are willing to spend.
Waterfall layouts can be completely different. How the water flows depends on the stone from which it flows. Falling smooth streams are obtained from stones with rounded, polished edges. Sparkling threads of water will come from the cut stone. Using two stones and two levels of water drainage, an asymmetrical flow will be obtained. In this case, the volume of water in both streams can be the same. If the volume of water is limited, it is better to make it flow around the stone.

How to choose plants for an alpine hill
The choice of plants for a rock garden must be thought out in advance, since each type of landscape is suitable for one or another set of representatives of the fauna world, for example, rock gardens on slopes are characterized by creeping species, and valleys are characterized by flowering types. Experts advise choosing representatives of the flora that bloom in different periods, so that the alpine slide can please the eye for a long time. Perennials, in most cases, bloom in the fall. This could be lavender, geranium, saxifrage, etc. Their growth requires careful monitoring, since heavily overgrown crops can block sunlight for shorter plants. Bulbs (crocuses, hyacinths) bloom in the spring, and in winter, coniferous species - thujas, some varieties of spruces, etc. - will not allow the landscape to be empty.
On the alpine hills there are also low-growing shrubs, such as Japanese maple, rosemary, azalea, and dwarf roses. Among herbaceous representatives, you can choose thyme, bells, marigolds, and edelweiss, phlox, and dwarf ferns are also often planted on the hills. Ground cover daisies, St. John's wort, and yarrow will perfectly cover the empty spaces between the stones.
When planting, you need to take into account one of the important rules: low-growing species are planted in groups, and lush flowering ones - separately. Planting plants in the ground begins from the top of the alpine hill and gradually moves to its foot
To avoid water evaporation and block plants from being damaged by weeds, when planting, you need to leave a small funnel around each specimen into which to pour pebbles.
How to make and decorate a beautiful flower alpine slide: diagram, description, photo
For alpine hills, choose unpretentious plants that bloom in spring, summer and autumn.
Scheme of planting plants on an alpine hill
It is best to choose perennial plants with small flowers associated with mountains:
- Edelweiss , native to the Alps, grows up to 20 cm in height. Blooms in summer, June-July. Covers the slopes of the mountains.
- Sedum is an unpretentious bright pink or yellow flower. In the radius where it blooms, not a single weed will grow. Flowering occurs in autumn from September to October.
- Reproduction - fleshy green leaves, folded into a rosette, and resembling roses, and purple flowers, grow close to the ground, and reproduce by daughter rosettes. Blooms from July to September.
- , saxifrage literally covers the ground with its small white flowers like a rug. Prefers to grow in the shade.
- Shovel or sleep grass is one of the first flowers to appear in the spring.
- Small daisies of different shades can decorate our rocky garden almost the whole summer, since there are many varieties of these flowers.
- primrose will delight us with lush foliage and flowers of different shades, but we need to take into account that it loves partial shade.
- Armeria alpine begins to bloom in June, the height of the bushes is up to 10 cm.
To prevent it from happening that there will be no flowers for a certain period of time, you need to draw up a diagram showing all the planned plants, indicating their flowering period.
In addition to flowering plants, miniature trees look beautiful: dwarf pine, spruce and cypress, as well as small shrubs: barberry, juniper, boxwood.
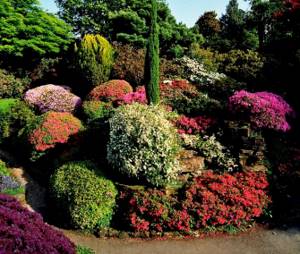
Beautiful flower alpine slide
How to make an alpine slide in a small area?
If you have firmly decided that a self-made alpine slide will be the decoration of your garden, step-by-step instructions will give you the opportunity to avoid gross mistakes and get the desired result.
Before starting work, sketch out a sketch of the rock garden - this will help you decide how much area it will occupy, what configuration it will have and how many tiers you will make on it.
You can even roughly estimate how much an alpine slide will cost you - a diagram drawn to scale will help you calculate how many and what kind of stones you will need, how much drainage, sand and soil will need to be prepared. The design needs to be made in relation to the area in order to take advantage of all the advantageous aspects of the existing landscape.

Creative decoration for rock gardens - clay bowl with plants
When deciding on the location for the future rock garden, do not forget that you will need to look at it - choose the most favorable angles. In addition, think about it - you may want to spend your free time near it. Then you will need an adjacent flat area with paths, space for a table and a fireplace.
The path from the rock garden leads directly to the recreation area

A cozy corner for relaxation in the “rock garden”
Very interesting visual effects will be obtained by using natural uneven terrain - decorative elements inscribed in the natural landscape will be a great addition to it.

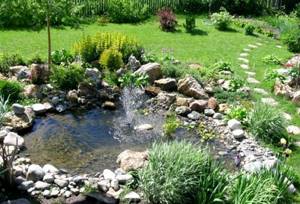
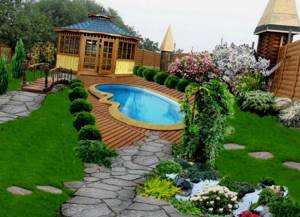
Spectacular alpine slide with a small pond

This is not an imitation of a landscape, but simply an artistic composition of asymmetrically located stone blocks with paths between them and plant compositions
- The next step is to transfer your diagram to the site. Make the markings using a string or filling the required lines with a contrasting material - sand, lime. This will allow you to look at the proposed location of the rock garden from the outside. You may decide to slightly change its configuration to suit the terrain.
- Having approved the choice of location, you need to prepare the site for laying stones. Soil consisting largely of clay or chernozem will have to be drained; sandy soils do not need such preparation. For drainage, the soil is removed to a depth of at least 30 cm, the pit is filled with large fractions of building materials, compacted and covered with removed soil flush with the surrounding soil. To compact the loosened soil, it is spilled with water.
- The largest boulders are placed along the perimeter of the prepared site. If necessary, they can be buried in the soil - then they will have a more natural appearance. The internal space is filled with soil, which will become the basis for the next tier, as well as a habitat for plants.
- Having retreated the calculated distance from the first row, insert the next chain of stones, maintaining the desired configuration of the rock garden.
- Having completed the required number of tiers, the top is decorated. To do this, you can lay one large stone, or use several small ones stacked in a pyramid. This will prevent erosion of the soil, and will also complete the composition.

Vertical blooming alpine composition creates a romantic mood

A retaining wall in the form of a rock garden is a new salvation from “boring” walls
What stones should you choose for an alpine slide?
Stones and plants for an alpine slide are the core of its design, so their choice must be taken seriously.
First, you need to decide on the size of the alpine slide and start from there. If the alpine slide is large, you can use large boulders, otherwise (if the slide is approximately 5m*3m) small stones and flagstone are used.
Stones for an alpine slide are the key to an effective design
When choosing stones, pay attention to their shape and appearance, because... these criteria will be noticeably reflected in the overall design of the slide
Laying stones should be carried out in tiers, no less than 3, but no more than 5. Don’t be afraid to experiment and embody the most vivid manifestations of your imagination: create patterns from stones, make a stone composition, etc.
Remember that in winter and early spring the alpine hill will not delight you with flowering plants, so the stones should create an attractive appearance even without additional decorative elements.
You should not make large distances between the stones, because... the created alpine slide may seem bald, but at the same time, do not forget to leave room for ornamental shrubs and flowers.
Avoid perfect symmetry in the arrangement of stones, because... the general appearance should resemble a piece of a natural area untouched by human hands.
As for the placement of the stones itself, it should be noted that the most massive boulders should be installed at the foot of the hill, and small stones should be placed closer to the top.
Among all the stones, choose the most attractive and original one to install it on the top of the alpine hill.
This, in fact, is all I wanted to tell you about the component of the alpine hill - the stones, now let's move on to the next important element - the plant world
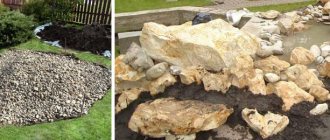
Time to collect stones
Of particular importance are the stones, which will serve as both a construction and a decorative element for the slide.
Their selection should be approached with special attention, and experts advise giving preference to rocks with low porosity.

These include sandstone, granite or basalt. Rocks such as tuff or shell rock absorb water quite quickly, which leads to their relatively rapid destruction.

As for the shape of the stones selected for construction, it is better to look for a middle ground.

If you look at a photo of an alpine slide made by yourself, you will notice that the most pleasant-looking options are the ones in which the boulders are not too round, but at the same time not too angular and sharp. All stones must be of the same type.

The best works of alpine slides in landscape design: photos
Alpine slide made of tires
Alpine slide made of tires with a pond and fountain
Alpine hill in a place unsuitable for cultivation
So, now we know how to arrange an alpine hill on our site.
Construction of the slide
The construction of the slide is of no small importance. This design can be done in different ways
rocky slope
This option is characterized by a rocky shape, which is mainly made of stones. Plants are planted among them.
Terraced slope
This composition is characterized by protrusions at different heights. They are made using retaining walls. Buildings can have different configurations.

mountain gully
This area is characterized by stones of different sizes. They protrude from the ground. The boulders are supplemented with plants with a long flowering period.
Gorge
When constructing it, it is worth taking into account the terrain. Stones are used to decorate the slopes. At the same time, ground cover crops are planted on the hill.
Czech rolling pin
This is a multi-tiered hill that includes flat stones. They are folded vertically. Decorative crops are planted nearby.
Valley in the mountains
The structure is made of large stones, which are partially immersed in the ground. The composition is complemented by lushly flowering crops.
Choosing a location for a waterfall
One of the most difficult stages of building a waterfall is choosing a location for it. If the structure is positioned incorrectly, it will only spoil the appearance of the site. It is worth considering other features of choosing a location:
- Trees should not be located near the hydraulic structure. They will be drawn towards the water, destroying the ground under the structure.
- Cascades are also not installed near the house. Otherwise, water may wash away the foundation, which will lead to the destruction of the house. Moreover, mold will form on the walls of the building.
- It is recommended to install the waterfall on a hill. This will not only look beautiful, but will also create a natural slope for the water to fall. If you don’t have such a place on your site, then it should be created artificially. You should not place the cascade near a low-lying area, otherwise all the debris will get into the water, which will certainly clog the pump.
- Among other things, you should make sure that the waterfall is clearly visible from different points - that is, it should be placed in an open space.
Once you have decided on the location for the structure, you can begin choosing materials to create it.
Caring for decorative structures
The lifespan of the waterfall depends on how the waterfall is cared for.
To extend the life of a waterfall, it is necessary to provide it with proper care. The main activities are as follows:
- systematically add water to the tank as it evaporates;
- clean the water surface from accumulated debris (leaves, branches);
- add special anti-blooming drugs to the water;
- Aquatic plants are planted in the pond (if possible), which will not only decorate, but also purify the water;
- Clean the pump filters 2 times a month;
- drain the water for the winter;
- Regularly inspect the wires for damage.
Step-by-step guide to creating an alpine slide
Step 1. Preparatory stage The first stage is to choose the most “picturesque” corner of your site. Draw a diagram of the rock garden on paper according to your wishes. Decide how many rocks you need, what types of plants you want and how to plant them. This alpine slide diagram will tell you the approximate cost of materials. You'll need to consider a few other factors, such as the level of the terrain (you may need to create a slope or berm for proper drainage). You need to determine how much sunlight and shade your rock slide will receive at any given time.

Types of alpine slides
Of course, you also need to determine the size of your composition. If you plan to install large rocks, you will most likely need to hire an excavator and other professional equipment to create optimal drainage conditions for your plants. Step 2: Gather the necessary materials Tools and materials needed to create your own alpine slide:
- Crowbar for moving large stones, tape measure, cord, pegs, wheelbarrow, watering can,
- A shovel for cultivating the soil, a rake for spreading compost and a trowel for planting;
- Alpine or other suitable plant species;
- Landscape fabric or polyethylene sheet;
- Broken pots, small stones, old bricks and other fillers;
- Stones of different sizes (slate, granite or sandstone), sand, crushed stone, gravel, compost.
Step 3. Mark the boundaries of the future rock garden using rope and contrasting bulk material (sand or lime). Step 4. Remove weeds. If you cannot get rid of them in the usual way, use a herbicide to kill more resistant weeds. Step 5. Remove the soil to a depth of 30 cm. The created “bowl” is filled with broken bricks, various types of waste construction materials, and gravel. This will improve drainage and also provide support for the stones. Compact this cushion layer well. If you are creating a slide on a flat area, pour a slide from the same material and also compact it well.

Step 6: Separate the bottom base layer from the compost. Step 7: Lay down the rocks.

Step 8: Mix up the prepared soil mixture and mound it around the boulders. Step 9: Take a rake and level the soil mixture. Step 10: Add plants to your rock garden Step 11: Add a layer of mulch.

The alpine slide you created with your own hands requires regular maintenance in the future. A rock garden as part of a garden plot is also susceptible to various types of pests - ants, birds, slugs, etc. You need to regularly inspect your alpine slide and remove weeds. Don't overwater your plants to avoid problems with root rot. Remove fallen leaves immediately. Be careful with watering to avoid problems with root rot along the line.
Design of an alpine slide with a pond
During the construction of a rock garden, you must strictly adhere to the developed plan and take into account all the features of the landscape. Correct design of an alpine slide with a pond:
- Mark the area for the embankment and pond using rope and pegs.
- Dig a pit for the pond; its depth near the rock garden should be within 0.8-1.5 m.
- Make a flat surface.
- Pour 5 cm of sand into the bottom of the hole and compact it a little.
- Install the pump.
- Lay a film along the bottom of the pond or install a ready-made form. Fix the waterproofing sheet securely with stones.
- In the place where the embankment is formed, remove a layer of soil 50-80 cm deep.
- Drain. To do this, use broken bricks, crushed stone and other construction waste.
- Prepare a soil mixture to create a mound from peat (1 part), sand (1 part), soil (1 part) and small gravel.
- Form a slide from the resulting mixture.
- Lay out the stones according to a pre-designed pattern.
- Fill the gaps between the boulders with cement to prevent slipping.
- Replant the flowers carefully so as not to damage the roots.
- Fill the reservoir with water and wait several days for the waterproofing sheet to completely level out or for the finished container to be installed correctly.
- Turn on a water circulation system in the pond.
Features of the alpine slide
The main feature is that the composition should look as natural as possible; artificial elements are not allowed.

Height
Alpine slide, as the name suggests, is a hill. The height can vary from 1 to 3 meters.
For taller compositions, a slide core will be required to prevent collapse. One slope should be flatter, which is best located on the south or east side.

Stones
Also, the alpine slide is a rock garden. Depending on the type of stones there may be more or less. Natural stones-boulders of the same type, differing in size, look best.

Plants
Since the landscape composition in question is an imitation of mountainous terrain, the plants for the alpine hill must be suitable.
It is advisable to use low-growing plants; evergreen conifers are well suited: cedar, juniper, spruce, larch.

Also suitable for use: thuja, succulents, violet, phlox, hosta and other plants.
It is best to choose flowering plants so that they bloom at different times for a beautiful display throughout the season.

Location
At the dacha, alpine slides look most organic on natural slopes or breaks in the landscape. But this does not mean that such a composition cannot be created on a flat area.
Alpine slides are placed in a prominent place and so that the bulk of the plants are in the sun before noon, and in partial shade after noon.

Not the best location in the shade of large trees and where groundwater comes close to the soil surface.

How to make and decorate an alpine rock garden from available materials?
Rockery is a garden of stones, plants and dwarf trees.
A rockery is not necessarily an alpine garden; it can be planted on a flat surface and consist not of alpine plants, but of small ordinary ones.
Alpine rock garden
There are 3 styles for recreating rockeries:
- Japanese-style rockery , it is characterized by minimalism - a small number of stones with or without plants.
- A European-style rock garden is a hill made of different stones, similar to a natural hill in temperate latitudes.
- Rockery in English style . It is characterized by the presence of a variety of evergreen plants.
It is important to remember that a rock garden cannot be built close to home. In winter, when snow slides off the roof, it can destroy fragile trees.
If you are setting up a rock garden and there is a fence nearby, you need to decorate it - plant climbing plants near it that will hide the fence.
We begin to lay a rockery using improvised materials:
- Let's mark out the area for the future rock garden.
- We pull out all the weeds and grass.
- Remove 20 cm of soil with a shovel.
- For drainage, fill the entire space with a thin layer of crushed stone and small pieces of broken brick.
- On top of the drainage we pour soil consisting of garden soil mixed with a small amount of sand and small crushed stone.
- We take fairly large natural stones from your area on the side of the road or in a quarry, preferably the rock is of the same type, and bury them halfway into the ground.
- Small stones are also useful, we install them on large stones.
- First, we plant coniferous shrubs: dwarf spruce, thuja, juniper.
- Flowering plants need to be selected to bloom from spring to autumn: snowdrops, crocuses, tulips, phlox and others.
- To keep small stones in place, we plant saxifrage, juveniles, and sedums.
- All plants must be a suitable size (small).
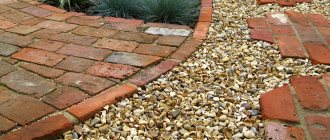
- Additionally, we decorate the distances between the plantings by filling them with crushed stone.
- Next to the rock garden you can install a gazebo or a beautiful bench to relax and admire the beauty.
Stones: which ones and where to get them
The basis of any type of slide is stones and you will need a lot of them - several tons, and of different sizes. Choose from those breeds that are more common in your area. Chopped blocks look best, but already aged, with dark edges. You can also use pellets with smooth sides, but creating a natural composition from them is not an easy task. You will need about one fourth of a large size, about the same amount of a medium size - the rest are small stones.
Granite looks great. But it is hard and “cold”; even the most tenacious saxifrages can rarely grow on it, and the soil next to it quickly acidifies. This should also be kept in mind and periodically adjust the acidity (or plant plants that love acidic soil).
Stones in the form of slabs look good on low slides
It is best to use tuff. It drains water well, water flows through it well, and what’s even more important is that plants grow well right on it
What’s also important is that it neutralizes acidity, which the “Alpines” like.
Lime slabs are also good, but they come in slabs; they are good for decorating alpine plains or very low and gentle hills.
What is a rock garden
The mound of stones and plants is very similar to an alpine mountain landscape in miniature. To make the composition natural, a suitable option would be an elevation of three tiers with flower beds, with a flowing stream or water source at the foot.
Types of alpine slides
The future design of the alpine slide depends on the chosen type. There are many options, including:
Rocky slope. It has a rocky appearance, built mainly from stones, among which alpine plants are rarely planted.

rocky slope
Mountain slope. This is a complex, combined composition. It uses stones of various sizes. The mountain slope is high; creeping and low-growing crops are used to decorate it. An artificial waterfall can be installed in this building.

mountain slope
Terraced slope. A composition with protrusions at different heights, which are lined up using retaining walls. Such buildings differ in configuration and length.

Terraced slope
A hill of stones. One of the most difficult buildings to construct. The composition harmoniously combines low-growing perennial plants and large boulders.

Hill of stones
Mountain hollow. This is an area with different sizes of stones protruding from the ground. The boulders are diluted with plants that have a long flowering period.

mountain gully
Gorge. During construction, the terrain is taken into account. The slopes are decorated with stones; the flora in this rock garden is represented by any ground cover plants. This composition is often built with an artificial pond.

Gorge
Czech rolling pin. A multi-tiered hill made of flat, vertically stacked stones. Alpine plants are planted next to the building.

Czech rolling pin
Valley in the mountains. Looks like a mountain valley. Constructed from large stones immersed (partially) in the soil. The composition is complemented by asymmetrically arranged plants that bloom profusely.

Valley in the mountains
Alpine lawn. This is a stylish mound of stones with plants from the highlands. It is assumed that there is a fountain or pond.

Formation of a rock garden
There are no strict schemes or requirements for the formation of an alpine slide. What it should be depends only on the imagination and desires of the owner of the site on which it is created.
But there are some rules that must be taken into account when creating it:
- The stones are stacked in tiers. The first tier consists of the largest stones; they create the base, the foundation of the slide. They should be laid around the perimeter. The stones of the first tier are sunk into the ground by about one third, this is done to give them greater stability and a natural look to the slide; Photo: laying stones for a rock garden
- the average number of tiers in an alpine slide is from 3 to 6;
- A small distance is left between the stones for filling the fertile layer and planting plants in it. Also, the fertile layer is poured between the tiers. It is prepared from turf layer soil, peat and fine gravel in a ratio of 2:1:1
- when forming an alpine hill, symmetry should be avoided, because this is a copy of the natural landscape, and not an engineering structure;
- the height of the alpine slide depends on the area it occupies - for every meter in diameter there should be 20-25 cm in height;
- The top of the hill can be decorated with a large, beautiful cane, this will give it completeness and protect it from erosion by precipitation. You can also build a small pyramid of several stones.
Stones for the slide

From large stones
When the drainage is ready, you need to select stones.
- When selecting boulders, it is necessary to take into account that the smaller the size of the rock garden, the smaller the size of the stones should be. For a large slide, you can take decent-sized boulders, but for a small slide, flagstone will do.
- Choosing stones
The only criterion that the owner of the site must follow when constructing a rock garden is the criterion of naturalness. That is, there is no need to be too zealous. Excessive randomness in the arrangement of stones is as unnatural as regularity. - You should not take several different types of boulders. Usually in nature, piles of stones are found from the same rock. Preference should be given to natural materials.
- For a rock garden to look truly amazing, it needs to look good even without any vegetation. This is precisely the secret of the masters.
- The slide, as a rule, has from 3 to 5-6 tiers.
- When laying stones, we must remember that plants will soon need to be planted here. Therefore, a layer of moist, fertile soil should be poured between the tiers. Don't pack the stones too tightly.
Step-by-step instructions for creating a rock garden
There are different schemes for creating a rock garden with your own hands. It is difficult to say which of them is better, because they are all interesting and attractive in their own way. Let's consider one of the instructions for creating an alpine slide using the example of the most classic and popular scheme.
Before you study the step-by-step instructions in detail, pay attention to the stages of creating an alpine slide with your own hands:
- Planning (drawing a sketch, drawing up a diagram).
- Selection of stone materials and flowers, plants.
- Site selection.
- Marking of the future building.
- Creation of drainage.
- Laying stones.
- Planting plants.
Step-by-step instructions for creating an alpine slide will help any summer resident and gardener create a wonderful composition on their site. And now we can move on to a more detailed description.
Marking the future structure
Ideally, you need to make a sketch of the future composition. It will help you understand how well the location was chosen and how organically the slide will fit into the site. Using a sketch diagram, you need to decide how much space the structure will take up, what its height will be, and also approximately calculate how much material will be needed - stones, substrate, sand.
When you decide on the shapes and boundaries of the composition, you can make markings. To do this, it is best to use a thick rope or make markings using lines made of some material (for example, sand, crushed chalk).
Preparing the site
If the soil in your chosen location is sandy, then you don’t have to make a drainage base, but in other cases you can’t do without drainage.
Creating a drainage base involves the following steps:
- It is necessary to make a depression at the selected location of at least thirty centimeters (optimally 50 cm) and fill the hole with drainage material (the optimal drainage thickness is 10 centimeters, and if the soil is very dense, then the layer can be made thicker). Crushed stone, broken brick, moderate stones, and gravel are ideal.
- It is recommended to pour sand about 5 centimeters thick on top of this layer.
- After this, the material needs to be slightly compacted and covered with excavated soil to the level of the rest of the ground. But before laying the soil, it is imperative to clear it of weeds.
- Then it is necessary to water this place abundantly so that the earth settles down.
The drainage layer will protect the area from stagnation of moisture and ensure normal air permeability in the soil. Thanks to this, the plants will be able to develop and grow normally, delighting with their beauty.
Installation of stones
Now you can proceed to installing the stones. The ideal shape for an alpine slide is pyramidal. The stones are laid in tiers (usually from three to six tiers). That is, you need to lay stones in tiers like a pyramid to imitate a slope.
The following sequence of work should be followed when arranging stones:
1) The largest stones are laid first. It will be better if you bury them a little into the ground (for maximum reliability and naturalness).
2) Then the space between the installed boulders is filled with soil. As soil, you can use a mixture of garden soil, peat, sand (mix in the same ratio).
3) After this, you need to lay down a second row of stones, which is smaller in size than the first row, and also fill the empty space with soil
Please note, to make a rock garden slope, each subsequent row must be smaller than the previous one
4) After you have installed the required number of rows (and the required number is determined by your desires), you should complete the top of the composition - you can install one large or several not very large stones on the top.
Let's consider the classic schemes for creating an alpine slide and the arrangement of stones:
Video: instructions on how to make an alpine slide with your own hands.
Planting
There are several excellent options for planting plants; surely everyone can find the ideal option for their dacha or garden. To make a real alpine slope with your own hands, you should choose suitable plants.
Below you can study several popular schemes for planting plants on an alpine hill and choose the best option for yourself:
Creating a mini rock garden
A mini rock garden will become a unique decoration for a small area if there is no room for a full-fledged slide. Its arrangement is not particularly difficult even for novice summer residents. Mini-rock gardens include container or mobile alpine slides. They are placed in large flower containers or decorative containers. To decorate them, it is better to choose small plants and flowers, small stones, and pieces of wood. A neat mini-rock garden can be beautifully placed along the fence of a country house; it will become an exquisite decoration for a gazebo, attic, or porch.
To set up a small rock garden in a container you will need a container of the required size. Simple wooden boxes, ceramic products, and slotted bricks with holes for water drainage work well. The container must be high so that enough soil can be poured into it. It is necessary to pour drainage at the bottom with the addition of expanded clay and gravel, and on top - a water-retaining layer of peat. Next, add fertile soil for planting.
To decorate a mini-rock garden with plants, a mono-planting of young plants is perfect. A small container can accommodate several types of plants. A larger container can accommodate more varied arrangements.
Perennials will look good in a small rock garden: sedum, aster, creeping gypsophila, cloves, thyme. Particular attention should be paid to geraniums, which grow very well in closed containers. Variegated types of vegetation are less persistent and should not be carried away.
Necessary materials
The scheme for creating a rock garden is quite simple. The main thing is to think through it step by step in advance, taking into account the design features and the location of the future composition.
You will need the following materials:
- stones, preferably of the same type;
- sand;
- gravel;
- crushed stone;
- turf;
- peat;
- fertilizers;
- limestone;
- land and materials for planting.
An alpine slide will be an excellent addition to your garden.
You need to prepare construction tools and equipment:
- special tape measure;
- pegs;
- bayonet shovel;
- cord;
- metal scrap;
- shovel with a long handle;
- garden wheelbarrow;
- garden watering can
Suitable plants
When choosing plants for a garden rock garden, you must consider the following criteria:
- Beginning and duration of growing season and flowering. This is important for maintaining the beauty of the alpine slide from spring to late autumn.
- Aesthetic compatibility of color and shape of leaves and flowers.
- Shade-tolerant or light-loving.
- Features of soil and watering for different types of plants.
- It is better to choose plants with a growing season longer than two years that have a dormant period in the winter months.
- “Sleeping” perennials resume growth in the spring thanks to the “living” underground part. This allows the grower to save time and effort on updating vegetation.
- It is best to choose plants that bloom alternately. Thanks to this principle, there will always be a picturesque and well-kept rock garden next to the house.
Examples of the most suitable low-growing plants: cinquefoil, salvia, nasturtium, spirea, daisy, primrose. Very often, the hill is decorated with tree-like or low-growing coniferous specimens, and to create an accent, you can add several large plants or shrubs. Juniper and dwarf pine are excellent choices for this.
An aesthetic and functional addition to the alpine slide will be medicinal herbs: thyme, rosemary, chamomile, mint, lemon balm.
See also: the main nuances of planting plants for an alpine hill.
Classification of alpine slides for a country cottage
The admiration for the beauty and thoughtfulness of details in rock gardens is amazing. In them, every stone is in the right place, and the flowering of plants lasts all year. An alpine slide is an aesthetic decorative element for the courtyard of a country house. There are 7 styles of its design:
- Natural rocky surface.
- “Mountain slopes” with coniferous trees, complex bends and huge blocks of stone.
- “Valley in the mountains.” This style of execution involves the chaotic placement of stones of different sizes on the territory of an alpine hill.
- “Slope with terrace.” Different wall heights, use of unusual shapes and elements.
- “Forest Ravine” is a decorative space with natural springs and a waterfall. It can be created artificially.
- “Wall made of stone.” Here the stones are arranged in a chaotic manner, and the mound is of small height.
- “Rock from the Czech Republic.” The stonework in it is made in layers of stones of equal size.
- “Lawn in the Alps.” This is a combination of wild mountain plants and coniferous trees. All of them grow exclusively in the mountains, so special conditions should be created for their optimal growth and development.

Create the base of the rock garden in the fall so that in the spring you can plant plant seeds and tree seedlings in the ground. Already in the summer you will enjoy the aesthetic beauty of the created composition.
How to make and decorate an alpine slide without stones or tires?
Alpine slide in a budget version - a slide made from tires . To make a hill from used tires, you will have to paint them with enamel or machine paint, and then stack them in a hill and plant plants.
Another option: do not paint the tires, but cover them with pebbles and plant flowers.
You can also make an alpine slide with ponds from old tires.
Alpine slide made of tires with ponds
We build ponds:
- We select several tires of different sizes.
- We dig a pit according to the size of the largest wheel.
- We install the wheel in the pit and concrete the bottom.
- We cut off the upper part of the wheel with a jigsaw.
- Nearby, higher in level, we install a smaller wheel, concrete the bottom, and cut off the top with a jigsaw.
- We cover the inside walls of future ponds with waterproofing film, and line the outside with stones and pebbles.
- We install a pump to circulate water from one pond to another.
- We plant plants around that love moisture.
Using the same principle, by cutting small tires you can create a stream that flows into a pond.
Alpine slide made of tires with a stream and a pond