Concrete walkways are the strongest in their class
Do you want to proudly drive your car around the yard? Then give preference to a concrete screed. It doesn't have to be monotonous and gray. Using modern dyes and shapes, you can create a wide variety of designs. Let's look at the benefits.
- Frost resistance and durability. Strong concrete can withstand frosts down to -50 degrees; the only danger is icing at the beginning of winter, when moisture that has penetrated into the cracks freezes and bursts the screed. But it will withstand about 300 defrosting cycles.
- Increased strength. A 10-centimeter concrete screed can support a 30-ton vehicle. Just 3-4 centimeters is enough for a front garden or a car entrance near a garage.
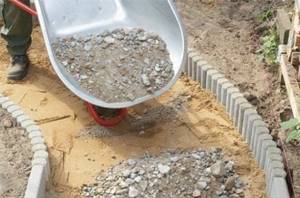
- Easy to install. All you need is to remove a layer of soil up to 10 centimeters thick and pour in the solution. It is not necessary to install a border - the specific gravity of the material is too large to “spread”.
- Saving. 1 m2 will cost 2 times less than ceramic tiles, a wooden path or natural stone purchased at the base.
The design of the paths at the dacha leaves much to be desired, of course. The only thing you can do is change its color and shape a little. But keep in mind that powder dye costs a lot of money, about 55 rubles per 1 m2. Whether it's worth doing is up to you to decide. And the biggest drawback is the need to hire a construction team, since it is very difficult and long to work alone. For 1 meter you will need about 3 concrete mixers of solution.
General technological rules for constructing a garden path
When arranging garden paths, preparing a high-quality base is important. For a path on clay soil with an expected heavy load, a base with a depth of at least 50 cm and a sand cushion 30 cm thick is required. For footpaths on heavy soil, a sand and gravel base 30 cm thick, in which the sand layer is 15 cm, is sufficient. Each layer of gravel, crushed stone and sand are compacted and spilled with water.
The bottom of the trench is compacted and covered with geotextile. After compacting the bottom, geotextiles are laid out. Geotextiles are also laid between the sand and gravel layers, which increases the strength of the base and its service life. This material was developed specifically for road construction in permafrost regions. By isolating the layers of soil and cushion, geotextiles prevent sand from being washed out and the gravel and crushed stone cushion from sinking into the ground. It prevents the germination of weeds and allows water to pass through well.
When paving paths made of stone or tiles, sand with a grain size of 0-7 mm is used under the base. Sand is poured in a layer of 5-7 cm and leveled. The laying of road material begins from the two outer rows. Side stones are installed on cement mortar or a special curb with a ledge.
Gaps of at least 2-3 mm are left between the stones, which are filled with clean fine-grained sand or dry mixture. Sand is compacted in the cracks, if necessary, more is added and water is spilled.

When constructing paths of any kind, a slope must be maintained to allow water to drain. For this purpose, a base is made with a convex profile, so as to provide a slope of 2-3 cm per 1 m from the axis of the path or special drainage. For paths with a slope of more than 5 cm per 1 m, steps are required. To determine the size of the steps, the following rule applies: two step heights plus depth equal a step length of 60-70 cm. A step-by-step garden path is made of slabs measuring 40x40 cm at a distance of 60-70 cm between their centers.
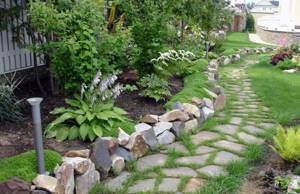
A natural stone
If you are looking for a beautiful material for garden paths, then natural stone should suit you. However, this material has a huge disadvantage - its cost. Granite, marble, labradorite, limestone are expensive stones, about 700-1200 rubles per meter, so you need to immediately reconsider your budget. The second disadvantage is slipping. Some stones (marble, for example) may not be very safe for human movement during rain. You can try your path not only with your feet, but also with your head. However, there are more advantages:
- increased strength - the shelf life is not limited, is not exposed to moisture and frost, like concrete;
- excellent appearance, which is recognized as the best by many designers;
- ease of installation, as it is laid on a sand bed or compacted soil;
- easily withstands any temperature changes.
Delivery of natural stone is a difficult process, since the material itself is heavy and has a smaller working surface area than flat tiles, for example. If you want to create an incredible garden path design or simply add more luxury to your area, then natural stone is the perfect option!
DIY garden path made of tiles
Materials and tools
To lay a garden path with your own hands, you need to prepare tools and building materials:
- sand,
- paving slabs,
- border,
- cement,
- cord,
- metal or wooden stakes,
- hammer,
- rubber hammer,
- shovel,
- long rule
- two pipes with a cross section of 2.5 cm,
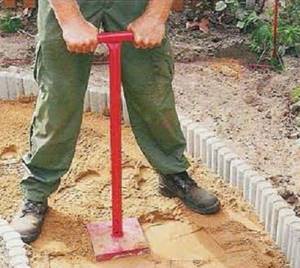
- rammer,
- cart,
- building level,
- Master OK,
- buckets,
- broom,
- grinder with diamond blade,
- knee pads
Designation of the route of the future track
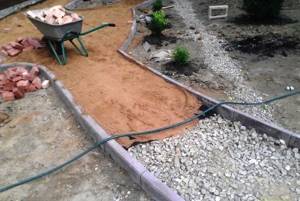
The route of the garden path is marked with metal or wooden stakes and cords stretched between them. In places where the path bends, the pegs are driven in more tightly. Marking winding paths is done with a regular watering hose.
Along the width of the marked path, the soil is removed to a depth of 25 cm. The removed turf is used for the lawn. The base of the path is checked with a building level.
Laying borders
First, curb stones are installed. Using a long rod and a long level, check the slope of the prepared path base. If the soil is loose, curb stones are placed on a thin concrete layer.
Preparing the base
The first layer of crushed stone or stone or brick chips is poured into the prepared trench. The thickness of the layer is 10 cm. It performs a drainage function. The bulk material is thoroughly compacted.
Gravel or coarse sand is poured on top of the crushed stone, leveled and compacted with a layer of 10 cm. To ensure that the sand cushion is well compacted and does not spread when walking, it is recommended to place temporary wooden bridges on it before laying the tiles.
Laying tiles
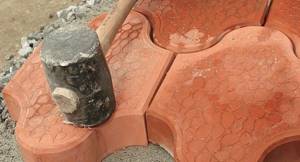
Rectangular and square tiles are laid, leaving gaps (seams), which are later filled with sand. The seams ensure the drainage of rain and melt water. Profiled tiles of more complex shapes are laid without seams and fit tightly so that they “catch” like puzzles.
If the sand is tightly compacted, then the tiles are simply laid on its surface. If it is loose, then the stones are pressed into the sand with a slight rotation. The stones are hammered through a wooden block so that they lie in the same plane. The construction level controls the slope.
Sand is poured onto the laid tiles and swept into the seams, then the path is generously watered with water from a hose or watering can. In case of poor-quality sealing of seams, after the sand settles and the water dries, the procedure is repeated.
Crushed stone or sea pebbles
One of the best building materials, which allows you to make a path very quickly, cheaply and beautifully. The only drawback may be the appearance, although this is what many summer residents like. This material for paths in the countryside is not suitable for driving (the material is loose and not concreted), although, if necessary, any pressure can be applied to the surface. If the embankment becomes deformed, simply level it with a shovel. The installation process is even simpler. Let's take a closer look.
Step 1
.
remove 10 centimeters of earth, not necessarily exactly, +/- 3 centimeters does not matter.
Step 2
.
Every 2-3 meters, make supports from wooden beams or concrete, 10 centimeters high.
Step 3
.
fill the resulting cells with building material, level it and compact it with a vibrating plate.
If it is possible to compact the earth, do so. But the procedure is not necessary - subsidence does not play a special role, since the material is free-flowing and can then be leveled with a rake or a shovel.
DIY stone garden path
For the construction of garden paths, quartz sandstone, also known as “savage”, Luhansk stone or ocher stone, is most widely used. Sandstone looks like dense, ragged plates of different sizes. Decorative tiles and paving stones are made from it.
Sandstone is a durable, dense, frost-resistant stone. It practically does not absorb moisture.
Required tools and materials:
- cord,
- gravel,
- sand,
- shovel,
- Master OK,
- building level,
- mallet or rubber mallet.
The boundaries of the future path are marked with a cord.
Shovels are used to dig up the earth using a bayonet.
They fill it up and compact it with gravel. Sand is poured on top of the gravel bed. The paving stones are laid tightly and adjusted with a hammer. The construction level is used to check whether the surface of the path is level. Stone slabs or paving stones are laid from one edge to the other. Sand is poured onto the laid path and swept into the cracks.
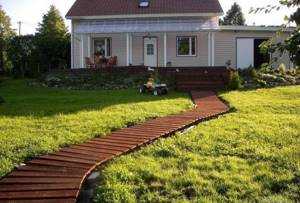
Wooden stumps and boards
If you want to give your site more luxury, then it makes sense to decorate it with wooden boards. There is a lot of hassle with them, but the appearance is very beautiful. In order to maintain the physical and mechanical properties of the wood, it must be varnished every year, and also ensure that a lot of moisture does not fall on the “parquet”. As a rule, decorating garden paths with wood is very difficult, since the path must be 10 centimeters above the ground and placed on wooden beams and stumps.
You can simply cut hemp up to 10 centimeters thick and install it on a sand bed - a good appearance, but durability leaves much to be desired. In addition, a lot of work is added on cutting wooden decks, treating them with impregnations, anti-corrosion resins and other mixtures.
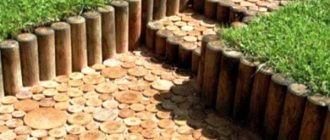
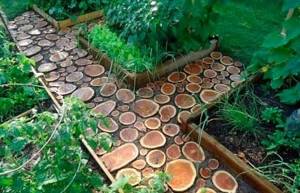
DIY wooden garden path
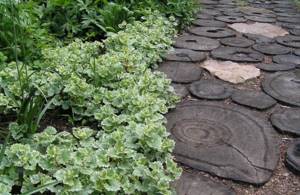
You can use the trunk of an old or fallen tree to pave a garden path.
Materials and tools:
- log or old tree trunk,
- gas or electric saw,
- polyethylene film in the form of a roll or red clay,
- brush,
- metal container,
- sand,
- concrete,
- drying oil
The trunk and thick branches are sawn into rings 5 cm thick of different diameters. In a large metal container, heat the drying oil to a boil. Using a brush, treat the rings with hot drying oil on all sides. Leave until completely dry.
Laying a path of wooden saw cuts
First, determine the dimensions and route of the future path. To pave the path from saw cuts and logs, prepare a trench 30 cm deep. The bottom of the trench is covered with plastic film or covered with clay. This is necessary to waterproof and protect the wood from rotting. Fill it with coarse sand in layers of 5 cm, compact it and water it with water. Saw cuts 10 cm high are placed on a sand layer close to each other. Smaller ones are inserted into the gaps between large checkers. Using a building level, check the location of the rings in the same plane. The remaining cracks are filled with sand or filled with concrete. Paths made from saw cuts are usually made with a border.
Hard tracks
Hard surfaces include: concrete, natural and artificial stone, paving slabs, wood, clinker bricks.
Garden paths made of wood
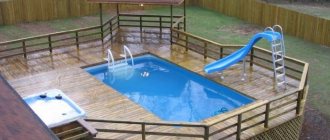
Quite often, wood is used to lay garden paths. Larch is considered the most suitable type of wood for paving. Its advantages include greater strength, moisture resistance, beautiful wood pattern and color, and a pleasant smell of resin. Wooden paths are usually laid from transverse cuts buried in the ground or solid boards. For a summer cottage with a swimming pool, paths made of wide wooden boards are a good choice.
Wooden covering is a natural material, pleasant to walk on, suitable for any garden. There are bulk wooden paths made from sawdust or mulch. The mound of mulch and sawdust settles and moves when walked. Paths of this type are laid in places with low traffic. They require regular topping. The main disadvantage of wooden coverings is their susceptibility to rotting and fragility.
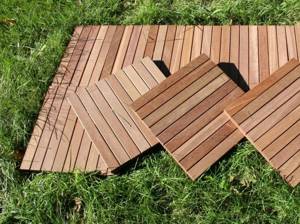
Decking – garden parquet
Garden parquet, decking or anti-slip is a new interesting material for garden coverings. For its production, natural hardwood is used.

Garden parquet has the form of rectangular or square sections made of wooden planks. The planks are attached parallel to each other or with a specific pattern. Standard sizes are 30x50 and 50x50 cm.
Sections of garden parquet are joined during installation. They are fixed on special supports. Different heights of supports allow the paths to follow the terrain of the site or smooth out differences in ground level. Garden parquet has ventilation slots up to 8 mm wide. Garden parquet sections come with hard and soft fastening. Hard parquet is entirely wooden, while soft parquet has a plastic lattice backing with fasteners. Installation of garden parquet is simple and quick.
Advantages of garden parquet:
- environmental safety of the material,
- durability (up to 50 years),
- ability to retain heat,
- quick drying,
- resistance to moisture and rotting,
- anti-slip profile,
- strength,
- ease of installation,
- ease of care,
- variety of designs.
The surface for laying garden parquet must be carefully leveled and compacted.
There are various base options for garden decking:
- concrete screed with gutters,
- wooden logs embedded in gravel,
- sand and gravel cushion,
- compacted soil cleared of grass growth.
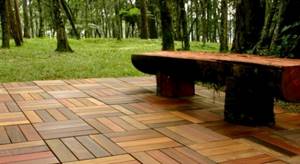
A properly prepared base will ensure reliable placement of garden parquet and high-quality drainage.
Garden parquet requires maintenance; it is washed with water, and heavy stains are cleaned with a brush. At the end of the season, the parquet is dismantled and stored in a dry room until next spring.
To protect against fading, parquet is coated with a special oil twice a year. This will further extend the service life and maintain the attractive appearance of the decking.
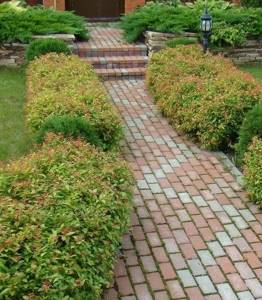
Stone garden paths
Stone is traditionally used to construct garden paths. This is material for centuries. It looks organic in any garden. Due to its natural origin, durability, beauty, variety of species and shapes, stone is widely used in garden landscape design.
Various types of stone are used to pave paths in the garden. The texture of the stone coating can be rough, rough and smooth to a shine. The range of colors and shades is very diverse: gray, dark red, black, greenish-gray. The main disadvantages of natural stone are its high cost and heavy weight. The most expensive rocks are: granite, basalt, marble and porphyry.
Cheap types include limestone and sandstone. In winter, an ice crust forms on granite and marble. To get rid of ice, a heating system similar to a warm floor is installed under the stone covering.
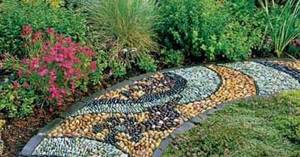
Treated and untreated stone is used for paving garden paths. Without processing, sandstone, limestone, dolomite, quartzite, slate, gneiss, and granite are used. They are used in the form of flagstone and chips. The following rocks are processed: quartzite, gabbro, basalt, granite, diabase, which are used in chipped and sawn form. Common materials for paths are various types of pebbles: sea, river and lake. There are even mosaic paths made of multi-colored pebbles cut into layers on a special fabric base.
Granite, diabase, gabbro and basalt are igneous rocks and are very durable. These types of stone are used to make paving stones and slabs.
Dolomite, limestone, sandstone and shale are sedimentary rocks. When arranging garden paths, they are used in the form of slabs with a thickness of at least 4 cm. These rocks have a porous structure. Limestone and tuff absorb moisture. It is advisable to treat the coating of such stone with a special water-repellent compound every 3 years.
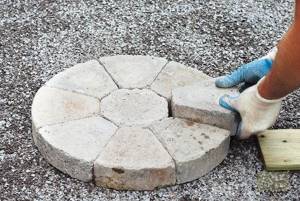
Concrete pavement stone
An economical alternative to natural stone pavers is concrete paving stones. It is available in several sizes and different shapes, rectangular and round. Concrete paving stones are most suitable for walkways with traffic loads.
Paving slabs
For the production of modern paving slabs, a cement-sand composition with the addition of dyes is used. The tiles are comparable in strength to natural stone. Paving slabs have a thickness of 45-80 mm. According to production technology, tiles can be vibro-cast or vibro-pressed. For main entrances and driveways, thinner and more durable vibro-cast tiles are preferable; pedestrian paths are laid out with vibro-pressed tiles.
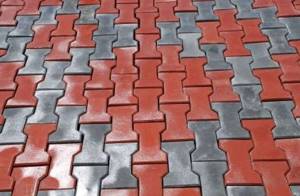
Tile paving is done in different ways: “bandaging”, “herringbone”, “ladder”. There is a method of laying “staggered”, when the wide spaces between the tiles are filled with lawn grass or gravel, crumbs, and sand.
Paving slabs can be concrete or ceramic. It is better to choose ceramic tiles with a rough surface to avoid slipping. There are ceramic tiles that imitate natural stone, “ceramic granite” or coated with glazes of different colors.
When purchasing paving slabs in Moscow, you should consider the following characteristics:
- Frost resistance (200-300 cycles). One cycle according to GOST means keeping a prototype tile at a temperature from -20 to +200C. In winter, paving slabs go through approximately 5 cycles. Thus, the service life is 40-50 years.
- Water absorption (3-6%). The smaller this parameter, the better, since water freezing inside the tile destroys it.
- Compressive strength (400-1000 kg/cm2). This is an indicator of the load that the tile can withstand. For garden paths, tiles with a lower compressive strength are quite suitable.
- Bending strength (40-150 kg/cm2). Characterizes the strength of tiles located at an angle.
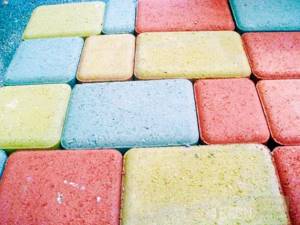
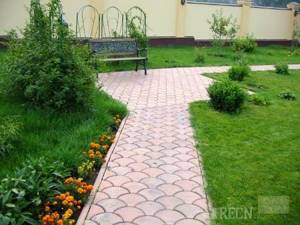
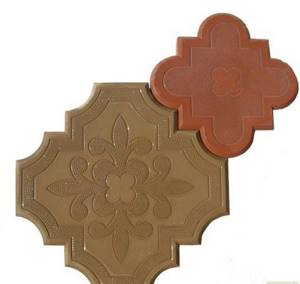
For garden paths, paving slabs and figured paving elements of various geometric shapes are used. In addition to the usual rectangular paving stones, tiles are produced in the form of a rhombus, honeycomb, coil and other more complex shapes. There are edge modules of paving slabs with a straight side for laying close to the curb or wall of a building. This is very convenient, as it eliminates the need to trim the tiles. Paving slabs are available for sale in a wide variety of colors. Tiles can be fully colored or surface painted. The top coat paint is fragile and wears off quickly.
Paving slabs are durable, strong, and frost-resistant. They are suitable for driveways and walkways. The tiled surface heats up moderately in the sun. Melt and rain water quickly drains into the cracks between the tiles, leaving no puddles on the path. If the installation technology is followed, the tile covering does not settle and does not form depressions.
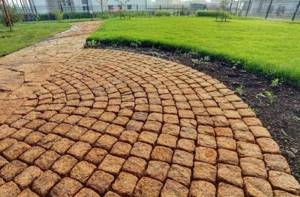
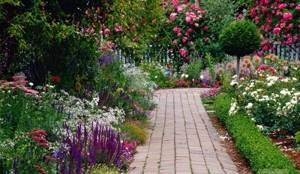
Clinker brick
Clinker bricks are designed specifically for paving paths. It comes in a variety of shapes (tiles, regular or slotted bricks). This material practically does not absorb moisture, is characterized by increased abrasion resistance, and has an original color.
Clinker bricks are placed on top of pebbles or crushed stone on a concrete mortar with a layer of 2-2.5 cm. The seams between the bricks are filled with sand-cement mixture in a ratio of 1:4. It is recommended to lay slotted clinker bricks on a sand and gravel bed. The cracks are filled with fertile soil and sown with grass. Brick is one of the most durable materials for garden paths. It is strong, frost-resistant and does not fade in the sun. Using different bricklaying methods, you can lay out geometric patterns in the form of herringbone, wicker, brick and perpendicular rows.
Plastic
Garden paths made of plastic are a simple and economical option for summer cottages. The most commonly sold floorings are 30x30 cm in size, which are easily and quickly attached to each other. Recently, plastic paving slabs have appeared. Its installation is not difficult: the tiles are simply stuck into the ground, which is especially convenient for quickly laying temporary paths.