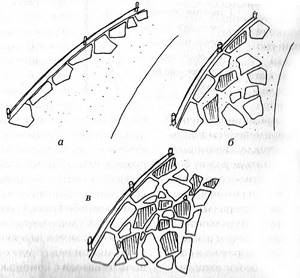
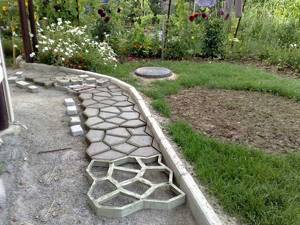
How to install formwork
Edged boards or thick plywood sheets with a smooth inner surface are used as formwork.
If the formwork structure is planned to be removable, then before installing it it is recommended to treat the inner surface of the boards with a special lubricant - thanks to it, the formwork can later be disassembled easily and quickly.
If there is no lubrication, you can use used machine oil.
Step-by-step instructions for installing formwork can be presented as follows:
- The boards are installed in trenches on a previously prepared base. The formwork can be installed all at once or gradually, as the boards are freed, the height should be equal to the height of the planned path. The horizontality of the structure must be checked using a building level.
- Layers of sand and crushed stone (if necessary) are poured onto the pre-compacted bottom.
- A mesh of reinforced rods is laid.
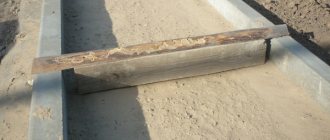
- Every 2-2.5 m across the trench, boards up to 20 mm thick are installed, which will take the main load during pouring. They will also serve as expansion joints, thanks to which they will not crack due to temperature changes.
The formwork should protrude 5-10 cm above the ground.
If you need to arrange paths of a curved shape, then instead of boards, plywood or plastic panels are used, which are easy to bend in the desired direction.
In order to save effort and reduce material costs, the formwork can be installed in parts.
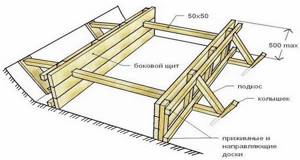
Edged boards are suitable for formwork.
Benefits of natural stone
The main advantage of the material is environmental friendliness and safety, which is very important in the modern environmental situation, where people are surrounded by dirty air and water, harmful radiation and products. Natural stone, unlike artificial analogues, does not emit chemicals during temperature changes
Natural stone, unlike artificial analogues, does not release chemicals during temperature changes.
The material is characterized by high strength and wear resistance, and is not subject to deformation under the influence of humidity and other climatic changes.
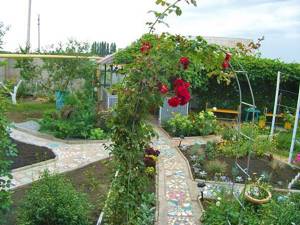
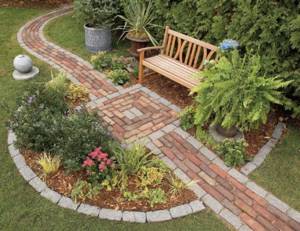
Another advantage of natural stone is its aesthetic appearance; the material is widely used in finishing work; recently, laying natural stone on paths has become widespread.
The range of shades and textures offered by nature itself can satisfy the most demanding client.
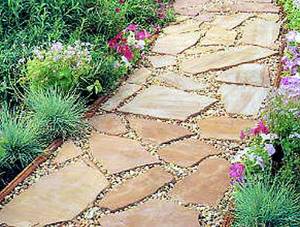
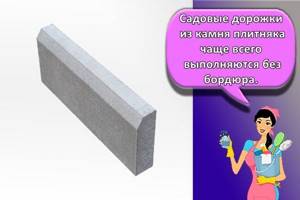
Flagstone is considered the most suitable material for paving paths, as it is durable, versatile, and easy to install and operate. The technology is not complicated; laying natural stone on paths does not require the use of complex equipment or materials.
Do-it-yourself paving of paths with paving slabs: step-by-step guide ↑
If there is vehicle traffic, the foundation should be strengthened. On top of the crushed stone, you need to pour a layer of concrete 12-15 cm thick, providing drainage holes. Concrete can be reinforced with reinforcing steel mesh or simply with loose pieces of reinforcement:
- The last layer of the base can be made of sand or a cement-sand mixture. Only coarse-grained river sand, well sifted, without pebbles, debris and clay inclusions, is suitable. If you prepare a mixture, the ratio of sand and cement depends on the brand of cement: for M150 the proportion is 1:3, for M400 – 1:6.
- To perfectly level the underlying surface, you will need guide beacons. Such beacons can be already installed cemented curbs. In this case, the surface can be leveled using a flat rule board, in which slots are made at both ends in the shape of an L so that the board rests on both side stones.
- If this method is not suitable, then two pipes with a diameter of 15-20 mm are used as beacons. They are laid along the passage, the surface is leveled with a board, then the pipes are removed and the grooves are filled up.
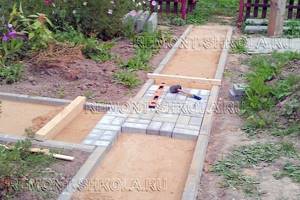
- Spread the sand or mixture in a layer of 7-10 cm, level it with a rake and compact it so that the laid paving stones are approximately 1 cm higher than the curb. This is the allowance for shrinkage.
- Now you can lay tiles or paving stones on the finished base according to the planned pattern. Each of them is driven in with a rubber hammer and leveled; if necessary, sand is added under the base or excess is removed. The width of the tile joints is maintained at 3-6 mm. A grinder is used to trim and fit pieces.
- Upon completion of installation, sprinkle the cement-sand mixture over the entire surface and sweep it into the tile joints with a broom or brush.
- Rinse the coating with a watering can or hose with low pressure and remove any remaining mixture.
During installation
Of course, it’s not enough to lay garden paths with tiles yourself; you need to properly care for them so that the surface does not collapse. For example, in winter you should not remove snow with metal shovels, much less break ice with a crowbar.
Substrate preparation and installation
To ensure that the paving stones do not move during use, the base must be properly prepared. There are 3 main technologies:
- Concrete.
- A combination of cement and sand.
- Sand.
Planning and marking
It is recommended to start work with planning and marking the site, which will allow you to determine the required amount of materials. Other recommendations:
- The path should be located at a sufficient distance from trees, because roots can damage the integrity of the foundation.
- The width of the path should be no more than 1.2 m. It is recommended to choose a multiple size of paving stones, which will reduce the amount of work.
- It is recommended to give simple forms of tracks, because... with complex ones, you have to spend a lot of time cutting the stone. Due to the high hardness, this is quite difficult to do.
- The slope must be created in such a way that precipitation is diverted away from the structures.
Marking on the site is carried out using pegs and thread. It allows you to maintain high precision when carrying out work.
Drainage layer design
Heavy rainfall can create a lot of problems because... water washes away the base. Therefore, experts recommend creating a high-quality drainage layer:
- The top layer of soil is removed taking into account the markings.
- The recommended depth of the trench to be created is 30-40 cm.
- A layer of sand is placed at the bottom of the trench and compacted well.
- The next step is to lay geotextiles, and the fabric should overlap by 10 cm. This layer is required to reduce the likelihood of weed growth, because it only allows water to pass in one direction.
- The drainage layer is represented by a layer of gravel, the thickness of which is 10-15 cm. A fine fraction material is selected, which should be compacted. The layer is covered with non-woven textile.
excavation
Installation of curb stones is carried out after creating a drainage layer. The height of the curb is adjusted by adding sand. Most often it rises 5-7 cm above the ground.
Construction of a concrete base
The main load will fall on the concrete base. It is created as follows:
- A layer of sand 3-4 cm thick is poured.
- The border is often used as formwork. If necessary, the spread of concrete mortar can be limited by securing edges made from boards around the perimeter.
- A layer of concrete 10-15 cm thick is poured into the created formwork. If a car drives on the surface, the base is reinforced. It takes about 72 hours for the composition to dry.
- After the concrete has gained hardness, a cement-sand mixture is poured onto the surface. The selected tile will be laid on it.

Concrete foundations are expensive. However, if the technology is followed, the track will last for a long period.
Cement sand base
A universal option is a cement-sand base:
- To begin with, a layer of sand 7-10 cm thick is created and compacted.
- Dry cement crumbles and is compacted again.
Path made of tiles and ceramic tiles
The remains of tiles after construction or renovation can be used to lay a path in the garden. Moreover, not only whole tiles will be used, but also individual pieces.
Entire paths can be designed either as an independent material or in combination with facing bricks or natural stone.
Pieces of ceramics and tiles can be laid out in a beautiful mosaic or in the form of a thematic picture. However, this will require a lot of perseverance and a lot of time. But the result will please you.
To design a path made of this material, proceed as follows:
- According to established standards, a trench 10 centimeters deep is dug for the path. Rubble is poured onto the bottom in a thin, even layer and compacted thoroughly.
- To strengthen the base and give it strength, reinforcement is made of thick metal mesh.
- Concrete solution is prepared, the path is poured and leveled. The pattern or pattern of tile pieces begins to be laid when the cement composition begins to set slightly. To make the work go faster, the drawing is laid out next to the path in advance. Then it is only transferred to the hardening concrete.
- After laying the tiles, the seams are rubbed down.
If whole tiles and pieces are laid out, then large elements should be placed along the edges and in the center, and the space between them should be filled with smaller ones.
You can use glass bottles with sand turned upside down as borders, as in the photo.
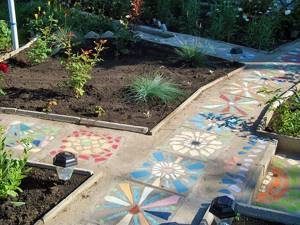
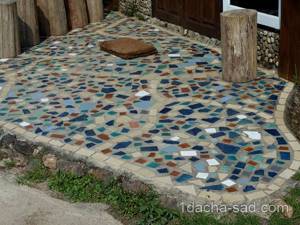
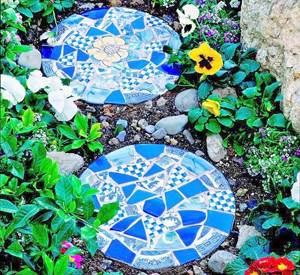
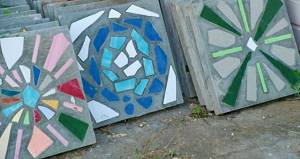
Broken Tile Mosaic - How to Make Beautiful Garden Paths
Design of a garden path with a mosaic of broken tiles A mosaic covering of paths in a garden plot can be made from broken tiles and broken tiles. It may seem that laying such pieces of tiles is done as expected, but in fact it is done according to certain rules that ensure the symmetry and strength of the garden path.
Principles of laying mosaics from broken tiles
How to make a beautiful mosaic , even if you do not have an artistic education: to lay out the outer edge of the path, use large pieces of broken tiles, which must have at least one straight edge.
Pieces of various shapes are laid out in the center of the path. You can make a simple geometric figure or pattern, and then lay out pieces of tiles on it.
Irregularly shaped fragments are used to fill the voids between the laid out elements.
The covering of such a path depends on the source material and the imagination of the paver.

Broken tile mosaic
Here is an interesting example of a path with a mosaic of broken tiles - with fun inserts: a bat and a frog.
The process of laying a mosaic garden path
Before laying, you need to select and sort the pieces of tiles by size, shape and color if you plan to lay the path in a certain color scheme. The sorted pieces should be placed near the installation site so that what is needed is at hand.
Bright paths - mosaic of broken tiles
Now you need to make a base for this track . Remove the top layer of turf and compact the bottom of the trench. If the soil is very loose, then it should be removed and filled with a 10 cm layer of greasy clay and compacted thoroughly.
Pour a layer of sand 5 cm thick, level the surface and compact it. After this, they begin to lay out the tiles, having previously pulled the marking cord at the required level.
Paths with mosaics made of broken tiles
Existing tiles with straight edges are laid dry along the perimeter of the path along the cord. Next, you should mix a little cement mortar, lift the first tile, put the mortar under it and press the tile by rotating it.
You need to make sure that it fits well and only then begin laying the next tiles, checking the horizontalness each time. Or you should check the slope of the path if it has one.
Mosaic made of broken tiles - patio at the dacha
Having laid the tiles around the perimeter, make the center of the path from large pieces of irregular shape, laying them directly on the sand base using the prepared mortar, removing or adding base sand if necessary.
Once you have laid all the center tiles, check the level in the center and around the perimeter. To do this, place a wooden block on the path and level the tiles by tapping them with a hammer.
Playground with mosaic made of broken tiles
The remaining free space between large pieces of tiles should be filled with small pieces of irregular shape, securing them with mortar. To do this, apply mortar to the bottom of the tile with a trowel and lay it on the base.
Scheme for laying mosaics from broken tiles
In order to level the path after the small fragments have been laid, you should use a wooden block and a hammer.
The joints formed between the tiles should be filled with liquid cement mortar, which will ensure the strength of the coating.
In order to prevent rainwater from retaining on the path when jointing, small holes need to be made.
You can achieve a decorative effect when laying out a mosaic path if you skillfully combine different laying methods and different materials.
Mosaic tiles for garden paths
Nowadays it is very popular to lay out a mosaic path using thick colored glass.
Some will want to get a runner that looks like a patchwork quilt , using the most unusual and bright materials. Then feel free to combine colored glass, natural stone and tiles.
In any version, the path can become a decoration of the garden and the pride of the owners. But do not overuse the number of combined surfaces, the intricacy of the pattern and the number of colors.
It is better to skillfully use different surface textures rather than color contrasts in the material. Sometimes variegation is appropriate, for example, among a green lawn or on the path leading to the playground.
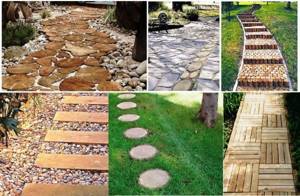
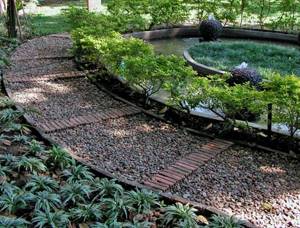
A path made of decorative slabs and large natural stones can be laid along the bank of an artificial stream, then its bed will set the direction of the path.
Mosaic coating does not have to be expensive . Here you can combine red brick, cobblestones, concrete, and wooden cuts.
The mosaic path should be arranged and designed in accordance with the available material suitable for covering.
Example of round mosaic slabs
The main disadvantage of mosaic pavement with various materials is the difficulty of maintaining the path. In winter, the surfaces will need to be cleared of ice, or in the fall all paths will need to be covered from water with a layer of polyethylene.
Mosaic of broken tiles in garden paths by Antonina Romanyuk
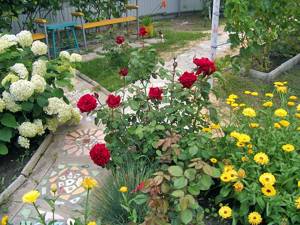
I have always been impressed by those people who, working on their land, transform and decorate the space. As much as I walk around summer cottages, I always pay attention to those where the handwriting of a passionate person is visible.
Antonina and I got in touch after she commented on my post with a mosaic made of broken tiles, saying that she was also creating paths from this waste material. We talked and Antonina sent me her short story with photographs. Let's admire the author's tracks!
Below is Antonina's text:
We bought a house four years ago. At first, they grabbed their heads: the area was unkempt, the grass was waist-deep, the trees were in disrepair. But the eyes are afraid, but the hands do.
True, we had to take into account our modest capabilities, since we are, after all, although young, but pensioners.
We cleared the garden of weeds, marked the paths and got to work. They set up their own mini-workshop in the basement for these purposes. They began to make slabs, borders and decorate them with mosaics. Broken tiles, which were bought in construction stores, were suitable for this. And this is what came out of it.
Then they acquired forms and began to fill them with concrete mixture, and along the edges there were the same broken tiles. Of course, it was translated immeasurably, but we were pleased with the result. Let's get settled further. We work, which means we live!
I am grateful to this sweet woman for the material she provided! By the way, if you have something to tell and show, then leave your comments and I will contact you and be happy to host your ideas and experience!
My video tips - do-it-yourself mosaic from broken tiles
Share link:
- Click here to share content on Facebook. (Opens in a new window)
- Click to share on Reddit (Opens in new window)
- Click to share on Pinterest (Opens in new window)
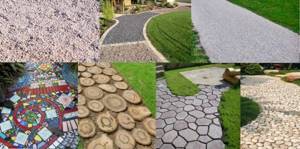
Choice of material - types of tiles
For paving garden passages, materials are chosen depending on the traffic flow. For wide paths where vehicles can pass, durable coatings are needed. Narrow paths are decorated with light tiles.
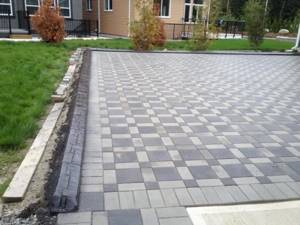
The highest quality and most durable path - bounded on both sides by curbs pre-installed on the concrete mixture
A natural stone
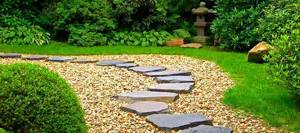
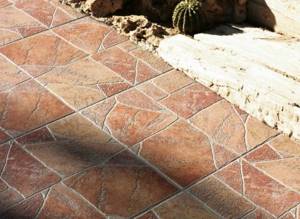
Stone garden paths are a classic. The stone will fit into any landscape design, it all depends on the shape and color of the stone:
- durable granite with a variety of textures is offered in the form of tiles and bricks;
- marble amazes with its variety of shades, most often used in the form of natural cuts of blocks;
- The choice of slate for installation is hard, quartzite, the palette of shades is wide from gray to marsh, pinkish-salmon to carmine;
- quartzite is harder than slate, rougher, cut into tiles or paving stones;
- shungite is smooth, smooth, gray like asphalt, sometimes there are pieces with shiny quartz veins;
- sandstone is cut into bars and tiles of various formats, moisture saturation is higher than that of other stones, but it is very decorative, the rough texture creates an anti-slip effect;
- flagstone is quartz rocks that form layered deposits, textured, yellow to reddish in color.

Stone tiles with a relief surface look elegant and expensive
A combination of stones with a rough and smooth surface is allowed. The best option is the joint laying of sandstone and marble.
Fake diamond
For paving stone paths in the country, clinker bricks and concrete tiles are used. Clinker is made from plastic clay, looks like a solid brick, and comes in shades of brown and red-brown.
Clinker paving stones are one of the most durable materials for country paths
Porcelain tiles vary in texture, color, and are produced:
- in the form of tiles of various formats;
- torn plates imitating natural pieces of stone.
Most often you can find porcelain tiles in medium and large formats
Garden path made of porcelain tiles with imitation of natural stone
When working with flagstone, it is recommended to install curbs on paths after laying to reduce the number of trims.
Concrete
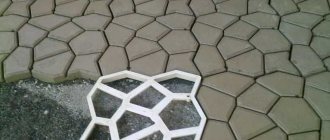
The concrete is made smooth or with an anti-slip surface (the hardening concrete is treated with sand). They imitate the texture of flagstone and clinker. Concrete paths made of tiles in the country are an economical design option. When making fragments yourself, ready-made molds are used.
Concrete tiles are produced in different sizes, textures and thicknesses
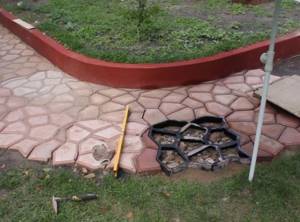
When making it yourself, concrete tiles are poured directly on site
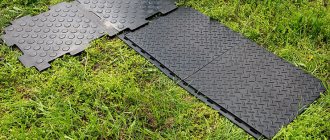
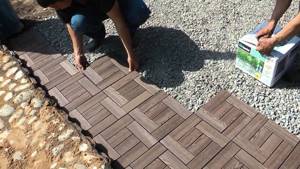
Polymers and plastics
Modern manufacturers offer many types of decking - artificial deck boards or parquet. Paths made from such tiles look like wooden flooring and are not afraid of moisture or temperature contrast.
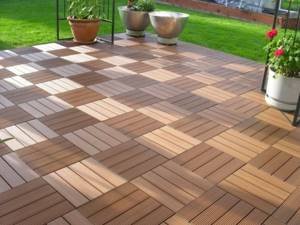
Garden decking or parquet are panels with a pattern made from a mixture of plastic and wood flour.
Plastic covering made of modules is suitable for constructing paths and decorating recreation areas
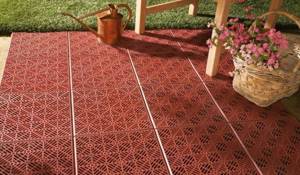
Lawn tile gratings are created in the form of modules; they are usually green, easy to install, and will preserve the green carpet.
A path made of plastic lattice can be made directly through the lawn, or it can be laid on a sand bed and the cells can be filled with fine gravel.
Distinctive features of the material
First of all, you should understand what exactly flagstone is, which is often used to create nice garden paths. These are flat slabs of natural stone, the thickness of which can vary from twelve to fifty-five millimeters. The shape of stone plates can be almost any - square, rectangular, oval, round.
Depending on the source material, there are several types of flagstone stone. The most popular are granite flagstone, slate flagstone, and sandstone flagstone.
The widespread use of flagstone stone in landscape design is due to its many positive features, each of which will be considered separately.
Smooth and non-slip surface
Stone plates have an absolutely flat surface that does not slip when exposed to moisture or snow. This ensures safety and comfort of movement along garden paths.
The degree of moisture absorption of flagstone depends on the initial density of the stone and averages about 6%.

Ease of processing and installation
Processing flagstone is not difficult. Natural stone is easy to cut, grind, polish and engrave. Laying out paths from this material is also very simple. This is done using the standard method without border edging.
Laying paving slabs on a paving stone path
How to lay paving stones correctly with your own hands. There are several options for choosing a starting point to begin laying tiles when constructing a structure. Where to start laying tiles? The most correct option seems to be choosing the starting point for laying the tiles depending on the important visible elements. In this case, it is the intersection of lines of movement.
Tip: the beginning of installation can also be done from the lower to the higher point, from an optically important boundary or other significant visible elements - porch, entrance, etc.
Use tool No. 2 - (height 6 cm) to create a flat surface for the leveling layer. Move the device along the curbs as if along guides, removing excess sand.
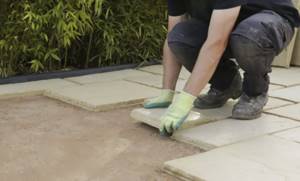
Lay the tiles starting from the center. Using a rubber hammer, press the tiles into the sand until they are level with the curb. Recess the tiles by about one centimeter or a little less. Further compaction will eliminate minor unevenness. Check the flatness of the tiles using a building level.
Continue laying paving slabs until the entire surface is completely filled with tiles. At the end of the paving stone path, if necessary, use a grinder with a diamond-coated wheel to cut the curb stone to the desired length.
What tools and materials will be needed
When starting to work with flagstone, you need to prepare the necessary tools and related materials. Let's take a closer look at each of them.
Kiyanka
A mallet is a small carpenter's hammer, the striking element of which is made of durable rubber or wood. Using this tool, you can achieve the tightest possible fit of stone slabs to the base.
Master OK
A trowel or trowel is a tool necessary for uniform stirring and subsequent application of cement bonding mortar. Made in the form of a small spatula with a handle.
Level
Using a building level, stone slabs are laid with maximum accuracy relative to the ground surface without errors.
This essential tool can be made of metal, wood or plastic. Its important elements are barrel-shaped measuring flasks filled with liquid - they are called “level eyes”. A widespread model is a level with two “eyes” - horizontal at 180 degrees and vertical at 90 degrees.
Border
Garden paths made of flagstone stone are most often made without a border. However, it is also possible to have a low border made of small vertical stone slabs.
Bulgarian
To cut stone slabs, you need a grinder (grinder or angle grinder) with improved dust protection and adjustable speed.
Crushed stone
High-quality crushed stone combines well with flagstone, making the garden path more impressive and durable. There are three main types of crushed stone - slate, granite and gravel.
Roulette
To mark garden paths, a construction tape is used, which combines the properties of a compass, calculator and marker.
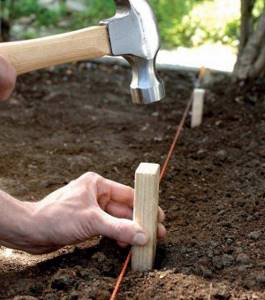
Pegs and cords for marking
The future garden path is marked using sharpened wooden pegs. They should be driven to a depth of at least 300 millimeters. Then stretch a marking or tapping cord, which is also known as coated thread, across the entire inner surface of the stakes.
Shovel
Using a shovel, a trench is dug in the place where it is planned to arrange the future garden path. The depth should average 30 centimeters.
Wire brush
A brush with hard bristles made of metal wire will be needed to remove traces of rust, salt deposits and other defects from the surface of the flagstone stone.
Vibrating plate for soil compaction
A vibrating plate or vibrating roller is an indispensable tool when laying paths made of any types of tiles. For ideal compaction of stone slabs, paving slabs, gravel, crushed stone and sand, devices of various capacities are used.

Concrete mixer
This device is used not only for stirring the cement mortar, but also for rolling in natural stone.
Sand
The masonry mortar contains sand, which can be river, sea or quarry
In addition to its origin, attention should be paid to volumetric weight, density and composition
Safety precautions when working
When working with cement, one of the most harmful factors is dust. Therefore, before preparing the mixture, you should wear protective clothing: gloves, a respirator or a protective mask.
But it is also important to ensure that diluted dye or plasticizer does not come into contact with your skin or eyes.
You need to be careful when the concrete mixer is working. You should check the integrity of the wires and sockets, do not test the quality of the concrete and do not correct problems when the equipment is plugged in.
Although the process of preparing paving slabs is labor-intensive, the result is worth it. In a month, garden paths laid out with a beautiful exclusive coating can turn your garden plot into a small masterpiece of landscape design.
Drawings for laying paving slabs and paving stones - design solutions
There are several types of paving; installation technology is chosen depending on several factors:
- relief features;
- the width and contour of the path, on a wide one you can create large mosaic designs, on winding ones, chaotic laying is appropriate;
- architectural features of buildings located on the site;
- purpose of the zone being designed.
Using paving slabs, you can make paths with unusual patterns, different colors and textures
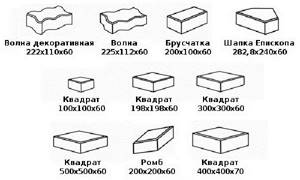
Manufacturers produce tiles in various sizes:
- square;
- hexagonal;
- in the form of fish scales;
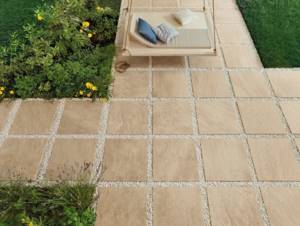
- rectangular - this shape is considered traditional.
Paving slabs are convenient to use both on narrow paths and for paving large areas
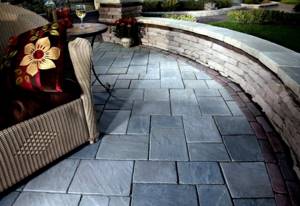
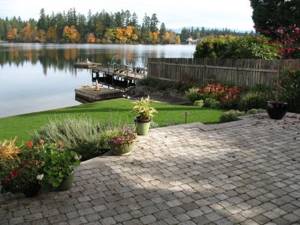
Paving the recreation area with large-format natural stone tiles
Combining different tiles allows you to create beautiful patterns on garden paths
Patterns are created by alternating the position of the tiles, using coatings of various colors and sizes.
Errors when marking the area for tile laying lead to an increase in the consumption of coatings. The number of tiles that need to be cut increases.
Typical installation options with step-by-step instructions can be easily found on the Internet:
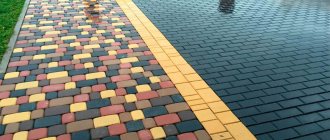
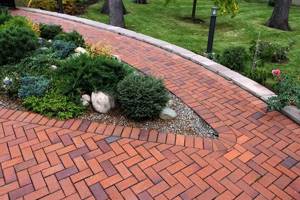
- Direct laying is the formation of narrow strips that set the direction of movement. In rows, the seams are combined with adjacent ones or made with a shift of half or 1/3 of the tile.
- “Herringbone” - installation of covering fragments at an angle, one of the popular methods of paving paving stones, clinker bricks (by changing the angle of the “herringbone”, the width and length of the path are visually adjusted).
- A chaotic laying order is welcome if the tiles in the packs do not match in shade (before installing the covering, it is recommended to open all purchased packages, only then begin laying).
- “Checkerboard” – alternating light and dark fragments. For chessboard, tiles of any shape are used, the main thing is that they match in size.
- Diamonds are created for visualization; they can lengthen and shorten the sidewalk.
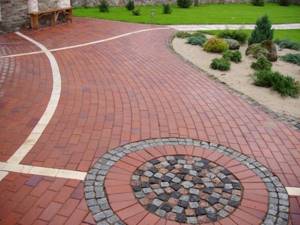
- Circles and segments are formed by radial laying; colored square tiles look especially decorative.
- The curly ones are laid out according to a prepared template, and interesting images of birds and animals, intricate patterns, and ornaments are obtained.
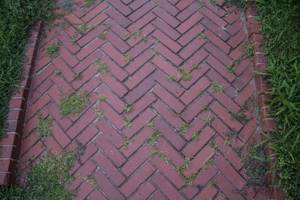
Path made of clinker bricks laid in a herringbone pattern

Garden paths laid out with rectangular tiles “staggered”
Working with natural stone, selecting pieces to fit the format of the path, sawing off or chipping the excess. If desired, smooth the sharp corners of the stone with a grinding machine. The fragments are laid end-to-end or with a gap filled with sand or concrete mortar with the addition of dyes. For whiteness, fluff is added, shades of gray are created with ash. You can add water-based or acrylic paint colors to concrete.
The trend is zoning using a combination of natural paving with other types of coatings; transitions are decorated with different green spaces that complement the unified picture of the landscape.
Paving paving slabs
In terms of reliability and durability, tiled stitch is not inferior to concrete stitch. There are 2 nuances: the material will be more expensive and requires proper installation. Therefore, ceramic bricks, either used or left over after construction, are often used instead of tiles.
Having prepared the base of the garden path (the method is described above), lay bricks or paving slabs using the following technology:
- Make a dry cement-sand mixture (prance) in a ratio of 1:4 and lay it on top of the compacted gravel backfill with a layer of 2-3 cm. At this stage, provide a slight slope for water drainage from the coating, leveling the prance with the rule.
- Lay the tiles close together, stone to stone, tapping them level with a rubber mallet. Check the horizontal level with a building level after paving each row.
- Carefully fill the joints between the tiles with grout. Try to compact the mixture so that grass does not grow through the seams.
If you need to lay out a site in front of a garage or in another place with increased load on the coating, you should use cement mortar. Decorating a sidewalk like this is easy: buy tiles of different colors and shapes. More information about the technology of paving tiled paths is described in the following video:
DIY garden path made of concrete: step-by-step mosaic
For those who don’t like simple and boring options, we have prepared an amazing step-by-step master class on creating a unique and inimitable step-by-step path with your own hands! It’s not at all difficult to create such beauty, but at the same time, no one in the area will have such an amazing path. A very skilled craftswoman made this step-by-step concrete path with her own hands and shared her project online. Now, thanks to her detailed instructions, anyone can create such a miracle! And most importantly, to make such a path, you don’t need to mix concrete all day or make any effort. Just use your imagination a little, and then you will get a unique masterpiece that will give any store-bought tiles a run for their money!
So, to create a concrete path with mosaics, she needed:
- non-stick baking tray (any shape, preferably round)
- petrolatum
- adhesive paper
- old plates
- pebbles and unnecessary jewelry
- glass
- concrete
- mesh for reinforcement
The author described all stages of the work in step-by-step instructions. At the end of the work, the master advised to coat the finished parts with varnish. Then we lay step-by-step slabs as in previous master classes.
This version of a step-by-step concrete garden path will appeal to those who love a creative approach in everything!
Photo source intimateweddings.com
Natural stone for paths - step-by-step paving instructions
When you get tired of picking up stones, you can proceed to the most interesting part of the process - namely, laying them. Don't forget to prepare all the tools needed for this process - a trowel, a bucket and a few dry rags.
Step 1: Site Preparation
If you carried out dry laying on a concrete screed, carefully remove the sandstone to the side, maintaining order. Prepare glue in advance for lubricating the stones themselves - properly mixed glue will not contain lumps and will remind you of liquid sour cream in thickness. The selected tiles should be coated with glue on the side that will be applied to the ground using a hard brush. While they are drying a little, sweep the concrete base thoroughly, you can even vacuum it - dust can significantly ruin the installation process.
Step 2: Gluing the Stones
So, you have prepared the material for installation. Apply the pre-prepared adhesive mixture, namely its economical version, to the site with a trowel. It should be applied carefully, even in excess, but in no case leaving empty spaces - water will definitely get into them, and at sub-zero temperatures this can lead to the tiles breaking off from the concrete base.
Place flagstone No. 1 on top of the mortar and press down firmly. For greater confidence, it doesn’t hurt to even press on it with your feet. You must squeeze out as much glue as possible from under the stone - in this case, it will lie firmly on its base, leaving no voids underneath. Carefully collect excess glue back into the container with the mixture.
Glue the second tile in the same way. Dashes and symbols will significantly speed up the process. When docking, first press on the side that is in contact with the already laid stone, and only then press on the other side. The second option is also possible - lay the sandstone at a short distance from the “neighbor” and, while pressing on it, simultaneously move it towards the already glued tile. In this case, excess glue will appear in the gap between them. You cannot leave them there - remove them with a trowel and wipe the stone with a rag, since washing off the glue will be a very difficult task.
After laying a few tiles, you will feel like a real master in such a matter as paving with natural stone with your own hands. Make sure that there are no differences between them; with the help of the adhesive mixture you can always raise the tile to the desired level. You will not encounter any more difficulties in laying natural stone.
Step 3: After installation
It will take several hours for the glue to set well. And the very next day you can take a stiff brush and clean the area, generously watering it with water. It is acceptable for the glue in the gaps to wash out a little, forming hollows. The surface of the paths must be sprayed with water for several more days until the glue completely hardens. Surely, you will like the look and color of wet flagstone - in order to achieve a permanent effect, you can cover your DIY natural stone garden paths with polyurethane varnish.
https://youtube.com/watch?v=JWb4yLwd7PU
Tile installation
After preparing the soil, sand is poured in an even layer; it will increase the strength of the sidewalk and will also serve as a drainage system. Water is carefully poured onto the laid and leveled layer of sand until puddles form on its surface. Two pipes are laid along the edges of the base, at a selected distance from each other. Sand is poured between them and leveled with a channel. The result is a smooth sandy surface.
The tiles are laid strictly according to the level of the stretched string. Its installation begins from itself. The tiles must be placed close to each other. Such actions will prevent the increase in seams between them. You can use crosses, then the distance between the tiles will be 2 mm everywhere. Its level is adjusted by adding or removing sand from under its layer with a trowel. The path is leveled with a mallet and checked with a building level. The resulting seams are covered with a layer of mixture, the components of which are cement and sand, and then watered with water.
Bed preparation, soil excavation, compaction
After preparing the area for the future path, you can begin to excavate excess soil. The soil is selected to a depth determined by the thickness of the tile plus 3-5 centimeters of sand cushion
If, for example, your tile is 10 cm thick, then the excavation depth will be 13-15 cm
The result is a path flush with the surrounding surface. To excavate the soil, first vertically pierce the soil with a bayonet shovel along the entire perimeter of your path, then excavate the soil directly from the area of the path itself, controlling the depth of its excavation. After excavating the bulk of the soil, clean the path bed using a shovel. Next, compact the soil in the path bed using a log.
Beautiful ideas for the yard
Practice shows that original hand-made tiles often look more advantageous than factory-made ones. Solving this problem yourself is quite simple:
- Tiles in the form of leaves. The creation of such elements involves the use of a combination of gravel, sand and cement in a ratio of 3: 3: 1. To obtain such slabs, you can use any large leaves (optionally, burdock, zucchini or horseradish), carefully pressing their back side into the solution. Next, you need to put the tiles in the shade and spray them periodically. As soon as the solution has hardened by half, the leaves should be separated and the slabs should be left to dry.
- Concrete circles. Typically, such elements are placed surrounded by crushed stone or pebbles. Molds for round tiles are most often made from cut plastic buckets.
- Patterned tiles. The material of this decor is DSP, into the surface of which decorating elements are pressed - pebbles and shells, keys and coins, pieces of colored glass and much more.
Finally, it remains to be stated that laying paving slabs in a dacha is a relatively cheap and at the same time effective way to improve a garden plot. To make paths from such material with your own hands, you do not need to contact specialists or purchase expensive equipment. It is enough to adhere to the recommendations listed above, which will allow you to solve this problem with the least amount of time and effort.
In the next video, watch a master class on making paving slabs with your own hands
Construction of a flower garden
If you still have paving slabs, you can make a small but nice flower garden to decorate the area. It is made even easier and faster than the track itself.
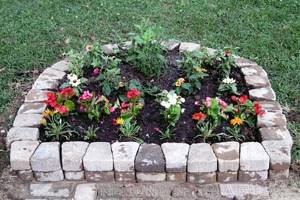
You can simply lay tiles on tiles without using cement mortar or tile adhesive, cover it with soil and the flower garden is ready.
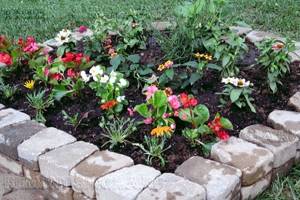
If you have the time and desire, you can make a flower garden by fastening the tiles with cement-sand mortar, and you can choose, for example, white cement, then your new flower garden will be beautiful and eternal, but in this case it is recommended to prepare the base with more than 5 cm of sand.
Constructing a garden or personal path in this way is really inexpensive both in terms of time and materials. You can easily make such a path yourself with your own hands without the involvement of specialists and workers. Such a path will serve you for a long time and reliably, especially since something made by yourself is always more pleasing!
Tags
dacha path paving slabs tiling
Which tile to choose?
Pedestrian paths are important objects in the country, ensuring free movement within the site. Paving slabs are most often used to organize them. This material has a number of important advantages, such as:
- environmental friendliness,
- reliability;
- durability.
Important! To lay such a path, the area must have a sufficient amount of free space.
This is a very important point, since in a limited area it is much more difficult to install a path, and its appearance will be less attractive. Experienced craftsmen do not recommend installation in rainy weather.
Variety of tile paths
How to choose a tile? When choosing this building material, you need to pay attention to the purpose of the future path. If this area is exclusively pedestrian, then for its construction you can use products whose thickness is 40 mm
Larger tiles can be used to lay out paths for vehicles to pass through.
You also need to pay attention to the shape of the tiles. The complexity of its installation depends on this factor.
Rectangular-shaped products are the most appropriate, since they are the easiest to make a path from.
Rules and tips
When buying tiles, the site owner should take into account that some of the material will turn into waste. First of all, this is explained by the cutting of paving slabs, which depends on the shape and dimensions of the elements used, as well as the method of their installation.
In addition, it is advisable to consider the following points:
- It is not recommended to build paths at a distance of up to 70 cm from trees. As the root system of the latter develops, it can seriously damage the created surfaces.
- If the traffic intensity on the paths is average, then in most cases a width of 0.8 m is sufficient.
- In situations where the owner of the site plans to use paths for transporting luggage in wheelbarrows or moving a large number of people, the width of the created coating must be increased by at least 20 cm.
- To ensure that subsequent work is carried out with the least difficulty, it is advisable to mark the outlines of future paths using a thin cord stretched between the pegs.
It should also be noted that paths laid out on a dry mixture or mortar on a crushed stone bed can support the weight of a passenger car. If you lay the materials on a base that is reinforced 1.5 times, you can get a path that even a medium-sized truck will not be afraid of.
Laying paths
Planning and dividing the territory into sectors
A DIY path in your dacha is very interesting! But before you start any construction work, you should plan everything carefully. On graph paper, draw up a diagram of the site - take into account every building, plant, parking space, etc. There must be a path to the entrance to the building from the gate! The remaining directions should be chosen according to the author's intentions.
The easiest way to plan paths on a site is to create paths along previously trodden paths. As a rule, the path must be at a distance of no less than 60-80 cm from the trees (all due to the fact that every year the root system grows and increases, and over time the path can become deformed).
Please note that the average passage for one person is 75 cm, so the width of the path will be approximately 75-80 cm, and where there is constant movement it will be from 100 to 150 cm. The areas can have different sizes, much depends on the purpose.
If you have not worked with an angle grinder too often, then you should choose the shape of the tile that requires the least trimming - square or rectangular. It can also be styled in an unusual way if you choose a good pattern and shades. The width of the sidewalk is selected by the owners, preferably so that the paving stones lay without cutting - this way you can save material and time.
Purchasing materials
To ensure that a paving slab path in your dacha does not require constant maintenance and repair, you should choose the right type of tile, which will depend on the expected loads. For example, to build a walking path, you should use a fiberboard with a thickness of 2.5 to 4 cm. If it comes to a parking space for a car, use vibrocast tiles with a thickness of 4 to 6 cm. Paths that will be used for industry should be made of tiles with a thickness of 6 to 8 cm (such tiles are made only in special enterprises).
Expert advice and features
In order for you to be able to navigate the types and sizes of tiles, you should also pay attention to the following statistics - paving slabs for country paths most often have a rectangular shape and a size of 20*10 cm. No less popular are square tiles of various sizes, and 10 *10 cm, and 50*50 cm. Since large tiles themselves are heavy, they are used extremely rarely. In addition, we are talking about a suburban area of several hundred square meters, where the paths are from 70 to 80 cm wide. For this reason, many opt for tiles with a size of 30 * 30 cm, but if in some place you have enough width of 50 cm is ideal - you can simply lay large 50*50 tiles between the border.
In addition to standard types, tiles can be in the form of a butterfly, diamond, hexagon, fan, mosaic, wave, and others. The thickness of these types ranges from 2.5 to 6 cm. If you wish, you can abandon the curb and make a path without them, but if you live in a region where there is a lot of rainfall and it is plentiful, then this is not the best solution.
The border helps make the path not only aesthetically complete, but also strong:
- When choosing a stone for a border, consider the color of the sidewalk tiles. Sometimes for a border, use a rectangular tile placed on an edge.
- Gravel or crushed stone should be fine/medium. The second option is preferable, and with its help it will be possible to create a less fluid and stronger base.
- We only use sand that is clean and free of impurities from stones, clay or plant roots.
- Geotextile material can serve as an excellent protection against grass germination, and will also help strengthen the base and help drain accumulated liquid. The main characteristic is the elimination of sidewalk subsidence.
- To prepare the mixture for laying on the base and grouting joints, use cement grade M-400 or M-500.
Basic installation steps
Marking
Along the perimeter of the future path, pegs should be driven in, which will be located at a distance of 100 to 300 cm. After this, pull the cord along the height of the planned border. If you have a lot of bends, then you should place the pegs clearly along the marked contour of the paving slab path with your own hands. When finished, it must be above the ground, at a low height, so that when precipitation falls, water does not begin to accumulate on the sidewalk. To do this, you should build the surface of the future path with a small transverse slope. The marking of one curb should be 5 degrees higher than the first so that water can drain freely. The slope can be longitudinal-transverse and longitudinal.
If the path is laid without a slope, use gutters to drain water. In some cases, the ground should be left. In this case, the path will turn out to be much higher than the ground level, but then there is a high probability that rain and melt water will very quickly cause the path to deform.
Choosing land
Accurately according to the markings, you should select soil to a depth of 20 to 30 cm. In many ways, the depth will depend on the thickness of the base that will be molded under the tile. The pegs should be driven into the ground deeper than the intended selection so that the intended markings are not disturbed. Afterwards, select the soil over the entire area where the base for the tiles will be made. When carrying out excavation work, you should constantly check the soil level so that everything comes out evenly.
Installation of border
In the photo of a path made of paving slabs, the height of the sides will be greater than the tiles, so along the edges of the cleared area you should dig grooves below the excavated surface by 15 cm and with a width of 15 cm. This will be quite enough to strengthen the borders. After this, the base for the path should be compacted using mechanical or manual tamping.
To do this, gravel should be poured into the prepared grooves along the path at a level of 5 to 8 cm. After this, it must be wetted and compacted until compacted, and then the surface must be leveled. Now you should install a curb along the beacons, fix it with a cement solution (1 to 5, 1 measure of cement, 5 measures of sand). Check the slope of the path using a rule and a level (should be 5 degrees). After this, the solution must harden, and this will take at least a day, and only then can you begin to create the base.
Preparing the base for tiles
So, you should make a backfill of crushed stone or gravel 6-16 cm deep, and then moisten everything and compact it well. Next, roll out geotextiles over the entire area, which will protect the sidewalk from grass growing, as well as from sand spilling onto the crushed stone and improve drainage. After this, pour a layer of sand from 6 to 11 cm on top, compact it, and immediately before laying the sand should be wetted and allowed to dry. Please note that the sand should be damp, but in no case wet.
Geotextiles should be laid under crushed stone if the soil on your site is considered unstable. It will help delay the subsidence of crushed stone/gravel into the ground, and will also further strengthen the base of the paving slab walkway. While the sand dries, you should prepare a cement-sand mixture. Add cement to the sand, and the ratio is 1 to 5, i.e. 1 measure of cement and 5 of sand. The latter must be clean and free of impurities from stones, clay, roots or earth. Mix everything thoroughly. Afterwards, pour the finished mixture onto a layer of dried sand and can be compacted. The layer should be 5 cm.
In order for the layer to be uniform over the entire area, you should use a rule or even the most ordinary board with edges that are shaped like the letter “L” to level the mixture. In this case, the curbs at both ends of the rule should be like beacons. If the leveling area is large, then the pipes should be laid at a distance of 1 and parallel to each other. Now all that remains is to mix a solution of cement and sand, and then you can compact the layer and pull off the excess with a rule. Pipes will serve as excellent beacons. When the pipes are pulled out, carefully pour a mixture of sand and cement into the resulting recess.
Laying
Laying a path from paving slabs in a country house will require the use of a building level, a mallet and rules, as well as a trowel or trowel. As a result, the distance from the top border to the top layer will be “tile thickness – 1 cm”. When making a walkway, the paving slabs must be 10 mm higher than the curb, since after shrinkage everything will be level.
The tiles should be laid away from you so as not to accidentally step on the already prepared base. You can apply the rule from the end to align the first row. Subsequent rows in this case will be laid according to the report or pattern. If any element begins to protrude or even fall through, it is better to remove it with a trowel and remove/add mortar, and then put it in place and tap it with a rubber/wooden mallet. Then attach a building level and check the plane. You should always check the height of the tiles using the rule, at least according to the outermost tiles, but do not forget to take into account a slight slope for water drainage.
If the tile has an irregular shape or you have chosen a pattern with a large number of trims, then first you should lay out whole tiles according to the drawings and only then begin filling with the trimmed parts. This way, you can use even substandard material around the edges that was set aside in advance. After this, you should arm yourself with a grinder and a circle on the concrete, as well as a construction pencil. Mark the tiles, draw the required size and cut along the side that will go to waste.
Yes, such work is dusty, so in no case neglect protective equipment, namely earplugs, goggles, a respirator and gloves. And yes, under no circumstances remove the casing from the angle grinder, but simply select an angle grinder of the required diameter.
Rubbing seams
The remaining mixture of cement and sand can be used as a tile grout. Sprinkle the mixture over the entire area and mop using a mop that has hard bristles.
The excess can be removed with the same mop. After this, use a garden watering can or a watering hose with a sprinkler to wet the path and leave it to stand for 3 days. This way the mixture will set and begin to gain strength, so you should under no circumstances walk on the laid paving stones during this period of time.
Caring for the tiles during operation is simple, but it has a lot of features. In winter, you should never clear snow using metal objects, and salt and de-icing mixtures that contain salt are also harmful for such tiles.
For safe movement, it is best to use sand as a powder. Yes, the appearance of a path made of paving slabs will delight you for decades, and it doesn’t matter whether you make it yourself or seek help from specialists.
Design of paths made of paving slabs ↑
Even from identical squares you can lay out beautiful garden paths from paving slabs. And if you use different colors, sizes, shapes and layouts, then the number of design options increases to infinity.
Square shapes are laid seam-to-seam (for example, a two-color checkerboard layout), offset, or diamond-shaped. For garden paths made of paving stones, popular laying patterns are herringbone, wicker, and brick bond.
There are a lot of options for paving garden paths with paving slabs. If desired, you can lay out any complex ornament. The main thing is not to forget about the basic landscape design style of the site. Modern materials are not always appropriate; in some cases, products aged using special techniques are needed.

Decoration of steps with inserts of luminous LED elements
Concrete preparation and mixing
Based on the calculations, a mixture of cement, sand and crushed stone is prepared, to which water and plasticizers are added. The composition is mixed and brought to a homogeneous creamy consistency of medium viscosity.
Crushed stone is used in medium fractions, 10-20 mm in size. When constructing paths with increased load, it is recommended to use crushed stone with a fraction of 40 mm.
It is advisable to mix the mixture using a concrete mixer, especially for large volumes of work. If you don’t have a concrete mixer, you will have to make the solution manually. To do this, all the components are poured into the container and thoroughly mixed with a shovel, after which water is poured into the mixture and mixed again until a homogeneous mass is obtained.
Mixing the solution.
It is advisable to use plasticizers in small quantities in order to make it more convenient to distribute the fill throughout the trench. Too much additives can reduce the strength of the concrete grade.
The simplest plasticizer additive can be prepared independently using the following starting materials:
- silicate glue;
- slaked lime;
- PVA;
- any detergent.
Instead of silicate glue, you can use liquid glass, and washing powder or laundry soap is suitable as a detergent.
If the paths are planned to be colored, then pigment dyes of the required color must be diluted with the concrete mixture.
Classic concrete path
Monolithic concrete covering is the most reliable and relatively inexpensive option. If you follow the technology when pouring, the structure will last at least 30 years. The main disadvantages are the labor intensity and length of the process, because the concrete mixture hardens within 4 weeks. During the hardening period, the path cannot be used. Therefore, do not rush to plant flowers near the future path, where you will have to arrange a temporary passage.
To pour concrete paths with your own hands, you need to prepare the base, as described in the previous section. Then proceed in the following order:
- Install curbs or assemble wooden formwork for laying concrete.
- Prepare the tools - a building level, a trowel and a rule made according to the width of the monolith.
- Tie a mesh of reinforcement Ø8-12 mm with cell dimensions 150 x 150 mm and install it on top of the crushed stone bedding, using stands 3-5 cm high.
- Mix 1 part of cement grade 400 with 2.5 parts of sand and 4.2 parts of crushed stone with a particle size of up to 20 mm. After mixing the mixture with water, you get concrete M 200.
- Place the mortar in the formwork to a height of 12-15 cm, leveling it using the rule. The task is to make a flat surface with a slight slope on one side, ensuring the drainage of water from precipitation.
- Divide the reinforced concrete monolith into slabs using expansion joints at intervals of 2-2.5 m, installing transverse boards.
- Wait 7 days and dismantle the formwork. Final hardening will occur after 28 days.
You can beautifully design a concrete path at the pouring stage, using special plastic molds that imitate natural stone. The decoration is simple: a form (preferably several) is immersed in fresh concrete and pulled out after initial setting. In order not to buy ready-made frames, savvy craftsmen have adapted to making homemade items from metal; the technology is shown in the video:
Laying sandstone on sand
An excellent summer cottage option that does not require large expenditures.
Instead of excavated soil, the path blank is filled with sand to a height of 5 cm, moistened with water, and compacted.
The next layer is performed before masonry work; it consists of dry cement and sand in a ratio of 1 to 7.
The cake is compacted, then prepared slabs are laid on top of it.
Once the sandstone has been placed, the gaps are re-filled with the mixture and filled with water.
During the drying period, avoid mechanical impacts on the track.
After 2-3 days, after the mortar has settled in the masonry joints, fill them again.
Economy option - embankment paths
Although simple, compacted stone stitches offer the following benefits:
- cheap construction;
- absence of puddles on the surface - water goes through the gravel into the ground;
- a correctly laid embankment has an attractive appearance, which is reflected in the photo.
Nice gravel path near a pond
It is difficult to build a crushed stone path on a slope, so for a sloping landscape it is worth choosing a different solution. The second disadvantage is the need for constant care. Needs backfilling, leveling, removal of overgrown grass
These works are carried out annually, usually in the spring, after the snow melts. To implement this inexpensive option, you will need fine crushed stone or gravel, geotextiles and sand.
Foundation construction step by step
To begin, mark the paths on the site in any convenient way - using twine and pegs or sprinkling with lime. Then remove the turf and proceed to laying the base according to the instructions:
- Dig a hole at least 150-200 mm deep along the marking lines and compact the bottom with a tamper.
- Cover the dug profile with geotextile fabric and install borders along the edges.
- Fill the sand cushion to a height of 7-10 cm (a mixture of gravel and sand will also work). Tamp down thoroughly and water.
- Make a base of coarse crushed stone 80-100 mm thick, level and compact. It is allowed to use broken bricks and various natural stones. Large boulders should be broken.
Making the finishing fill
In order for the path to serve for a long time and not sag under load, it must be covered with an even layer of fine crushed stone and compacted thoroughly. Perform the operation in several stages, achieving maximum coating density. Mechanization tools - a manual roller and a vibrating plate - will be very helpful.
There are no more tricks in the construction of embankment paths. Homeowners often lay similar stitches between the beds in their vegetable gardens to ensure they can walk comfortably in wet weather. When laying in a country yard, there is a way to bring beauty: combine a gravel embankment with flat stones or decorative slabs, as done in the photo.