Benefits of drip irrigation
Making such a system with your own hands will not be difficult. The popularity of drip irrigation can be easily explained by highlighting its main advantages, including:
- Economical. This method of irrigation, unlike others, allows you to reduce water consumption several times.
- With this type of watering, the weeds remain without watering. After all, moisture comes directly to the root of a plant, vegetable, fruit or ornamental crop.
- Autonomy. Thanks to this system, plants can be left unattended for a week. Drip irrigation will be carried out without additional assistance. The main thing is that there is water in the system.
- With drip irrigation, the soil does not harden or crack. After all, moisture gets exclusively under the root of the plant crop.
- Moisture does not reach the above-ground part of the plants. This eliminates the risk of burns on the foliage, as well as the development of rot and fungal diseases.
- Water does not flow under your feet when watering.
If you wish, you can make drip irrigation from plastic bottles with your own hands.
This is an excellent alternative to more expensive systems. Everything is made very quickly and simply. It is enough to have the necessary amount of consumables in stock and just a few hours of free time.
First steps to install drip irrigation
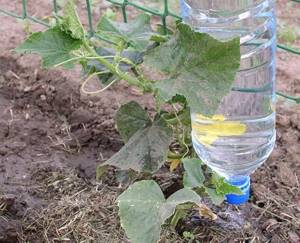
Let's consider the organization of drip irrigation using the example of two cucumber bushes and one plastic 5-liter bottle. First you need to dig a hole between the bushes. The depth of the pit should be about 15–20 cm. Of course, it is best to consider drip irrigation of this kind before planting. Here you need to be extremely careful and not damage the root system.
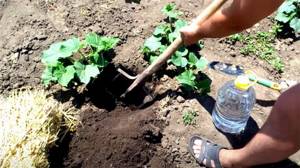
It is necessary to dig a shallow pit in which the plastic bottle will be installed
The pit should be larger in diameter than the bottle. This is important so that some semblance of drainage can be done. Otherwise, the holes will become clogged with soil and the irrigation will not function properly.
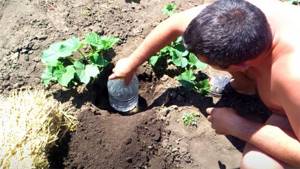
The diameter of the pit should be 5–10 cm larger than the bottle
Arranging holes for drip irrigation and drainage
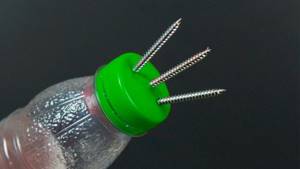
In order for moisture to flow to the right points, you need to make holes in the bottle directly opposite the bushes. They can be made using furniture nails, which should not be pulled out immediately - this can be done later. Here, their presence will help you not to make a mistake with the location of the bottle. After all, there is no point in supplying water in the other direction from the roots, which means you should pay close attention to this point. The holes should be made at a height of 2-3 cm from the bottom so that debris that may get inside does not clog them and block the water supply.
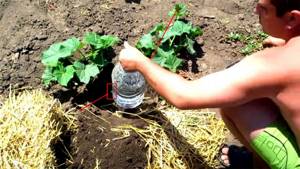
The nails sticking out of the bottle are clearly visible, they make it clear how to position the bottle
Now you can remove the nails and continue arranging drip irrigation.
Related article:
Do-it-yourself drip irrigation in a greenhouse : advantages and disadvantages, how to choose the right devices, review of popular models, how to make automatic watering with your own hands.
What you need
To make your own drip irrigation from bottles, you will need:
- Knife for cutting containers. You can use scissors.
- Sewing needle for punctures. But it is better to use nails or an awl.
- Plastic bottles. For making drip irrigation, containers with a volume of 1 to 2 liters are suitable. If the system is installed under bushes or young trees, then you can use 5-liter bottles.
- Nylon tights. If necessary, they can be replaced with cotton material.
- Empty ballpoint pen refill.
Method one
So, how to make drip irrigation . First you need to prepare the containers. In each bottle, it is worth cutting off the bottom of the bottle, stepping back from the bottom about five centimeters. To avoid severely deforming the container, the lid should be screwed on. You should punch a hole in the bottom of the bottle and then just cut it off.
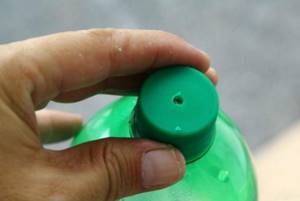
Up to 4 holes should be made in the lid or neck of the container, the diameter of which should be from 0.3 to 0.5 millimeters. The throughput of the structure depends on the number of punctures. In other words, the intensity of watering.
Ready-made structures must be dug near plant stems , deepening them by about 4 centimeters. A piece of fabric or nylon tights should be placed inside the containers. This will protect the holes from excess debris. If desired, such a unique filter can be attached to the bottom of the bottle. Thanks to this, the water will always be clean.
Recent Entries
Chainsaw or electric saw - what to choose for the garden? 4 mistakes when growing tomatoes in pots that almost all housewives make Secrets of growing seedlings from the Japanese, who are very sensitive to the soil
What if you hang it?
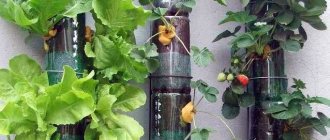
To prevent the holes in the lid or neck from becoming clogged with soil, you can hang the structure. The container can be fixed with the bottom or neck down. Such a system is much more convenient to fill out.
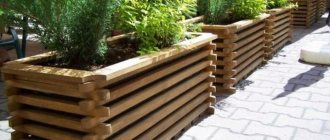
Bottles are best attached to wooden slats . To do this, you can thread a strong wire through the wall of the bottle, and then hang the container on the crossbars above the bed.
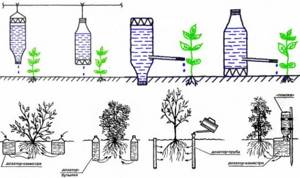
Options for manufacturing a drip humidification system
There are quite a lot of options on how to make such a system yourself. First, you need to consider all the options, and then choose the most optimal one, based on your capabilities and conditions.
Also, do not forget that you need to carefully select the location of the bottles and the intensity of the water supply. Different systems suit different cropping patterns and this should always be kept in mind.
The easiest way to make automatic watering with your own hands is to puncture a small hole in the bottom of the container and place it near the plant. This does not require any special preparation from you, but you need to consider the following nuances:
the hole must be microscopic. To do this, you need to pierce the container with a needle. A large hole will lead to rapid water consumption, which puts an end to the principles of efficiency and autonomy;
increasing the number of holes allows you to create a more humidified environment;
the container should be located as close to the stem as possible so that water flows directly to the root system;
The container can be buried a little next to the plant. This will avoid wasting water;
the container can be hung directly above the bush, if this option is suitable for the given crop;
Method two
to make drip irrigation with your own hands from bottles .
In the first case, holes had to be made in the neck, but you can also turn the structure over. Holes in bottles must be made carefully so that they are not very large. Otherwise, water will flow out of the vessel very quickly. You should retreat about 2.5 centimeters from the bottom of the bottle. Filled containers are simply placed near the plants . If desired, you can make more holes and simply dig a container near the bushes, which should receive regular moisture. In this case, the cover should be removed. You can protect water from debris using nylon tights. However, you will have to use a watering can to fill the containers.
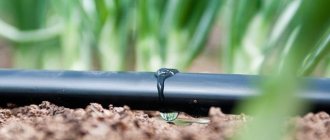
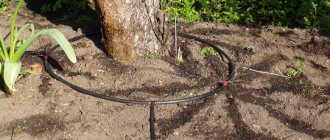
Drip irrigation - what is it: device and principle of operation
Before you start watering, you need to become more familiar with the structure of the system and the features of its functioning. The operating principle of this design is that it ensures the flow of liquid directly to the roots of the planted cucumbers. In this case, water can be supplied not only to the lower layers of the earth, but also to its surface. If it is necessary for water to flow into the fertile layer of soil, a dripper is installed. To irrigate the soil surface, the system is equipped with drip tapes.
Many irrigation systems are equipped with a special pump responsible for the flow of liquid. Without it, the water will take longer to travel through the main pipes.
Rod irrigation system
There is another variation of the bottle drip irrigation system .
You can do it yourself. To do this, you need to make only one hole in a plastic bottle, and then insert an empty ballpoint pen into it. Of course, the writing tip should be removed from the rod in advance, and the remaining paste should be removed. This can be done with regular alcohol. The rod in the structure must be directed to the area where watering is required. You can fix the tube using garden varnish or ordinary plasticine. If necessary, you can bury the bottle a little so that it does not fall.
How to make a drip irrigation system from a plastic bottle
Using plastic bottles is the easiest way to ensure dosed irrigation of beds, and there are several reasons for this:
- plastic containers are available - all residents of the country have bottles;
- There are many varieties of bottles by volume - you can choose the right size container for any plant;
- It’s very easy to work with plastic with your own hands: the bottle can be cut with a regular knife or scissors, you can simply make a hole in it, and easily connect it with other elements;
- The volume of the bottle can last for several days, depending on the needs of the gardener;
- plastic bottles are very practical and durable - the designed irrigation system will last for several seasons.
It is quite simple to calculate how much water the bottle will give to the plant, and for how long such watering will last - this can be done experimentally. Much here depends on the composition of the soil on the site and on the size/number of holes in the plastic container.
On average, we can say that:
- a 0.5-1 liter bottle will last for 2-3 days;
- a container with a volume of 2-3 liters will be able to water the beds for 5-10 days;
- large plastic bottles of 5-6 liters will be enough to irrigate the bushes for two weeks.
Important! There are several ways to make a watering system from bottles. You need to choose the appropriate method based on the characteristics of the site and the plants planted on it.
For indoor plants
make drip irrigation from plastic containers for indoor plants.
In one bottle you need to cut off the bottom and make a hole in it, the diameter of which will correspond to the diameter of the lid from the second container. You need to make two cuts in the neck of the plastic bottle. You need to screw the lid onto the container and then thread it into the bottom of the first bottle. The finished structure remains to be filled with water, and then placed on a recessed tray, turning the neck down. Containers with seedlings or flowers with holes in the bottom should be placed on the tray.
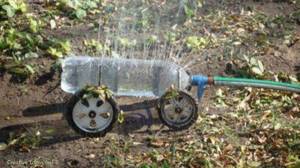
Modifications
Other forms are basically a development of the described options. Usually the bottoms of inverted bottles are cut off to make it easier to fill in new water and not make the structure heavier, and special spray nozzles are inserted into the neck. Small carts will allow you to move the hedgehog sprayer around the beds.
To avoid contamination of the neck with soil, sand is sometimes added to them or tied with a piece of cloth.
When using bottle irrigation, it is important not to overuse water, otherwise the soil will deteriorate and the moisture will quickly go into the ground. In general, spot irrigation can significantly increase yields and at the same time prevent the growth of weeds.