It just so happens that in the countryside it is not a dog that is man’s best friend, but ordinary domestic chickens. The main life cycle of domestic chickens coincides with the period of active work in the country. There is enough space and food at the dacha, all that remains is to build a small summer chicken coop with your own hands in order to save and increase the chicken tribe until the fall.
How to organize a country life for a chicken
Rarely do any summer residents decide to seasonally keep a chicken breed without building a chicken coop. Even if during the summer period you enclose part of the site with a mesh, which can be viewed on the website of the steel mesh manufacturer, and use the barn as a chicken coop, it will be very difficult to save the livestock. In addition to dietary meat and traditional eggs, chickens produce a sufficient amount of chicken droppings. Therefore, in order not to collect both products throughout the entire site, it is easier to make a simple chicken coop in the country with your own hands.
Regardless of where and how to build a room for keeping chickens, a summer chicken coop must meet several basic requirements:
- The structure must be strong and rigid so that the weather or a small predator cannot cause the slightest harm to the bird. Chickens, like any domestic animal, easily succumb to panic and fear, so even in the summer version of the chicken coop there should be a durable room where you can hide;
- Any building for chickens should be planned as a chicken coop with a run. The opportunity to browse, rummage and bask in the sun is vital to good avian health;
- The summer version of the building for chickens should be easy to clean, disinfected with lime and promptly cleared of droppings.
Advice! The box of a summer house is usually made well ventilated, and at the same time with a normal level of thermal insulation.
You should not cover the summer version of the chicken coop with metal or corrugated sheets. The expectation that the scorching rays of the sun will be able to disinfect the building is extremely incorrect. Most of the pathogenic microorganisms will not die, and chickens clearly do not like a building that is hot after a hot day. Even a summer chicken coop should be disinfected and cleaned at least once a week.
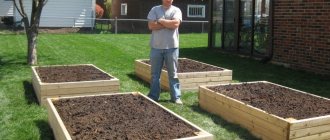
Most often, the size of a summer chicken coop is calculated according to the norm: four chickens per square square of the house area. The area of the pen for walking should be at least four times larger. A chicken coop for 5 chickens will take no more than 10 m2, including 1.5 m2 for a roost, the same amount for a shed with a vestibule, and the remaining 6-7 m2 will be used for walking, fenced with a net.
But in practice, most summer residents are racking their brains in search of a solution on how to make the size of the pen for summer walking in a chicken coop as large as possible without damaging the garden beds. The goal is simple - chickens, by their nature, should be active and able to graze on growing grass.
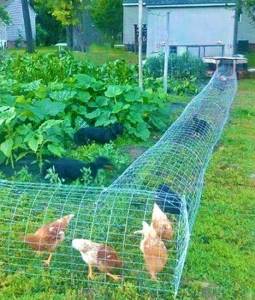
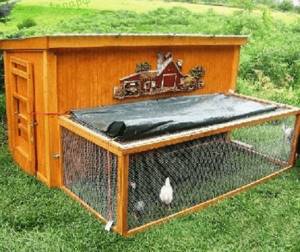
There are even designs for summer pens made in the form of tunnels from a chain-link mesh folded into half an arc, photo. The owners rearrange the tunnels throughout the site from time to time. Despite its unusual nature, with such a walking scheme, chickens have the opportunity to develop vitamin-rich vegetation and pasture without damaging the beds.
Advice! You should not try to compensate for the lack of proper walking in the summer chicken coop with vitamins and mineral supplements. Chickens grow quickly from excess premixes and vitamin complexes, but get very sick.
If eggs and meat are not intended for sale, it is better to abandon premixes and ready-made mixtures in favor of regular wheat, corn and what is available in the garden beds.
How to make a chicken coop at your dacha with your own hands
There are several more principles for building a chicken coop in the country. This is a factor of its location: it should not be in a lowland - in such conditions it will be more difficult to walk the bird, since it is more humid and colder there. It is advisable that the room be located on some kind of elevation: if there is no natural one, then you can create an artificial height by laying stones, bricks or crushed stone.
Another important parameter is its orientation to the cardinal directions. A major factor here is how much light will enter the room through the windows. Light should enter the chicken coop in large quantities. Their egg production depends on how much light the chickens receive. So, for laying hens the best option is when the sun shines up to 17 hours a day. Therefore, the best option would be one in which the windows face south and the door opens to the east. If the chicken coop has a rectangular shape, then it is located from east to west.
The temperature factor is also important. Both high and very low temperatures have a bad effect on the ability to lay eggs. At temperatures above 25˚C, chickens reduce their activity by half, and at even higher temperatures, they will stop laying eggs. So, if the place is very hot, the windows should have plywood shutters. Temperatures below 8 °C are also undesirable.
Calmness is also an important factor. Birds should feel calm and avoid unnecessary noise and screams. Having calculated all these factors and designed the layout of the future chicken coop, you can begin to build it. It is advisable to use the columnar foundation . It is economical and inexpensive. In fact, the main components here are gravel, sand and cement.
There is also an option without a foundation at all. This is a frame chicken coop. Then you will have to put iron sheets, which will act as a fence, along the perimeter. These sheets must be driven 30 cm into the ground to protect them from rodents and rats.
First you need to mark the foundation using rope and metal rods, which must be hammered around the perimeter of the future building. Then they should be wrapped with rope. The next stage is to remove a 15-20 cm layer of soil. Then dig holes (up to 70 cm deep, 2 bricks wide) - they will serve as a guide for the pedestals that need to be erected in the corners and around the entire perimeter. Sand and gravel (its thickness is 10 cm) must be poured onto the bottom in layers. Next, two bricks are used, which are placed at the bottom of the pit, and on top - cement mixed at a ratio of one to three. Then two other bricks - across the previous ones. And so on until the pedestals reach the level indicated by the ropes.
After this procedure, you need to let the solution set - wait about a week. After that, gravel is poured between the bollards and in the area around the perimeter of the building. The next stage of construction is the construction of walls. Of the many options, one of the most economical and does not require professional knowledge is a 4-edged beam measuring 100 by 150 mm. Please note that the walls must be treated with a special agent to protect against parasites.
The tree is used as a lag for the floor, laying the beam on an edge. Its ends must be connected into half a tree. The logs are located at a distance of 50 cm, filling the gaps between them with the remaining scraps from the timber. Ruberoid with a double layer of insulator can be used as an insulator in the first crown of the base, the rest must be connected using the tongue-and-groove method.
Wooden dowels are used when the timber has natural moisture; they will also protect the frame from warping after shrinkage. In the corners and perimeter of the building, at a distance of a meter and a half, in a checkerboard pattern, holes should be made under the dowels, 2.5 beams deep. The dowels are driven into the wood (7 cm).
After completing this stage of construction, you should first secure the ceiling beams, install rafters and make a roofing deck. It is worth remembering that walls cannot be built less than 1.8 m. There is another way to build walls, using frame technology. Then the frame is sheathed on all sides with boards, pouring some kind of insulation between them.
The next stage of building a chicken coop is its ceiling and roof. It is better to make the roof gable - so that the food or necessary equipment is in a safe place and safe. It is this design that will allow for maximum drainage of rainwater from the roof, and will also contribute to less snow retention. A dry attic works well for this.
You can insulate the ceiling after laying it with any boards and strengthening the beams. For this, both expensive insulation and ordinary expanded clay or coal slag are used. It is important to remember here that before insulating the ceiling, you need to think about ventilation of the chicken coop. It is simply necessary in the summer, as it cools the room, removing unpleasant odors. Yes, and fresh air is necessary.
For ventilation, you can make 2 wooden boxes. And place them opposite each other in the corners of the room. Place the end of one channel at the same level with the ceiling, the second - 40 cm lower. Using tin dampers on the ventilation pipes, you can regulate the temperature level. Sometimes it is useful to install a heater, protecting it with wooden slats, and hiding the wires to it in pipes.
Last, but not least, the stage is laying the floor. It is important that it is warm and, if necessary, easily cleaned of dirt and droppings. Therefore, a bedding made of straw and sawdust 5-7 cm thick is used, which is easy to replace when dirty.
The base of the floor is wood, this is the most optimal option. To avoid freezing, it is better to make a double floor using a 25 mm thick wooden board. First, lay uncut boards, a vapor barrier layer on top, and only then timber (one hundred by one hundred mm in size). Fill the spaces between them with insulation. Lay the finished floor on top using an edged board. Keeping the floor covered with straw or sawdust will help keep the room tidy.
The main part of the chicken coop is the chicken perch. Its dimensions are calculated based on the number of birds - each requires at least 30 cm of free space. You can use a block of size 3 by 5 or 4 by 6 cm with rounded edges - this way the chickens will not be injured and it will be comfortable for them to hold on to it.
There is no need to lay out a perch in the form of a ladder, in which case the birds will try to fly higher, which will create an atmosphere of competition for the best place. It is better to place the perches at a distance of half a meter from each other and almost a meter (up to 80 cm) from the floor. Small trays can be placed under them for ease of cleaning the room.
A separate place should be built for laying hens - in fact, the chicken coop itself is intended for them. Therefore, it is necessary to create all the conditions for these chickens. You can build plywood boxes in a quiet and peaceful place, filling their bottom with sawdust or straw. You should proceed from the calculation for 5 chickens - 1 nest, up to 40 cm deep, the height and width are the same - 25-30 cm. You can also make it from baskets. In such conditions, the hen will lay a lot of eggs. You can also make a separate – small, 3 by 4 cm – door for them.
There should also be a feeder in the chicken coop in case of inclement weather. A drinking bowl also keeps her company - a deep bowl is also suitable for her. You can add not only mixed feed, but also a variety of additives: grass, millet, grain.
The main elements that make up the chicken coop - namely the feeder, perch and waterer - are located in a separate, warm section (box) of the chicken coop. In addition, you need to take care of the chicken run. This is a special area, next to the main part, but fenced with something, for example, a metal mesh.
The aviary is calculated from the ratio that at least one 1 sq. m should be allocated per bird. chicken coop. You should not save on its construction - after all, the more the chickens move, the better they lay eggs. A separate conversation about lighting and windows. The area of the windows should be related to the area of the chicken coop in a ratio of 1:12. It is better to place windows on the south side. They should be kept partially open for a constant flow of air. The sun's rays should illuminate the perch, feeder and drinking bowl. It is better to make small windows (half a meter by half a meter) or, as a last resort, or in winter, install lamps with shades at the rate of 5 W per 1 m kV.
So, the main points on how to better and more easily raise chickens in the summer at the dacha are listed. In fact, it is not so difficult - you just need to take care of your small dacha residents. Including building housing for them - a good and comfortable chicken coop. Caring for poultry is simple and convenient. By raising poultry in your dacha, you will be provided with fresh eggs and meat all year round.
Materials for building a summer chicken coop
The summer version of the chicken coop is traditionally built from boards and slabs. Forget about any OSB, chipboard, fiberboard, plastic, and especially vulture panels. Firstly, assembling a summer cottage building from edged boards will cost much less, and secondly, the materials should not contain any resins and polymers that chickens can easily peck from the surface of the walls.
The second condition is the possibility of treating the inner surface of the walls of the summer chicken coop with lime and sanitary liquids. Wood will absorb 1.5-2 mm of solution, metal or OSB will not absorb anything at all, and lime will not even stick to plastic.
The best roofing for building a summer chicken coop is bitumen shingles. It does not rot, does not rattle under raindrops, and at the same time is strong enough to protect against martens or hawks.
In addition to boards, chain-link mesh is widely used to build a summer chicken coop. A pen is made from mesh, and the floor and basement parts of the summer building are reinforced to protect against rats and weasels.
Any external, that is, wooden parts of the building that are not immersed in the ground, are impregnated with antiseptics and whitewashed with lime mortar. Varnishes and paints on any basis are not welcome for placing a summer chicken coop.
Many summer residents, when solving the problem of how to make the construction of a chicken coop more durable, use fatty varieties of ordinary clay. A layer of material 1-2 cm thick can be whitened or painted with water-based emulsion. Coating or plastering a building with a mixture of fatty clay with horse manure and rye straw filler allows you to solve three problems at once:
- The mixture provides excellent preservation of the wooden frame of the building even without the use of toxic chemicals;
- Good sound and thermal insulation will provide a cool atmosphere inside the building in the heat and comfortable conditions even with slight frosts on the ground;
- The cost of such finishing will cost pennies, but if the technology is strictly followed, the plaster will last for at least ten years, and under the open sun it becomes stronger every year.
For a summer chicken coop, you can use a cosmetic version of plaster with a thickness of 5-6 mm. To prevent cracking of the protective layer, a painting mesh is used. This coating allows for normal protection of wood.
A similar mixture can be used to construct an adobe floor if the summer building will be located directly on the ground. To make an adobe base, you will need to remove the top layer of earth to a depth of 15 cm. Next, a thin layer of sand and crushed stone is poured onto the bottom, a protective mesh is laid, and the upper part is covered with fatty clay soaked in water, 4-5 cm thick. After absorption Parts of the moisture sand layer are compacted with a wooden tamper. After each litter removal, the floor surface is wiped with liquid clay and lime, which has natural antiseptic properties.
The most interesting designs of summer chicken coops
Before you start looking for a drawing of a summer building that is suitable for the design, first of all, you need to decide on the main parameters - the size of the chicken coop and the number of chickens.
If you plan to build a chicken coop for broilers with your own hands, then it is worth remembering that such a building is somewhat different from a room for ordinary chickens. A chicken coop for laying hens can be made with high springboards and parapets, perching poles are placed in increments of 45-50 cm to 1 m, nests can be built at a height of 70-90 cm. For broilers, the installation height of the poles is reduced to 30-40 cm, nests and feeders are installed directly on the floor or on a small podium. The reason is quite simple - broilers, with their large mass, have relatively weak bones, so falling from the perch often leads to serious injuries.
Summer chicken coop design for several chickens
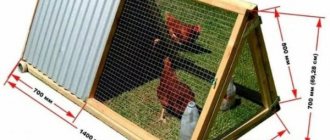
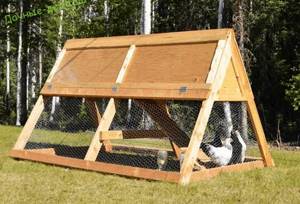
The simplest version of a summer chicken coop can be built in one day, having at your disposal 12-14 m of wooden slats, 5 linear meters of metal mesh and 7 m2 of plywood. The design of a summer building for chickens is shown in the drawing.
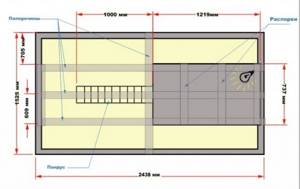
The general arrangement can be read in the figure below. The summer building is made in the form of a symmetrical gable structure, the upper part of which is covered with plywood and reserved for the house. At a height of 70 cm, a floor is sewn, which also serves as a ceiling for the lower compartment.
The dimensions of the base of the summer chicken coop are 153x244 cm, providing normal walking and housing for 5-6 chickens. The frame of the building is made of wooden slats or timber; a ventilation hole and a hatch are cut out in the upper part of the summer chicken coop, allowing you to open the house and remove laid eggs, clean, add food and water to the feeder and drinking bowl.
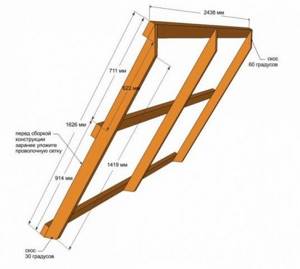
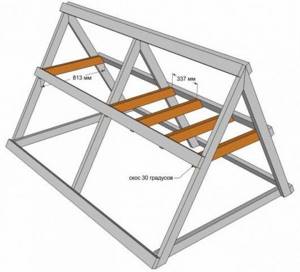
The cross-section of the summer building is an isosceles triangle. Each of the slopes is made according to the above drawing. Initially, longitudinal joists are cut out, the ends are cut at an angle of 60° and 30°, respectively. Transverse boards are sewn onto the logs, onto which plywood will be stuffed and a protective mesh will be stretched. After assembly, using a drawing of the external frame, a floor is filled inside from sections and remnants of edged boards, on which it is advisable to lay a steel sheet so that the droppings remain inside the building and do not spill out when being collected on the chickens’ heads.
After assembly, wooden slats can be treated with an antiseptic and the surface thoroughly rinsed with water. The internal surfaces of the building must be treated with lime.
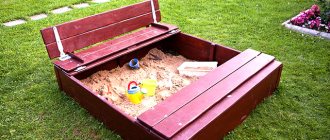
The design does not provide for a floor on the lower level, which, in fact, fits into the idea of using a summer chicken coop. Every two to three days the building is moved to a new place with clean grass, thereby eliminating the need to clean the pen for walking the birds.
This design of a summer chicken coop is perfect for the first attempts at breeding birds, since a house for 5 chickens for a summer house is still not enough to provide for an ordinary family of three or four people. As you gain practical experience in caring for chickens, you can choose a more practical full-size version of the summer chicken coop.
Insulating the chicken coop for the winter
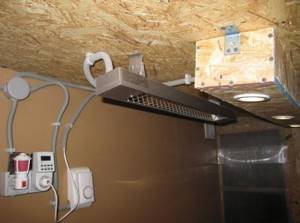
Veterinary standards recommend maintaining the temperature in the chicken coop at least +14°C. Typically, chickens provide a comfortable temperature in their home with their own heat, provided that the chicken coop is well insulated. The use of panels with low thermal conductivity during the construction of a poultry house, the use of insulation when laying the floor, and a double or triple layer of glass in the window, as a rule, reliably ensure heat retention in the room.
However, when installing electrical wiring for lighting a chicken coop, they usually make an outlet to connect a heater in case the temperature outside drops below -20°C.
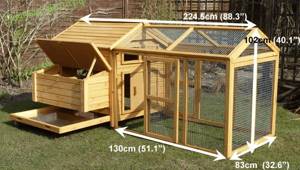
Small mobile chicken coops for a maximum of 5 chickens are becoming increasingly popular in household plots. In addition to the ease of maintenance, they are also distinguished by the possibility of their construction by the owners’ own efforts.
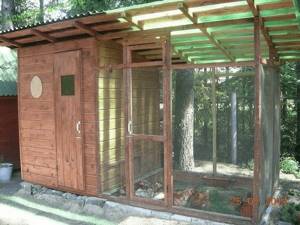
Country version of a summer chicken coop for 10 laying hens
The above design of a summer chicken coop is made on a light foundation of stone and brick, laid on a sand-filled area. The chicken house is built according to the classic frame scheme from timber and 20 mm edged boards. Such a chicken coop can no longer be moved around the site, so the location for the summer building must be determined once, preferably under a tree.
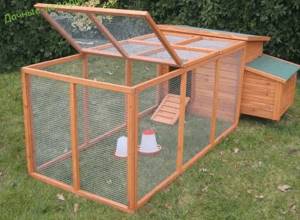
The highlight of the project is the canopy over the summer pen for walking chickens. Cellular polycarbonate is used as the roofing material, and the canopy supports are used as pillars for the protective mesh.
The floor in the summer paddock is sandy with the addition of pebbles and ash. Periodically, the sand base has to be removed and replaced with a new layer. The low location of the entrance hatch allows you to use the chicken coop for breeding almost any breed of chicken, and the spacious premises of the summer house can accommodate 10 - 20 broilers or 30 laying hens.
Construction process
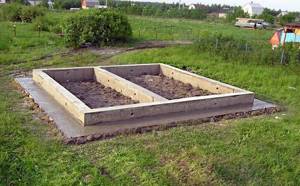
For a poultry house, a strip foundation is made from brick.
The success of building a chicken coop is largely determined by proper planning. First you need to decide on the installation location, make a competent drawing, calculate the need for materials, purchase tools and equipment. Safety issues should also be considered. You need to prepare a stable stepladder, helmet, goggles and gloves. Electrical equipment must be grounded.
The construction of the chicken coop itself is carried out according to the standard algorithm:
- Foundation. For bricks and blocks, a shallow tape is poured. It is better to make a columnar or pile foundation for sheds made of timber and panels. A good solution is asbestos-cement pipes filled with mortar. It is not advisable to make a slab, since walking on concrete is contraindicated for birds.
- Floor. Wood is considered the best option. Raised boards above the ground provide optimal levels of thermal insulation, ventilation and comfort for living creatures. The floorboards are laid on the joists and nailed into place. To extend their service life, the materials are treated with an antiseptic and a hydrophobic agent. If there is dense and dry clay soil under the barn, then you can fill it with fine crushed stone and sifted quarry sand on top.
- Walls. When choosing material and technology, you should evaluate the prospects for using the chicken coop in the future. It is quite possible that the experience of keeping birds will not take root, the building will be out of use, and the effort and resources will be wasted. Therefore, the optimal solution would be to build a frame-type structure. It is inexpensive, it is not difficult to disassemble, and there is always a use for lumber. In such cases, a frame is made, which is sheathed with chipboards or boards. If you decide to build walls from blocks, the barn needs to be made spacious so that you can later use it as a warehouse or workshop.
- Roof. The project is determined by the seasonality of use of the chicken coop and plans for the attic space. For a summer building, a simple lean-to structure is sufficient. Operation in the cold season involves the creation of an insulated gable system. They make a roofing pie consisting of interior finishing, membrane, insulation, waterproofing and finishing coating - slate, ceramic, metal or soft tiles.
- Sheathing. The outside of the barn can be finished with timber siding or corrugated sheeting. It is better to whitewash the walls from the inside with lime - this is a fungicide and antibacterial protection.
For all-season buildings, you need to install an insulated window and door.