Every child dreams of such a romantic and breathtaking structure as a children's tree house. It’s so exciting to have a small summer house in the forest near your dacha or even in the city in your yard. In such a house you can watch what is happening, watch adults from a shelter, spy, play, and shelter from bad weather. And if the construction was approached especially carefully and responsibly, then you may end up with a small copy of a full-fledged country house, where perhaps there will be no communications, but you can eat, sleep, play, relax and do other interesting children's activities.
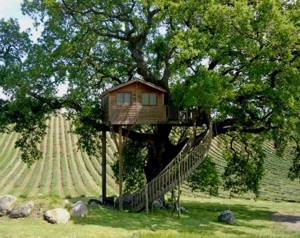
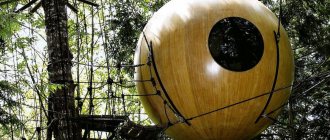
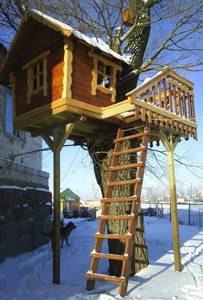
Figure 1 – Excellent tree house
How to build a tree house?
To acquire such an interesting structure, you need to make a lot of effort, and you can’t do it without the help of your elders. After all, the house needs to rest securely on the trees and be safe. Such a house should accommodate at least 2 people, because children rarely play alone. First you need to choose a place for construction. It is highly desirable (but not necessary) that there be powerful and strong living trees nearby that will serve as support for the house. However, this is not necessary. You can do without trees at all, but then you need much more materials and time for construction. It is also necessary that the soil at the construction site be dense and the terrain more or less flat. The construction site must be cleared of debris and small vegetation.
Where do you need to start?
First you need to answer a few important questions:
- How many children will the house be designed for? The more children play in the house, the larger its dimensions should be.
- What age are the children who will play in the structure? Depending on the age, the nature of construction will vary greatly. Children need the safest possible home at a low altitude, reliably protected from wind and rain. For older children, the nature of construction will be different: larger scale, higher reliability and massiveness, larger dimensions and functionality.
- The height of the house. For small children, it is advisable to place the house as low as possible and provide it with a very reliable, comfortable and safe ladder. For older children, you can build a house higher and come up with several options for getting inside the house: a wooden staircase with steps, a rope staircase, a cable car, a spiral staircase, etc.
Before starting construction, you need to determine the height at which it will be located, select materials and stock up on tools, and also determine for what purpose it is being built: for a simple visit and admiring the surroundings, or will it be a house in which you can sit, lie down, play and pass the time.
Also, before starting construction, if a small children’s treehouse will be located close to neighboring houses, you need to obtain the consent of the neighbors to place such a structure next to their house.
Using a live base
This option is perfect if there is a forest next to your site, and you can find several living trees that will serve as the basis for a house in the future. A prerequisite is to arrange the trees in a square shape. For the construction method that will now be considered, you will not need a full set of construction tools, and the materials for it can be found in the forest itself. Accordingly, this option is suitable for those people who are interested in how to make a treehouse using a minimum set of things. The only tools you will need are:
- axe;
- knife;
- a large ball of rope;
- chainsaw;
- tarpaulin canopy or film.
This type of construction, in which a DIY tree house requires a fairly large number of dry poles, requires coordination of the procurement of material so that this procedure is legal. In addition, when harvesting, you need to be extremely careful and not cut down a living tree.
Note: It is quite easy to distinguish a living tree from a dry one. For example, a dry pine tree usually has a top without needles, and the trunk has many dry branches. If you still doubt whether this tree is dry or not, then make a small notch on the tree trunk.
Some design dimensions
Here the area of the house will directly depend on the distance between the trees. As already mentioned, it is desirable that all four trees vaguely resemble a square. You won’t get ideal geometric dimensions, but you can still find such a group of trees. The height can be chosen from three to four meters.
Installation of support poles
Of course, it is best if several people participate in the construction, it will be much easier and the work will progress faster. Construction begins with the installation of supports to the trees, on which, in fact, the entire structure will be supported. The supports themselves will be tied to living trees using ropes. Dry pine is suitable as support. Its diameter must be at least 20 cm.
Important point : when tying a support to a tree (especially for crooked trees), make sure that its upper edge is in close contact with the tree; the lower part will still be pressed by the weight of the structure.
First, each support is tied to a tree at the level of a person’s height, and then at the top. At this point you will need a ladder to get to this place. You can make a simple ladder with your own hands from one thick pole, making deep notches with an ax every forty centimeters (the distance should be chosen individually).
When tying supports at the top, it will be practically impossible to do without an assistant, since it will be quite problematic to grasp the tree with your hands while maintaining your balance on the stairs. Taking one end of the rope in his hand, the partner will bend the other end around the trunk and feed it to you from below using a long stick.
When all the vertical supports are secured with ropes, you can begin installing the horizontal supports. They must be the most durable, since overestimating their strength can then play a cruel joke on you and there will be a high risk that the entire structure will collapse. This is a rather labor-intensive procedure, because lifting powerful logs to a height of three or more meters will be difficult even for two people. You can use two ways to lift them and install them on vertical supports:
- Having thrown one end of the log onto the vertical support, one person rises and holds it there with his hands, while another person manually throws the other end of the log onto the vertical support.
- Having tied a rope to a log, one person lifts the log by its end, and a partner lifts it at the other end using a long pole.
Flooring installation
When this entire frame with vertical and horizontal supports is assembled, you can begin laying the floor. Since this type of construction does not involve the use of nails, but instead they are replaced by rope, the floor will be made up of poles, tightly fitted to each other. Before laying them on the floor, you must first remove all the knots from the poles with an ax so that there are no gaps between them and they do not cling to your feet. To begin with, you can simply throw all the poles onto the frame. It will be most effective if someone stands on the stairs and a partner serves him.
The log floor itself is held together with rope. At this time, it is necessary to ensure that large gaps do not form. If necessary, you can change the poles. At the end, you need to trim the log floor, sawing off the excess. Based on the massiveness of the structure itself, where the floor and walls will consist of solid poles, there is a need for additional support. Where there is the greatest distance between the trees, you should support the horizontal support with another log, while sharpening its upper part in the form of a semicircle so that the other log fits tightly into it.
Danger: when tying poles on the floor, be careful and careful, as they can move apart at any moment, you may fall through, or, even worse, fall to the ground.
Walls and roof of the home
The construction of walls begins with the installation of a horizontal beam, which will later form part of the frame for the roof. The next step is to install vertical guides at each corner, and poles are placed in the groove between them. It is advisable that they be of the same diameter, this way you will achieve a snug fit between them. But if they are a little larger, then this is also not scary, you can always chop them with an ax and knock them out with another pole. This method of building walls is very fast, simple and quite reliable.
Above one of the finished walls, another pole is installed at an angle, which will serve as a continuation of the frame for the roof. Then we lay the poles across the entire width, keeping a distance between them of about 30-40 cm. On one side they are tied with ropes. All that remains is to lay the construction awning on top of the roof, securing it on all sides with rope.
Nowadays, houses in the forest have developed to such a scale and acquired such a direction that adults can already fully live in them. However, the construction of such a house will take no less time than the construction of an ordinary house. But other than that, a treehouse for children will be and remains a great place where they can feel like they have their own space and spend time to their heart's content.
Construction materials
It’s impossible to make even a small house quickly. Most likely, the project will take from several days to several weeks, depending on the scale of construction. Materials needed to complete the work: 1. Small logs for the construction of the supporting structure of the future house. 2. Boards of various lengths and widths for wall cladding, flooring, railings, roof trusses, etc. 3. Beam for the base of the floor, walls, roof, railings, stairs.

Figure 2 – Timber for construction
4. Plywood. A very light material that can be used to cover walls, lay floors, and make a rough roof. 5. Tin for finishing the roof. 6. Plexiglas for windows. It is not advisable to use ordinary glass for windows - it can break and injure children. You will also need several types of fasteners:
- Nails.
- Self-tapping screws.
- Screws.
- Hinges for windows and doors.
- Bolts with nuts and washers, etc.
You also need to take care in advance about choosing paint and varnish products to protect your home from moisture and mold: you need to choose the most environmentally friendly impregnation, varnish, and paint. If you have a lot of desire and ingenuity, you can literally build a very interesting and functional children's tree house in just a week, in which adults and children will enjoy spending time.
What should a children's treehouse look like?
A tree house for children must first and foremost be safe. This means that its height above the ground should not exceed a certain value, and the thickness of the trunk should not be less than 30 cm in diameter.

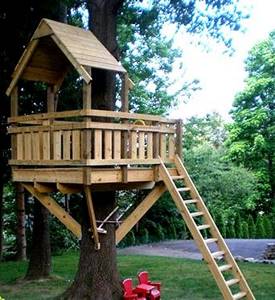
The process of building a simple tree house
It must have a fence railing. And besides this, when making a tree house, you need to take into account many more different factors:
- Height. The older the child, the larger it can be. But the maximum permissible distance between the ground and the floor of the building should be no more than 2 m. The optimal height is considered to be human height, that is, about 1.8 s. For children, it is better to make a play area within 1 m above the ground.
- Convenience. A playhouse on tree branches should be equipped with a reliable and comfortable ladder in the playhouse. The crossbars in it should be comfortable to grip with a child's palm. And the distance between them should be such as to prevent accidental slipping of a leg or arm.
- Capacity. The building should have enough space for everyone. Including adults, whom the little inhabitants will definitely want to invite to visit. Therefore, drawings must be made with a reserve of free space.
Selecting a tool
For construction you will need a wide range of tools and equipment. You may need the following:
- Hammer.
- Ladder.
- Roulette.
- Level, level.
- Circular for cutting boards.
- Plane.
- Chisel.
- Hacksaw.
- Screwdriver with a set of bits.
- Screwdriver Set.
- Extension cord for providing electricity to power tools.
- Brushes for applying protective coatings.
- Axe.
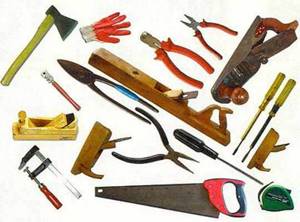
Figure 3 – Construction tools
Choosing a place for construction
When all the necessary materials, devices and tools have been collected, it’s time to move on to action. We choose the optimal place on which to build a tree house. You need to find a place where there will be one, or better yet two or three trees standing at a short distance from each other. These trees must be powerful and massive enough to support a future structure with children (and maybe adults) inside. In addition, trees must have a strong root system and grow more or less vertically. They should also be alive, with a minimum of dry branches. A sick or dry tree can break, and the entire construction will turn into a big disaster.
Choosing a tree to build
If you decide to make a treehouse with your own hands, then first you need to find a suitable place to build it. There are a number of criteria that need to be taken into account when choosing. These include:
- the composition of the soil around the tree;
- type (species) of wood;
- his age;
- condition of branches and trunk;
- crown volume.
Now we will consider in detail each of the selection parameters. The foundation for construction should be on normal, not sandy soil. Otherwise, the trunk will collapse under the additional weight that the tree house will create.
An example of a tree with a built children's house
The type of wood significantly influences the choice. It is better to exclude pine, like other conifers, immediately. Sharp needles can injure a child, and the resinous trunk will create a lot of problems with washing clothes and bathing the children. Linden wood is too soft, and poplar, willow and chestnut have a weak root system. Therefore, a do-it-yourself tree house is most often built on oak or maple. They have not only solid wood, but also a branched crown, convenient for installing a platform.
Of the fruit trees to install a small house, an apple tree is suitable. But it is only suitable for children; its branches may not be able to withstand adults.
The tree chosen for construction should not be young or old. And the more branches there are, the better the result. Please note that the thickness of the branches on which the tree house for children will be mounted should not be less than 20 cm.
Choosing trees
The optimal tree species for supports are oak, ash, maple. Resinous rocks are not suitable because ants often gather at their base, and resin constantly flows down the trunks. Coniferous trees are thorny. Trees with a fragile root system - birch, poplar, alder - may collapse and not withstand the load. Fruit-bearing trees are also not suitable for the reason that the arrangement of an orphanage can disrupt good fruiting. Once the optimal type of wood has been selected, you need to decide on the location. It is better to place the house between two or three trees. This way it will have at least several powerful natural supports, as a result of which less time will be required for construction and less building materials will be spent. Sick and dry branches should be removed immediately, as they will not be of any use. Branches that will interfere with construction can also be cut down, but wisely - after all, this is a living tree, and excessive interference can harm it. Trees alone may not be enough for support. In this case, it will be necessary to build additional supports.
Figure 4 – Selection of trees to support the future children’s home
Before you start construction, you need to figure out whether you have enough professional skills to independently build, albeit a children’s house, but still a house? If the answer to the question is yes, then you can start working. If not, then you need to enlist the help of a professional or a “handy” assistant who has extensive experience in construction.
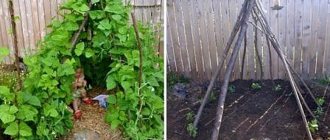
How to make a hut with your own hands?
First you need to choose a suitable place to build this temporary shelter. It cannot be installed in narrow gorges, on river banks, or at the bottom of canyons. Because floods, flash floods or sudden downpours may occur. The danger comes from creating a hut under rocks that overhang the site, as well as at the foot of steep mountains. When choosing a parking place, you need to take into account the cardinal directions. Let's consider the main location options.
- How to make a hut in a mountain forest. The specified attached-type structure is well suited for this area. This means that one of the walls or even two walls will be made of wood or stone - part of the rock. In this case, you should try to avoid precipitation. That is, do not place a hut in hollows with obvious traces of water flows. Because if it rains, a stream of water will flow down. Otherwise, the rules for installing this structure are the same as for a tent. The entrance to the hut should be on the side opposite the top. Grooves should be made around the perimeter to allow water to drain in case of rain.
- How to make a hut in a lowland forest? The answer to this question is quite simple. In a forest where there is a plain, it is possible to build a recessed, classic or attached hut. In this case, the place is chosen based on the weather. This is important. In cold weather without rain, you need to find a hole that will serve as a temporary shelter. In case of rainy weather, the specified structure is placed on an elevated place.

We make a sketch and a project
Next, we proceed to the sketch of the future house. First, you can photograph the trees from different sides, so that the construction site is always at hand and before your eyes, and the necessary information is in your head. Next, on a regular sheet of paper we make sketches of the future house in various projections: frontal, horizontal profile. Here we write the specification - how much and what will be needed for construction. We describe in detail the name of each material, its dimensions, you can write down the approximate cost in order to create an estimate. The more detailed all the details of the project are described, the more accurately and smoothly everything will be implemented in practice.
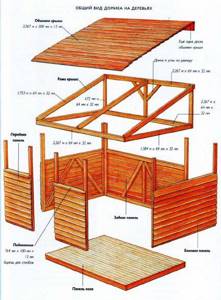
Figure 5 – House design with a detailed description of materials and their parameters
Selection of materials
When selecting materials for construction, they must meet the following requirements:
- Environmental friendliness. We are talking about children, so the use of non-ecological materials should be kept to a minimum.
- Strength. Old, half-rotten boards are not suitable for construction, since the finished structure will become unusable within a couple of years.
- Economical. It is clear that you would like to build such a minor structure as a children’s house with minimal investment, so you need to think through the project so that less money is spent: you can ask friends or acquaintances for materials, and buy everything that cannot be found for free at a discount and promotions.
Let's start construction
Here we come to the most interesting and exciting part - construction. We collect all the necessary materials, tools, equipment, select a suitable illuminated place to work and get started.
Stage 1 – We build a support for the future house
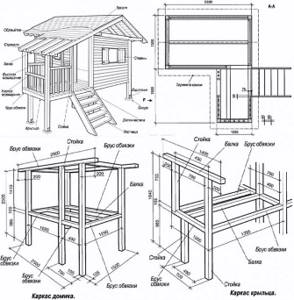
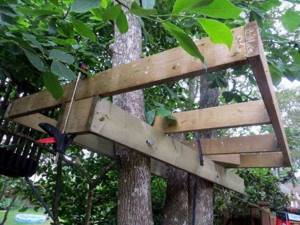
First of all, we install supports, or beams, that will support the house and, together with tree trunks, bear the main load. We nail or screw powerful logs or beams to tree trunks so that the finished house is located at a given height. We check the horizontality with a level or level.
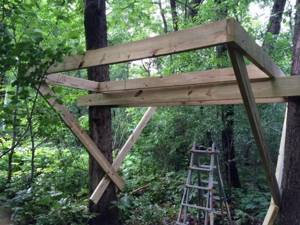
Figure 6 – Installation of house support
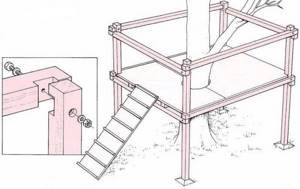
Stage 2 – Constructing the frame of the house platform
From boards and beams we assemble a rectangular or square frame on which the house will actually stand. We fix the frame on trees and supports. We make additional braces, supports and corners if necessary to ensure the reliability of the structure.
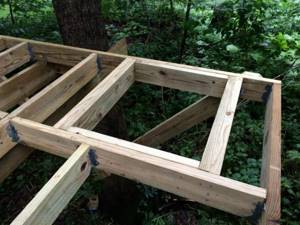
Figure 7 – Installation of the house frame
Stage 3 – Making the floor
We sew the platform on top with boards or plywood. You can provide a hatch or rope ladder as additional entertainment.
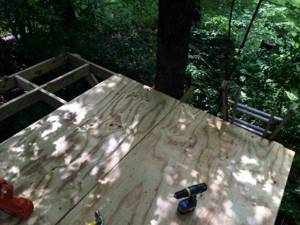
Figure 8 – Sew up the floor with plywood
Stage 4 – Making the wall frame and rafter system
Separately on the ground we assemble the frames of the walls, each separately. We carefully measure everything and collect it. Don't forget about windows and doors.
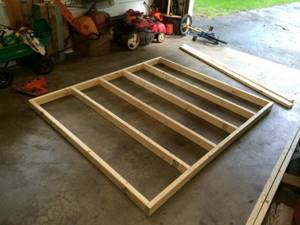
Figure 9 – Wall frame
We also assemble the rafter system: we attach the rafters to the ridge. Then we separately lift the walls and rafter system to the top of our house under construction using a winch, a hoist, or the strength of the hands of several men. We assemble the frame of the house on site and attach it to the support of the house.
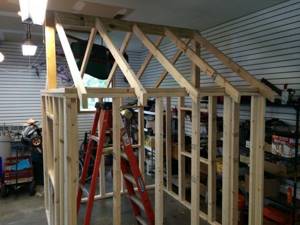
Figure 10 – Rafter system
Stage 5 – Sheathing the walls and roof
We cover the walls with plywood or boards. We do the same with the roof. Don't forget to leave door and window openings.

Figure 11 – Sew up the walls
Stage 6 – Insert windows and doors
We assemble windows and doors. The windows can be made of plexiglass - it does not break and it will be very difficult for children to get hurt, in addition, this material transmits light perfectly. Also, as an option, you can make shutter windows. It looks very original, but the house will receive less natural light when it rains, and there will also be no protection from insects. We insert a pre-assembled or solid door from boards. We hang it on the hinges, adjust it so that it does not warp, and it opens and closes easily and freely.
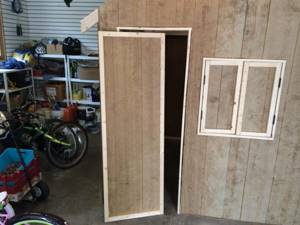
Figure 12 – Installing the door
Stage 7 – We cover the inside of the house with plywood or boards (if necessary)
This option, although it will reduce the internal area of the room, will make the house look more comfortable and tidy from the inside. You can also put insulation between the inner and outer cladding; in this case, the house will keep warm better and not be blown around so much by winds.
Stage 8 – Installing the stairs
This step could have been done earlier. We assemble a ladder from boards. You can make it from two long and wide boards and small transverse steps. It is very important that the ladder is as strong and reliable as possible. It is also necessary to get rid of sharp corners and edges.
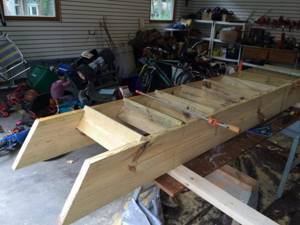
Figure 13 – Installation of stairs
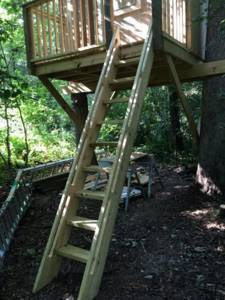
Figure 14 – Installation of stairs
Stage 9 – Installing the roof
Thin sheet metal is perfect for roofing. It will not let rain through and is quite durable. In addition, it does not weigh much and is easy to attach. We fix it on the roof with an overlap from the bottom up using metal screws with washers.
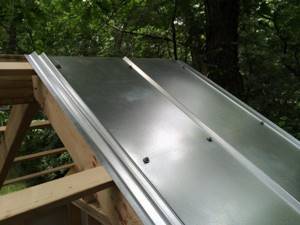
Figure 15 – Roof installation
Stage 10 – Making the railing
Since the house will be located at a height, it is imperative to build railings that will perform a protective function. We assemble them from boards and install them on top.

Figure 16 – Installation of railings
Stage 11 – Protective coating of the house
To protect your home from moisture and pests, it is highly advisable to treat it with special impregnations or varnish. Can also be painted. But it is better not to abuse chemicals and maintain maximum environmental friendliness of the building.
Stage 12 – Interior decoration
Depending on the purpose for which the house is intended and the scale of construction, you can make beds for children inside, put furniture there, and hang shelves. You can also install electricity into your home to keep it light at night.
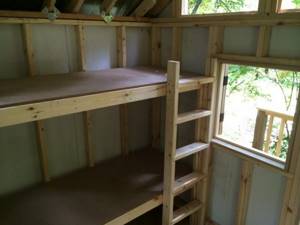
Figure 17 – Inside view of the house
Design
Having decided on the choice of tree, it is photographed from different angles. The background design of the drawing will be a good help for design decisions. You can find a finished house project on the Internet. If your imagination requires flight, everything is in your hands.

At the same stage, the dimensions of the building, types of stairs, types of supports and methods of fastening are indicated.
Note! A lightweight version for a tree - pole supports, which are installed next to the plant, serve as a guarantee of additional safety.
Bolt supports are attached with special devices directly to the trunk. More often used if the tree has a V-shaped stem.
Options for ascent and descent are considered:
- ladder;
- rope ladder;
- rope;
- pole;
- a standard staircase with railings attached to the platform of the structure.

Children prefer everything at once - a ladder, a rope and a pole for descent, rope bridges. Additional attributes will replace an amusement park for little explorers.
For safety reasons, the base of the house is not located high. The distance from the ground should not exceed 1.7–2.5 m. To ensure that in a tree house built with your own hands, the child does not get hurt, and the support becomes more reliable, the nails are replaced with bolts and nuts, which are recessed into the wooden base. The materials used in construction are tested for strength. The platform must be fenced with walls or high railings with posts.
Completion of work and summing up
Now the construction has come to an end. It's time to breathe out and evaluate the work done. We inspect the house and identify any defects that need to be corrected. You can ask an independent person to inspect the building to make suggestions for improvements.
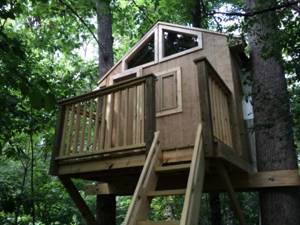
Figure 18 – Construction is complete!
Also, special attention should be paid to home safety, because we are talking about the health of children. Here are some mandatory conditions that a finished treehouse must satisfy:
- The structure must be constructed at an acceptable height to minimize the risk of injury.
- All bolted connections and sharp parts that may be within the reach of a child must be covered and isolated. The edges of the boards and beams are cleaned and chamfered.
- Open areas must be fenced with railings.
- Protective coatings are as environmentally friendly as possible.
- The ladder must be strong and reliable so that it is convenient to climb and descend. If everything is done with soul and love, the children will be delighted and grateful for such a big and painstaking work!
Laying the floor and limiting space
To lay a wooden floor in a house you will need a sanded board. It is desirable that the wood does not have any rough edges that could cause a child’s hand to get splintered. Cutting holes for the branches and trunk of a tree at the top will be problematic, so it is better to do all the necessary manipulations at the bottom.
To do this, the boards should be laid out according to the size of the flooring, leaving gaps of 1–2 cm. Then measure the diameter of the trunk, limit the markings, and cut a hole. There should be plenty of free space around the trunk, as the tree continues to grow. The boards are attached to the installed frame in the same order as on the ground. There must be gaps to allow rainwater to flow into them.
The safety of children is a priority, so the built area for a tree house must be limited. You will need another stable frame made of timber of a smaller cross-section. Wooden rods corresponding to the height of the railings or walls are mounted at the corners of the platform. At intervals of 50 cm from the corners, the frame is reinforced with additional racks.

The exposed beams are secured with spacers. The walls are sheathed according to the wishes or capabilities of the owner. For this purpose, scraps of sanded boards, lattice fencing, plywood, and MDF panels are suitable.