What is hydroponics?
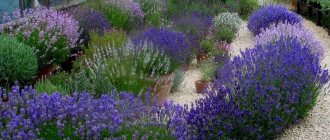
The technology became quite widespread at first among large farmers. Not only vegetables, fruits, and berries are cultivated in this way, but also most of the flowers that are sold in stores today. With this method, the substrate is replaced with a special nutrient solution. Hydroponics at home gained popularity later, when it became clear that there was nothing complicated in the design.
Useful tips for growing plants.
Advantages of the hydroponic growing method
Cultivation without soil has many undeniable advantages:
- Saving. The system itself is quite expensive; it is offered in variations for a large number of crops or as an individual design, which is inconvenient. If you do hydroponics yourself, it will cost very little.
- Minimum labor costs. There is no need to treat pests, dig holes in the ground, water, build shelters, and so on. In addition, the area of planted crops can be reduced by using multi-tiered or multiple systems.
If we talk about environmental friendliness, adding a special complex to the solution is a much more natural option than nitrates, which are present to one degree or another in the soil.
Hydroponics at home, do it yourself
Flaws
There are practically no downsides to such a system. The only drawback is that at home, unless we are talking about a large drip installation in a greenhouse, it will not be possible to grow a large crop.
Nutrient layer technique. What is the essence of the method?
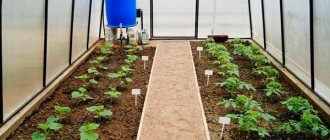
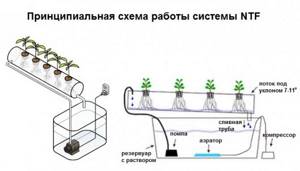
NTF technology was developed in the 60s. in England. It is very simple and universal, it works on a spill and drain system. From the name “nutrient layer technique” it becomes clear that the nutrient solution is constantly circulated in a thin layer in the system. Externally, the NTF system looks like a slightly inclined frame with trays installed on it, through which the nutrient solution flows and where pots with crops are attached. Under the trays there is a reservoir with a nutrient solution, which is connected to the trays by two types of tubes - irrigation and drain. Using a pump, water is automatically supplied to the tray from the irrigation pipe and flows through the drain pipe back into the tank, from where it is reused. Since the trays are located at a slope of 7-11°, the nutrient solution continuously flows over the roots in a thin layer, nourishing the roots. To ensure that the water in the tank does not stagnate and is enriched with oxygen, it is necessary to use a compressor, its tubes must be located directly in the tank.
How to make hydroponics at home?
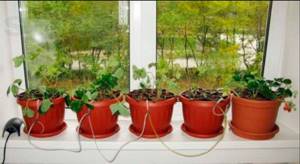
There are several installation options. The simplest home hydroponics is considered to be the one where the water supply is carried out thanks to a pump.
Selection of tools and materials
Installation at home can be assembled from the simplest available means:
- large plastic container;
- pots for each crop;
- pump (best with a spray stone);
- Styrofoam.
So that the latter does not have to be cut to fit the size of the lower container, you can purchase a plastic container with a lid. The main thing is to choose black or at least dark-colored and opaque containers. This will allow the solution to not evaporate longer.
Hydroponics at home
Step-by-step construction manufacturing
When the tools and materials are ready, proceed to the actual assembly:
- The top panel (foam or plastic basin lid) serves as support for growing pots. Holes are made in it. The main thing is that the pots hold on and not fall through, so the diameter is carefully measured.
- Holes are made on the side for the water supply system. The connection diagram depends on the design solution. The hoses can be connected directly to the pump or through a spray stone, if provided.
- The container located under the top panel is sterilized. It is filled with liquid and a spoonful of chloramine is added. This allows you to kill all bacteria.
- The pots are placed in the holes and then the pump is connected. After half an hour it is turned off. Drain the water and wait for the tank to dry.
- Fill the lower container so that the liquid touches the bottom of the pots. Cover the pots with pebbles, perlite, mineral wool, expanded clay or moss.
The installation is completely ready for further operation for growing the desired crops.
Preparations for pests and diseases.
Choosing a location and installing a hydroponic system
It is best to place the equipment where the conditions meet the plant's lighting and temperature requirements. It is not recommended to place the installation next to heating devices in winter, as this will promote rapid evaporation of moisture and may adversely affect the condition of the green mass and will require additional humidity control.
The most profitable insurance products from VTB on the website https://strahovanie-vtb.com/.
Which tax system to choose
Description and photos of the main types and varieties of spathiphyllum
A very primitive option, which, nevertheless, will be useful for people planning to engage in soilless cultivation. Using the installation described below, you can conduct testing - for example, check how a particular fertilizer affects a specific crop. The system is extremely simple; no special materials are needed for it.
To work you will need:
- 5 liter plastic bottle;
Hydroponic setup from a bottle
- drill;
- expanded clay for drainage;
- compressor;
- stationery knife.
Step 1: Using a utility knife, cut off the top of the bottle.
Step 2: Drill 10 to 15 holes in the top, spacing them evenly.
Step 4. Drill a small notch on top of the main container to route the hose from the compressor.
Step 5. Place a hose at the bottom of the main container, then place a container filled with expanded clay.
Step 6. In principle, the system is ready - you can pour the prepared nutrient solution into it. For greenery, you will need a seedling pot - dig a small hole for it in expanded clay, place it there and compact it for greater stability.
When everything is ready, turn on the compressor. Further care is no different from what is indicated in the previous paragraph of the article.
Hydroponic technologies are based on irrigation. They are the ones who determine what equipment will need to be ordered. There are passive systems, where the process occurs independently, and active ones, when the substrate is supplied using a pump.
- Wick is the simplest passive growing method. The nutrient medium is supplied through the wicks independently. There is no outside intervention, so the system is cheap and simple. Requires substrate container and wicks.
- The most common is drip irrigation. Using a pump, the nutrient liquid is supplied to the roots in drops. This is mainly how vegetables are grown.
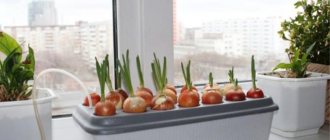
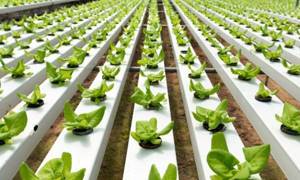
- Flow hydroponics is most often used for growing greens. A life-giving solution circulates in the channels where the roots are located.
- Drip-flow or combined. The device is complex, but progressive. Cultivates delicate crops, such as berries. With this system, plants can be arranged in tiers.
- Aeroponics. She has a great future. There is no soil or liquid medium here. Plant roots hang freely in an opaque empty container, into which a liquid substrate is periodically supplied in the form of aerosols or mist. In addition to the pump, you need a sprayer and a timer.
Want to start growing something more unique? Then read the article about the truffle growing business!
At the initial stage of organizing a business, it is best to pay a single agricultural tax or work on the simplified tax system (your contributions to the budget will not exceed 6% of gross income). If in a year or two you reach a level where the volumes of grown products allow you to enter into contracts with supermarkets and large wholesalers, then it would be more rational to pay taxes on a general basis.
Hydroponics solution
The volume of the composition should always be at the same level. This is achieved by regularly adding fluid. The water must be filtered or settled, that is, soft. The solution is completely changed every three months. The recommended acidity level is 5-6 pH. The exceptions are palm trees, which require 7.0, and azaleas and gardenias, which prefer an acidic environment of 5.0. To check the pH, you can use an aquarium meter, which you can purchase at a pet store.
Hydroponics
The composition consists of two ingredients:
- Complex fertilizer. It is purchased in the store. If you plan to grow flowering and fruit crops, use “Uniflor Bud”, and for others who need to increase green mass, use “Uniflor Rost”.
- Calcium nitrate solution. It is done at 25%. 250 g of tetrahydrate calcium nitrate are diluted per liter of water.
The concentration of the solution for do-it-yourself home hydroponics when growing fast-growing plants is increased by 1.5 times, and vegetable annuals by 25%. For the winter period, on the contrary, it is halved.
Pests of home and garden plants.
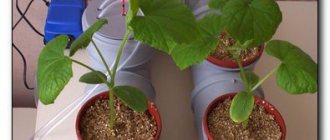
Homemade hydroponic setup
Hello Dear Readers!
In the article “We build it ourselves,” it was said that you can make a hydroponic installation yourself without any special costs or capital investments. Yes it's true. In today’s article I will try to describe a similar installation, made from scrap materials in a very short time and with minimal labor costs.
Well, let's get started.
The first thing we need is to find a suitable container with a lid. I found it from a friend who had wanted to throw it away for a long time, but for some reason did not. It was decided to adapt a plastic bucket with a volume of 15 liters for growing three plants.
I cut out three holes with a sharp knife (Photo No. 1)
in a lid with a diameter for our cups (Photo No. 2).
The cups were purchased at a grocery store for a ridiculous price. The holes should be cut very carefully so as not to cut off too much. The cups should fit easily into the holes, be held by the edges and not fall through. Next, holes are cut in the cups along their entire surface for free access of the solution and growth of plant roots (Photo No. 3).
Mineral wool was used as a filler for the development of the root system; or rather, the Agros seedling cube was divided into four parts and placed in this form in each cup. (Photo No. 4).
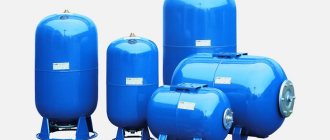
The most expensive thing I had to spend money on was an air, two-channel compressor for the aquarium. (Photo No. 5).
Both channels were combined into one and stones were installed at the end, used in aquariums to break the air flow into smaller bubbles. Oxygen saturation of the nutrient solution is very important for plants. A hole was made in the tank lid for the hose from the compressor, and the spray nozzles (stones) were placed at the bottom.
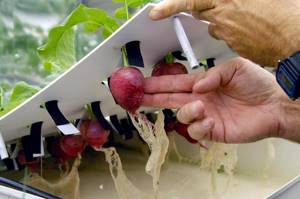
The tank is filled with ordinary water in the amount of 10 liters. The lid with the holes is tightly closed, the cups are inserted into place (Photo No. 6).
The same cups were used to create a greenhouse effect. Having cut off the edges of the cups, I covered the previously planted seeds with them (Photo No. 7).
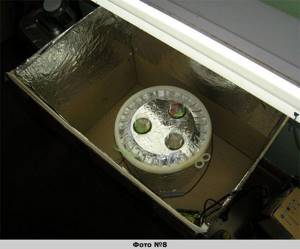
The seeds were planted in cups with mineral wool, pre-soaked with ordinary water. To protect our solution from the development of various plants and microorganisms in it, the tank was completely covered with food foil, which additionally created a reflection of light rays from it (Photo No. 8).
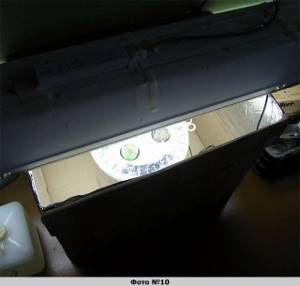
To create an independent system, a large cardboard box of equipment was found.
Its inner walls were covered with the same food foil. A light source is installed on top, consisting of a reflector from an old lamp found in one of the kindergartens and two 36-watt fluorescent lamps (Photo No. 9).
That's all, the system is ready (Photo No. 10).
For several days I will not use solutions, but will simply soak the mineral wool with ordinary, settled water, the pH level of which is currently 8.0 (Photo No. 11).
As soon as the seeds germinate, I will dilute a nutrient solution in a reservoir already filled with water. Next, all that remains is to turn on the air compressor and use the timer to automatically turn on and off the lighting of our installation. I wish you good harvests.
Dear visitor, you have entered the site as an unregistered user. We recommend that you register or log into the site under your name.
Plants for hydroponics
Absolutely any crops can be grown in this way, but annual crops are best suited. This allows you to quickly obtain a harvest and maintain the cleanliness of equipment between plantings.
Hydroponics is in demand for cultivation:
- tomatoes;
- bell pepper;
- Luke;
- cucumber;
- mint;
- strawberries;
- greenery;
- tulips.
Growing perennials in this way is difficult, since it is necessary to periodically clean the lower container, so the plants are left without nutritional composition for some time.
Rate this post
Main types of equipment for growing vegetables
There is a wide range of hydroponic systems on sale. We invite you to familiarize yourself with those that domestic gardeners and vegetable growers have already tested:
- Potty system. A compact multifunctional installation, which is considered to be the most effective. It is based on a tray with pots, a pump that supplies the solution to the roots, tubes, and a mat to control plant growth. Mineral wool, perlite, etc. are used as a substrate.
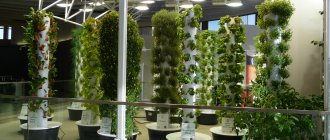
- The installation has the shape of a cylinder. Plants are grown on mineral wool, which is systematically irrigated.
- It operates through ventilated devices that supply plants with oxygen and carbon dioxide. Supplemented with lighting devices that regulate the supply of light to young shoots.
- Try-System. A hydroponic setup that is ideal for those who have no experience in growing plants this way. It is also suitable for those who intend to cultivate plants in one system that require different care. It is based on several containers. Each of them is irrigated separately.
- Multi-tier installation. The system consists of several tiers on which a rack with plants and devices for supplying light are installed. The lower tier is occupied by trays with seedlings and a pot with a nutrient composition. Lighting and liquid supply are automatic.
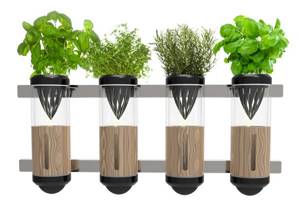
- Flower pots LECHUZA. A simplified system based on elongated pots with an artificial sterile substrate, which provides air supply to the plants for more than one year. The presence of an irrigation system eliminates manual watering. The plant may not be moistened for several months.
- AquaFarm system. Plants are placed in a container filled with expanded clay. Under the pot there is a tank with a nutrient composition, which is supplied through a pipe. A budget installation that is efficient in growing garden crops.
Now you know what a hydroponic system is and what are the benefits of using it. If you are new to this business, take a look at inexpensive installations that involve a simplified management process.