Description of the Japanese Kerry bush
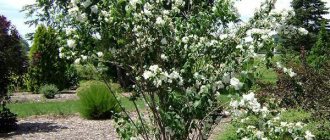
Kerria japonica is an openwork shrub whose height reaches an average of 1-2.5 m, some varieties can grow up to 3 m. The leading quality of the plant is its rapid growth, which allows you to experiment with the form of pruning.
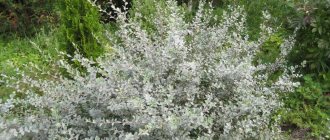
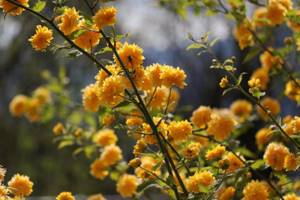
The crown of Japanese kerria has the shape of a cone. The shoots of the bush are erect, twig-like. Their surface is painted in light green tones.
The leaf blade is in many ways reminiscent of a raspberry leaf. The length can reach 8-10 cm, lanceolate in shape, jagged along the edges and tapering towards the end. The upper side of the leaf plate is smooth to the touch; there are small fibers on the bottom. The petiole is bare, 5-15 mm long. In summer, the foliage of kerria is light, pale green, and in autumn the bush transforms - the leaves acquire a rich yellow tint.
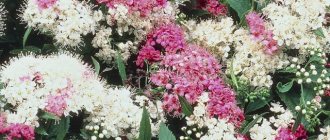
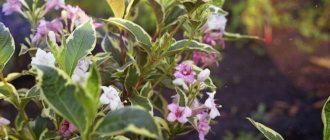
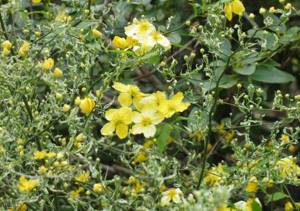
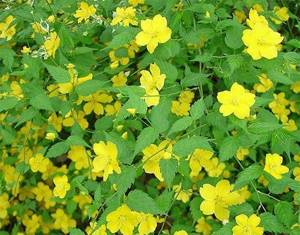
Flowers can be either double or simple - it depends on the specific variety. The average diameter of flowers is 4-5 cm.
Important! Japanese kerria has gained great popularity for its resistance to air pollution. The shrub feels equally good both in a summer cottage and in urban conditions. It can even be planted near roads.
Description
Kerria is a shrub belonging to the Rosaceae family. The genus is represented by only one species - Kerrya japonica, which has several subspecies. Its homeland is the forests and mountainous regions of Japan and southwest China.
The plant grows quickly. In nature it can grow up to 3 m in height. The crown consists of bright green shoots. In a young plant they are straight, forming a pyramidal crown. Over time, the shape changes, becoming more magnificent and curly. The bush looks elegant at any time of the year. Even in winter, without flowers and foliage, the lacy pattern of its shoots attracts attention.
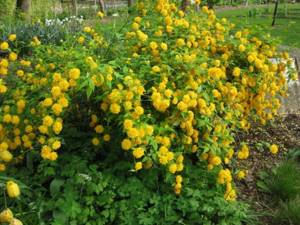
In mid-spring, the bush is covered with small double or single bright yellow flowers, 4-5 cm in diameter, with a subtle delicate aroma reminiscent of dandelions. The flowering period lasts about a month, and under favorable weather conditions and sufficient soil moisture - more than 1.5 months.
Kerria has decorative not only flowers, but also leaves. Arranged alternately, up to 10 cm long, serrated, elongated oval with deep veins, pointed at the ends. The “facial” surface is smooth, the lower one is pubescent. In summer, the foliage is bright green, changing to yellow in autumn.
Winter hardiness of kerria
Winter hardiness of Japanese kerria is average. In the south of the country, where the climate is mild, the bush can be left without shelter for the winter. In conditions of middle latitudes and in the north of Russia, the plant is insulated. It is very important to cover the kerria where the winters have little snow.
The coloring features of the shrub give it a decorative appearance even in the winter months - green shoots, giving off a yellowish tint, contrast perfectly with the white snow.
Important! The advantages of Japanese kerria include its ability to quickly recover. Even if the shoots of the plant freeze in winter, they will quickly recover. But the flowering will not be as abundant.
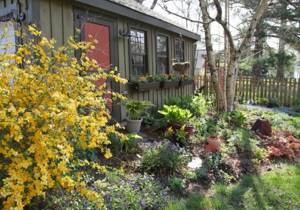
Kerria in landscape design
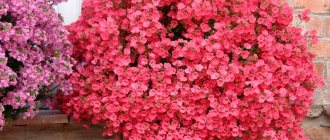
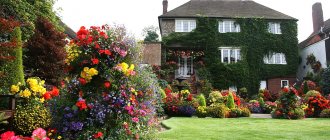
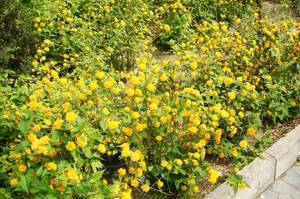
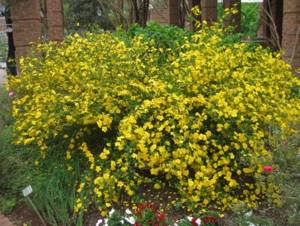
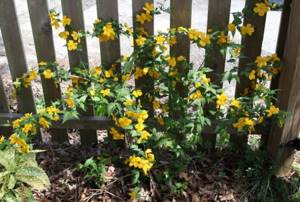
The shrub looks equally advantageous both in single plantings and in group compositions, fitting perfectly into the overall picture of a mixed flower garden. The bright flowers of Japanese kerria allow it to be harmoniously combined with dark, monochromatic conifers: thuja, juniper, spruce. Japanese kerria looks no less impressive when used in borders and hedges.
The best neighbors for Japanese kerria include garden crops:
- rose;
- host;
- spirea (varieties that bloom in the summer months);
- azalea;
- Mahonia;
- witch hazel;
- rhododendron;
- hazel;
- vesicular carp;
- derain;
- bloodroot;
- forsythia.
Separately, it is worth noting that Japanese kerria looks good next to ground cover plants: periwinkle, tenacious, phlox.
How kerria blooms
The shrub blooms in late May-early June; there are also late-flowering varieties. The positive qualities of the plant include lush flowering extended over time - it lasts for 3-4 weeks. Depending on the weather conditions in the region, the duration of flowering time of the bush may decrease or, conversely, increase slightly.
Sometimes, in especially favorable years, the bushes can bloom again. Although the second flowering will not be as abundant, it will still add decorative value to the garden.
The fruits of Kerria japonica are a small, juicy drupe of dark brown color, obovate or hemispherical in shape, wrinkled, 4.8 mm long. If you grow a shrub in the conditions of central Russia, the plant will not form fruits.
Important! Because Kerria japonica blooms in May and its flowers are shaped like roses, the shrub is sometimes called the “Easter rose.”
Features of growing Japanese kerria in the Moscow region
Caring for Japanese kerria in the Moscow region in spring and summer is not much different from growing shrubs in other regions, but in the fall the plant must be carefully prepared for wintering. Otherwise, the bush will freeze with the onset of frost, especially if the winter promises to be little snow.
You can start insulation in October or November, always on a dry, cloudless day.
In the Moscow region, flowers of Kerria japonica appear in May, even before the leaves appear. Flowering lasts up to 25 days.
Kerry varieties
The genus of this culture is represented by only 1 species - Japanese Kerry itself. The lack of species diversity is made up for by a large number of varieties. Some of them are popular in Russia.
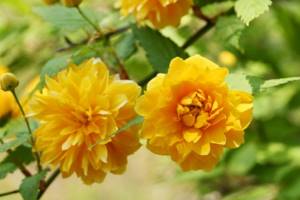
Pleniflora
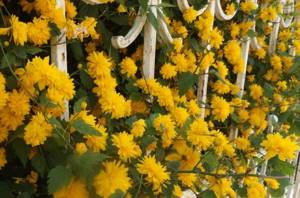
Kerria japonica Pleniflora (Plena, Pleniflora, Flore Plena) is an upright shrub with a dense crown. This variety of Japanese kerria blooms with small double flowers, as seen in the photo below. They reach 3-4 cm in diameter and resemble pompoms. Located singly or 2-3 in the leaf axils.
Golden Guinea
Kerria japonica Golden Guinea is a plant with an elegant leaf shape and quite large flowers. They reach 6-7 cm in diameter. They are simple in type, not terry.
Variegata (Picta)
Kerria japonica Variegata or Picta (Variegata or Picta) is a variety with flowers that have 5 petals. This variety is distinguished by the decorativeness of the leaf plate - it has a gray-green color and a light stripe along the edge. Small cream spots are also visible on the surface of the leaf.
The diameter of Kerria Japanese Variegata reaches 1-1.5 m, the height does not exceed 1 m. Usually the bush grows to 50-60 cm in height.
Kerria variety Variegata grows very quickly.

Albomarginata
Kerria japonica Albomarginata is a variety with simple flowers and small leaves. The leaf blade of this variety has a white edge along the edge. Among other varieties, Albomarginata is distinguished by the asymmetry of its leaves.
Important! This variegated variety of Kerria japonica grows very slowly, so it should be pruned very carefully and sparingly.
Aureovariegata
Kerria japonica Aureovariegata is a terry variety of medium height. With good care, the bush grows up to 2 m. If conditions are favorable, the flowering of the Kerria variety Aureovariegata lasts for 3 months.
Simplex
Kerria japonica Simplex is a variety with simple flowers. The shrub has the shape of a ball and grows in breadth, not upward. Bright yellow, medium-sized flowers are located in the axils of the leaves. During flowering, the bush looks like a golden ball.
Caring for deciduous shrubs
The kerria variety called “Picta” is the most demanding to care for. It grows slowly and is relatively low, up to 1.5 m in height.
But in general, kerria is easy to care for. Other plants can help with this. They will create shade from the sun's rays or protection from the winds. Kerria is not affected by diseases and is rarely attacked by pests.

Although Japanese kerria is considered a drought-resistant plant, it still needs careful watering both in the heat and during the flowering period. The most important thing in watering is that the moisture does not stagnate. It will help its new shoots grow better and not die in high summer temperatures.
Read also: Tritsirtis planting and care in open ground in the Urals
Features of feeding
Mullein fertilizer will serve as an excellent top dressing. After all, the bush, like all forest plants, loves soil with an abundance of humus. Feeding alone may not be enough, and after two weeks you can repeat the procedure. Fertilizing with a mixture of compost and ash will also be quite rich (150 g per sq. m). Fertilizing the plant must begin immediately after spring pruning.
The most important part of care: pruning
Since Japanese kerria grows quickly, it is often pruned . In March, it is necessary to prune frozen or broken branches. After the plant has flowered, you need to cut off the old shoots and fertilize with mineral fertilizers. Pruning can be done in mid-July. Thus, in the fall the bush will bloom even more magnificently. To preserve the decorative appearance, all tall branches are shortened to the same length, and young branches are not touched.
Planting and caring for kerria in open ground
When choosing a place to plant Japanese kerria, you should adhere to the following tips:
- The shrub loves light and does not bloom well in the shade. As a last resort, you can plant the crop in partial shade.
- Drafts do not have the best effect on plant development. It is better to plant it next to a fence or some building.
- The best type of soil for Japanese kerria of all varieties is loam. This garden crop does not like dry soils, but wetlands should also be avoided.
Important! If the kerria is exposed to direct sunlight all day, its flowers may fade within a week. Their color then changes from rich yellow to dull white.
The plant is planted in early spring, before buds appear. Autumn planting is also possible - a month before the onset of cold weather.
To prevent kerria shoots from breaking from the wind, you can plant other flowering shrubs nearby:
- Kuril tea;
- vesicular carp;
- spirea.
Coniferous crops will also provide good protection.
Preparation of planting material
Kerria japonica seedlings do not need any special preliminary procedures. If desired, you can place them for a couple of hours in a container with water or a special solution that stimulates root growth. So Japanese kerria will take root better in open ground.
Preparing the landing site
The main condition for lush flowering of kerria is loose loamy or sandy loam soil. If the soil is heavy, it is diluted with fine-grained sand. The meager area is dug up and organic fertilizers are applied.
How to plant Japanese kerria
Planting is carried out according to the following scheme:
- In the selected area, dig a hole about 50-60 cm deep. The diameter of the hole should correspond to its depth.
- A bucket of compost mixed with garden soil in equal proportions, 100 g of wood ash and 50 g of mineral fertilizer are poured into the bottom of the planting hole.
- After this, a kerria seedling is lowered into the hole. The root collar should be at ground level.
- Then the hole is covered with earth and watered abundantly.
- To better retain moisture, the soil under the bush is mulched.
Advice! For the first 2-3 weeks, it is better to additionally protect young seedlings of Kerria japonica from the sun so that it does not burn the tender stems.
Watering and fertilizing
Kerria japonica is a moisture-loving plant, but it tolerates excess water in the soil extremely poorly. If the water begins to stagnate after heavy rainfall or frequent watering, the roots of the Easter rose will begin to rot. To prevent this from happening, during prolonged rains, watering is reduced or stopped altogether. If heat and drought sets in, water a little more often, especially during the flowering period.
The frequency of watering is adjusted according to the condition of the top layer of soil. The next time the bush is watered is when the soil underneath is completely dry. If after watering or rain a dense crust forms on the ground, the tree trunk circle is loosened by several centimeters.
Important! Do not use cold water to water the bush. It must be soaked in the sun before use.
Feed the kerria with organic fertilizers 2-3 times per season, preferably in late April-early May and June. Plantings respond well to fertilization with rotted compost and horse manure in the spring. In autumn, wood ash and complex fertilizers (for example, “Autumn Kemira”) are added to the soil. For 1 m2 about 200 g of ash.
When flowering ends, you can add mullein infusion diluted in a ratio of 1:10 to the soil.
Important! Japanese Kerria does not need fertilizing in the first year of life - the need for fertilizer is included in the care of the bush starting from the second year. If you start feeding the plantings too early, there is a risk of burning the roots of the seedling.
Kerry pruning
Japanese kerria is pruned for sanitary purposes or to maintain its shape in order to preserve the decorative appearance of the bush. In March or April, you should inspect the bush and remove all damaged shoots: frozen or broken under the weight of snow. To stimulate branching of the bush, you can additionally trim the remaining branches by 1/3.
When the flowering of the kerria ends, you can begin to prune the faded branches back to the branches that did not bloom - it is on these that the buds will form for re-blooming in the fall. Around the same time, pruning is done to rejuvenate the bush - for this, all shoots older than 4 years are removed. If the crown of the kerria has become too dense, it is thinned out. Since this crop grows very quickly, you don’t have to be afraid to cut off too much - the bush will recover in the shortest possible time.
Important! If Japanese kerria is not thinned out when the crown thickens, some of the leaves will experience light deficiency, which can affect the development of the plant.
Shelter of Japanese kerria for the winter
You can start covering Japanese kerria for the winter as early as October. The latest date is the second or third ten days of November.
Insulate the plant in dry, cloudless weather.
- Gently bend the shoots to the ground, trying not to break them. Kerria should not be placed on bare ground; dry leaves or grass should be placed under the stems; foam plastic can also be used.
- The laid shoots are firmly fixed so that they do not unbend - for this they use a special frame of stakes. It will also serve as protection from snow, which can crush the bush if precipitation is heavy.
- A layer of dry leaves, spruce branches or wood shavings is placed on top of the frame.
- Additionally, the bush is covered with lutrasil. You can use alternative shelter options, but the material must allow air to flow well so that the plant does not rot.
The shelter is removed in the spring, when constant warmth has established and the threat of return frosts has passed.
Advice! Remove insulation in cloudy weather and do this in stages, layer by layer, over several days. The kerria cannot be opened completely - young shoots can get sunburned.
Kerria japonica or Kerria japonica pleniflora
We will talk about such a beautiful and fabulous plant as kerria, this plant got its name in honor of William Kerr, he was the first gardener in the royal botanical garden on the island of Ceylon. And as you probably already guessed, it grows specifically in Japan, and accordingly, it is also called Japanese kerria .
The plant itself is a shrub, a kerria bush. This is an amazingly beautiful creation of Mother Nature. Its beauty lies primarily in the elegant and graceful structure of thin branches, which form intricate, interesting patterns, seemingly like any other Japanese plant. And of course, this whole picture is complemented by the leaves themselves, which smoothly continue the image already given by the branches. They seem to have been carefully drawn by the skillful hand of a master, but we all know who the master really is.
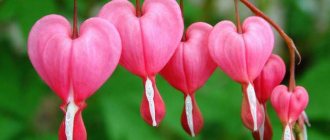
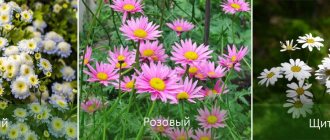
The color of the plant is remarkably yellow, even more than yellow, the leaves are bright and even golden, pleasantly pleasing to the eye, the color is soft and does not hurt the eyes, the appearance of the plant is really very pleasant. However, what is noteworthy is that there is another variety of this shrub - pink kerria , this type also takes place and it is, of course, no less attractive and pleasing to the eye.
Flowering period
Now let’s talk about the features of kerria as an object of nature. For example, about the period when it blooms. It blooms, oddly enough, in the spring, this warm and, of course, favorable time for the flowering of any shrub. To be precise, this happens in the last days of May, when Japanese kerria is just beginning to bloom. In addition, kerria, surprisingly, blooms several times : it blooms again at the end of summer, but, unfortunately, it does not bloom as profusely as in the spring in May.
Another simply amazing property or feature of this pleniflor is its durability , just like that of a real Japanese samurai. The Japanese kerria plant itself is very delicate, but despite this, it can withstand frosts well and behaves hardy in winter, however, sometimes the ends of the shoots freeze in winter.
You are probably interested in knowing how to grow such an unusual plant, now we will find out, because no matter what the shrub is, you can find an approach to it and grow it safely. Kerria does not tolerate wind, especially cold wind , so planting must be done in a place sheltered from the winds.
Of course, one of the most important factors is the soil. For Japanese kerria, moist, fertile soil mixed with sand and containing clay is suitable.
It's no secret that over time, any plant, shrub or flower begins to dry out, of course, the plant will live for a very, very long time if you care for it properly, but it is constantly, albeit with a certain frequency, modified in every possible way, and sometimes cuttings or individual The branches on the kerria begin to dry out. They need to be cut so that the bush can continue to develop safely, but this must be done at a certain time; it is advisable to cut off dead cuttings in April.
Under these conditions, you can easily and, most importantly, grow kerria correctly, let’s summarize:
To grow this plant you need to remember two things:
- A place sheltered from cold winds.
- Fertile land with sand and clay.
Reproduction
Probably, if you have already decided to care for Japanese kerria, then it will be interesting and useful for you to learn about the propagation of this plant; we will find out how easier and more effective it is to propagate Japanese kerria right now.
The easiest way to propagate kerria is to divide the bush ; of course, an older bush is best suited for this purpose. After division, it is necessary to press or somehow attach the flexible shoots of the plant to the ground. Thus, you will get horizontal layering, of course, it will be better to do this if you can really press but at the same time leave the shoots intact, for example, by tying them to a perch, or placing plates or any other device over the shoots that will not allow the plant to rise.
In addition, there is another way to propagate this lovely plant. You can also separate the shoots from the bush and grow them; it is recommended to do this in a shaded place, where, of course, there will be no wind or frost. At this time, while the kerria has not yet grown and become stronger, it must be watered, abundantly, but not excessively.
Now let’s talk about how to properly plant Japanese kerria so as not to damage it and so that in the future it will grow and flourish calmly. At the very beginning, of course, you need to dig a hole for the kerria; it should not be particularly deep; a hole sixty centimeters wide and about fifty centimeters deep will be enough.
The hole should be filled with soil favorable for growing, turf soil, humus or other fertile soil, and finally add about eighty grams of natural fertilizer. And the shrub itself should be planted in this hole full of excellent soil, after which, of course, one should not forget about watering the kerria.
Sometimes it is worth replanting the kerria, it will be more beneficial for the plant, and since it is not particularly picky, you can do this at any time, however, you should never forget about accuracy. True, there is some advice that it is still better to replant in the spring or autumn, at which time there are no leaves on the bush yet.
Read also: Ornamental onions planting and care in open ground with seeds
This plant is really very, very moisture-loving , and it is worth watering more carefully, especially after transplantation.
It is important to know the intricacies of growing and caring for this plant, here are some of them:
After the first flowering of the bush, around July, the plant should be pruned and fertilized with a healthy infusion of mullein. Tall branches need to be pruned more abundantly and kept to the same cutting level. Young borings can also be cleaned a little, but cutting them off is in no case recommended; you can only clean them up a little, so to speak, for the sake of decency, and then the kerria will feel fresh and pleasant, and will be able to continue to bloom freely and easily.
Judging by the condition of the plant, you can determine how often it is worth feeding it with the miraculous infusion of barnyard. It is, of course, not advisable to overuse fertilizer, but to improve the condition of the bush, you can water it with mullein one more time a week after the pruning operation.
These procedures, including cutting and fertilizing, stimulate the active and vigorous flowering of Japanese kerria. The bush crown is actively growing. In addition, the number of young and fresh shoots increases noticeably.
Let's summarize how to care for the plant:
- When drying out and actively growing, trim the cuttings and the plant itself.
- Fertilize kerria with special substances in reasonable quantities.
Several interesting features of kerria lie in its types; in addition to the most common Japanese kerria, there are several more equally interesting varieties of the plant. In addition to the main form, the bush has another one - terry. In its usual form, the flower consists of five bright yellow petals; they reach five decimeters in diameter.
In the case of double kerria, the flowers resemble miniature roses, also yellow. These flowers appear, as a rule, closer to the top of old branches, at the ends of young shoots, or even on new leaves that have appeared only this year.
That's all the most important and most interesting information about this amazing Japanese plant - kerria, it will perfectly decorate your garden or add color to any other place, but we must not forget about the care and maintenance of the shrub, and then it will really never cease to delight you with its bright, bright colors. pleasant view, carefully watch the kerria and then your mood will always be normal.
How to propagate Japanese kerria
Japanese kerria can be grown in the following ways:
- cuttings;
- layering;
- in divisions;
- shoots
Important! The shrub is not propagated with seeds, as in this case partial or complete loss of varietal qualities is possible.
From this list, it is especially worth noting cuttings and propagation by layering - these are the most popular methods of propagating kerria.
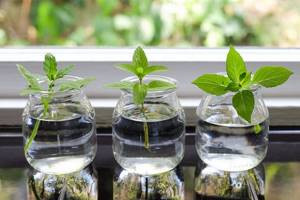
Preparation of cuttings occurs as follows:
- Green cuttings are cut in July, woody ones are cut in August.
- Each cutting must contain at least 2 buds.
- The lower cut must be made obliquely.
- Immediately after cutting, the cuttings are placed in a cold greenhouse, in partial shade or shade.
- Cuttings almost always root successfully, but the process is slow. For the winter, planting material is left untouched.
- In the spring, in May, the cuttings are planted in separate containers. Cuttings are grown at home.
- After another year, the cuttings are planted in open ground.
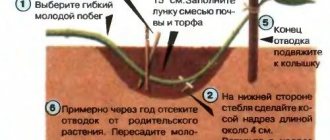
Reproduction by layering is considered one of the simplest methods of breeding kerria. Happens in the following sequence:
- In the spring, before the sap begins to flow, they carefully examine the bush and select one of the most developed shoots on it.
- The branch is bent to the ground and placed in a furrow about 6-9 cm deep; there is no need to dig it in.
- To prevent the shoot from unbending, it is fixed with staples on the ground.
- After 2 weeks, young stems will begin to sprout from the cuttings. When they reach a height of 10-15 cm, the furrow is sprinkled with earth so as to cover the young shoots by 5 cm.
- By autumn, new shoots form their own root system. At this time they can be cut and replanted.
Advice! For better rooting, you can sprinkle the furrow not with ordinary soil, but with nutritious soil.
Reproduction
The main method of propagation of this plant is vegetative. Far from the homeland, in other climatic conditions, fruits do not set, so the seed method is not suitable.
Layerings
Reproduction by layering is carried out in the spring. Young shoots are placed at the bottom of shallow (up to 7 cm) grooves and pinned to the ground. It takes about 2 weeks for new shoots to appear. When they grow to 15 cm, they are sprinkled with earth up to half. Rooting usually occurs by autumn, after which they are separated and replanted. In climate zones with cold winters, the cuttings can be left indoors in individual containers; in milder climates, the seedlings can be immediately moved to a permanent location.
Cuttings
Cuttings are the most common method of propagation, but they take a long time. Green young shoots are cut off in mid-summer, woody ones - in mid-spring, in April. Be sure to save two buds; the cut should be oblique. At first, the cuttings are planted in partial shade in cold greenhouses. By autumn, they take root, but the seedlings are kept in this mode until May of next year. After which they are planted in individual pots and grown at home. The cuttings are kept in this way for about a year, and only then are they transferred to open ground. That is, from the moment of cutting to rooting in a permanent place, almost 2 years will pass.
Root suckers
Root shoots are taken from an adult specimen in the fall. This is a convenient technique: planting material can be immediately placed in open ground. A prerequisite is good watering of the young plant.
Dividing the bush
Usually division is combined with transplantation. An adult needs it periodically. The bush is carefully dug up and cleared of soil. After which it is divided into several parts. Prerequisite: each part must contain the main root and strong shoots. It is recommended to divide in spring or fall, although any time other than winter will do. The cuttings are placed immediately in the soil and watered abundantly for the first two weeks.