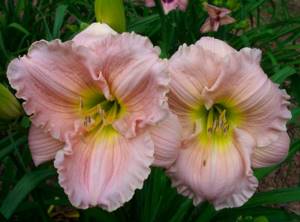
| Hybrid daylily Vivid Butterfly |
There is probably not a single gardener who does not know about daylilies. They can be seen both in grandmother’s front gardens and in modern gardens. They say about it: “the flower of an intelligent lazy person,” “planted and forgotten.” Flower growers tell each other myths that if daylilies are fed, they will not bloom. This is all wrong!
The original appearance of the daylily has changed beyond recognition. Modern hybrids require more careful attention, but they will not cause great difficulties. In a short growing season, they should grow green mass, form flower stalks, bloom with gorgeous flowers and set seeds (if pollination has taken place). And our winters! This is a huge stress for hybrid varieties.
The fact is that most modern hybrids come from the southern states of America. In a word, these overseas sissies simply need our help so that they can fully reveal all their gardening qualities in the difficult conditions of Central Russia. With just six right steps, you can grow this beautiful perennial in your gardens without much effort.
Description of daylily: varieties and varieties
Daylily (Hemerocallis) is a perennial herbaceous plant native to East Asia. Daylilies have been grown in gardens since the 18th century. According to the description, the perennial has a dense rosette of two-row basal leaves that diverge in the form of a fan. The strap-like petals are pointed at the end. The rhizome is powerful with cord-like roots.
Daylily Forgatten Dreams
On a note! The name daylily is translated from Greek as meaning “day” and “beauty.” This emphasizes the beautiful flowering of the plant, which lasts 1 day.
There are about 20 natural species of perennials. They are decorative, unpretentious, and can grow on ordinary soil.
The most famous types:
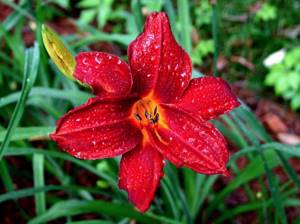
- red lemongrass;
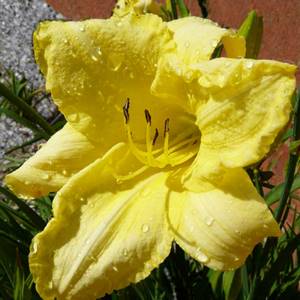
- yellow;
- lemon yellow;
- Du Maurier;
- Middendorf.
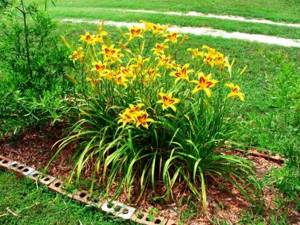
Everyone is familiar with the common orange daylily (Hemerocallis fulva), which can often be found in summer cottages, parks and squares.
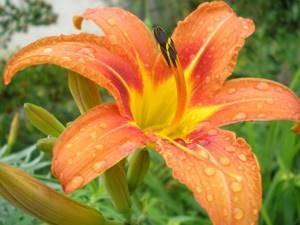
Red daylily
Before flowering, the plant throws out 5-20 flower stalks, with a height of 40 cm to 1 m, depending on the variety. 10-30 flowers bloom on each peduncle; the buds do not bloom at the same time. The color of the petals is the most varied (excluding blue shades).
What daylily flowers might look like:
- triangular;
- star-shaped;
- rounded;
- arachnids.
The shape of the petals is corrugated, fringed, terry. Thanks to the efforts of collectors, two-color varieties with a pleasant aroma of flowers and remontant hybrids have been obtained.
Currently, more than 60 thousand varieties and hybrids of daylily have been bred. American and Australian breeders, the authors of the latest new products, strive to create large, densely double flowers of original colors.
Known varieties and hybrids:
- Thin Man is a new hybrid variety with huge flowers up to 25 cm in diameter, on peduncles 1 m high. Thin petals are curled into a spiral, red at the edges. The throat is bright yellow. Each peduncle produces up to 30 buds.
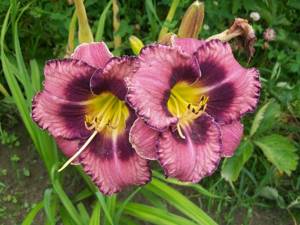
- Mildred Mitchell is a bush 70 cm high. Flowers with a diameter of 18-20 cm are pink-purple in color with a pronounced aroma.
- Moses Fire is a plant 70 cm high, a remontant variety. It blooms in July-August with large double flowers of brick-red color.
- Black Prince is a bush up to 80 cm high. It blooms from mid-July with red-burgundy flowers with a yellow center with a diameter of 15 cm.
- Frans Hals is a medium-sized bush, 40-50 cm. Flowers are 15 cm in size, scarlet in color with a yellow center, with a sweet aroma.
- Jordan – bush height 60 cm, dense rosette of dark green leaves. Corrugated flowers of raspberry-lilac color bloom in August-September.
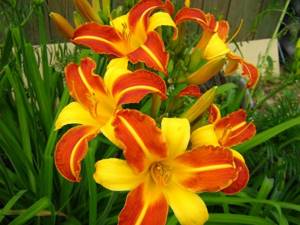
Daylily variety Frans Hals
Planting daylilies
Before starting gardening work, it is necessary to resolve several important issues related to growing the chosen crop. For example, it is important to decide on the timing of planting daylilies, since the right time plays a decisive role in the success of rooting and the future health of the plant. The planting period for daylilies is extensive; the plant can be planted from early spring to mid-autumn, but the correct choice of date depends on the planting region and climatic conditions. So, for example, in the southern regions of the country, daylilies can be planted until the end of September; the plant will have time to take root before the onset of cold weather, given that frosts and prolonged subzero temperatures most often do not occur in the south. In the middle zone and northern regions, it is recommended to plant daylilies in the spring so that the plant takes root and takes root before the onset of a difficult period. It is noteworthy that this rule must be taken into account both for planting daylily seeds and for propagating an existing bush.
Choosing a daylily planting site
Not all gardeners pay due attention to choosing a place to plant daylilies. Based on the climatic conditions of the plant’s homeland (the Far East), they believe that the plant can grow and bloom perfectly anywhere in the garden. However, the experience of other gardeners shows that daylily is a light-loving plant that requires at least 6 hours of daylight. In a sunny area, daylily takes root more easily, grows quickly, blooms expressively and suffers less. In addition to lighting the area, it is necessary to take into account the following conditions for growing daylilies:
- The daylily bed should be protected from the winds, since strong winds can break the flower stem.
- When taking care of the required amount of sunlight, remember the restrictions that depend on the color of the daylily. The daylily variety with delicate pastel flowers welcomes any amount of sunlight, while dark flowers need to be shaded from the midday sun so that they do not lose their brightness of color.
- When choosing soil for daylilies, give preference to well-drained and fertile soil. The plant loves moisture very much, but stagnation of water can cause harm. There should be no ardent competitors for water near the daylily, otherwise the flower will suffer.
The procedure for planting any plant begins with preparing the site and planting material. Daylily is no exception. I will describe planting daylilies step by step below.
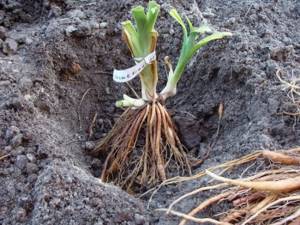
- When purchasing a grown plant in a store, you need to pay attention to the quality of the daylily rhizome and varietal characteristics. The daylily root system should be strong and dense to the touch, without dark spots. If the roots are torn off or there are few of them, the plant will still take root, but will spend at least two years recovering. The place where the hybrid or variety was bred is necessary for the gardener to understand the climate of the flower’s homeland. If the climate of the homeland and the gardener’s region is categorically different, it will be difficult for the plant to take root, and diseases are possible.
- The bed must be carefully dug up, the roots and remains of weeds must be removed from the soil - they are the main competitors of the daylily in obtaining nutrition and moisture from the soil.
- The pit for the daylily should be free to accommodate the roots without breaking them during planting. Place a mound of soil at the bottom of the hole.
- Place the daylily seedling on a hill, carefully straighten the roots. Don't try to lay them out evenly and horizontally, just make sure the roots don't break during backfilling.
- There is no need to deepen the plant; the root collar should go no more than 3 cm below the ground level, but make sure that the roots are not on the surface of the ground. A hint will be a light stripe near the rhizomes - it is a kind of mark of the ground level at the previous place where the plant was planted.
- Sprinkle the seedling with a mixture of peat, sand and humus. Add mineral fertilizers and a little ash to the soil mixture; these preparations will speed up the rooting process.
Planting site, soil
Lychnis perennial - planting and care in open ground
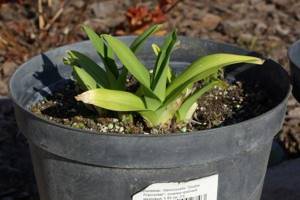
Daylily prefers open, well-lit places. Varieties with dark-colored petals fade quickly in sunlight; for such plants, it is recommended to create partial shading during the midday hours. When planted in the shade, the daylily will bloom poorly. The perennial can be grown in containers.
Attention! For successful flowering, daylilies need to be in the sun for at least 6 hours a day.
The plant loves loose fertile loams with a neutral or slightly acidic soil reaction. If the soil on the site is heavy, humus and sand are added to it. Light sandy loam soils are filled with compost. The perennial has a root system with thick roots that are prone to rotting. If groundwater is close, it is necessary to do drainage or plant flowers in high beds.
Landing
We have already found out what this or that variety of daylily looks like. Let's consider the main nuances associated with planting daylilies in the spring, preparing the soil, and watering.
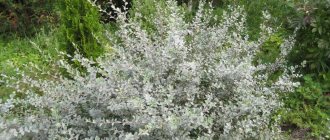
It all starts with selecting a site that is optimal for growing. This recommendation is not accidental. The plant is a long-liver, and with proper care can live for 12-15 years without replanting. Preference is given to areas with bright lighting. Peduncles are not afraid of drafts or gusts of wind. Where many cultures feel uncomfortable, white daylily will come in handy. A prerequisite for active growth is a large space that is not occupied by other large herbaceous plants and shrubs. But close proximity to groundwater and high humidity are contraindicated. Otherwise, you will definitely have a question about why your favorite daylily turns yellow. One of the reasons is flooding.
Daylily in a flower garden
Optimal disembarkation time
Daylilies can be planted in a personal plot or garden throughout the warm season. However, it is spring planting that is considered the most successful. Seedlings quickly take root and flourish in flowering. The material can be stored for a month - just sprinkle the roots with a mixture of sand and peat. The leaf blades are cut in half.
You can also plant daylilies in the fall of 2021. But it is advisable to do this before the onset of severe cold. Otherwise, they simply will not have time to take root. Before winter, seedlings are covered with earth and mulched with leaves. Experienced gardeners believe that May and August are the two most favorable months for planting.
Soil preparation
Soil selection plays an important role in preparing for planting. On the one hand, flowering of daylilies is quite possible on any type of soil. But on the other hand, to achieve maximum results, growing daylilies must be accompanied by suitable conditions.
According to experts, the best choice would be fertile loam with drainage . Clay soil is diluted with sand and compost. Take care to keep the area free of excessive moisture. This is especially true for areas located in lowlands. There are two options: arranging drainage for daylilies at your own dacha or planting them on a raised bed.
Planting in open ground - main nuances
Before planting, each seedling is carefully inspected. Weak and damaged roots are removed, and the cut site is treated with a fungicide solution. Dried roots are moistened in a growth stimulator.
Further actions are performed in the following sequence:
- The area is being dug up. If necessary, fertilizers are applied (compost, rotted manure). For depleted soil, we can recommend a mixture of humus with peat (1 bucket), 30 g of phosphorus and the same amount of potassium.
- Depressions are made according to the size of the roots and the rhizome is distributed.
- Sprinkle and compact, water with a small amount of water. When planting daylilies, regardless of the variety, the root collar is deepened by 3 centimeters.
- In a flower bed with daylily flowers, the distance between plants should be 70 centimeters.
In order for the hybrid daylily to receive a sufficient amount of moisture, it is necessary to reduce its evaporation. The soil is mulched; pine needles and tree bark are suitable. This is how daylilies are transplanted not only in spring, but also in autumn. Maintenance is minimal: water on time.
Tips for care and planting (video)
When and how to plant
Perennial garden geranium - planting and care in open ground
In order for a perennial to grow for many years in one place and bloom profusely, you need to know how to plant daylilies correctly. Planting is carried out in May when the weather is warm or at the beginning of autumn.
How to plant daylily? The landing order is as follows:
- They make a planting hole - place a bucket of peat-humus mixture with 30 g of superphosphate and 30 g of potassium sulfate in the hole. Minerals are thoroughly mixed with the substrate.
- The roots of the plant are dipped in a weak solution of mineral fertilizer for several hours.
- Inspect the root system, removing dry, rotten roots.
- The foliage is cut to a length of 15 cm.
- Planting material is placed in the hole. Carefully ensure that the root collar is 2-3 cm below ground level.
- The plant section is covered with soil, and the soil is carefully but firmly compacted around the stem.
- The bush is watered, the planting circle is mulched with sawdust, peat, and pine needles.
Before you start planting daylilies, you need to consider what space the adult plant will occupy in the garden bed. Some spreading varieties grow more than a meter wide.
Planting in open ground
Best time to plant
Even experienced gardeners cannot tell you the exact time when daylilies can be planted in open ground in the spring. It all depends on the region of Russia, the selected variety or hybrid, the established temperature and weather conditions. However, the optimal time for planting is considered to be early spring, when the threat of frost has passed.
If the time for planting has come, the plants have leaves, and there is frost outside the window, you can postpone planting for 2-3 weeks, fulfilling a couple of conditions. The leaves should be cut in half, and the daylily rhizome should be wrapped in a damp cloth and buried in the sand.
In the Moscow region, it is better to plant daylilies in open ground in late April - early May. In the southern regions, the dates are shifted to an earlier time - mid-April. In areas with a harsh climate (Siberia, the Urals), it is better to postpone planting until mid-May. Even the end of the month will be a good time for rooting, the main thing is that the soil warms up to the required depth in a flowerbed or dug up garden bed.
On a note. If you were unable to buy rhizomes in the spring or did not have time for gardening work, you can plant seedlings in the ground in the summer, the main thing is to choose days that are not too hot, and better yet, rainy days. In autumn, there is a danger that the planted rhizomes will freeze or die, or the flowers will grow weakened.
Watering and loosening the soil
Perennial phloxes: planting and care in open ground
The perennial is unpretentious, drought-resistant, and tolerates temperature changes well. Caring for daylilies is not particularly difficult. The plant should be watered rarely, but abundantly. Watering is carried out at the root, trying not to get on the foliage. The plant can do without watering for some time, but will bloom less intensely. It is especially important to water the bush in the second half of July, when flower buds are being laid for the next year.
It is important to know! Overwatering has a bad effect on the plant and can lead to rotting of the neck and roots.
Weed and loosen the top layer of soil regularly. At the same time, they try not to touch the root system, which can rot.
Reproduction methods
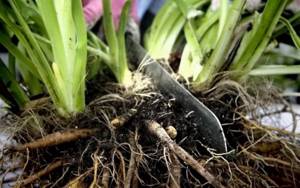
Daylilies can reproduce vegetatively and by seeds. The most convenient way is to divide the bush. It is better to carry out the event in the spring so that the plant has time to take root well before the cold weather. Some plant varieties are easy to separate with your hands, but more often you have to use a sharp knife or shovel.
The bush is divided into several large parts. Each pruning should contain part of the root tissue, 2-3 buds, and several leaves. You can simply cut off the side part from the mother bush. After the procedure, an adult plant is not watered for several days so that the cut site does not rot.
Reproduction by dividing the bush
Proliferation (rooting of inflorescences) is a method of vegetative propagation of daylilies. The peduncle is not removed until the upper part dries. At this time, small rosettes of young plants form in place of the inflorescences. The peduncle is cut off, the foliage is shortened by a third. Seedlings are placed in water for roots to appear. Root formation is stimulated by adding 1-2 drops of Epin or Zircon.
When the roots grow to 3-5 cm, the shoots are planted in small pots. Leave it at home for the winter. They are planted in open ground in May, when the danger of frost has passed.
Daylilies are rarely propagated by seeds. It's a long process. Plants bloom only in the third year. Sowing seeds is justified for breeding purposes or when you need to grow a large amount of planting material.
Interesting information! During seed propagation, the varietal qualities of the mother plant are lost.
Rules for propagation by seeds:
- The seeds are soaked in a 3% solution of hydrogen peroxide (15 ml per 1 liter of water), covered with a plastic bag and put in a dark place. Germination takes from 5 to 15 days. It is necessary to periodically check whether the seeds have hatched.
- When the roots appear, the sprouted seeds are placed on a layer of small pebbles and placed in the light.
- The seedlings develop a root system and small leaves appear. Young bushes can be planted in separate pots.
- Plants are planted in open ground when the leaves reach 15-20 cm in size.
Sowing of seeds is carried out in March. If there is lighting, you can sow the seeds earlier - in January-February.
Daylily propagation
There are several ways to propagate daylilies, each with its own advantages and disadvantages.
Dividing the bush
The simplest and most common way to obtain young daylilies, which in all respects will be identical to the mother ones. If necessary, the bush can be divided throughout the growing season. As a rule, division begins when the plant reaches 3-4 years of age. Another signal for replanting is the crushing of flowers. The optimal time for division is the first half of summer - the beginning of autumn, then the plant will have time to get stronger before the onset of frost.

Dividing a daylily bush
Seed propagation
It is used only for breeding activities, since in everyday life daylilies planted using this method are not able to maintain their species characteristics.
Reproduction by offspring
If all transplantation standards are observed, it allows you to increase the number of plants from one manufacturer, while maintaining all the species characteristics. But before you plant the rosettes in open ground, you should plant them in pots and place them in a warm place for several weeks.
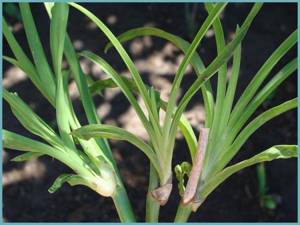
Reproduction of daylily by offspring Important! If there are still 6-7 weeks left before frost, plant the sprouts in the fall, and if they have not had time to take root, then in the spring (mid-May).
Feeding and replanting
Adult daylily bushes need to be fed three times during the growing season. In May, nitrogen fertilizer is applied to the bush. You should not overfeed the plant. Excess nitrogen leads to an increase in green mass to the detriment of flowering.
During the period of bud formation, perennials are fed with mineral phosphorus-potassium fertilizer. A month after flowering, fertilizing is repeated to ensure the full formation of flower buds for the next year.
Daylily can grow in one place for 8-10 years. Old plants are difficult to rejuvenate; they are overgrown on all sides with small divisions that are difficult to take root. Large bushes are difficult to replant.
Plants are better tolerated when transplanted at the age of 3-5 years. In May or September, the plant is dug up, if necessary, divided into 2-3 parts, and planted in planting holes with a prepared substrate.
Feeding during different periods of the growing season
When choosing fertilizer, the most important thing is to focus on the stage of growth in which the flower is currently located.
Spring feeding scheme
How to feed rhododendron after flowering
The first feeding of the flower is carried out when the soil warms up to approximately +6 °C. In different regions this can be either March or May.
Note! It is necessary to start from specific weather and climatic features, and not from the month.
You can also focus on the stage of flower growth. When the first fertilizing is applied, the flower usually already has leaves about 10 cm long. At this stage, it is necessary to apply a complex fertilizer containing the maximum amount of nitrogen. You need a little phosphorus and potassium.
You can water the plants once or twice with growth stimulants diluted in the correct proportions. The number of waterings should be determined depending on the condition of the daylily.
Summer feeding scheme
When the plant begins to produce buds, it should be supported. To do this, it is necessary to feed in June and July with products that have a large amount of potassium and magnesium. But the nitrogen content should be reduced.
This ensures more luxuriant flowering and will increase its duration.
Pests and diseases
Daylily bushes can be affected by fungal and viral diseases. Root collar rot is a fungal pathology transmitted by pests. The disease can develop during deep planting or poor soil aeration. To prevent disease, do not allow stagnation of water or overfeeding plants with nitrogen.
Leaf streaking is caused by a fungus. Yellow stripes appear on the foliage, and the above-ground part of the bush turns brown and dries out. The affected leaves are removed, and the daylily is treated with a fungicide.
Rust - red spots on leaves and flowers. Plant growth slows down and flowering intensity decreases. The disease cannot be treated.
Note! Non-infectious diseases appear due to unfavorable weather, violations of planting and care rules.
The main pests of daylily:
- thrips are small sucking insect pests that can be found on the inside of leaves;
- aphids - often attack flowers in hot weather and serve as a carrier of viral diseases;
- spider mite – becomes more active in dry, hot weather;
- root mite - damages leaves and inhibits plant growth.
At the beginning of the growing season, preventive spraying of flowers with systemic insecticides and acaricides is carried out.
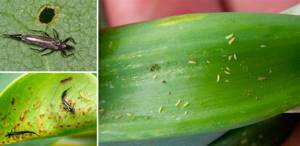
Leaf damage by thrips
On a note! The most popular products are: karbofos, inta-vir, fitoverm.
In rainy years, many slugs appear on daylily leaves. To combat them, metaldehyde is used. Blue granules are laid out on the soil surface, 3 pieces per plant.
Flowering period and after care
Daylily throws out flower stalks, each of which contains 10-30 buds. Every flower blooms in the morning and fades in the evening. At the same time, 2-3 flowers bloom on one peduncle. The flowering period lasts 30-45 days. Early varieties begin to bloom in June, late varieties - in August-September. By selecting a collection of varieties, you can achieve flowering of daylilies in your dacha from early summer to late autumn.
Perennial flowering
Interesting information! There are nocturnal varieties of daylilies, the flowers of which bloom in the evening and fade by morning.
Many gardeners are interested in how to properly care for blooming daylilies. In order for the plant to maintain its decorative appearance, faded flowers must be regularly plucked out. This stimulates new buds to bloom. An unkempt plant with wilted petals looks sloppy.
Use in landscape design
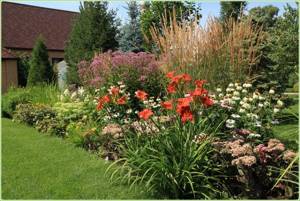
Its unpretentiousness, duration of flowering and decorative effect throughout the growing season open up great possibilities for the use of daylily in landscape design. The plant is suitable for single planting and goes well with other plants.
Daylily looks good in group plantings next to astilbe, phlox, and irises. Framing the composition with plants with decorative foliage - hostas, heucheras - looks beautiful. Leaf rosettes of daylily go well with late-blooming perennials - asters, chrysanthemums. A flowerbed with blooming daylilies looks interesting when planted in the background and between bushes of ornamental grasses.
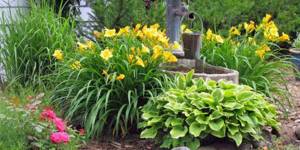
Flower in plant composition
Many gardeners love daylilies for their ease of planting and care, beautiful and long-lasting flowering. Beginning gardeners can be advised to begin their acquaintance with flowers by growing natural species and well-known varieties that have proven themselves to be hardy and winter hardy.