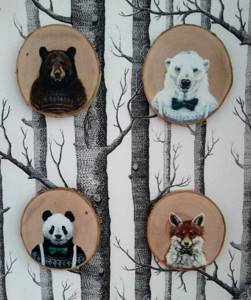
Paintings are one of the components of the warm and unique atmosphere. And if the paintings are made independently, the emotional “response” from them can be an order of magnitude higher than that of purchased ones. Paintings for the interior, created with your own hands - you will see photos of examples below - thoughtfully thought out and lovingly brought to life, will give you a good mood for a long time.
Let you not have the talent of an artist, do not shine with creative flair and doubt your taste. Cast aside your doubts. Having a desire to create original paintings for the interior, you can learn some techniques on your own and after a while admire the creation of your own hands.
Looking for an idea for a painting
Inspiration is a fickle and timid thing. Let's not wait for inspiration from above, but let's actively search for ideas for future paintings for the interior.
Advice. At the very beginning, it will be useful not to look on the Internet in search of ideas. Trust your inner instinct: what exactly do I need, how would I like my painting to look, what mood should it bring into my life and into the interior of my home? Write down all the thoughts that come to your mind.
Information, having gained a critical mass, will definitely “shoot” with an original idea. And having the main features of what you are looking for, you can choose the appropriate technique for creating paintings with your own hands for the interior and look at the photographs.
Anything can serve as an impetus for creativity: from sewing accessories and beads to family photos and letters from the home archive.
Advice. For any mother, a touching option for interior decor will be a panel collage of children's drawings, appliqués, the first cute doodles and other priceless creations of little hands.
Eco paintings
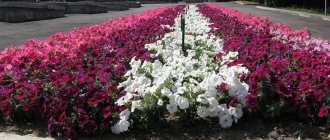
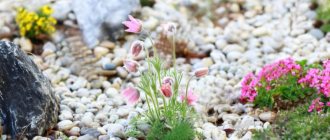
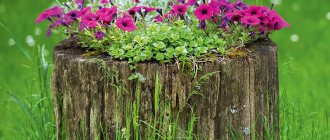
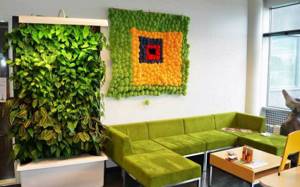
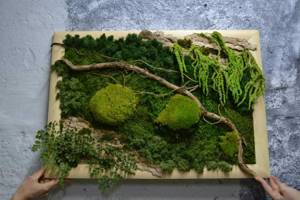
Homemade flower paintings are one of the fashion trends this season. They can be made not only from dry herbs, but also from living plants. Vertical gardening systems, as well as panels of moss and succulents, will help bring you closer to nature.
You need to dry flowers and herbs very carefully so as not to damage their appearance. You can use an iron or oven. For a voluminous herbarium, choose express drying. Place the most spectacular specimens one at a time.
If you do not have experience in creating eco-panels, then you need to start with something simple.
However, even a beginner can be lucky enough to secure dry and fresh objects so that they look incredibly graceful and elegant. But this is rather an exception. It’s better to first develop skills and abilities on simple crafts.
Choosing ways to create a picture for your interior
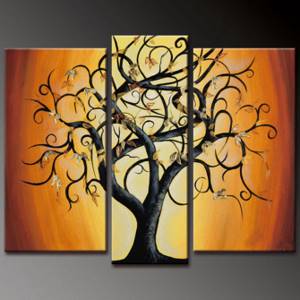
There are many ways to bring creative ideas to life. Paint with watercolors, acrylics, create modular oil paintings, create panels from leather, thread or wool, make posters from photos - the choice is yours. Each of the paintings will be interesting and unique in the interior.
USEFUL INFORMATION: Decorating an apartment with decorative stone
Volumetric paintings made of leather
To create such a picture it is not at all necessary to buy expensive new leather. Whole pieces from worn-out items will be used: bags, boots, raincoats and even gloves. Leather can be painted with acrylic paints if a suitable color is not found. In general, the technology for creating a three-dimensional painting from leather is no different from the same one from paper.
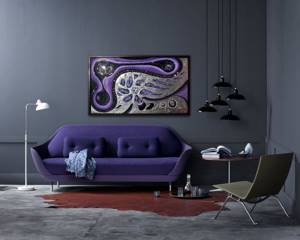
Three-dimensional painting in the living room
Three-dimensional painting in high-tech style
Painting with paints
Even if your talent as a painter has passed you by, you are quite capable of creating abstract paintings for the interior at the “cute and soulful” level. You will need:
- oil, acrylic or watercolor paints;
- tablet or easel;
- canvas;
- brushes;
- palette and palette knife;
- scotch;
- solvent.
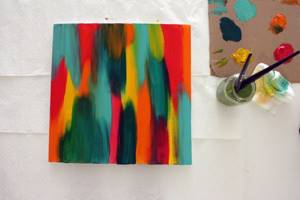
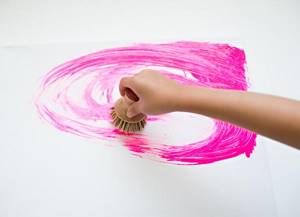
Abstraction
For those who do not have any special talent for drawing, we suggest not to be upset. Try making an abstract painting. Believe me, the result will pleasantly surprise you.
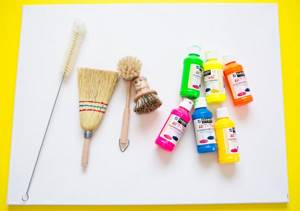
We will prepare the following materials:
- canvas of the required size;
- liquid paints;
- brush;
- brush;
- brush;
- broom.
Squeeze the paint onto the canvas in random order.
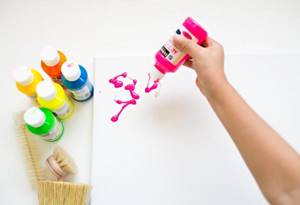
We distribute the paint with any tool. There are no specific rules here, just use your imagination.
Mix different shades on the canvas and continue to distribute them with brushes or other tools.

Leave the painting for a few minutes to allow the paint to dry a little.
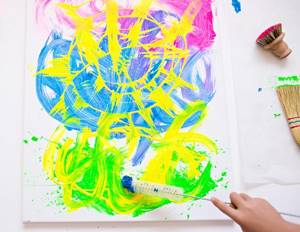
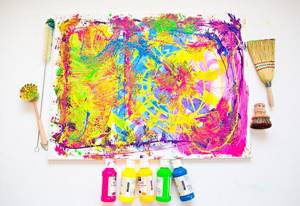
We continue to fill the canvas with paints until the desired result is achieved.
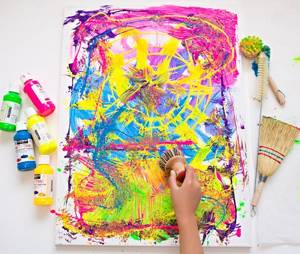
Leave the painting until completely dry, after which you can hang it on the wall.
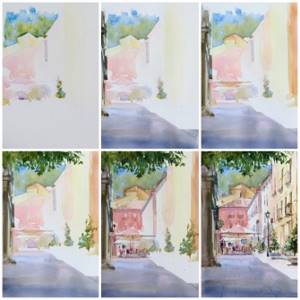
Choosing colors
In order to choose the right colors for a painting, you need to know that:
- to obtain the desired shade, the paints are mixed on a palette and only then applied to the canvas;
- on a sunny day, the color of the object has golden shades, on a cloudy day – grayish;
- if the subject of the painting is night, the objects will be richer and darker than during the day.
Variety of colors
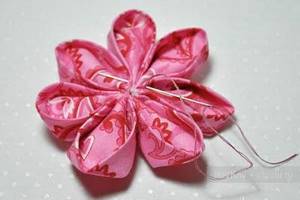
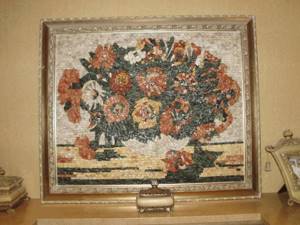
You can make absolutely any flowers in the paintings. Daisies, poppies and cornflowers drawn with ribbons will combine into a very cute bouquet of wildflowers. Irises look gorgeous and bright, and peonies, white and pink roses look elegant and delicate. Red roses will bring solemnity. Also charming are spring tulips, daffodils and lilacs, which are difficult to distinguish from real ones.
You can use not only satin ribbons. Flowers made from organza are unusually delicate and airy. For a room in pastel colors, such flowers will be an ideal addition to the decor.
Read this: Chamomile from a plastic bottle to create the right atmosphere in the country
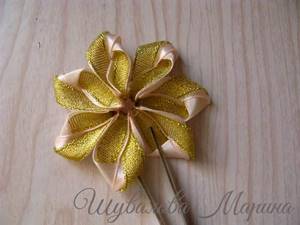
Brocade ribbons are well suited for making decorative flowers. Their metallic shine will look great against a dark background. Such paintings are very impressive and original.
Pieces of fabric are also suitable for creating flowers. Flowers made from colorful cotton fabrics are associated with home warmth and comfort.
Let's create
Multi-volume works and 6 years of study at the institute are devoted to the art of drawing. At the everyday level, we can give several guidelines in this process:
- draw simple objects first;
- dilute and mix the paints for your painting with a reserve, because you won’t be able to achieve exactly the same shade again;
- Before applying the next layer, the previous one must dry well;
- try different techniques, but focus on two or three that you can do;
- within three days, an image made with oil paints can be corrected, failed details can be corrected, or they can be completely erased.
Advice. If, when starting the picture, you planned a plot in the style of realism, and by the middle of the process you are surprised by abstractionism, it doesn’t matter. Urgently pretend that this is what you intended from the very beginning. Abstract creations are merciful to the mistakes of beginners, and in the interior they look impressive and mysterious.
DIY paintings: 100 ideas for the interior
and the wallpaper there is pistachio color and it will look
paintings, panels Trimmingpaintings, panels Trimming
Category:
Trimming
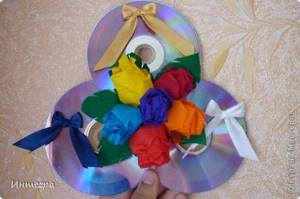
Technique: Trimming 1. gift 2. lilies 3. valentine1 4. valentine2 5. swan princess Author: Integra ~ I need more criticism, this is the only way I can improve, please don’t flatter me Source: Country of Masters paintings, panels Trimming
PANNO Susanna needleworkPANNO Susanna needlework
Category:
Cross-stitch
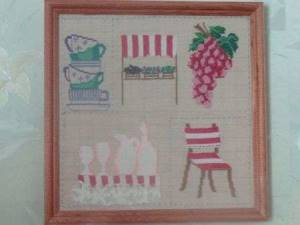
I bought the magazine Susanna needlework, I really liked so many ideas for the home and decided to experiment with all the simple ones and this is what happened (though I haven’t washed the pencil yet) And here’s how it should be and a few more ideas Author: Natalya Source: BabyBlog
Panel DecorationPanel Decoration
Category:
Miscellaneous
Technique: Decoration 1. I got this panel as a gift for my godfather... Only it's not quite finished yet... A similar composition needs to be made on the reverse side. so that it would also be beautiful from the street...... 2. 3. 4. 5. 6. 7. Author: ...Galka... ~ I love tactful constructive criticism
I want to make a panel on the wall in the kitchen-living room (80 BY 80), but I don’t know how, maybe someone can tell me something, I’ll be very grateful. Modeling I want to make a panel on the wall in the kitchen-living room (80 BY 80), but I don’t know how, maybe someone can tell me something, I’ll be very grateful. Modeling
Category:
Modeling
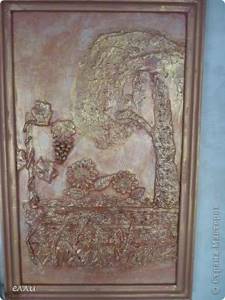
Technique: Modeling 1. I FINALLY FINISHED MY TEST PANEL PICTURE. I OPENED IT WITH VARNISH AND TONED IT WITH GOLD, IT LOOKS MUCH BETTER LIVE. 2. FIRST STAGE - MODELING ON DRYCARDBOARD (PVA + FINISH) 3. PAINTING Author: ellie ~ If you have something to write to me, write without hesitation Source: Country of Masters
Home / Mosaic panels / About the panels / Beautiful panels
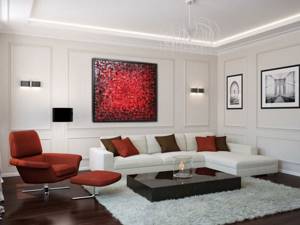
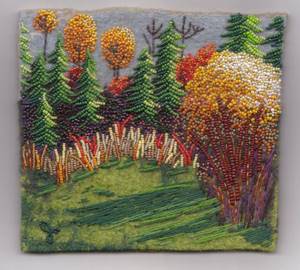
Bead paintings
Interesting and beautiful paintings that will complement the interior of the kitchen or bedroom are obtained using beads. It’s painstaking, not quick, but relatively simple, and most importantly, it’s good for the nervous system.
USEFUL INFORMATION: Niches made of plasterboard in the hall and living room (17 photos)
You will need:
- frame on a solid base;
- printed drawing;
- beads;
- wire or thread;
- Super glue;
- toothpick.
We begin to create a masterpiece for the interior.
- Free the frame from the glass.
- Draw the outlines of the frame on the base.
- Paste the pattern on which you will lay out the beads.
- Use thread or wire to mark the contours of the design, gluing them to the base.
- Glue the beads, distributing them tightly, without voids. If this is uncomfortable to do with your fingers, use a toothpick. Apply glue to small fragments, not allowing it to dry.
- Let the painting dry completely by placing it vertically for a while. If somewhere the beads are not glued well, they will fall off and you can re-attach them.
- Frame your beaded item, hang it on the wall and admire the transformed interior.
Volumetric bead paintings
We will need:
- beads of the desired color and size;
- threads;
- needles;
- ready-made plot for embroidery;
- frame.
If you have never dealt with embroidery and beads before, you can go the simple route: buy a ready-made bead embroidery kit. If you are ready to take on more complicated work, then you will need to choose a design for the future painting and independently select the necessary beads for it in the store.
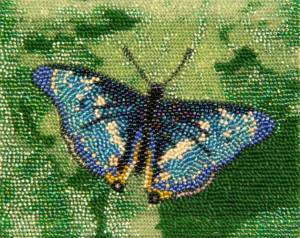
Three-dimensional mosaic painting
The work will consist of stringing beads onto a needle and making bead stitches on a fabric base with design lines applied to it. This work is very similar to regular satin stitch embroidery. At the end of the embroidery, we also frame the resulting three-dimensional image.
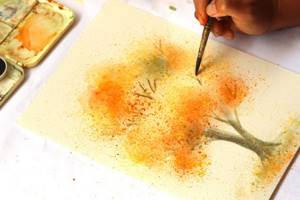
Three-dimensional painting depicting autumn
Painting for the interior from scrap materials
To make the work of your hands, intended for the interior of your home, interesting, do not limit your imagination to any specific techniques. Combine, break the rules, create your own recipes.

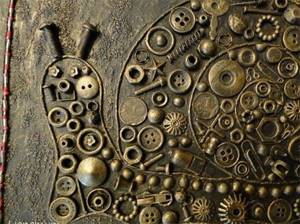
Various decorative and natural materials can be used: leather, fabric, buttons, sequins, quilling elements, wallpaper, dried flowers, sea pebbles, shells and even wool. The painting for the interior made of wool is worth considering in more detail.
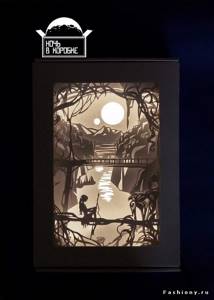
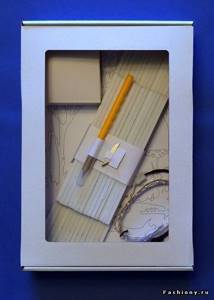
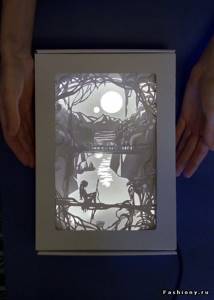
Light painting
You will need:
- sketch for a painting;
- paper or cardboard;
- frame for fastening sheets;
- knife;
- LED strip;
- frame box.
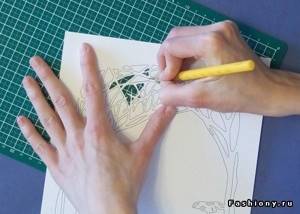
Making a sketch for such a picture is quite simple, because you can print it on a printer. Prepare the work surface. It is best to use a wooden board. Using a knife, carefully cut out the details in the sketch, as shown in the photo.
If only one drawing is used to create a picture, then we fix it on each side.
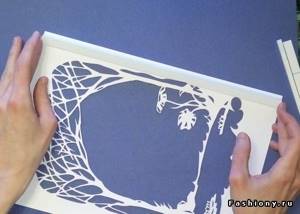
We install the backlight in the frame and attach the sketch on top.
Close the frame box and turn on the backlight. A beautiful light painting is ready!
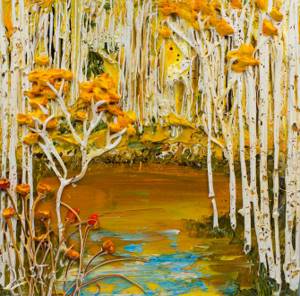
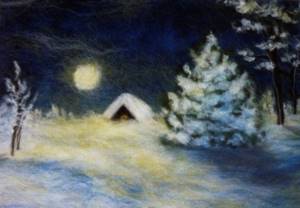
Painting with wool
Wool painting is a whole art from an unexpected perspective. This is where you don’t have to worry about your artistic abilities: a sketch of a drawing can also be applied under a stencil. Warmth, depth, volume are just a few of the epithets for such a work. A painting made of wool breathes, lives its own life and brings special warmth to the interior.

You will need:
- clamping frame;
- non-woven or flannel backing;
- scissors, tweezers;
- wool of different colors.
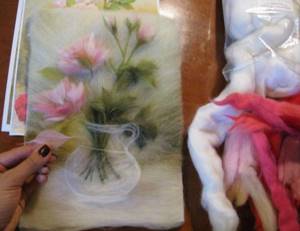
Now we begin to paint a picture with wool.
- Draw a sketch on the base.
- Start laying out the wool with the main background color, and then lay out the wool of other colors in layers. You can apply the wool by pulling it into a strand, plucking it into a “cloud”, or tearing it off. Each method creates a different effect: delicate color transitions, transparency or richness of texture, light haze or dense fluffy balls of fur.
- Give wool objects the desired shapes: convexity, texture, layering.
Important! Sometimes apply glass to the wool composition. This way you will evaluate the intermediate result and be able to eliminate shortcomings in a timely manner.
- Clean the glass with alcohol, press it against the painting with clamps and trim off any protruding hair.
- Secure the frame and enjoy the result.
USEFUL INFORMATION: How to make stucco on the wall with your own hands?
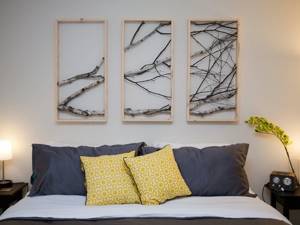
How to make a decorative wall panel from flowers
You will need
- - tree branch;
- - papyrus or corrugated paper;
- - beads;
- - glue gun;
- - pencil;
- - scissors;
- - glass vase/jar;
- - stapler;
- - a piece of artificial moss.
Instructions
Place artificial moss at the bottom of a jar or vase. Place a branch in the moss, using scissors to give it the desired shape and cutting off excess branches. Cut out several circles from tissue paper of two colors. You will need circles of three sizes - 5 cm, 4 cm and 3 cm in diameter. Make as many circles as the number of colors you want to place in the composition. Start assembling the flower with a large circle, on which a slightly smaller circle is superimposed, and then the smallest circle. Each flower consists of three circles of different sizes. Mark the center of the flower by pressing it lightly with your fingers, and then staple the flower into the center. Spread the petals and bend them into a natural flower shape. Decorate the centers of the flowers with beads to match the color of the paper. Then make several more flowers of the same type from paper of a different color. If you wish, you can combine several colors at once in one flower - then it will turn out to be unusual and non-standard. Using a glue gun, attach your artificial buds to the branches. You can attach beads not only to the cores of flowers, but also to the branches themselves, depicting young buds and berries. An unusual and stylish composition for home decor is ready.
Video on the topic
Home \ Wall panel made of flowers and plaster
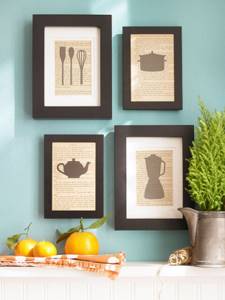
Homemade posters for the interior
An original painting for the interior of the kitchen with your own hands will be posters made with handwritten recipes from your mother’s culinary notebook, for example. Handwritten text, inscriptions and quotes on a culinary topic, and simply useful information for the housewife can be arranged in a meaningful composition and decorated with it in the kitchen interior. Stylish posters can be created from collages of family photos. The main photo is located in the middle of the collage, and it is framed by photos that are in tune with the overall theme. The collage is mounted in a frame under glass.
Everyone can create their own masterpiece for the interior. Your creation will not always cost less than purchased, but it will be worth it. But if there is a desire, the means will be found.
Suitable flowers
Flowers for living paintings must be selected individually depending on living conditions, individual characteristics of living components and compositional decisions.
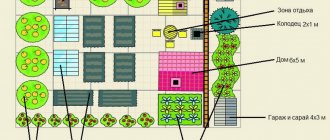
Choosing plants depending on the amount of sun in the room
To create panels from plants, the following types are usually used:
- Dracaena is unpretentious to lighting, has a presentable appearance and a beautiful shade of leaves and stem;
- Succulent - grows well in any soil and in any light, is not afraid of drought and changes in humidity;
- Haworthy - has an original color scheme of fleshy greens and compact sizes;
- Delosperma - this representative of coniferous trees will perfectly complement your work with a snowy effect;
- Zygocactus - fits into any composition, has a long stem that is easy to plant and beautiful shades of flowers;
- Rhipsalis - unpretentious to lighting and soil, will perfectly complement any composition;
- Euphorbia is an unusually hardy herb that is not afraid of drought, changes in humidity and light.
Note! Each representative of the list has individual external features that provide the work with originality and flavor.
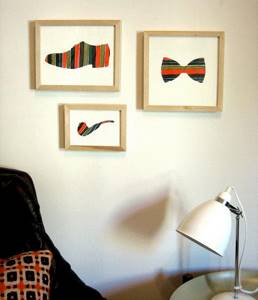
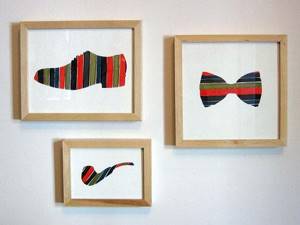
Stylish silhouette paintings
Of course, not everyone can boast of artistic talent. But if you really want, you can make silhouette paintings that will become a stylish addition to your home.
You will need the following materials:
- acrylic paints;
- wax paper;
- black marker;
- stationery knife;
- brush;
- cardboard for the base;
- paper;
- an image of what you want to create;
- picture frame.
We print the images on a printer.
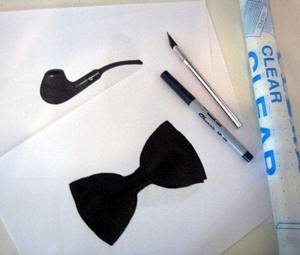
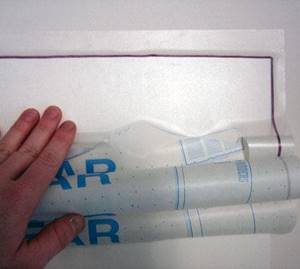
We outline the outlines of the images with a black marker. Transfer it to wax paper. Cut out the silhouette according to the transferred markings. Place it in the center of the sheet of paper and fix it in this position.
We paint over the surface not covered with the stencil. At this stage, use your imagination to get a unique picture.
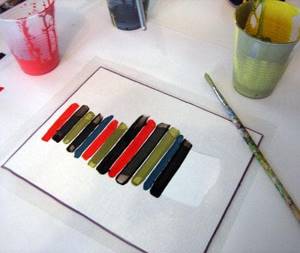
Leave until completely dry and remove the stencil. If desired, you can make several more such images. We place each of them in a frame.