Option #1. Making a stork from plastic bottles
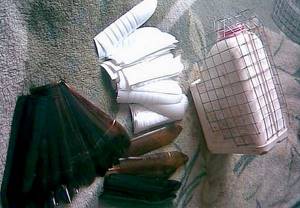
Before you start working, you need to take a small sheet of plywood and make templates from it. Templates need to be made in the form of the body and wings of a bird, as shown in the image. You will also need opaque plastic bottles (preferably white or black), red electrical tape and self-tapping screws. The procedure is as follows.
Step 1.
First, you need to connect the previously made templates with each other using self-tapping screws. Plastic milk bottles will be used as feathers. The bottles should be cut into strips of equal width, and then a fringe should be made on the edges of each of them.
Step 2.
Next, the finished feathers must be secured to the stork’s “body” using a glue gun. It is typical that black PET bottles will be used for the lower body and tail (usually shampoo containers are used for this).
Stork with baby on the nest
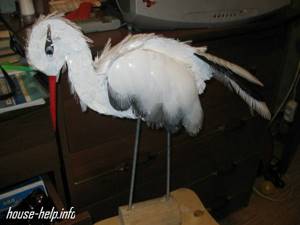
Another way to make your home rich and happy is to make a stork on the nest. You can use tilde bird patterns as a basis. Cut feathers from white plastic milk bottles, staple them together and make wings, decorating the ends with real feathers. Place a few white feathers on the top of your head. Form a tail out of real feathers, sew or glue on eyes and a tie, and place the bird in the nest.
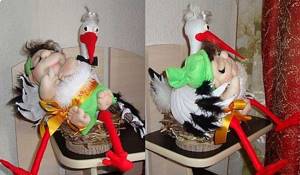
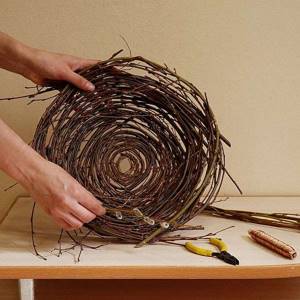
It can be made from ordinary rods, fastened with wire. To make a stork with a baby, put any doll in its wings. The master class on making a lucky amulet is over.
Option #2. Making a stork from polyurethane foam
Now let's talk about another option for making a stork for the garden with your own hands. Now you need to first prepare a 5-liter plastic container, polyurethane foam, polystyrene foam and tape. The algorithm of actions should be as follows.
Step 1.
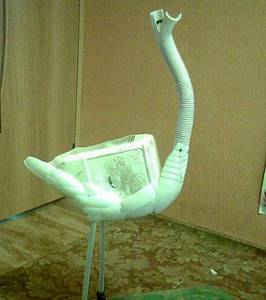
First, the body parts are attached to the bottle using a container. For the neck, ordinary wire is used, lined with pieces of foam. The thighs need to be made in a similar way (using foam and wire). An ordinary large-diameter nail is quite suitable as a key.
Step 2.
The workpiece will look at the preliminary stage as shown in the image below.
Step 3.
For the bird's legs (at least in this implementation) used electrodes are used. In the absence of electrodes, you can select a similar material - for example, thick wire twisted into several turns, or metal rods from thin reinforcement.
Step 4.
So, all parts of the stork’s “body” have been assembled, but before proceeding to the next step, you need to carefully check the strength and reliability of the fasteners.
Step 5.
After this, the entire layout must be covered with polyurethane foam.
Step 6.
All excess is carefully trimmed off.
Step 7
Now the sculpture is almost ready. If the polyurethane foam has already completely dried, then the bird needs to be painted with acrylic paint.
Step 8
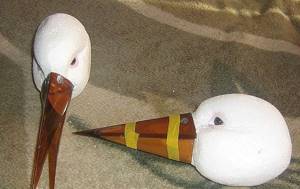
Next, a small piece of wood is taken, a “beak” is modified from it and attached to the “head” of the bird using a nail.
Step 9
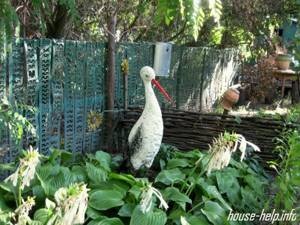
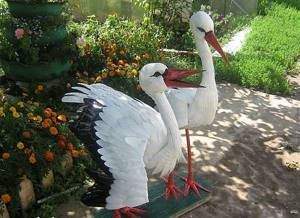
Natural feathers are inserted into the wings and tail to make the stork look as realistic as possible. Look what a wonderful garden stork you will make (if you do everything right, of course).
How to make a stork for your dacha with your own hands: master class
A DIY garden stork is one of the favorite crafts of summer residents and gardeners, and there are many variations of its execution on the Internet, but the manufacturing principle is approximately the same in all cases, regardless of the materials used and the richness of the decor. Read how to make beautiful wooden signs for your home.
First of all, the head, neck, torso, wing frame and legs are made, which are connected with fastening tools.
The remaining time is devoted to the rather painstaking procedure of cutting, fringing and decorating the feathers - they will make up the plumage of the bird’s body, neck and tail. There are homemade options without using plastic bottles, but they are less common.
Let's take a closer look at different options for making a stork in this article.
Option #3. Making a stork for the garden from a canister
Before you begin, make sure you have the following supplies:
· five liter canisters;
· plastic bottles (black and white);
After this, you need to perform the following sequence of actions.
Step 1.
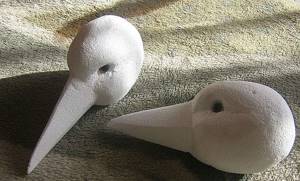
Cut out the foam blanks and use a knife to shape the head. Cut out the eye sockets and make the beak flatter.
Step 2.
Use sandpaper to make the surface as smooth as possible. Place toy eyes in the eye sockets (we’ve already talked about where you can get them).
Step 3.
Cut a beak from a plastic bottle and secure it with glue.
Step 4.
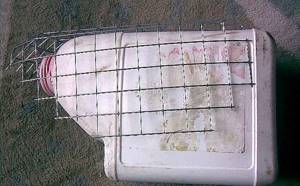
Make a bird's body from a plastic canister and cut off the handle.
Step 5.
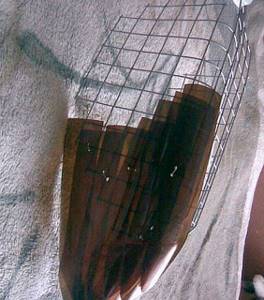
Cut a piece of mesh large enough to wrap around the canister. Round the mesh a little so that it looks more like wings.
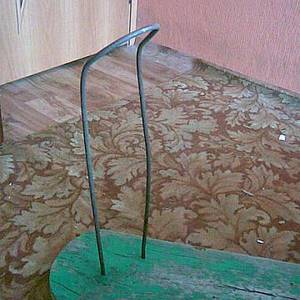
Step 6.
A thick metal rod must be bent and legs made from it.
Step 7
Feathers for the stork are cut from white bottles.
Step 8
After this, you can proceed directly to assembling all the elements. Work should start from the “tail”.
Step 9
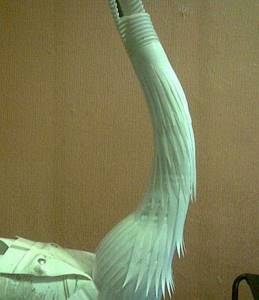
For the “neck”, a corrugation (for example, from a vacuum cleaner) or something similar is put on the wire. The feathers are attached using self-tapping screws. Due to the fact that our bird’s wings are folded, feathers can only be attached to the belly and slightly on the sides.
Step 10
White bottles are cut in half, and a fringe is formed at the cut sites. The bottles are attached to the “neck” using tape.
Step 11
“Wings” must be made from one edge of the prepared mesh. It is important that the second row covers the first by 1/3. On the third row, white plastic is used.
Step 12
For the “legs” of the stork, appropriate blanks are cut out of 0.5-liter bottles.
Step 13
All that remains is to paint the bird’s “beak” and “legs” red. That's it, your DIY garden stork is ready!
Master class on making happiness
In order for almost real storks to appear on the paths of your garden, you will only need a few hours of passionate DIY work.
- Cut out a head with a beak from a piece of foam plastic, draw eyes or glue in black beads with your own hands.
- Cut a beak in two parts from a dark bottle and glue it in place.
- We begin the master class on making a body by cutting off the handle in the canister. Then you need to bend the mesh with your own hands to the shape of the canister and trim off the excess.
- To make the legs, bend the rod and secure its ends to the board.
- We are conducting a master class on making plastic feathers.
- Attach the feathers to the canister, starting from the tail.
- The master class on attaching a neck begins with attaching the reinforcement wire. Then a hose is put on it.
- Attach small “feathers” to the neck with tape.
- Secure the feathers to the mesh.
- The stork for our garden will stand with its wings folded, so we simply attach all the feathers with a stapler with our own hands, overlapping each previous row by a third.
- We finish the master class by connecting all the details and decorative tinting of the eyes, beak and legs. You can install this bird with your own hands in the depths of the garden for the whole summer. It will not be damaged by rain and will not fly away.
Sculpture made from plastic bottles and plywood
To work you will need several plastic bottles in black and white. The basis of the structure will be a sheet of waterproof plywood.
To work you will need the following tools and devices:
- jigsaw;
- scissors;
- screwdriver or screwdriver;
- pliers;
- hammer;
- steel staples;
- self-tapping screws;
- glue gun;
- red nail polish;
- thick wire.
The stork can be made from plywood and white plastic milk bottles, which are cut into fringes for plumage.
Once the tools and materials are prepared, work can begin.
It is carried out in the following sequence:
- A paper template of the bird's body and wings is made. The size of the sculpture is chosen based on the size of the plot and the tastes of its owners.
- Markings are applied to the plywood. The workpieces are being cut out.
- The edges of the workpieces are polished. The plywood is being primed.
- The wings are attached to the stork's body using self-tapping screws. As a rule, the wings are made in a folded position.
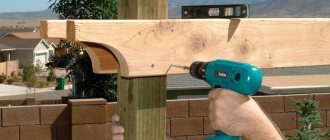
- The legs are being made. A steel rod with a diameter of 6-10 mm is suitable for this. Using staples, the steel parts are nailed to the plywood. The lower edge of the rod can be sharpened for ease of fastening the product in the ground or nest.
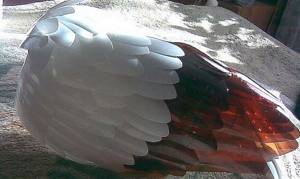
- White milk bottles have their bottoms cut off. What remains is cut into 2 parts vertically. The strips are cut with scissors. They will imitate feathers.
- Plastic fringe is prepared in a similar way from black bottles.
- The cut pieces are attached to a plywood base. This is done from the tail. The black stripes are attached first. They are used to trim the lower body, tail and wings.
- The rest of the bird is trimmed with white plastic strips.
- The beak is covered with red nail polish.
- The eyes are painted with black paint. You can use large buttons or eyes from one of your old toys.
The stork figure is ready. It can be easily attached to any surface. With the onset of inclement weather, it is better to remove the product and store it in a warm room until spring.
Garden crafts from plastic bottles: DIY stork
Original crafts made from plastic bottles are an affordable and easy way to transform your site. Thus, a stork figure made of durable plastic will decorate the garden, create a unique atmosphere and become the personification of happiness and good luck.
A stork figure made of durable plastic will decorate the garden, create a unique atmosphere and become the personification of happiness and good luck. The illustration for the article is used under the standard license ©dachnyedela.ru
Press your finger up and subscribe to the “ Ideal Vegetable Garden ” channel.
Preparatory work
You can create a bird, guided by already tried ideas, using fastened parts from plastic containers, wood, metal, foam, etc. For the craft, you need to prepare:
- plastic canister with a volume of 5 l;
- white milk bottles of 1 l and 0.5 l or transparent containers for plumage;
- dark plastic containers with a volume of 0.5 l, 1 l and 1.5 l;
- a piece of foam plastic 10 cm thick for the bird’s head;
- a piece of corrugated pipe or an unnecessary vacuum cleaner hose for the neck;
- chain-link mesh for the wing frame;
- metal rod 5-10 mm thick for legs.
Original crafts made from plastic bottles are an affordable and easy way to transform your site. The illustration for the article is used under the standard license ©dachnyedela.ru
You will also need the following tools:
- scissors;
- sandpaper;
- stationery knife;
- furniture stapler;
- thin flexible wire;
- self-tapping screws;
- universal glue;
- paints;
- tassels.
You can create a bird, guided by already tried ideas, using fastened parts from plastic containers, wood, metal, foam, etc. The illustration for the article is used under the standard license ©dachnyedela.ru
Making a stork from foam plastic
As a rule, after external insulation of walls, quite a lot of foam scraps remain. They do not have to be disposed of. You can make many interesting and beautiful crafts from this material. Polystyrene foam is lightweight and easy to process. You can make a stork from foam plastic quickly, without using complex tools.
For work you will need the following materials and tools:
Making a stork from polyurethane foam.
- glue;
- sharp knife;
- steel rod;
- wood saw;
- pliers;
- sandpaper;
- black paint;
- paint brush.
Making a stork sculpture for the garden is carried out in the following sequence:
- Blanks are made from wire that will imitate the legs of a bird. Their lower ends are sharpened. The upper ends of the rod are bent at right angles for fastening in foam.
- The contours of the bird's body parts are applied to the foam. The largest piece should be the central part of the torso. The remaining fragments will be needed to give the figure volume, create wings, neck and head.
- The blanks are cut out. This is best done with a saw.
- Steel rods are attached to the central part of the body. In order for subsequent fragments to fit tightly onto the base, grooves are made in it for the rod. To avoid lateral vibrations, the rod is fixed to the base with additional brackets.
- Styrofoam strips are glued to the central part of the body, adding volume. Wings are glued on top of them.
- The neck and head of the sculpture are placed on the pin.
- Using a knife and sandpaper, the stork figure is given its final shape. Additional finishing is not needed, since a relief imitation of feathers can be created on the foam.
- The tail and wings of the bird are painted with black paint. The beak can be wrapped with red electrical tape or painted.
What else can you make a stork from?
Craftsmen manage to create masterpieces from everything lying around in the garage, including, and also use leftover building materials after renovations. You can safely take note of several of these variations of garden storks - making them will not be more difficult than the previous option.
From polyurethane foam
Using this method, you can create a garden sculpture by turning it and giving the stork a realistic image. The “skeleton” of the product will be a steel frame - steel rods are welded to each other, and then other elements of the stork’s body are attached to them.
To make a stork you will need:
- 5-liter plastic bottle;
- polyurethane foam;
- steel rods;
- Styrofoam;
- dye;
- soil solution;
- scotch;
- rasp.
You need to put a bottle body on the frame, and attach sharpened pieces of foam plastic to each other with tape to the neck rod. Curly hips made of foam are secured in the same way.
Even with the use of waterproof plywood, the possibility of the sculpture getting wet during the cold season increases, so it is recommended to store it indoors until the weather warms up.
To make a stork you will need:
- plywood;
- plastic bottles with white and dark walls;
- hot glue gun;
- rods;
- jigsaw;
- self-tapping screws;
- scissors;
- screwdriver;
- furniture stapler;
- red acrylic paint.
It is advisable to first apply the elements of the body and wings on paper, creating a “pattern” of the parts before cutting them out on a sheet of plywood. The wings are screwed to the body with self-tapping screws. The legs are made of steel rods and are attached with staples to sheets of plywood that serve as the body. Sheets of plywood are also used for or.
Feathers are created from bottles, and each plate, in turn, is processed along the edges with scissors until an airy fringe is obtained. The plumage is applied to the entire surface of the stork, starting from the back: first, black feathers are laid out, and then white ones, from which the bird’s tail is also created.
Each workpiece is sanded along the edges and the surface is primed.
- a layer of red paint is applied to the plywood beak;
- You can draw the eyes yourself.
The rods of the paws can be sharpened from the bottom edge so that they can easily fix the product in the soil.
From foam plastic
The foam stork is a monolithic structure, lightweight and easy to manufacture.
To work you will need:
- foam sheets;
- steel rods;
- universal glue;
- scissors;
- saw;
- furniture stapler;
- sandpaper;
- acrylic paint black and red.
First of all, the legs are made - the lower edges of 2 steel rods are sharpened, and the upper edges are bent for subsequent fixation in the foam body.
The main creative work on such a stork consists of creating the correct foam blanks, because the finished bird will consist entirely of it. The body, head and neck are drawn in foam and cut with a saw.
He will tell you about plastic barrels for watering the dacha.
Iron rods are stapled into the stork's body, its surface is sheathed with a layer of foam plastic for volume, and wing blanks are glued on top. The neck and head are mounted on a rod.
The stork's beak is painted red, and it is better to make inset eyes from beads or balls - this way the figure will be more expressive.
Next, the final modeling of the figure is carried out, giving it smooth and beautiful features with sandpaper and a knife. This is the case when you don’t have to make feathers for the bird - the embossed plumage can be cut directly on the body of the product, simply accenting the edges of the wings with black paint.
Using polyurethane foam
Stages of making a stork from foam plastic in parts.
An unused foam balloon can be successfully used to make a three-dimensional figure of a stork. Using foam, you can quickly make a three-dimensional blank from which to cut out the desired shape.
To work you will need:
- plastic bottle with a capacity of 5 l;
- scotch;
- Styrofoam;
- steel rod;
- primer;
- paint brush;
- acrylic paints;
- sharp knife;
- rasp.
There is a similar set in the pantry of every home. There are no additional costs required.
A garden decoration in the form of a stork sculpture is made in the following sequence:
- The steel frame is assembled. For strength, it can be fixed by welding.
- A plastic bottle is placed on the frame.
- Styrofoam strips are taped to the neck wire. You can grind them to shape in advance and glue them together.
- The pins intended for the legs are fitted with thigh parts machined from foam plastic.
- The finished frame is moistened with water. Foam is being applied. It covers the entire surface of the workpiece, except for the wire simulating legs.
- After the foam hardens, all excess is cut off. Relief is created using a knife and rasp. After finishing, the sculpture is cleaned of sawdust and dust.
- The dried product is coated with a primer. Next, the bird needs to be painted with acrylic paints. Varnish is applied over the paint.
To make the sculpture more realistic, you can use natural black and white feathers, which are inserted into the tips of the wings and tail.
For reliability, they need to be placed on polyurethane glue.
The finished figure can be installed in the garden for a long time. A stork decorated with acrylic paints withstands ultraviolet radiation, cold and moisture.
Construction of a nest for a stork
The figure of a bird looks great in the yard among lawns and flower beds. But you can make the yard even more interesting by creating an artificial nest and installing a sculpture of a stork in it. There will always be many places on the site where such a composition would look quite appropriate.
The location of the stork in the nest can be the following objects:
- Roofs of houses, bathhouses, sheds, garages, gazebos and covered barbecues. As a rule, exclusively gable roofs are used. On a flat surface the nest will not be visible. To prevent the structure from being blown away by the wind, a durable platform is made for it, attached directly to the rafter system. The removable structure, consisting of X-shaped overlays connected by boards, has proven itself well. A platform is made on top on which the nest is built.
- The top of a tree or the base of a thick branch. Dacha owners do not always have the opportunity to get rid of a large tree standing in the middle of the plot. But it is quite possible to decorate it accordingly. A sculpture of a bird in a nest can be a key element in a yard setting. The base is constructed from boards on which the platform is knocked together. You can use previously cut branches.
- If a power or communication line runs through the territory of the dacha, then it can be used for decorative purposes. You can dig the pillar yourself. Together with a nest and a bird, it will look great in a recreation area or on a playground. The base is nailed to a wooden post or screwed with self-tapping screws. To secure the socket to a reinforced concrete support, welding will be required. If there are no embedded parts on the support, then you need to break its upper part to get to the reinforcement. The steel base can be removable. To make the composition more realistic, the pole can be painted to match the color of the wood.
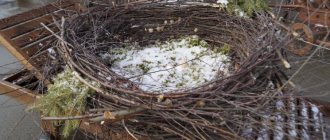
The base for the nest can be old wheels from a bicycle, cart, trailer or wheelbarrow. You can weave a nest from tree branches or bushes. Black steel wire is used to secure the structure.