Editor Ideas 8357
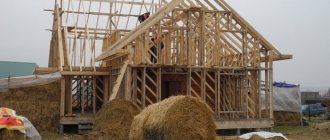
In winter, more than ever, you want to decorate your yard with something fabulous and unusual. What if you build a snow house? You can do this while walking with your children or gather friends and have a blast. For construction you will need: snow, free space, waterproof clothing and your imagination. Do you want something more serious? Use the available materials to help you - wooden blocks for the frame, plastic film and thermal insulation material; polystyrene foam works well. It is best to immediately decide what your house will be like and what its purpose is. If you started construction for decorative purposes, then it makes sense to think first of all about the exterior decoration. If children will play in the house, it is necessary to provide them with comfortable conditions inside.
What is an igloo
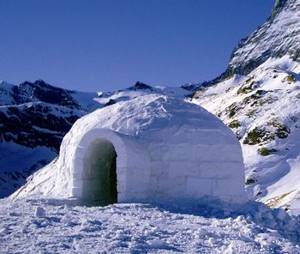
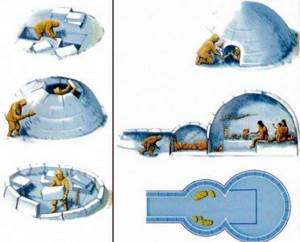
Translated from Inuktitut, “igloo” means “winter dwelling of the Eskimos.” Such houses are dome-shaped buildings, the diameter of which reaches about 3-4 meters, and the height - 2-2.5 meters. The main material for building igloos is ice or snow blocks compacted by the wind. If the snow cover is deep, the entrance to the room is built in the floor, breaking through a small corridor to it. If the snow cover does not have the required depth, then the entrance is built in the wall, adding an additional corridor using snow blocks.
Each Eskimo camp has several buildings, where up to four related families are located. Eskimo housing is divided into two types: summer and winter. The first consists of stone buildings located on a slope, the floor of which is deepened into the ground. From below, a long passage of stones, partially buried in the ground, leads to the house. The last part of the passage, which is located above the floor, is covered with a wide slab of stone, and is at the same height as the bunks in the hut.
The snow house has a completely ordinary layout: the sleeping bunks are located in the back of the room, and there are bunks for lamps on the sides. When building walls above ground, stones or whale ribs are used, whose arcs are spaced so that their ends intersect each other (or both materials). Sometimes, when constructing the roof frame, whale ribs are used, adding supports to the structure. Seal skins are tightly tied to the finished frame (which allows for high-quality insulation of the house from ice), on which small heather bushes and another additional layer of skins are then laid in a thick layer.
Scheme of construction and arrangement of an igloo house
When constructing igloos, snow or ice slabs are used. The blocks are laid in a spiral, from right to left. To do this, two blocks in the first row are cut diagonally to the middle of the third, after which the construction of the second row can begin. During work, each row is slightly tilted so that a neat spherical shape is obtained. The small hole that remains at the top is closed from the inside using a wedge-shaped block. Then the builder, located inside the hut, seals all the cracks with snow.
The entrance tunnel digs through a snowdrift from the outside, ending in a hatch in the floor of the building. If the layer of snow is shallow, then an entrance hole is cut in the wall of the igloo, and a corridor of snow blocks is laid out next to it.
In this video you can watch the process of building a snow igloo house
Building a snow house
In the winter season, especially before the New Year, more than ever you want to decorate your area with something unusual and even magical. Everything around was covered with snow, so crisp and fabulously shiny. What if you make a house out of snow? This idea can be brought to life by gathering your friends in nature or while walking with children and having a lot of fun. In order to build a snow house, you don’t need much:
- snow,
- shovels,
- flat ground,
- warm and waterproof clothing,
- and, of course, fantasy.
Snow house in the country
Before construction, you need to decide for what purpose the house is being built. If it will serve only to decorate the site, then more attention should be paid to the appearance of the structure. And if you decide to make it for children, then first of all you need to pay attention to internal comfort and decoration.
Types of snow houses
Houses made of snow can be anything: it can be a palace or a fairy-tale hut, a house, a hut or a fortress, or it can look like an igloo - the dwellings of the peoples of the north. It can be either free-standing or resting on the wall of the house. If the house rests on the wall of the house, then the space for creating a unique and original design becomes less than when the snow building is located in an open area. When a snow structure is located separately from other buildings, it can be decorated with an unusual porch, which will give the house a finished and holistic look.
Laying the walls of a snow house
- Well, what's the matter? First of all, we decide on the shape and size of the future house.
- Then we choose a place in your garden to build a house. It should be snowy and smooth. Then we clear and, if necessary, level the area on which your future masterpiece will be located.
- The next step is to draw a projection of your future house in the snow and clear the area of snow. For a more stable position of the house on a snowy base, you can place shields under it. This will ensure both the stability of the structure and additional comfort for the people in it.
- Next, we proceed to the construction of the walls of the house, its frame. This can be done in several ways.
- You can make walls from snowballs. We roll snow balls of different diameters and begin the construction of a snow structure. We start with lumps of larger caliber and gradually, as we lay out the walls, reduce their diameter.
- Or you can make a house out of snow blocks. To do this, cut out even rectangles measuring approximately 50x50x10 centimeters and lay them in a checkerboard pattern. For greater decorativeness, we trim the unevenness with a hacksaw or straighten it with a shovel.
Construction of the roof of the house
It doesn’t matter which masonry method you choose, the construction principle will be the same everywhere. First, we lay out the first row around the perimeter, which will serve as the foundation. It must be smooth and durable. Then we build smooth walls to a height of about a meter. If the house is made of lumps, then we lay out the walls vertically, but if it is made of blocks, then we make a slight slope of the walls towards the center. Then we begin to move towards the middle, thereby forming the roof of the house.
- After you have managed to make the walls, you need to seal the joints with snow.
- Then we cut out an arched hole that will serve as the entrance to the snow house. You can also cut a window on the side or a ventilation hole on top.
- You can melt the snow a little inside. Then the walls will turn out without joints.
- Or you can do it differently and insulate the house. This procedure must be carried out if children will play in the snow structure or if you plan to spend some time there. To do this, the frame must be covered with plastic film. You can additionally put foam or burlap on top. The doorway and windows can be covered with thick fabric.
Secrets of building a snow house
At least two people must participate in the construction process of a snow house. It is almost impossible to do all the necessary work alone. When constructing this work, there must be at least one person inside and outside. The person inside plays a big role in shaping the roof and also cuts the door for access to the outside.
Another option for a finished house
When forming blocks or balls, the snow must be carefully compacted. If the house consists of blocks, then to form a roof they must be made of a trapezoidal shape, and if from snowballs, then with a smaller diameter than for the walls.
After installation, it is better not to move the snow blocks. This will affect the quality of the constructed structure. All blocks must have three anchor points. If you follow this rule, the snow house will be durable and safe.
If your house has a round base and you need to form a dome, then you need to use a peg with a rope. Then it will turn out smooth and durable.
The last block must be laid and trimmed by a person inside the snow house.
And most importantly, never leave children unattended in it, even if you have no doubt about its reliability and safety.
Finishing the finished house
Yes, the work ahead will not be easy. But in return you will receive unforgettable emotions, hear children’s laughter and see admiration in the eyes of others - this will remain your most vivid memory of winter.
Secrets of building a reliable igloo
- When working with blocks that are located next to each other, you should avoid touching their corners, otherwise the structure will become unstable. For convenience, it is recommended to leave a small triangular hole at the bottom of the joint of adjacent blocks (it can be easily sealed with snow in the future).
- It is highly recommended not to move a block installed on a wall in one direction or another, as this may cause it to wear out and lose its original shape. You can simply place a block, trim off the strongly protruding parts on one side and below, and then carefully move it as close as possible to the adjacent block. Then, using a saw, its final finishing is carried out. It is recommended to lay the slabs with the “crust” side inside the structure, as it is more durable.
- To make the work process easier, the upper hole in the dome can be carefully covered with one of the plates. Large cracks that are located between the blocks are sealed with pieces of crust, and small ones are treated with loose snow. Through holes and cracks are easiest to see in the evening, by the light of a small bowl of seal oil burning inside the igloo. In addition, warm air will slightly heat the joints, which will improve the quality of processing of holes and cracks.
- Before lighting a fire inside the igloo, you need to make a hole with a diameter of approximately 10-15 cm on the leeward side in the upper part of the dome and attach a smoke extraction pipe made of strong crust to it.
Who builds snow and ice houses and where?
In the tundra and northern regions, where frost reigns most of the year and there are almost no trees or stones, the only available building material is snow. There is a lot of it here, which is what the locals, the Eskimos, use.
They learned to build their national round-shaped dwellings from it, called igloos. A structure the size of a person is erected from compressed snow bricks, which are stacked on top of each other in a special way, fitting tightly and leaving no gaps.
The inside of such houses, oddly enough, is warm and cozy. Thanks to the frost outside, the snow blocks do not melt. You can light a fireplace in your home, which is installed exactly in the middle, so that the heat does not reach the walls. The walls of the igloo allow daylight to pass through well, so this house has no windows, and you need to enter it through a hole in the floor. In such a dwelling, Eskimos are not afraid of cold, blizzards and blizzards.
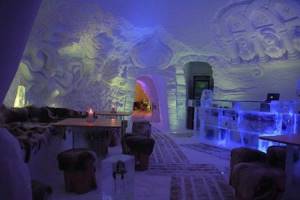
But no one builds ice houses on purpose. Because ice blocks are both more difficult to mine and process. But you can still see the houses from them. Ice structures are most often erected for advertising purposes - to attract people's attention.
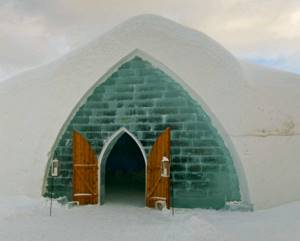
There are several unique hotels made of ice in the world, located in Sweden, Finland, Canada, Norway and Romania. They are completely made of frozen water, in some even the furniture and furnishings are icy. In Russia, there is a similar structure in Kamchatka. It’s cold inside these hotels, because they can’t be heated, but there’s still no end to visitors—the inside of the ice house looks very beautiful and unusual.
Interior of an igloo
The interior of the igloo is usually covered with animal skins. Traditional fat bowls act as sources of light and additional heat. When arranging a bed, the Eskimos use two layers of reindeer skins, one of which is laid with the flesh up, and the other with the flesh down. In some cases, in addition to deer skins, old skin from a kayak is used, which allows you to get a very soft and comfortable sleeping place.
During the daytime, the Eskimo hut is so bright that you can easily read or write in it without the need for additional lighting. Moreover, in sunny weather, ice walls can cause such bright light that it causes so-called snow blindness. When the polar twilight begins, the Eskimos can insert windows from thin lake ice into the walls of the hut, cutting small holes for them above the entrance. Zhirniks, used for heating and lighting the living space, provide soft and diffused light, which is enhanced by reflection on the ice dome.
If the vault begins to melt due to exposure to heat, then a 10-15 centimeter layer of snow is scraped off from the outside of the dome with a knife so that the hut cools down and stops melting. If the hut does not heat up, and frost appears on the inside of the dome and falls down in flakes, snow should be collected onto the dome using shovels.
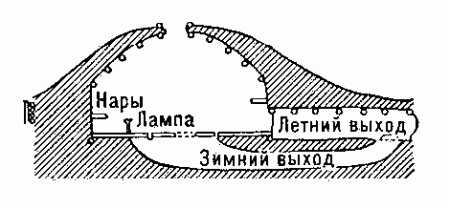
Diagram of a simple igloo house
The main part of the living space opposite the entrance is occupied by a snow bed. When arranging it, they try to use either a natural protrusion of the earth or the surface of a snowdrift on which the dwelling was built. If both options are not possible, then the bed should be laid using several blocks of snow. In some cases, small recesses can be cut into the thickness of the couch, which will act as cabinets. These niches are plugged with small snow blocks.
On the left and right sides of the entrance there are small snow bunks on which lamps, meat, etc. are located. A passage about 1.5 meters wide is left in the center. Eskimos usually sleep with their feet against the wall, across the bunks. One dwelling can accommodate 3-4 families at once. Each family had its own place on the bunk, which was separated from others by a mat woven from grass.
Finishing - a flight of fancy
Well, the rough work is completed, you can leave everything as is, or you can give the house a decorative look in accordance with your idea. We draw patterns with a stick, attach additional details from snow, paint with colored water, put fir branches and cones on the roof - we do whatever our heart desires. A garland stretched across the roof will look very beautiful. An excellent solution would be a window opening in the wall of the house. You can put candles on the windowsill (real or fictitious) and hang curtains from electric garlands. And if you really want to go into a fairy tale, you can insert transparent plastic into the openings and decorate it “like a stained glass window.” This way, your area will attract attention in the dark too. And what bright photos you will get!
Show your creativity and paint the house, involve the children in this interesting activity. There is nothing complicated in coloring: instead of a brush, we will use an ordinary plastic bottle as a tool. Use an awl to make a small hole in the lid so that a thin stream of liquid flows out when pressed. As a dye, we use whatever we get our hands on first - diluted gouache or ink; potassium permanganate, brilliant green and blue are also suitable. Water is absorbed into the snow and freezes, leaving a pattern in the depths. The ornament and splashes will look wonderful, and if you depict an original painting, you will get a real work of art on your site.
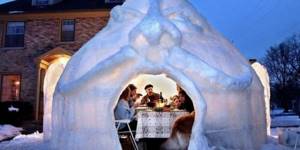
If you decide that the house needs interior decoration, make furniture out of snow, but it is better to bring a table and stools from home, in case you want to sit down. Lay an old carpet or mattress on the floor. The walls can also be painted. Place candles in the corners for lighting. For those who like difficulties, a snow house “with amenities” is suitable. At the stage of building the walls, run the cable in a corrugated tube, and you can connect the light bulb and heating. Or simply run an extension cord from inside the house and step over the wires. Don't forget about safety. Electricity can only be supplied to the house in the presence of adults.
There is a lot of work ahead, but your energy will not be wasted! You will find a wonderful place for children's games, and where, if desired, a cheerful company can settle down. Organize a banquet with barbecue or just invite your neighbor's children to visit. Such a house will decorate any area, and you will also solve the problem of snow removal. Therefore, if there is an opportunity to build a snow house on your site, be sure to take advantage of it. This will remain the most vivid memory of winter for both the little members of your family and adults.
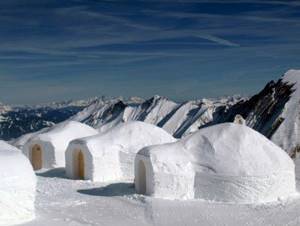
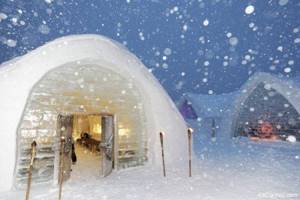
Modern houses made of ice and snow
Now houses made of snow are being built in the northernmost regions, and it has become a fashionable feature for residents of the north - to have not a country house, but their own snow house for relaxation and pastime.
Modern private house made of ice
Some enterprising people went further and turned this idea into a business.
Mini-hotel in the style of Eskimo snow houses
Fans of winter holidays and travel should definitely stay at least overnight in this hotel.
How to organize a winter picnic to make everyone feel warm?
What to consider
Menu for a winter picnic
How to spend your time
Someone might think that a winter picnic is strange, and even paint a sad picture in their head: “you’ll have to sit in a snowdrift at -20°C and eat ice sandwiches.” In fact, such leisure pretends to be unforgettable. It will remind you that winter is beautiful in its own way, and you don’t have to wait for summer to enjoy life.
What to consider
In winter there is not much warmth in nature, so take rugs and blankets with you - you can wrap yourself in them while sitting by the fire. You will feel like you have taken a piece of home comfort with you.
Prepare the warmest clothes you can find. A must-have set for every vacationer: a warm sweater with a high neck, two pairs of woolen socks, a ski suit or a warm down jacket and warm pants, a winter hat and mittens. Thermal clothing will also come in handy.
If the proposed parking area is not equipped with benches and a table, it is worth providing folding furniture. Or alternative options, for example, inflatable mats or mats.
Fire is a must at a winter picnic. Its source can be a fire, grill or barbecue grill. A simplified version is a Primus.
For a large company, it is advisable to look for dead wood and build a fire pit. Two long logs are placed close to each other, and a third is placed on top. Light it with brushwood, coal or a special liquid. There is a place for everyone around such a fire.
You may also need:
- large thermos or copper kettle;
- special thermoses for soup and second;
- thermal mugs, cups and cutlery;
- camping pot;
- skewers or wire rack;
- food foil and containers;
- thermal bag or thermal bags for food;
- hatchet and large knife;
- folding shovel for clearing snow for a fire;
- folding saw;
- coal, firewood;
- matches and lighter fluid;
- chemical heating pad;
- thermal insoles.
Menu for a winter picnic
Any recipes are suitable here, except, perhaps, ice cream and cold drinks. It is more practical to choose dishes that can be quickly heated or fried outdoors - after all, they must be hot, and hardly anyone will want to spend a long time cooking in a snowy forest.
Chicken kebab
- Soy sauce - 100 ml.
- Olive oil - 50 ml.
- Garlic - 4 cloves.
- Lemon juice - 2 tbsp. l..
- Ground black pepper.
At home, mix the ingredients and marinate the chicken in the sauce for an hour or two. Outdoors, fry chicken on a grill.
Waffle sandwiches
Buy soft waffle cakes and divide them into pairs. Place the filling between the two crusts. Ham with cheese and tomatoes, red fish with your favorite sauce or pate and chopped boiled eggs are suitable. Here's another idea for the filling (quantity to taste):
- butter;
- thin pieces of herring;
- greenery;
- eggs;
- mayonnaise.
At home, brush the first layer with oil, place herring on top, sprinkle with herbs; Grate the boiled eggs, mix with mayonnaise and salt, place in the last layer and cover with the second cake layer. Outdoors, wrap sandwiches in foil and heat on a grill.
Sausages in bacon
- Sausages - 12 pcs.
- Bacon thin slices - 12 pcs.
- Yogurt - 125 g.
- Mustard to taste.
- Baby apple puree - 2 tbsp. l.
- Black pepper, salt.
At home, wrap each sausage with bacon, and mix the ingredients for the sauce in a separate bowl. Outdoors, fry sausages in a covered grill. Eat with mustard sauce.
Accordion potato
- Medium size potatoes – 6 pcs.
- Cheese - 6 slices.
- Onion - 1 pc.
- Bacon slices - 6 pcs.
Peel the potatoes at home, make several transverse indentations in each one so that it resembles an accordion. Place chopped onion, cheese and bacon in the cavities; Wrap the potatoes tightly in foil. Outdoors, place on a wire rack in foil and bake for at least half an hour.
Winter drink "Hot Toddy"
For one glass:
- Whiskey - 30 ml.
- Honey - 1 tbsp. l.
- Lemon - a quarter.
- Hot freshly brewed tea - 150 ml.
At home, cut the lemon and prepare the rest of the ingredients. Outdoors, add honey, whiskey and the juice of a quarter of a lemon into a mug. Pour hot tea and stir.
How to spend your time
For a winter outing, active entertainment is suitable, which will cheer up children and adults and keep them from freezing. It’s great if there’s a slide nearby, but a sled is a rather large item. We suggest replacing them with compact ice cubes or inflatable cheesecakes. The most basic option is to build a “toboggan”: take a long piece of cardboard with you and wrap one end of it to hold on during the descent.
Organize a search for “treasure” around the parking lot. Take, for example, an orange or a chocolate bar and hide it. Compose several riddles and clues for finding the “treasure” and place them in different places.
Together with your children, you can search for animal tracks and guess who they belong to. And use your own boots to “draw” figures in the snow or leave “tractor tracks.”
Children will be happy if you tie cardboard “paws” of a snowman cut out of cardboard to their feet. Playing catch-up will definitely keep the kids from freezing. Yes, adults can also participate. Why not? The conditions are simple: the one who is catching up runs strictly in the footsteps of the one escaping.
Add some improvisation to traditional activities like building a snowman and playing with snowballs. You can build a fort or igloo out of snow, make a table and bench for tea drinking, roll a caterpillar out of snow globes, sculpt faces or some kind of animal for trees.
Lovers of the outdoors can bring skis or snowshoes. And dog owners definitely won’t get bored - this is the right opportunity to play with your pet or arrange training.
There is also an idea for a more relaxing leisure time: looking at snowflakes through a magnifying glass against the background of a black sheet. They can also be photographed in macro mode.
By the way, if you take a camera, charge the battery to 100% - it runs out faster in the cold. Try to keep your camera in a case more often and avoid sudden temperature changes that can cause condensation. When you return home, do not remove the device from your bag for at least a couple of hours.
A winter picnic is not at all boring and not at all cold if you take everything into account. We have a plan ready, a menu too, all that remains is to choose a day off. Have a great holiday!
Order from the Hit Shopping store: