Perhaps, there are things that are clearly not for everyone - no matter what a person’s wealth or character. Some accessories can tell a lot about their owner without even seeing him. We can confidently call one of these a weather vane. This mechanism is not something mandatory or vitally important and at the same time, it cannot be called just an accessory. A weather vane is not just a useful device for determining the direction of the wind; to a greater extent, it is an indicator of the life position and active status of the people who installed it in their home. How to select and install it, we will consider in more detail in this article.
Roof wind deflector: design and principle of operation
Although today the weather vane is most often used as an element of decor in country houses, it is too early to write it off from the pages of history. Even in our digital age, mechanical windsocks regularly perform their service at small weather stations, in ports and at airfields. Depending on the purpose, several types of weather vanes can be distinguished:
- meteorological wind direction indicators, which are made of forged metal and are characterized by high mobility, which, in turn, has a positive effect on the accuracy of the readings;
- instruments combined with a device for determining wind speed, which are called Wilde weather vanes after the name of the creator;
- chimney - with a body that additionally plays the role of a chimney cap;
- decorative - serve mainly for decoration, so their flag and indicator are made in the form of figures of birds, animals, fairy-tale characters, etc.
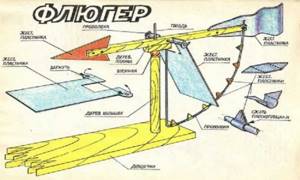
No matter how simple the design of the weather vane may seem, a reliable and durable wind direction can only be obtained if it contains the following parts and components:
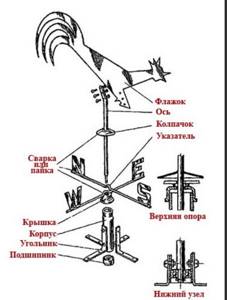
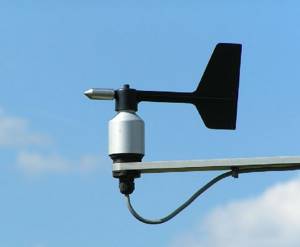
- The vertical axis on which the flag and counterweight are mounted. The axis can rotate freely 360° thanks to a sliding or rolling unit.
- A housing that is attached to the chimney or mounted on the roof. Being the base of the structure, the housing serves as a holder for the moving axis.
- Bearing. This unit is fixed in the housing and ensures ease of rotation of the windsock axis. The design may use one or more ball bearings, as well as sliding units consisting of low-friction bushings.
- Protective cap. It is installed on a vertical axis and prevents precipitation from penetrating into the windsock housing.
- Reference angles or bearings. They are two rods crossed at an angle of 90° with printed letters indicating the cardinal directions (North-South and East-West pairs). The rhumbs are rigidly fixed to the body and during installation of the weather vane they are oriented along the compass.
- Arrow (pointer) - attached to the axis at an angle of 90° and serves as an indicator of the wind direction.
- The flag is a blade mounted on one side of the boom. In fact, the entire decorative potential of the weather vane lies in the large surface area of this element.
- Counterweight. It is attached to the other end of the pointer and serves as a balancing device that balances the boom.
The design of the weather vane is so simple that it can be easily recreated at home.
Just one glance at the weather vane diagram is enough to understand how it works. Due to the high windage of the flag, the pointer rotates even from a small movement of air masses. The blade will rotate until it is parallel to the wind - in this position the resistance area will be minimal. In this case, the arrow will be directed in the direction from which the wind is blowing, and the flag will accurately indicate the place where the air masses are moving.
Stages of product production
First of all, decide on the design of the device, and then draw up a drawing that will show absolutely all the details. Next, the algorithm of actions is as follows:
- Make a vertical support from rebar, pipe or other metal rod. The length is 125 mm and the diameter is 13 mm.
- In the upper part, use a die to cut a thread for fastening the horizontal part of the product.
- At the bottom, install a bearing that will allow the weather vane to turn around the axis. It is important that dirt and water do not get into the bearing. To do this, put a cap made of a metal sheet on it (some people make a cap from a plastic bottle cap).
- The decorative element is fastened using four plates installed at the bottom, welded to a metal axis on one side. On the other side, holes are made for self-tapping screws, with which the weather vane is attached to the roofing material.
Since a weather vane with a propeller is a dynamic design, it is not installed on tall buildings, since it will not be visible how much the propeller rotates.
The main part - the “airplane” - is cut out of iron sheet, plywood or plastic. The propeller is made exclusively of metal. The blades of the rotating element are located at a slight angle relative to each other. You can make a propeller from galvanized sheet iron using metal scissors. A hole is made in the center of the blank strip for the fastening element, then the edges of the strip are turned slightly in different directions. There are two options for attaching a propeller to an aircraft:
- If the weather vane is made of plywood, the propeller can be attached with self-tapping screws to its end part. The fastener is not screwed all the way to allow rotation.
- A small pin is attached to the nose of a metal airplane by welding or soldering, at the end of which there should be a thread into which a nut and washer are screwed. This is how we get both the fastener and the limiter. The pin can be without a thread, but with a cap, but this option is suitable if the propeller is already on.
Weather vane design options
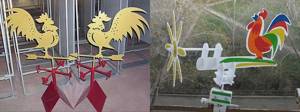
Traditionally, roof vanes are made in the form of flat silhouettes of fairy-tale characters, animals, angels, silhouettes of ships, vintage crews, chimney sweeps, and even beer mugs with fish. In the old days, in dense urban areas with high pointed roofs, in this way it was possible to designate the most important places in the city - the city hall, trading shops, pubs, the house of a doctor, baker and shoemaker.
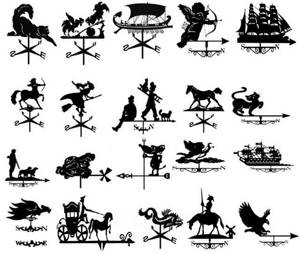
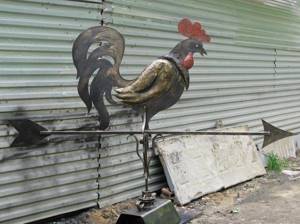
Today, silhouettes of cats, birds, roosters, dogs, and funny cartoon characters are increasingly chosen as weather vanes.

The silhouettes of storks on the roof are especially respected as a symbol of the reliability of the hearth.
Church silhouettes, figurines of angels and entire religious scenes are often used for weather vanes on the roof.

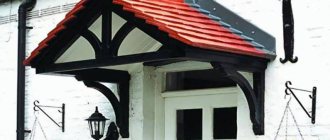
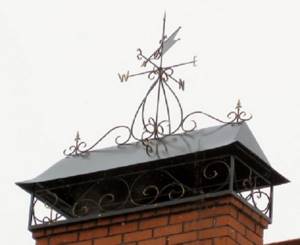
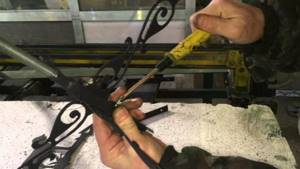
A separate category consists of the so-called weather vanes - chimneys installed on a chimney or chimney. In this case, the roof weathervane is made using artistic forging, which ensures high strength and durability of the structure.
A sign of high style is the installation of three-dimensional figures made of tin and sheet metal on the roof. Made from stainless steel and sometimes chrome-plated, such a weather vane always makes an impression on guests and passers-by.
We make a weather vane for the roof with our own hands
The best material for making a weather vane is considered to be thin-sheet steel; for small structures, with a format of 400x500 mm, a galvanized sheet with a thickness of 2-2.5 mm is used; for complex and large structures, three-millimeter metal can be used.
We select a suitable sketch of a weather vane. This could be a joke story.

More traditional silhouettes - wolf, cat, bear.
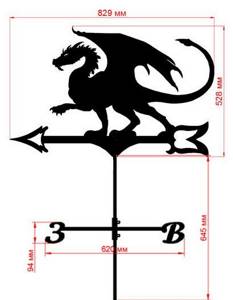
Silhouettes of dragons and exotic animals are especially popular for making roof vanes.
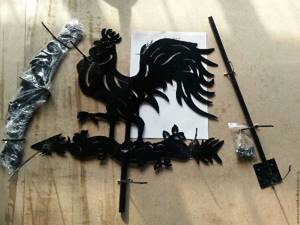
We transfer the silhouette of the weather vane we like onto the metal and cut it out with a jigsaw.
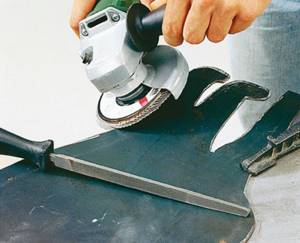
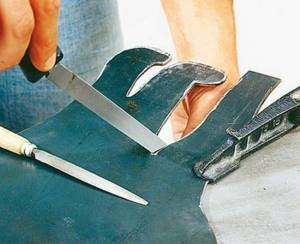
We clean the edges of the weather vane blank with a grinder.
You will first need to make a mount for installing the weather vane on the roof, photo.
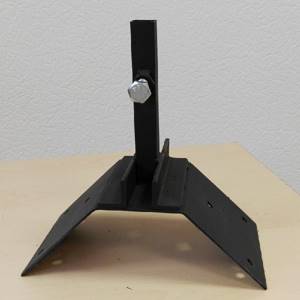
To do this, you will need a strip of metal 20 cm wide and 50 cm long. The strip must be bent on a steel corner in a vice in the shape of a trapezoid, as in the photo. We cut a hole in the center and weld a thick-walled steel pipe with an internal diameter of 15 mm and a height of 300 mm. To fix the axis of rotation of the weather vane, a hole is drilled in the side wall and an M8 thread is cut.
At the next stage, it is necessary to select the rotation axis for the pipe and cut a groove for installing the fixing bolt.
All that remains is to weld the metal silhouette of the weather vane to the axis and paint it with good weather-resistant paint, after which you can select a place on the roof ridge.
The simplest school design of a weather vane for a roof can be made in half an hour from a wooden block.
The weather vane is assembled from two bars. The first is used as the base of the axle, the second is used to make an arrow. For the feathering, you can use tin from a tin can, and as the axis of rotation, a regular nail driven into a hole drilled to a depth of 40-50 mm. The school weather vane will be able to show the conditional pressure or wind speed. To do this, you need to cut out a thin plate of tin and secure it to a thin wire suspension. By adding a graduated scale frame, the design can determine wind speed with an accuracy of 10%.
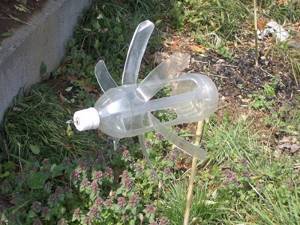
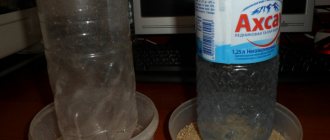
For use on the roof of a summer house or as a toy, you can make a weather vane from an ordinary plastic bottle. You will need a liter plastic bottle, a knitting needle or welding electrode and a wooden slatted support. You need to carefully make a hole in the bottom and cap of the bottle with heated metal. Next, blades are cut out on the side surface with a stationery knife and bent at an angle of 90° to the axis of rotation. All that remains is to fix the knitting needle on a wooden plank, put on the weather vane and test the device in action on the roof.
Gallery
- Decorative weather vane, Tallinn
- 11-meter weather vane in the Lazdinai area, Vilnius
- An ancient weather vane in the shape of a pistol in Jurmala, Latvia
- Decorative weather vane in the shape of a cat (Ukraine)
- Decorative weather vane, listed in the Guinness Book of Records as the largest (Jerez de la Frontera)
- Weather vane on the chimney
- Weather vane at the Meeresblick villa in the village of Otradnoye (Kaliningrad region)
How to make a weather vane
Glue the finished sketch of a weather vane in natural size, printed on paper, onto a piece of material of the required size. Transfer the contours to the material using any available method. You can do this:
- Using a carbon copy. This option will work with plywood, plastic and textolite.
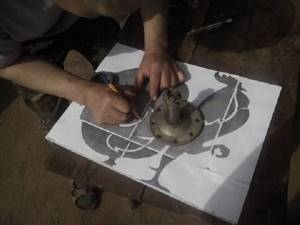
- Using punching. This method is suitable for metal. We take a narrow chisel or a powerful awl, place the tip on the outline, and hit the handle from above with a hammer a couple of times. The tip leaves a small dent in the metal. So we transfer the entire contour.
Some products look more like a work of art
Using the marks, we restore the contour. On some materials this can be done with a pencil or marker, for metal - only with the same punch.
To be able to understand where the wind is blowing, they make a compass rose like this
Next, you need to cut out the body of the weather vane along the resulting contour. You should choose a tool for cutting a weather vane depending on the type of material. In most cases, a jigsaw is suitable. For softer materials, you can also use a hand saw. For metal 2-3 mm thick, you can also try to cut the weather vane using a handsaw or jigsaw. True, it will take a lot of time. The metal is thicker, even the most powerful jigsaw will not take it. For such a case, you can use a welding machine and a large chisel. Straight and not very rounded areas, you can try to cut them with a grinder.
After the “body” of the weather vane is cut out, the edges are processed until smooth. To do this, use needle files, files, and sandpaper. If you have a grinder, the process can be speeded up by installing sanding discs of different grain sizes.
Tools and materials for manufacturing
Since our meteorological instrument has to constantly resist the influence of the environment, sometimes very aggressive, it must be made of appropriate materials, otherwise it will not last long. Often weather vanes are made of wood (even plywood) and sheet iron . Copper is rarely chosen , although this particular metal is more suitable than others.
A wooden weather vane treated with a protective compound will last for several years. The steel analogue lasts for several decades, subject to periodic tinting, which is not always possible, but the copper product is practically eternal. Copper sheet is the easiest to process, and there are no problems with decorating it.
Recently, weather vanes have begun to be made of plastic. The material is easy to process - no complex tools are needed. However, if the product is suitable for the roof of a country house, then it will not look good on a large luxurious house; expensive materials will be required. The following tools will be needed:
- metal scissors;
- saw;
- hacksaw;
- file;
- Bulgarian;
- sandpaper;
- drill;
- pencil;
- ruler.
Why do you need a weather vane?
We can formulate two reasons why the weather vane has remained popular to this day:
- The design is ideal for determining instantaneous wind direction. The device, which is almost several hundred years old, works better on the roof than satellites and electronic weather stations;
- With the correct selection of design and installation location on the roof, you can determine the wind speed and even measure it.
The vast majority of owners who have installed a weather vane on the roof of their house believe that the rotating silhouette or rattle helps drive away uninvited guests - pigeons, crows, cats. In practice, attaching a structure to the roof repels only the first three weeks, until the surrounding living creatures get used to the new stimulus.
Most owners consider them a fun toy, a symbol of good luck, and nothing more. But, despite the simplicity of the design, a weather vane on the roof can really help with the weather forecast and even predict rain. In any area there is a so-called rain horizon, the direction from which clouds with obligatory rain come. In this case, the figure on the roof can predict rain a couple of hours before the storm front appears.
The design of the weather vane is an asymmetrical flat sheet or silhouette fixed on the vertical axis of rotation. Under the influence of the pressure of the air flowing onto the plane, a torque arises, and the weather vane rotates on the axis until a minimum flow resistance is established. That is, the silhouette on the roof always points either to the direction from which the wind is blowing, or where, it depends on the choice of the owner.
How does a weather vane work?
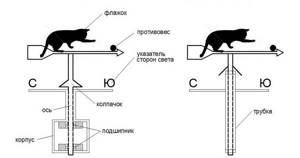
The weather vane design uses four main components:
- Wind vane - a metal, plastic or plywood silhouette mounted on a rotating cup of a rolling bearing;
- Friction bearing;
- Axis of rotation;
- A support unit that holds the silhouette on an axis in a fixed position on the roof.
The support for the silhouette is made for mounting on the ridge or on the gable of the roof.
Most roof weathervane designs are made according to a similar design; the main differences may relate to the design of the rotation unit. For large and heavy weather vanes, a sleeve bearing is used, in other words, a hardened steel axis inserted into a metal pipe. Silhouettes with a small windage must be installed either on a hardened steel ball or on a pair of rolling bearings.
A prerequisite for reliable operation of a weather vane on the roof of a house is the presence of an unbalanced aerodynamic silhouette. In simple terms, this means that if you mentally draw a vertical line along the axis of rotation of the device through the entire silhouette, then one of the sides should be larger in area. If the halves of the structure are the same, then the weather vane will simply rotate randomly on its axis.
It is quite difficult to check the quality of the weather vane “on the ground.” To do this, you will need to fix the weather vane in a place free from trees and buildings and in windy weather of at least 5 m/s. Most manufacturers do it simpler - they artificially increase the sensitivity of the weather vane by installing an arrow silhouette with a wide, flat “tail”. Now the device will respond even to a slight breeze of 1-2 m/s.
Often, due to the strong distance of the silhouette or weather vane from the axis of rotation, an imbalance occurs, so the structure has to be balanced by installing a counterweight. Otherwise, the device will tend to take one position when the center of gravity of the weather vane, like a pendulum, is at the lowest point.
Read also: Data sheet for Mercury electricity meter
Typically, cardinal direction indicators are added to the rotating silhouette on the roof, thus the design acquires a complete “meteorological” appearance. Real weather vanes look much more modest, it could be a small horizontal pitot tube with a rotating wing or a more primitive propeller free-stream velocity counter.
But, unlike home weather vanes on the roof, the meteorological device is installed in an open space, at a height of at least ten meters above the ground. Only in this case will the wind speed and direction sensor provide reliable data. All designs of Chinese weather vanes with silhouettes of dragons and intricate patterns, which, according to manufacturers, can be installed even on the balconies of multi-story buildings, are nothing more than funny toys.
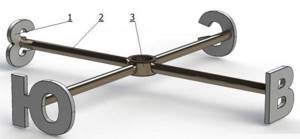
Directional indicators (wind rose).
Cardinal indicators are used to determine the direction of the wind. They are installed permanently on the axis of rotation and positioned using a compass or known landmarks. You can choose from Russian (SYUZV) or English (NWSE) spelling of letters.
Assembling the indicators is extremely simple, and is carried out according to the “groove-to-groove” pattern. For fixation on the rotation axis, 2 bolts and 2 M6 nuts are used (included with the weather vane kit). The assembly procedure is shown in the photo.
| Remove the indicators from the packaging and position them so that the grooves in the central part are opposite. | Insert the indicators with grooves one into the other, so that you get a U-shaped profile. | Insert the bolts into the holes and attach the nuts from the supplied kit. | Place the resulting structure on the rotation axis and secure it with pliers or a wrench. |
Features and purpose
A weather vane is a device from the arsenal of meteorologists. It is installed on the roof of the house, usually on the roofing part or on the chimney. Often, weather vanes decorate private homes. This device measures the strength of the wind flow and its direction. Now, in the era of modern gadgets, the weather vane seems like a relic of the past. You can install advanced equipment at home, and it will more accurately determine both the direction of the wind and its strength. However, weather vanes remain relevant to this day. Mainly, of course, for the sake of beauty, and not for practical purposes. But sometimes technology can fail. But the good old method will not let you down.
The history of the creation of the weather vane takes us to Ancient Greece in 48 BC. This design was made in the form of the pagan god Triton. He looks like a mermaid, only masculine. That is, he has a fish tail, and the body and head of a man. This weather vane adorned the top of the Tower of the Winds. The height of the tower was 12 meters, and its diameter was approximately 8 meters. The tower was octagonal. It was supposedly made by the astronomer Cyrrhus. The top of the Tower of the Winds was decorated with images of the eight winds - north, northeast, east, southeast, south, southwest, west and northwest. The weather vane that stood on the Tower of the Winds was 4-8 feet long. He indicated the direction of the wind and which god was responsible for the weather at the moment. Unfortunately, the weather vane of the Tower of the Winds has not survived to this day.
Weathervanes often adorned the roofs of the houses of noble people in Ancient Greece, especially wealthy landowners. But for them, the weather vane was also practical. It most often depicted the gods of Ancient Greece.
Weathervanes were also popular in the Scandinavian countries, more precisely, among the Vikings
For them, knowledge of the direction and strength of the wind was very important, since they were seafarers and often traveled on ships. And knowing where the wind was directed helped them in their calculations
Therefore, the weather vane was often located on the ship - either on the bow or on a special pole on the deck. It was made of expensive materials and depicted pagan gods. Only this time the gods were Norse. Later, the weather vane adorned church spiers. And these structures have already been preserved to this day. If you travel through Scandinavia and look closely at the tops of temples, you can see this ancient element.
In the Middle Ages, European countries also did not forget about weather vanes. The owners of large castles ordered them to be installed on their roofs. Together with the function of determining the wind, it served as an indicator of which family lived in this house, since the heraldic differences were displayed on the weather vane.
During the Victorian era, the popularity of weathervanes increased more than ever. At this time, they were no longer made by hand and to order. There were few such workshops and they did not have time to serve everyone who wanted to purchase this product. Therefore, production was organized that put the production of weather vanes on stream. After the Victorian era, interest in these designs declined. Their revival occurred only in the 1970s.

Weather vanes are divided into groups depending on their purpose.
Chimney. This weather vane is located near the chimney, more precisely, on the pipe cap from it. It prevents excess air from entering the chimney and, in strong winds, combustion products do not linger in the chimney pipe. This increases the ventilation and chimney draft. Then the fireplace and heating work adequately. Such a device is installed in the presence of a fireplace and helps its proper operation, especially if there are strong and gusty winds in the region where the house is built.

Plywood model
From pieces of plywood left over, say, after a renovation, it is quite possible to make a wonderful weather vane. To begin with, you should choose the simplest design.
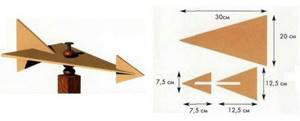
You need to cut three isosceles triangles from plywood. The optimal dimensions of the largest of them are 20 cm (base length) by 30 (total height). In this triangle, a hole must be drilled in the center for subsequent fastening of the weather vane to the block. The size of the hole should correspond to the diameter of a regular nail.
The second triangle should be made smaller - with dimensions of 12.5 by 12.5 cm. A thin rectangle should be cut from the top side of it. It should reach approximately the middle of the triangle.
The third triangle should be even smaller - with dimensions of 7.5 by 7.5 cm. A rectangle is also cut out in it, but this time it should start from the base.
Now we connect everything together: the largest triangle is the base, glue the middle part to it, and the cut out rectangular section will play the role of fastening. Thus, a tail is formed on the weather vane (as the rotating part of the weather vane is called).
On the other side, we attach the smallest triangle to the large triangle. As a result, the design should look like an airplane.
Insert a nail with a bead strung on it into the hole in the center of the main triangle. We put two more beads on this nail from below.
Now you just need to hammer the nail into a wooden block. In general terms, the design is ready. Additionally, it can be varnished, painted, or impregnated with water-repellent compounds.
Beautiful wooden weather vane in the shape of an airplane
Making such a weather vane requires the skills of a carpenter, but it also looks beautiful, and at the same time these skills can be acquired.
Among the relatively complex tools, in addition to a jigsaw, drill, screwdriver and grinder, you will need:
- vice and
- electric planer (you may be able to do without it).
As in the previous version, the propeller is first made; this propeller looks much better than in the first version, but more skills and tools are required.
The propeller blades are made in this case from plywood. The fuselage is made from blocks, sawed out with a jigsaw, and trimmed with an electric planer. All assembly and manufacturing details are described in the video.
The same video (at the end) shows an interesting version of a weather vane with moving figures. But for some reason the author made figures in which a woman is chopping wood, and a man is sitting and drinking... It’s not pretty, but you can understand the principle.
I recommend: How to cheaply build a house and arrange your summer cottage or suburban area
Links
| Weather vane at Wikimedia Commons |
- Weather vane
- article from the Great Soviet Encyclopedia.
| This is a draft article about meteorology. You can help the project by adding to it. |
| Meteorological instruments and instruments | |
| |