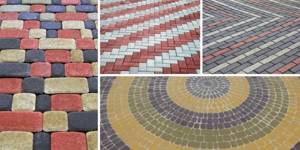
Storing paving stones. Mistakes made
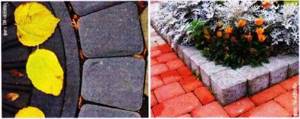
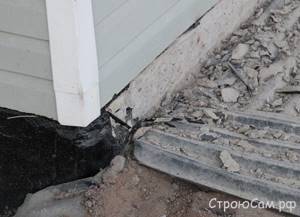
Storing paving stones - it would seem, what can we talk about here? The guys who brought the paving stones unloaded them by hand onto wooden pallets. They laid rows of 20, i.e. the pressure per unit area was quite large. After the rain passed, the pallets began to sink into the ground. The rows of paving stones began to move relative to each other, which led to the fact that the upper rows, with their far from perfectly smooth lower surface, scratched the lower rows. The photo below shows four samples: the first sample is in good condition, the rest are damaged.
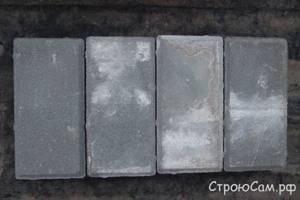
Paving stone samples 2, 3, 4 were damaged due to improper storage
Don't make my mistakes.
- If possible, place the pallets on a surface that is guaranteed not to sag (asphalt, reinforced concrete slab);
- If the pallets are laid on the ground, in my opinion, there should not be more than 10 rows;
- It is mandatory to cover the paving stones so that rainwater does not fall on them.
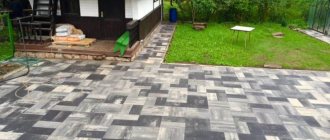
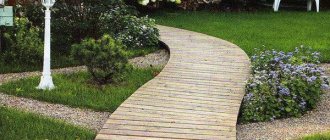
Paths and areas for people
The design of pedestrian paths and platforms is basically the same as for cars, but with some differences:
The supporting layer can be made not only from crushed stone and gravel, but also from sand, ASG, and small stone chips. The thickness of the supporting layer is sufficient 10 cm.
If the site has sandy, permeable soil, then there is no need to make a supporting layer. It is only necessary to level (taking into account the slope for water drainage) and compact the base.
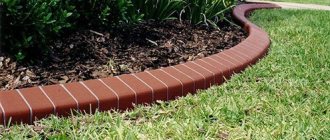
A sidewalk, pedestrian path or platform for people on the site of a private house may not have curbs.
Paths and areas on the site where cars will not move can be made without curbs. Such a path must necessarily have a transverse slope of 1-2% from the center to the edges.
The disadvantage of this solution is that the path without a curb cannot be raised above the lawn. Lawn levels tend to rise over time. As a result, the coating can easily flood and become dirty.
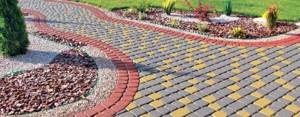
To cover pedestrian paths, it is enough to take paving stones or paving slabs 4–6 cm thick.
The appearance of the coating depends on the shape, color of the stones and the method of their installation.
Special shapes of paving stones. On the left - for laying around round wells, and decorative border posts for decorating flower beds - on the right.
After laying, a white coating may appear on the surface of concrete pavers. These are calcareous deposits that usually disappear within a year.
Tool for laying paving stones
List of tools and equipment that I used when laying paving stones:
- Hydraulic level (10 m). If you don’t have a laser level, which costs a lot of money, buy a hydraulic level that costs 100-200 rubles;
- Construction level 1 meter long;
- Metal profile with a section of 20 x 40 mm: a piece 2 meters long and a piece 6 meters long;
- Steel pins and wooden stakes;
- White nylon cord;
- Large rubber mallet (mallet). Most likely, one hammer will not be enough. For example, I broke two Chinese hammers. At the end of the work I had to buy a third one, already made in Russia;
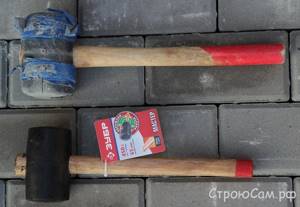
I did the bulk of the work with a hammer, which was all wrapped with electrical tape. At the end of the work I had to buy a new hammer, the third in a row
- Master OK;
- Two tape measures: one for 2 meters, the other for 10 meters;
- A broom for sweeping seams between paving stones;
- Clamp and heavy steel angle - a device for securing paving stones before cutting;

Securing paving stones before cutting with a clamp
- Grinder with a steel disc with a diameter of 230 mm. I advise you to use a steel disc rather than ordinary abrasive cutting wheels. When purchasing, I had a choice: buy a Chinese-made disk for 350 rubles or a Russian one for 500 rubles. I decided to buy a more expensive disc;

Steel blade (diameter 230 mm) for cutting stone and concrete
This disc cuts paving stones without any problems, although there is a lot of dust flying around.
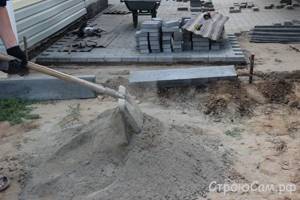
Preparing the site for laying paving stones
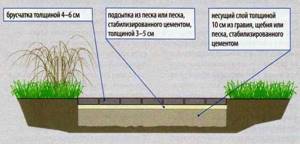
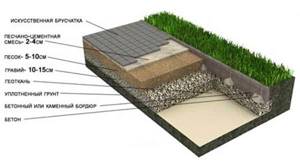
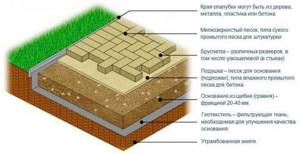
Whatever one may say, the most important stage when laying paving stones is marking and preliminary preparation of the site. The Internet recommends the following layer-by-layer layout for preparing the base for paving stones:
- Remove the top layer of soil and lay geotextiles;
- A layer of gravel 10-15 cm thick;
- A layer of sand 5-10 cm thick;
- Sand-cement mixture 2-4 cm thick;
Preparing the base for laying paving stones
To be honest, I only partially followed the technology for preparing the base. For example, I did not remove the soil, because for almost a year, there was already a layer of sand about 5 cm thick at the installation site. By and large, another layer of sand about 10 cm was laid, i.e. the total layer of sand became about 15 cm. The sand was compacted using a tamper made from a piece of timber with a cross-section of 20 x 20 cm and a height of about 1 meter.
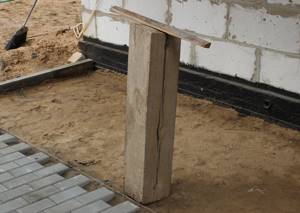
Manual rammer made of timber with a cross section of 20x20 cm
Before laying paving stones, it is necessary to install the curb stone. It is recommended to install the curb stone on a sand-cement mortar. Here I also deviated from the recommendations: I installed some of the curb stones on sand, and some on a dry sand-cement mixture. I did this so that if something happened, I could move the curb stone slightly inward or outward, in order to fit the curb stone tightly to the last row of paving stones.
Before installing the curb stone, check how smooth it is. The fact is that in Russia, there is by and large no such concept as quality control, so local craftsmen often stamp and sell defects.
Crooked curb stone
It is better to use such borders in less noticeable areas. It’s even better to cut when you need pieces of 50 cm or less.
Step-by-step instruction
Let's talk about how to lay paving stones with your own hands. The whole process consists of several mandatory steps:
- Planning and marking the perimeter of the site with calculation of the amount of material used.
- Preparatory work with soil.
- Preparing the base to create a drainage layer.
- Laying tiles.
- Final works.
Read also: What is the difference between paving stones and paving slabs?
Scheme and marking
At the dacha, paving stones should be completed and laid sequentially, starting from the marking stage. We recommend adhering to the following simple rules:
- Preparation of a preliminary plan with a site diagram on paper. In this case, you should indicate all the objects present on it that will be involved when the paving stones are laid.
- The diagram shows future paths made of paving slabs. Be sure to place them in such a way that the distance from them to the bases of the trees is more than 1.5 m. This way the crowns will not interfere with the passage of people, and the roots will not be able to damage the tiles.
- In addition, you should note that there must be a slope. It must be present in the direction from the main construction site, that is, the house. This is how water drainage systems are organized in a competent manner.
- The width of the created path is selected arbitrarily, but must always be a multiple of the size of the paving stones.
Next, in accordance with the prepared diagram, zones with paving slabs are marked on the site by placing stakes and a cord. In this case, the curb stone will be 80-100 mm wide.
And the height of the thread or rope will be equal to the level of the coating. It usually fluctuates in the range of 5-10 cm. It is easiest to adhere to all dimensional lines, including height, when using a level for construction work.
Soil development
Next, in order to lay paving stones in the courtyard of a private house, it is necessary to remove the top layers of the soil surface, that is, to perform a number of special preparatory work. Things to consider:
- The depth of the underlying layer and its preparation in depth directly depends on the base that will be used in a particular case. Therefore, it can be built on sand, concrete or cement.
- The bottom layer is formed by creating a drainage cushion on the ground. It consists of gravel and crushed stone. Thickness is up to 150 mm.
- Additionally, another layer is laid out. It is 30-50 mm.
- But the upper component bears the main load-bearing load, so its thickness is also quite impressive and amounts to 100-150 mm.
Read also: How to choose porcelain tiles for the floor?
The paving stones themselves are usually about 50-80 mm thick. Accordingly, the trench will have a depth of 350 mm.
Preparing the base layer
In order to properly organize the drainage support layer or base for laying paving slabs, you must adhere to the following list of simple recommendations:
As soon as the required volume of soil has been excavated, the base is compacted. Next, the canvas is lined, which is responsible for the impossibility of plants growing through it and eliminates the occurrence of breakthroughs in the prepared cushion.
A layer of crushed stone and gravel is laid on top of this canvas. The thickness should be based on the height of the curb stone. It is this layer that plays the role of a load-bearing base. It needs careful compacting.
Curbstone
To lay paving stones on a concrete or other base, you will also need to use a curb stone. There are some difficulties here that are associated with its weight. The step-by-step instructions here are as follows:
- The pegs are moved inside the previously organized tray. Now, from this moment on, the cord will act as a guide for where exactly the stone will be installed.
- To raise a stone, sand is often poured underneath it. Shrinkage in the lower direction is achieved by tapping with a regular wooden hammer.
- Heavy stone is based on a concrete mixture. It is carefully poured on both sides: external and internal. After it hardens, adding crushed stone begins.
- Once completed, a mound of sand is made on top. Here the layer will again be about 30-50 mm. The coating is specially spilled with water, since with this approach all existing cracks are filled.
Creating a base for laying
The base for correctly laying paving stones with your own hands can be created from one of the following options from the proposed list:
- coarse sand without impurities (for sand);
- cement-sand mixture (for cement and sand);
- cement mixture and gravel after compaction;
- reinforced concrete (on concrete).
View this post on Instagram
Publication from dacha, garden, construction (@dacha_garden.repair) Aug 12, 2021 at 7:21 PDT
If there are no high loads, you can install paving stones on sand. But if you plan to move a car along its surface, then you cannot do without using a layer of crushed stone. The most durable base will be concrete.
Read also: How to paint paving slabs?
Cement and sand
This format is used quite often. In this case, cement with a marking of over 400 is used and a solution with a high degree of homogeneity is prepared. As a rule, a concrete mixer is used for this purpose. The state of the mixture can be adjusted by adding crushed stone.
Then, in order to correctly lay paving stones on sand, it is necessary, using gentle blows with a hammer, to adjust the products to the minimum distances in relation to each other in order to achieve the required level of strength.
Gravel base
Gravel often has good load-bearing properties. To do this, perform the following set of actions:
- An additional layer of gravel is laid on the layer with previously placed crushed stone. It goes through the compaction stage.
- The paving slabs themselves are laid on a previously prepared cement-sand mixture. Often special plasticizers are added to it to achieve the desired consistency.
The gravel layer is organized by uniformly scattering the material. For compaction here you will need construction equipment.
Concrete and reinforcement
To lay paving stones on a concrete base and create a much stronger foundation, you will need to follow the following simple recommendations:
- Reinforcement is laid in the inner part of the trench. Thin rods undergo a binding process using thin wire. This will provide increased rigidity.
- Bricks are used to create a reinforcement network. Therefore, as a result of this process, they rise 40-50 mm above the level of crushed stone.
- The concrete itself is mixed into the solution by combining sand, crushed stone and cement. It is recommended to fill in one stage at a time.

Sealing works
Once the paving stones have been laid, it is necessary to seal the joints. For this, the same mixture is used as for laying the paving slabs themselves. The mixture is poured onto the surface and distributed with a brush. After this, the excess is removed.
Please note that paving stones can be laid in different ways. Depending on this, the degree of complexity of the installation process varies, but it is precisely the more complex patterns that have the greatest strength. Possible options:
- classic format;
- network;
- Christmas tree
Similar articles:
Mixture for laying paving stones
Initially, I planned to lay the paving stones on sand, since I did not see the point in using a sand-cement mixture. Moreover, I know that, for example, in Volgograd, paving stones are laid over large areas on sand without adding cement. However, I decided to figure out why it is recommended to add cement. As it turned out, cement is needed so that the sand is not washed out by water from under the paving stones .
So, I decided to add cement. There are different recommendations on the Internet for the sand/cement ratio: from a 1:1 ratio to an 8:1 ratio. I will say right away that in my opinion, making a one-to-one mixture is a sophistication. In general, it makes sense to proceed from what you plan to use to mix sand with cement. If using a concrete mixer, then I think it’s quite possible to use a ratio of 7:1, 8:1. Using a shovel, you cannot mix sand and cement perfectly. For this reason, it is better to settle on the golden mean and use a 4:1 ratio, i.e. four parts sand and one part cement. That's exactly what I did.
Can wet sand be used? At first, I only used dry sand. As it turned out, it is quite possible to use wet sand. Even when using wet sand, the mixture does not set within 24 hours, so there will be plenty of time to correct “shoals” if any are identified.
What should I mix the mixture with? The mixture can be mixed directly on the ground next to the place where the paving stones are laid. It seems to me that this is the best option.
Mix the mixture near the paving area
This month's popular paving products
| Name | Dimensions (L x W x H), mm: | Purpose: |
| Lawn (garden) border | 1000x200x80, 500x200x80 | For fencing paths and sidewalks |
| Road curb | 1000x300x150 | For designing road edges |
| Shallow drainage tray | 500x140x60 | organization of drainage and water disposal |
| Plastic drainage tray | 1000x149x81.50 | organization of drainage and water disposal |
| Paving stones “Brick retro” | 200×100×40 | paving paths and sidewalks |
| Paving stones "Rhombus" | 180x180x60 | decorative covering for paths |
Laying paving stones
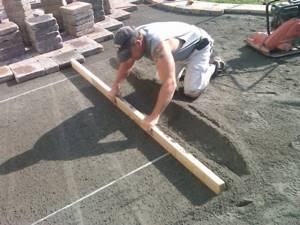
The recommended slope when laying paving stones is 5-15 mm per 1 meter. By and large, I followed these recommendations. In front of the house, the slope was slightly greater than the recommended upper threshold - 20 mm per 1 meter. The most important thing is not to make a slope of less than 5 mm per 1 meter. Laying paving stones perfectly for a beginner is not an easy task, therefore, with a small slope, the likelihood that there will be puddles on the paving stones after rain is very high.
Laying paving stones level
I laid a 1.4 meter wide path in front of the house using a 1 meter long building level. As it turned out, leveling with a level was quite a long and tedious task, although the path turned out to be quite level. The paving stones were laid without gaps; more precisely, the gaps were formed only due to the restrictive ribs on the paving stones (about 3 mm).
The paving stones are laid without gaps
Everywhere I tried to lay the paving stones in such a way that there was less need to saw them. In one place, it was necessary to cut down uneven areas in the foundation in order to fit exactly 14 pieces of paving stones.
I decided that it was better to “cut” the foundation than to cut the paving stones
As I already said, laying paving stones using a building level is a long process. It's good that I found out about the alternative option in time.
Laying paving stones along a cord (thread)
Here is the video itself, thanks to which I learned that you can quickly lay paving stones using a cord.
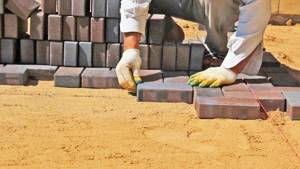
Please note that in the video, the paving stones are placed on the cushion by lightly tapping with a mallet. I tried to do the same. After laying it, I placed a stack of paving stones on top and the paving stones under the stack sank slightly. Conclusion: don’t be lazy to hit it with a hammer again , since you are laying paving stones for yourself, and not for your uncle. There is also no need to go to the extreme of fanaticism: you should not hammer the paving stones 5 cm into the cushion. As a rule, it is enough to sag the paving stones 1 cm into the dry mixture, and 2 cm into the slightly wet mixture. In the video below I demonstrate how I laid the paving stones.
Lay it down slowly but surely