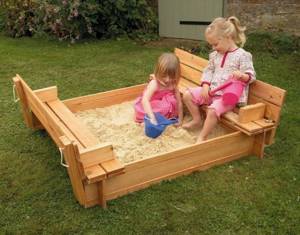
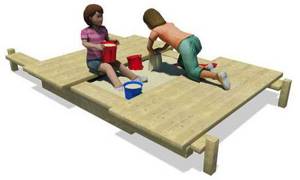
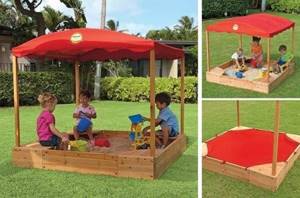
Children's sandbox with lid
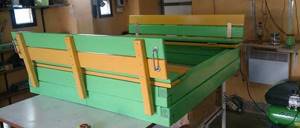
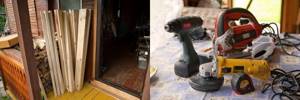
It’s not difficult to make a convenient and functional sandbox with a lid and built-in seats with your own hands. Buy boards and bars and sand them. You can start assembling. The corner bars should be long so that they can be dug into the ground; use the rest to strengthen the corners of the box. You will also need wicket hinges and paint.
When the structure is assembled, you can start painting; soak the “tails” that will be in the ground with a moisture-resistant liquid, or regular machine oil. Then begin assembling the movable sandbox lid by adding two more boards and attaching the wicket hinges. The sandbox lid will also serve as a bench. See step-by-step photos for all the details, a drawing is not included, use the dimensions at your own discretion.
Photo source https://ivan-kruglov.livejournal.com/86227.html Project author Ivan Kruglov
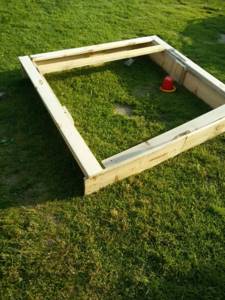
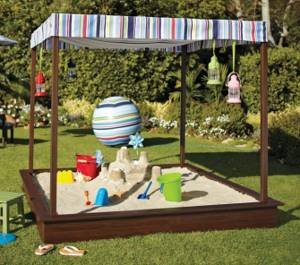
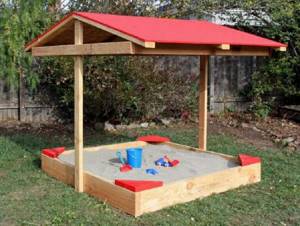
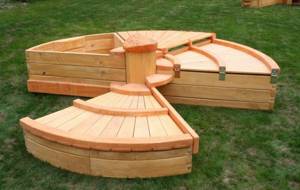
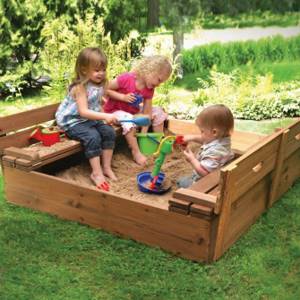
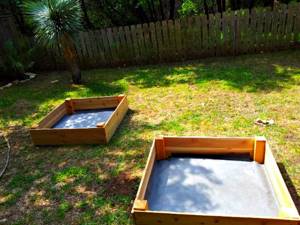
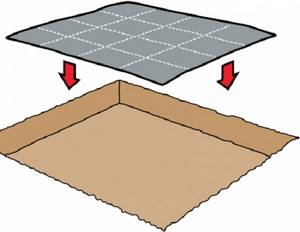
There are many such options for sandboxes, here is another one, only simplified, in this case the box does not need to be dug into the ground. It’s also convenient; the structure can be moved if necessary.
Photo source www.icreativeideas.com/diy-sandbox-for-kids/
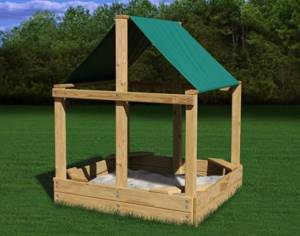
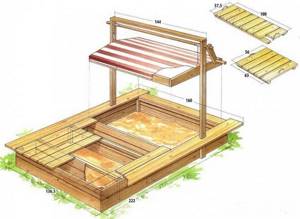
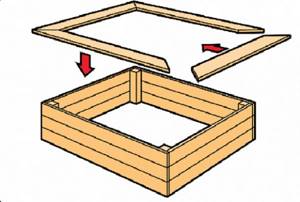
This is how it looks in the diagrams, of course not an exact copy, but to make it clear.
Photo source www.ana-white.com/2011/10/plans/sand-box-built-seats
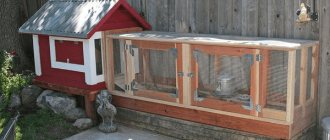
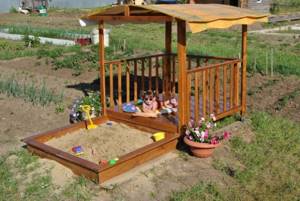
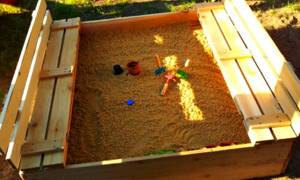
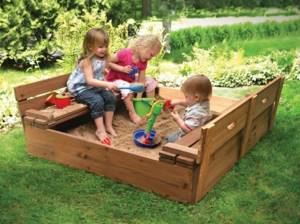
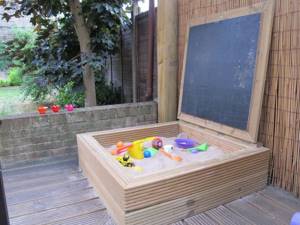
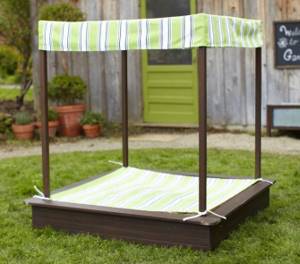
Another children's sandbox with a lid that will protect the sand well from animal excrement and other unwanted things, and at the same time allow water to pass freely, preventing the sand from drying out too much
This is very important, since dried sand, if it gets into a child’s lungs, can pose a certain threat to health. In this design, the bottom is open, so with free flow of water from above and dampness from the ground, the sand will always have the desired consistency
As in previous versions, the lid also serves as benches
When assembling, pay attention to the author’s interesting idea: to strengthen the back of the bench, which the child usually rests on when getting up from the sandbox, make wooden rotating latches that will rigidly hold the back in an upright position
Photo source srbu.ru/blagoustrojstvo-territorii/259-detskaya-pesochnitsa-s-kryshkoj-svoimi-rukami.html
DIY children's sandbox: all the colors of the rainbow with Motip!

It's the middle of summer. Tired of the heat and bustle of the city, we try to get out of the city more often, and on weekends we head to the dacha to have a good rest in nature. Many people plan to spend their entire vacation there. And if there is a small child in the family, then this is one of the best vacation options, because doctors do not recommend abruptly changing the climate and time zone for children under three or four years old. Therefore, many parents spend the whole summer at the dacha, enjoying the picturesque landscapes, silence and fresh air.
At the dacha you can organize a useful and enjoyable holiday for the whole family - the main thing is that everyone’s interests are taken into account. Therefore, when planning a recreation area, make sure that older family members can sit comfortably in a gazebo or sit on a comfortable bench, read a book while lying in a hammock, and set a table in the fresh air. However, this is clearly not enough for kids - after all, they love to play most of all and they always need something to do. Therefore, little fidgets simply need a children's sandbox!
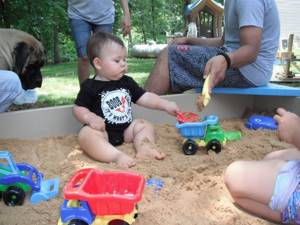
Experts have long agreed that playing with sand is not only interesting, but also useful. This develops children's creative abilities, eye and fine motor skills, makes kids more patient and balanced, because it is not always possible to build a beautiful tower or sculpt the perfect Easter cake the first time. In addition, the sandbox can be called a real school of friendship, because it is here that children gain their first experience of interpersonal communication. Playing with sand has a beneficial effect on the baby, and sand heated by the sun has a healing effect and improves health.
In this article we will tell you how to make a children's sandbox yourself. And aerosol paints from the Motip Dupli Group will help it become a real decoration of your garden plot - bright, durable and extremely easy to use. In the rich color palette of DUPLI-COLOR Aerosol Art, Crafts Spray, Trendy Specials and MAXI Color aerosols you can easily find not only popular shades, but also quite rare colors, as well as paints with various special effects.

Of course, you can buy a ready-made plastic sandbox in the store, but its size will most likely be small. It is inconvenient for even one child to play in a standard sandbox - there is simply nowhere for him to turn around. What if you need to call your mom, older brother or sister for help? And I would also like to invite friends to visit, because together it is much more fun and interesting to sculpt Easter cakes, build entire cities out of sand and pave a road through the entire sandbox.
It is also important that high-quality sandboxes are quite expensive, especially considering that you will only use it for a few months a year. Therefore, a DIY sandbox for children will help not only diversify your holiday, but also save your budget. In addition, an older child can be periodically involved in the creative process. He will be happy to help you do the simplest work, and then proudly tell everyone about what a beautiful sandbox you were able to build together. Well, in the eyes of your baby you will look like a real wizard!
The main thing to remember is that any place for children's games should be environmentally friendly and safe. And by choosing the shape and appearance of the sandbox, you can show all your architectural and artistic abilities and completely give free rein to your imagination. For example, you can complement the sandbox with various decorative elements.
Choosing the classics
The simplest and easiest option to implement is a rectangular or square open sandbox made of wood, which can be made in a few hours.
Where to place the sandbox?
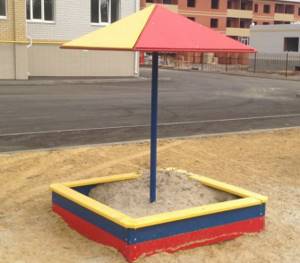
Children should always be visible, so do not hide the sandbox in the corner of your summer cottage, behind bushes, tall grass or outbuildings. It should be clearly visible even from the window of the house. Try to find a place that will be in the shade during the midday heat, but do not place the sandbox near fruit trees - fallen fruits and bird droppings should not fall into the sand. If you can’t find a suitable flat area, you can make a sandbox with a roof for protection from the sun, install a mushroom umbrella there, or use a removable awning.
Preparing the surface
So that the poured sand does not mix with the ground, and the remains of grass do not interfere with your baby’s games, the surface on which the sandbox will be located must be carefully prepared. First you need to mark the boundaries of the planned sandbox and remove the top layer of soil inside.
Making the base and benches
In each corner you need to dig holes for the racks with a depth of 35–40 cm. Since the racks will be partially underground, they must be treated with an antiseptic solution and covered with bitumen.
The racks are buried in the ground, and the sidewalls are nailed to them. They can be made from one wide board or several narrow ones knocked into a shield. You can determine the height of the side yourself; usually it is about 30 cm.
Important: the boards must be carefully processed and sanded so that the child does not get hurt or get a splinter.
We nail horizontal boards at the corners. These sides can be used not only as benches, but also as stands for molds, and also as a “table” for making shortbread cakes.
Painting the sandbox
Of course, the sandbox needs to be painted - as your imagination dictates. This will completely transform the sandbox, and will also protect the wood and allow it to last for many years. Motip aerosol paints will help you with this - you can find cans of paint in all the colors of the rainbow, as well as the rarest and most unusual shades!
Apply several thin layers from a distance of 20–30 cm, choosing paints in your child’s favorite colors. If desired, you can decorate the surface with various designs and patterns using a stencil. These can be not only flowers, animals or funny fairy-tale characters, but also numbers, letters, and various geometric shapes.
Finishing touch
Before pouring sand, we recommend laying paving slabs on the bottom of the future sandbox or filling it with cement mortar. For children's games in the sandbox, it is better to choose river sand - it is much cleaner and does not contain clay, but you can also use ordinary sand from a quarry. However, in any case, it must first be sifted.
Sandbox with lid
The sandbox can be equipped with a lid to close it at night or during rain, protecting the sand from getting wet and dirty.
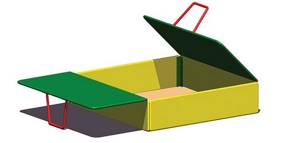
The easiest way to do this is to use a regular shield, which can be easily put together from the remaining boards or plywood. But the main drawback here is that the baby will not be able to remove such a cover on his own. Therefore, if you have some experience, it is better to build a transforming lid with hinged door hinges. The child will be able to open and close it independently, and during games such a lid will turn into a bench.
Sandboxes made from scrap materials
A sandbox at the dacha can be built from the remains of wooden posts, old car tires, plastic bottles and many other unnecessary things, painting them with aerosol paints. And with a creative approach to business, it will not only serve as a place for children’s games, but also act as a decorative element.
To find the right material, it is often enough just to go out onto the site and look around. And we invite you to look at photographs that will inspire you to create your own unique sandbox! After all, it’s not difficult at all – you just need to show your imagination and stock up on Motip aerosol paints!
Stages of work
Let's look at the process of creating a simple square or rectangular sandbox with a lid.
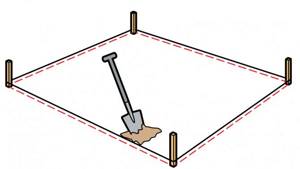
Site preparation: Clear the area of unnecessary debris; Using a tape measure, fence off the perimeter, drive in pegs and connect them with rope. Check the marking accuracy again. This can be done easily by comparing the diagonals: they should be equal.
Installing the base: Remove the top layer of soil (approximately 30 cm). Place and compact a layer (5 cm) of sand or crushed stone. It ensures water drainage and protects sand from the ground. Otherwise, they will mix, and insects and other inhabitants will appear in the sandbox.
Reinforce drainage with geotextiles. It allows water to pass through, but polyethylene does not, so when using film, make holes in it.
Installing the sides: Treat the blanks (45 cm long bars and 3 cm thick boards): sand, coat with antiseptic and prime. Place the bars in the corners to a depth of 20 cm. Attach the sides to them. Install horizontal pads. These can be boards of any width, also pre-processed.
Should I buy a ready-made sandbox or build it myself?
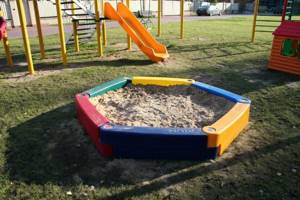
A common yard is not a place for bright, expensive objects that can be carried away by freebie lovers. A city playground is usually equipped with a simple sandbox of a square or rectangular shape made of wood with sides painted with oil paint.

Children's sandbox
In the private sector, at the dacha or in any protected area, you can equip an entire children’s playground and afford expensive decor. If there is no one in the family to build even the simplest box for sand, then they buy a suitable container in a children’s supermarket or order it online.
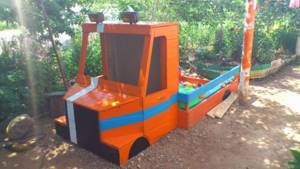
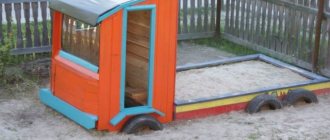
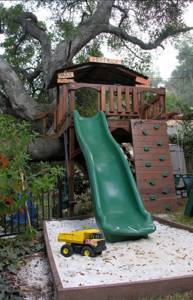
Sandbox in the form of a truck
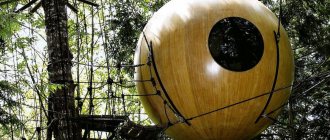
Some construction companies engaged in the construction of objects from rounded timber will, at the request of the owners, make not only a house. You can order an original sandbox, a pirate town, or a whole children's play complex with slides and houses. Or you can make children’s sandboxes with your own hands – photos and ideas will help bring an interesting project to life.
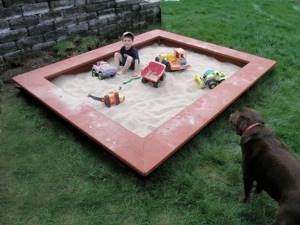
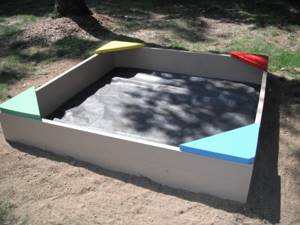
Square red sandbox

A homemade play area has the following advantages:
- it is a source of pride for the head of the family in front of friends and neighbors;
- the remains of timber, wooden boards, plywood, plastic bottles, bald tires and other material suitable for this undertaking were added to the work;
- the most economical option;
- the ability to choose the appropriate type of sandbox.
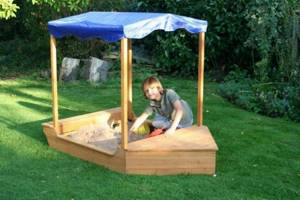
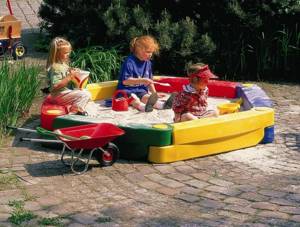
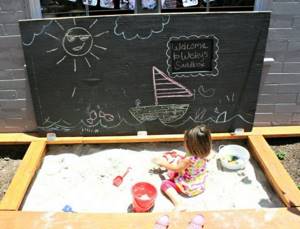
Children's sandbox in the shape of a boat
A bright plastic container for sand from the store is, one might say, a forced purchase, for example, when there are no men's hands in the house.
The construction of a wooden rectangle is accessible even to a novice craftsman who does not have woodworking machines and tools. It is recommended to order parts for a homemade children's sandbox from the nearest carpentry shop and assemble them at the dacha using a screwdriver or a multi-tool. Finally, sand and paint with non-toxic paint.
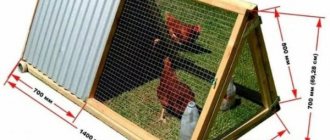
Sandbox with sun protection
Another simplest way is to dig vertically in a circle wooden posts from neatly sawn trunks of dry trees.
If the structure is made from stumps of different heights, children will happily use them to run around the sandbox.
Sandbox in the form of a house
It is much less common to make a sandbox from solid logs connected around the perimeter. This is a good option for resting a piece of dry fallen wood. Children will be much more comfortable if comfortable seats are attached on top of the logs.
Tires that have become unusable are also widely used as a container for sand. Rubber from a large diameter wheel is an ideal option for a summer house if the container is intended for one child to play in the sand. From scraps of several tires in the shape of a flower or a polygon, make a sandbox for 2-3 kids with your own hands. Only it must be painted so that the rubber heated in the sun does not evaporate the unpleasant odor.
Wooden sandbox in the yard
Step-by-step construction of a sandbox with a lid
The future construction depends only on your ideas, capabilities and preferences.
Option 1
To figure out how to make a sandbox with a bench lid with your own hands, you will need a diagram, drawings and step-by-step instructions with photos.
You also need to prepare:
- lumber;
- loops;
- nails.
Step-by-step production:
- All boards are subjected to initial processing with a jointer.
- Using a router, we round the edges and clean the material with sandpaper.
- We paint the blanks.
- We knock down a couple of boards using a block and nails.
- We turn the boards from step 4 over to the other side, place 2 more boards on the bars and connect them with loops with self-tapping screws.
- We mount another third, with the fastening elements located at the bottom.
When constructing the lid, it is necessary to make a gap between the boards of 5 mm.
- We make the second half of the product in the same way.
- We assemble the box from timber or boards and paint it.
- Attach the lid to the base.
Option 2
To build another sandbox, you will need the same list of materials as for the previous structure. A jigsaw, a grinder and a screwdriver will suffice as tools.
We produce in the following sequence:
- We cut the boards to size and process them using a grinder with an emery wheel.
- For the box we use a pair of boards on each side. We connect them with bars, as in the photo. The protruding part will serve as a support.
- We fix bars at the corners to increase the strength of the structure.
- We paint all wooden elements.
- We fix 2 boards to the base with screws. We lay a couple more boards and install hinges to them.
- We place the next two boards on the box and fasten them to the previous ones using bars.
- We choose the length of the wooden elements so that when the lid is lifted, they serve as support for the backrest.
- To prevent the benches from sagging, we attach a part in the center of the first two boards, as in the photo.
- We perform the second part of the lid in the same way.
- To protect the corners from moisture, we cover them with a wooden element.
- We prepare a place for the sandbox, install the structure and fill it with sand.
We advise you to study - Condensation and fungus: why windows sweat and how to fix it
With roll-up lid
You can build a simpler sandbox design without benches, in which the lid is rolled up. The tools and materials used are the same as in the previous versions, but instead of canopies, dense rubber is used.
Step-by-step instruction:
- We cut the boards to the required length, process them and cover them with protective agents.
- We prepare strips of thick rubber the same length as the boards for the lid.
- We assemble the shield using rubber to connect the boards.
It is better to use small nails to attach rubber strips.
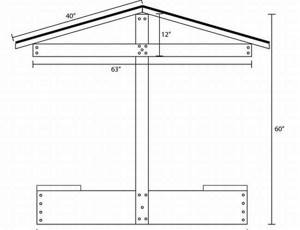
Roof for sandbox
An addition to the sandbox with a bench-lid, made by hand according to step-by-step instructions with drawings, diagrams and photos, will be a roof, and we’ll look at how to make it in more detail.
The material will also be wood, and OSB will be suitable as a roofing covering.

The build process is as follows:
- We fasten vertical elements made of timber 50x80 mm and 150 cm high to the side walls of the box with self-tapping screws.
- We level the racks using a level and connect them with a horizontal block.
- Assembling the base for the roof.
- We cut the rafters 1 m long, lay them and secure them to the prepared frame.
The roof base must be securely connected with self-tapping screws without any gaps.
- We cut out sheets from thick plywood or OSB and fasten them to the frame.
- We paint the roof in the desired color. If desired, the design can be decorated with different designs using stencils.
DIY sandbox: drawings, dimensions, assembly
Small children not only love to play in the sand, but also put everything interesting in their mouths. As soon as the parents are distracted, the scoop, the mold, or the fingers themselves end up licked. Of course, sand on the street cannot be sterile, but serious problems with its contamination are still worth solving. That is why today we will talk about how to make a sandbox with a lid.
This design allows you to avoid debris and plant debris getting into the sand, prevent animals from making a toilet in it, and reduce sand getting wet during rainfall.
Sandbox diagram and materials for it
Everyone determines the size of a children's sandbox for themselves. The standard design, in which 3-4 kids can freely play, is a square with sides 150 cm long and 25 cm high. If your family has one child, or you have very little free space on the site, you can reduce the sandbox to size 100 ×100 cm.
In order to make a standard sandbox, you will need:
- 2 six-meter boards 12 cm wide and 3 cm thick;
- 2 six-meter boards 12 cm wide and 2 cm thick;
- 2 meter beams with a side width of 5 cm;
- 6 large door or gate hinges;
- a piece of geotextile measuring 160x160 cm;
- self-tapping screws for woodworking;
- protective impregnation for wood;
- self-adhesive seal.
Whatever size sandbox you choose, it will only affect the amount of material, but you will still need the same tools:
- hacksaw, saw or jigsaw;
- a screwdriver (can be replaced with a hammer, but then you will have to use nails instead of screws);
- roulette;
- sandpaper or grinder with a grinding wheel.
How to build a sandbox
Before you start building a sandbox, prepare a place for it. You will need to remove the top layer of soil to a depth of 5-7 cm, level the ground, and remove large plant roots, if any. Spread a piece of geotextile on the prepared area so that it slightly extends beyond the boundaries of the sandbox.
Sand is always dragged from the sandbox around the site and spills out during play, so you should not install a sandbox next to plants that are sensitive to changes in soil composition; it is better to do it in the middle of the lawn.
If desired, you can sprinkle a layer of expanded clay, ASG or small pebbles on the geotextile to improve drainage, but you can do without it
Then start making a sandbox with a lid.
- Cut each 3 cm thick board into 4 equal parts, sand them thoroughly and treat them with an impregnation that protects the wood from fungus, moisture and direct sunlight.
- Cut one beam into 4 equal parts, also sand and treat with impregnation.
- Using self-tapping screws, fasten the boards into a two-tier structure, attaching them to the beams.
- Carefully drive all screw or nail heads into the wood to avoid injury.
- Place a strip of self-adhesive sealant between the boards - this will help prevent sand from spilling out through the cracks.
If the further steps of making a folding lid in the shape of a table and bench seem unnecessary or too complicated to you, you can always simply put together a square shield from boards that can be used to cover the sandbox at night. The only problem is that such a cover is very heavy, and children themselves will not be able to remove it.
Before you start making a transformable lid for the sandbox, carefully measure the base you get. Then cut the remaining boards into 8 equal pieces and begin assembling the bench and table.
For the table, attach one board directly to the sandbox using self-tapping screws, and the second to the first using 2 wood hinges. This way you can make the table wider or narrower, or lay it out at night as a cover.
Use six more boards for the bench, and 2 of them will go to the seat, 2 to the back, and 2 to attach to the frame. Screw the hinges to the outside of the lid so that the inner strips bend when opening upward. To fasten and fix the backrest, use a sanded beam. Calculate its length so that when opening the lid it provides a reliable support for the backrest.
Coloring the sandbox
Although a natural wood colored sandbox is nice and will easily fit into any design, some families prefer to paint it. You can get by with any bright monochromatic paint, or you can apply a design using a stencil. In any case, you will need not simple paints, but those that are suitable for outdoor work. It is advisable to take water-based aerosol enamel designed for painting children's toys - it is safe, bright and dries in a couple of hours.
Before painting the sandbox, remove it from the ground so that all edges are painted evenly.
How much sand do you need in a sandbox?
Every parent who decides to build a similar structure on their site for the first time faces the issue of filling the sandbox. In fact, calculating the volume you need is quite simple. It is enough to multiply the length, width and height of the sandbox and take into account that it is not filled to the brim.
In our case, this is: 1.5×1.5×0.2 = 0.45 cubic meters of sand, i.e. approximately 1500 kg or 30 bags.
It is advisable to take river sand for children's sandboxes; before filling the sandbox, it should be sifted and spilled with a weak solution of potassium permanganate or boiling water.
Sandbox with lid: advantages
Why did the idea of building a sandbox with a lid arise? Firstly, to protect the play area from pets. Because cats and dogs love to relieve themselves in the sand. However, the lid will reliably protect the sandbox from turning it into a cat litter box.
Secondly, during rain, less moisture will get into the sand through the cracks in the lid. This will be enough to maintain the sand at the “consistency” needed for building castles and making Easter cakes.
Third. Sand protected from drying out will not turn into dust. If sand particles get into children's lungs, quite serious consequences for the child's health can occur.
And finally, one more pleasant aspect. The sandbox lid can be transformed into two comfortable benches with backs. And parents will be able to comfortably watch the little one’s fuss.
Types of sandboxes
The simplest sandbox is the open wooden structure familiar to everyone from childhood. It is a box made of boards and filled with sand. Almost any man can make it, capable of sawing off boards of equal length and driving in several nails or screwing in screws. It is more difficult to make a collapsible sandbox - it is assembled from cuts of the same height and width, like a construction set. More complex preliminary calculations will be needed here. If you make do with improvised means, you can build a sandbox from wood cuts dug into the ground. Or simply lay thin logs, fastening them together like a log house.
Photos of varieties
Today you can increasingly find a sandbox with a lid. This may be a removable lid, which will need to be removed and then put on each time, or a hinged one. It will protect the sandbox from rain, falling leaves and unwanted visits from nearby cats and dogs who want to turn the sandbox into a toilet. And it’s much more convenient to leave the sandbox closed for the winter - you won’t have to clean it out of debris in the spring. An interesting option is a sandbox with a lid that transforms into a bench or table. It is not only functional, but also convenient. A child can sit on it while playing, rather than on the sand, and closing it is much easier than a solid one.
To cover the sandbox, you can use a polyethylene roof or umbrella. But this is protection only from the sun and rain, but not from garbage and animals.
Nowadays there are various types of plastic sandboxes on sale. But they, compared to wooden ones, have some disadvantages. Plastic is quite slippery after rain; it can be used of fairly low quality - fragile, with a specific odor.
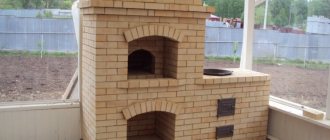
The sandbox can be made of brick or stone. Despite the fact that such a sandbox will look interesting, when playing, a child can get seriously injured by hitting the side.
A sandbox made of wood is still preferable, since it uses environmentally friendly material, it is the least traumatic - every father will carefully treat all surfaces, and it is convenient. When working with wood, you can develop and implement your own project - a sandbox-ship, car, carriage, etc., and modernize it over time.
Sandboxes made of various materials (photo)
What other types of sandboxes are there?
There is no point in arguing about which sandbox is better. After all, its safety and convenience for the baby should come first, and only then design options should be discussed. And yet, if an ordinary children's wooden sandbox with a lid seems too simple to you and does not fit into the concept of the site, then you can consider other options.
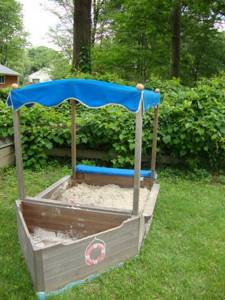
Sandbox with canopy
A canopy over a children's sandbox is not a design whim, but a severe necessity. Children spend an hour or more playing games, and under the scorching rays of the sun this can become dangerous. Therefore, unless your sandbox is located under trees or in the shade of buildings, a canopy will be a necessary element.
Installing it is quite simple - just extend the beams on which the walls of the sandbox are attached upward by 1.7-2 m, secure a rectangular frame made of the same timber on top and pull the awning. The easiest way to make it is from thick fabric, such as tarpaulin, but you can also consider colored polycarbonate, boards, and roofing materials. The main thing is that the canopy is securely fastened and shelters children from direct sunlight.
Tire sandbox
A small sandbox from tires can be made in two ways. If you have a wheel from a (very large) truck, then sand can be poured directly into the center of the tire, after washing it and painting it in a bright color.
If you only have standard car wheels, take three tires, cut them in half and lay them on the ground in the shape of a flower, fastening the edges of the wheels together. Of course, such a sandbox is not very environmentally friendly, and will not last long, but as a temporary solution it has the right to life.
Sandbox boat
A sandbox in the shape of a ship or boat is more interesting than a regular square, as it opens up space for themed games. In order to make it, you just need to replace one straight wall with a triangle. You can install a steering wheel, a flag, a small bench or something else in it.
Sandbox shell
If you don’t want to do anything at all, and it’s embarrassing to look at a child leaning over in anguish, you can buy a ready-made sandbox. There are small options that imitate a shell in shape, and the top flap is the very lid that is sometimes necessary.
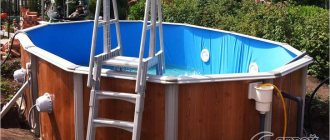
Have you seen such options in stores? Then give preference to a regular plastic artificial pond. They come in different shapes, sizes and colors, are easy to transport from place to place, wash, and are convenient to store.
Children playing in the sandbox is not only cute and safe, but also convenient because it allows parents to go about their business while keeping the kids in sight. Therefore, take a couple of days to build a sandbox with your own hands and enjoy summer games with your children.
- How to arrange a children's playground on the site
Are your children not eager to go to the countryside on weekends? Set up your own corner for them, and the guys will start looking forward to Friday as much as you.
Tools and manufacturing process
For construction you will need the following tools and materials:
- Lumber (boards, bars, beams, eurolining).
- Door hinges (if you plan to make a sandbox with a lid).
- Fasteners (nails, screws, self-tapping screws).
- Hammer, screwdriver, grinder, jigsaw.
- Tape measure or centimeter.
Fence the area where construction is planned. Arm yourself with a bayonet shovel and remove the top layer of soil. Divide the square where the sandbox is located with two diagonal lines, and at the place where they intersect in the center of the structure, make a small hole. This will be a place for water to accumulate after rains. The hole should be filled with small stones: crushed stone, pebbles, expanded clay. Make a funnel around the perimeter of the entire sandbox with a slight slope towards the center. This is easy to do with a patting motion with a shovel.
Construction of the frame
As a rule, the frame dimensions are 2.5 meters by 1.5, but you can choose any one. It all depends on your desires and the area of the plot.
We take the timber and cut it to the required size. Don't forget to sand the boards so that the child doesn't get hurt in the future. Take a screwdriver and fasten the structure to form a box. Then they begin to make the sides. They will serve as a bench and table for sand cakes.
Next, take the boards. They should also be processed in advance so that there are no uneven spots left. Screw them to the box. The easiest way to do this is with self-tapping screws.
Sandbox cover
At first glance, the place for games is ready. Now the question arises: do you need a lid for your sandbox? Much speaks in favor of this design:
- Firstly, it is protection from natural precipitation.
- Secondly, from dirt and insects.
- Thirdly, many animals are not averse to relieving themselves in sand. And these are unsanitary conditions for children to play.
We advise you to study - Types of hammers and their purpose
To build the lid, measure the required number of boards to size. Go over them with a sander. Attach a couple of boards to the bench with self-tapping screws, then fasten two more boards together and connect these two structures using door hinges. On the other side of the sandbox, repeat a similar procedure. If the lid needs to be made even longer, attach a couple more boards on each side using the same hinges, but fasten them on the other side. You should now have an accordion.
Secure the handles to lift the lid up. Now the folding lid for the children's sandbox is ready.
Treat the product with a wood antiseptic and let it dry. On top you can cover the sandbox with paints or draw different designs. You can do this together with your child.
If you give free rein to your imagination, you can come up with a high roof that will protect from the sun and rain. The easiest way to do this is to screw four bars to the base, and make a sheet of boards, plywood or other material on top.
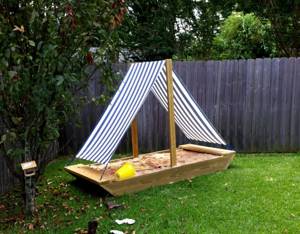
If you approach manufacturing creatively, it is possible to build an entire ship: a mast made of a block should be fixed in the center of the sandbox, and an old sheet will serve as sails. There are plenty of options to diversify daily games. Feel free to involve your child in this matter.
The simplest options for building a sandbox with your own hands
For any configuration of the playing area for sand, you need to prepare the bottom and remove the turf layer. Once upon a time, no one was involved in arranging the lower level of the sandbox, but today sanitary standards dictate their conditions. In addition, earthworms crawl from the upper layers of soil into wet sand after a rainstorm. Various microorganisms and helminth eggs can get into the loose substrate.
Sandbox in the form of a boat with an awning
Therefore, it is advisable to make an intermediate layer around the perimeter of the bottom according to the following principle:
- stretch agrofibre, plastic film or old tarpaulin, make holes in the corners for the drainage of rain, filling the sides to the brim;
- lay out a layer of broken porous bricks or remnants of paving slabs;
- The base of the sandbox is strengthened in the corners, where “legs” should be attached for digging into the ground.

Small sandbox with sand protection
Common ways to make a sandbox with your own hands.
- The sides for bulk children's "construction" material are made from inverted plastic bottles, the containers are filled with soil, sand or clay, they are dug into the ground in a circle or in the shape of a rectangle, the containers are braided with thick wire to ensure the integrity of the structure. Although this is a good alternative to wooden sides, children need wooden benches for laying out the sand figures and for sitting.
- Tires from heavy trucks, adapted for a children's sandbox, are another simple way to arrange a playground. Using large slate nails, the lower edge of the rubber is secured to a compacted area, the upper edge is carefully cut off, leaving enough space for a seat, the outer surface of the tires is painted in a bright color, a tarpaulin or film is placed on the bottom and covered with sifted sand, it is advisable to place a table and a bench next to it, and stretch awning
- A rectangular sandbox made of wood with your own hands is a classic option. You will need 4 identical pieces of board approximately 1.5 m each and up to 25 cm wide, 4 wedge-shaped bars of 40 cm each, 4 triangular pieces of wood. A children's sandbox can be made from prepared pieces of wood in 2-3 hours. Connect the boards for the sides at right angles with wedge-shaped bars using a screwdriver so that the flat edge of the bars is flush with the board, and the pointed one protrudes, connect all 4 corners and securely fasten the bars; when turned upside down, it should look like a low table with short legs. Then you need to prepare the site (remove the turf layer, lay brick or stretch agrofibre), dig small recesses for the pegs of the sides, put the sandbox in its place and dig in the base, nail the seats in the corners. Now you need to sand all the wooden surfaces well so that children do not get splinters while playing, paint the sandbox, and fill it with sand after drying. The last step is to attach a beach umbrella or awning next to the sandbox. If you have skills in working with wood, then it is better to make a canopy in the shape of a fungus. The height should be such that adults can easily enter under it.
Wooden sandbox with backs
Additional equipment for the children's play area - benches or a table with a bench, wooden figurines or garden decor, a box for children's equipment and molds. The site can be improved by adding new elements. As the child grows up, some things will have to be removed and new elements and accessories added.
Sandbox with lid: design features
When starting construction, think through the main details in advance, starting with size. The sandbox should be deep and roomy enough so that a one-and-a-half-year-old baby can climb into it without any problems, but so that even a five-year-old child doesn’t feel cramped there. For this purpose, dimensions of 1.5 m x 1.5 m are suitable: such a sandbox will not take up much space and can comfortably accommodate 3-4 children.
Calculate the height of the structure so that the sand layer is at least 15 cm. Do not forget to leave space on top for sitting. With a board width of 12 cm, you can build a sandbox using two boards, that is, 24 cm high. This is quite enough for the child to not only sculpt Easter cakes on his “construction site”, but also build a sand castle.
But does the sandbox need a lid? For those who love order and care about the health of children, the answer is obvious.
The cover protects the sand:
- from being scattered throughout the territory;
- from excessive getting wet during rain;
- from debris, branches, rotten fruits;
- from the encroachments of dogs and cats, arrange a toilet there.
The lid will protect the sand from contamination and become a convenient bench
The simplest cover is a shield made from boards, which is used to cover the sandbox after the game. It is the easiest to make, but such a cover is very heavy and bulky, it takes up additional space on the site during the day, and it is quite difficult to move it from place to place. Therefore, we suggest choosing a transforming lid: its construction will take more time, but the result will be justified. Build a lid that, when opened, turns into a table and/or a comfortable bench with a back: not only will the child like them, but they will also entice adults to join him.
How to make a sandbox with your own hands: step-by-step instructions
Today, parents and children are offered a wide range of sandboxes. The most advanced of them are plastic , made from linear polyethylene. They are very safe - no splinters, plus - the rounded shapes significantly reduce the possibility of injury.
Sandbox made of linear polyethylene on the play lawn
In addition, they are UV resistant, remaining bright and attractive, they do not need to be painted annually, like wood , and are easy to wash. When left in the sun, unlike metal ones, they practically do not heat up.
Sandbox made of linear polyethylene on a tiled area
And in terms of durability, they are significantly superior to both wooden and metal samples. Thanks to their light weight and modular design, they are quite mobile - they can be transported in a car and brought into a barn . However, with all its advantages, a plastic sandbox is quite expensive, especially considering the “temporary” nature of the purchase.
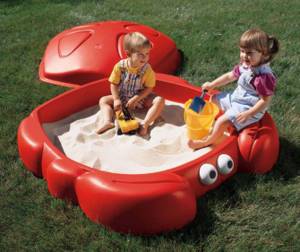
Sandbox made of linear polyethylene in the shape of a crab
do-it-yourself children's sandbox for a summer cottage
A simple square sandbox with wide sides and seats
The simplest and most easily implemented option for a country playground is an open rectangular (square) sandbox made of wood, which can be made with your own hands within a few hours.
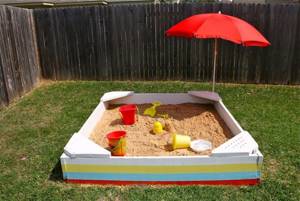
Simple square sandbox with corner seats and sunshade
A simple square sandbox made from several boards with a sun umbrella
Sandbox drawing in Fig. 1 just confirms this:
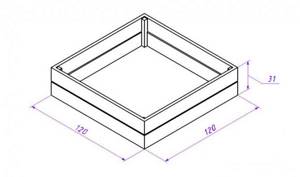
Rice. 1. Drawing of a square sandbox
First of all, you need to choose the right playground: the sandbox should be clearly visible from different places on the site and from the house so that the child always remains under supervision. In addition, you should not place the sandbox under a tree - fallen leaves and fruits will contaminate the sand.
Fallen leaves fall into the sandbox located under the tree.
After this, they begin directly to construct:
- site preparation - along the entire perimeter of the planned sandbox, the soil is removed to a depth of 25-30 cm and drainage is prepared - a well-compacted cushion of coarse crushed stone and sand. Thanks to it, atmospheric moisture will be easily and quickly absorbed into the soil, and the sand itself will dry out faster
- laying the base - as a base you can use thick plastic film, paving slabs , or even just a sheet of plywood in which you need to make holes for drainage. It should be taken into account that plywood can quickly become unusable, and the film does not pass water very well, which can accumulate in spontaneously formed depressions. The best option is geotextiles, which are highly permeable to moisture. In principle, you can limit yourself to just preparing the site (digging a hole and installing drainage), but in the future this will create problems - the sand will begin to mix with the ground, so it will have to be changed quite often. A dense base will help keep the sand clean, and it will also serve as a barrier to insects and rodents that will try to make their way to the top.
- we install the bars - they will be the support of the sandbox, they are installed in the corners of the sandbox. The optimal size of the bars is 450x50x50 mm. It is important to take into account that part of the block (approximately 15 cm) will be located underground, so in addition to treating it with an antiseptic, it should be additionally coated with bitumen. Prepared bars are hammered into the corners of the future structure
- we nail the sidewalls - it can just be one wide board or several narrow ones, knocked together into a shield, this is absolutely not important, it all depends on the chosen height of the side, although the usual height of the sidewall is 30 cm. It is important that the boards are carefully processed (sanded), not there were jagged edges, protruding splinters and knots.
- we install the seats - for these purposes we nail 2 or 4 horizontal boards horizontally to the ribs. These lining sides will be used both as seats and as stands for buckets, spatulas and molds, as well as “working surfaces” for baking shortbread cakes.
The sandbox is ready to be filled with sand
- pour sand: from two types of sand - river and quarry - without hesitation we choose river sand. It is much cleaner and does not contain clay or other impurities. For example, to fill a square sandbox with a side of 1.2 m, you will need about 0.3 m3 of sand.
A do-it-yourself sandbox will give your child many pleasant moments
Advice! It is better to sift quarry sand through a fine sieve before pouring it into the sandbox.
Rectangular sandbox with a lid-board for drawing inside
The standard version of the sandbox will require some modernization, namely the installation of a lid. This will solve several problems at once:
- will protect the sand from rain - it will not get so wet, plus - the lid will prevent sand from being washed out of the sandbox
Sandbox-transformer with one folded and one unfolded door
Transformable sandbox with unfolded doors
- protects sand from wind-blown debris
Round, rotating sandbox-transformer
Round, rotating transformable sandbox in a partially closed state
- will prevent the sandbox from turning into a toilet for dogs and cats
Small sandbox with lid
Sandbox with mobile lid-house
as a “ roof ” for the sandbox, but the option with a wooden shield looks more attractive and reliable.
Sandbox protected by two awnings - a sun awning and an awning protecting the sand

Sandbox without an awning to protect the sand
However, the most convenient option is a transformable with a hinged lid. Due to the fact that the shields in it are fastened with hinged hinges and handles are screwed to them, when folded they become benches with comfortable backs. Another advantage of this design is that a 5-year-old child can open/close the lid independently.
Transformable sandbox unfolded
DIY sandbox with a lid - the sequence of operations is shown in the video
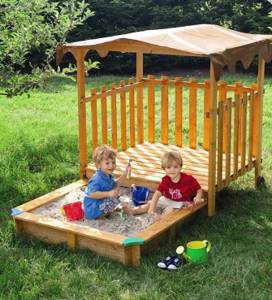
Since installing a sandbox under a tree is impractical, it is necessary to take care of protecting the child from the sun's rays - install a removable/stationary canopy .
Sandbox with wooden canopy
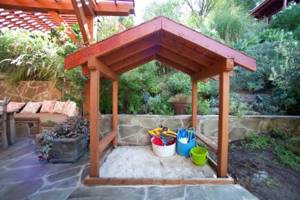
This could be simply four high poles at the corners of the sandbox, on which an awning canopy will be attached, or a canopy-roof made of wood, covering the entire area of the sandbox. But a mushroom sandbox made with your own hands from timber (10x10 cm cross-section) and a “hat” of triangular pieces of plywood will look more decorative. Under it you can wait out the sudden rain and hide from the sun.
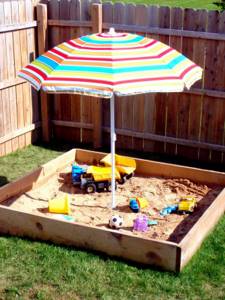
Sandbox with sun umbrella
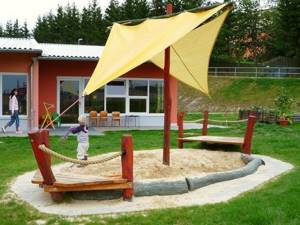
Sandbox with log sides and an awning that imitates a sail
Sandbox with a canopy stretched over a special bar
Advice! You can additionally attach a table - this will provide an additional surface for children's fun.
A do-it-yourself closing sandbox, the drawings of which include the installation of a canopy and an additional compartment for installing a small pool (water container), is shown in Fig. 2
DIY lockable sandbox with canopy and additional compartment for a small pool
Choosing materials for making a children's sandbox with a lid with your own hands
To make a sandbox, it is best to use those types of wood that are least susceptible to moisture. These can be quartered or tongue-and-groove boards, bars treated with an antiseptic. For long-term use, choose coniferous wood. Alder and aspen will last less. It is not recommended to use chipboard, plywood and other building materials obtained by pressing sawdust. It is best to pre-treat parts that will be in the ground with bitumen mastic.
To prevent sand from sinking into the soil along with precipitation, and to prevent weeds from growing in the sandbox, make a bottom in the sandbox. Please note that it is better to fill a sandbox with a height of 25 cm with 15 cm of sand and for a size of 2x2 m you will need about 1 m3 of sand. River sand is best suited, but you can use construction quartz sand, having previously sifted it to remove large fractions. Sea sand is salty, so it is better to avoid it.
Sandbox with lid: stages of construction
Before starting construction work, it is worth making a schematic plan drawing. Believe me, if you work with drawings, things will go much faster and better. Well, if you don’t have problems with memory and imagination, you can sketch it out in your head.
We begin construction by cutting the boards to the length you need. When the material is ready, start assembling. When assembling, it is necessary to drill guide holes for the screws to avoid splitting the boards.
First of all, make the base of the sandbox. For this, boards one hundred and thirty centimeters long and 3×7.5 centimeter blocks are used, fastening them at the corners of the “box”. Check the corners of the future sandbox. They should be equal to 90 degrees. Once you are sure it is correct, screw on the second tier of boards. As a result, you will get a base whose sides will be equal to 130 by 135 cm.
After the box is ready, you need to use a material that prevents the growth of weeds (you can use Spunbond). When stretching Spunbond, avoid excessive tension. The material must be spread over all areas of the structure, securing it with a construction stapler.
Making a lid-bench
After this, we begin assembling the cover. For these works you will need 12 prepared boards. The boards for the lid must be well planed so that there are no burrs. Because they can injure or prick the delicate skin of children. When making the cover, position the boards so that the smooth surface is “facing” the sand. Fasten two boards together using timber. And then connect three pairs using canopies to form an “accordion”. Repeat. You will get two lids, each consisting of six boards.

Attach each end board to the manufactured box. When fastening, do not be too zealous and do not overtighten the screws, otherwise the board may crack. Using sandpaper (an angle grinder is recommended), thoroughly polish the underside of the boards
We advise you to study - To be or not to be: sliding interior doors in the interior
Pay special attention to this issue, because the boards will serve as a seat
The seat back is secured with metal hinges. For secure fastening, it is recommended to use three or four loops, distributing them evenly.
To firmly fix the seat back in a vertical position, you need to build wooden latches. Simple boards, which are latches, should rotate 360 degrees and hold the back in an upright position.
Lids
The second attribute necessary for sandboxes is lids. Not only do leaves fall into the sand and all sorts of garbage gets into the sand, but animals also love to be there...being there. You can prevent attacks on the purity of the sand by using a lid. In the simplest version, it is a shield made of boards or cut out of plywood, to which handles are attached.

Cover made of boards
To avoid having to remove and install the panels every time, you can attach hinges, and to prevent the doors from hanging, weld handles on which they can rest. When the lid is folded back, you get two small play areas. Children can sit on them or build their own sand castles. Therefore, it is more convenient to make such covers from plywood: there are no cracks and they are lighter in weight.
Hinged lid
There is an even more interesting design - away. This type of cover is definitely made from plywood. Nail the top bar so that there is a gap left. A sheet of plywood is inserted into it. And so that the opposite end does not dangle, legs are nailed - small pieces of timber.
Interesting sandbox lid design
The same principle is implemented differently in the version in the photo below. It is already for those who are good at carpentry.
The cover rides on guides
Step-by-step instructions for making a children's sandbox with a folding bench
When making a bench, it is recommended to strictly adhere to the step-by-step instructions:
- Once you have decided on the location, you need to mark the area. To make the calculations more accurate, it is recommended to install pegs around the perimeter and stretch a cord between them. Using a tape measure and a square, you can make the corners even.
- Now you need to remove the top layer of soil with a shovel. It is advisable to make the depth a little more than 25 cm. This step will eliminate the rotting of plants and the appearance of various living creatures in the sandbox, and will also ensure the reliability and stability of the structure.
- Next, you need to level the bottom and fill it with gravel and sand in a 10 cm layer. Then the surface of the pit is compacted and leveled. Due to this, water will not accumulate under the sandbox.
- After preparing the bottom of the pit, you need to lay the base of the structure. Polyethylene is suitable for this. It needs to be laid at the bottom of the hole, after making several holes in it with a nail. This is necessary so that moisture does not linger in the sand for a long time, but goes into the ground.
- At this stage you need to make a frame for the sandbox. To do this, sides are constructed from two boards. For fastening it is customary to use self-tapping screws, bolts or metal plates. The connecting parts are bars - they fasten the sides on the inside of the sandbox.
- Before installing the sandbox in the soil, you need to dig 9 holes around the entire perimeter of the prepared hole, into which the supports will then go.
- Then the boards are secured with self-tapping screws to the upper edge of the side, serving as the basis for the lid.
- You need to attach door hinges to the boards you just installed at a distance of 35 cm from the edge.
- Now you need to secure two more boards. The hinges are installed on the opposite side.
- Then you should install boards that will act as a backrest. The corresponding wooden parts are secured with self-tapping screws.
- Now you need to fix the stops to the base of the seat.
- In order for the back of the benches to have a stop, you need to install the bars and secure them with self-tapping screws.
- At the end, it is necessary to install the structure in specially prepared holes in the ground and secure it well.
Manufacturing process
Basically, a sandbox with a fungus is installed for several years, so it’s better to do all the work thoroughly so that you don’t have to fix the defects next year.
Site preparation
The site preparation process includes the following steps:
- The perimeter of the future sandbox with a fungus or canopy is marked, after which the soil is removed to a depth of 25-30 cm.
- Take care of drainage in the form of a cushion of coarse crushed stone with the addition of sand. A well-compacted layer of material will ensure rapid absorption of moisture into the soil, facilitating accelerated drying of the sand after precipitation.
- It is recommended to make a base for a sandbox with fungus. It can be made of various materials: dense polyethylene, plywood or paving slabs. The first two options for a sandbox are not very successful - the film practically does not allow moisture to pass through, and the plywood quickly deteriorates. They are used when there is an urgent need to save costs. In any case, holes should be made for drainage. It is optimal to make the base for a sandbox with fungus from geotextile, which ensures the unhindered passage of moisture.
Comment! The last step can be omitted, but the base of the wooden structure with fungus prevents premature contamination of the sand as a result of mixing with soil. The second important function is a kind of barrier against the penetration of insects or rodents.
Box formation
The box is a key detail of any sandbox design, regardless of whether it will be equipped with a canopy in the future or not. The most common solution is to make a square or rectangular shape. Typical designs suggest focusing on a square design size with sides of 2.5-3.0 m. Taking care of environmental safety, it is better to make a sandbox from pine boards 2.5-3.0 cm thick. Creative parents can make an imitation of a boat or make a round one design. Installation of a standard box model consists of the following steps:
- Bars are installed in the corners. The optimal size of wooden products is 45/5/5 cm. Approximately a third of the timber (about 15 cm) will be in the ground, so in addition to treatment with an antiseptic agent, it is necessary to coat it with bitumen. The dried timbers are hammered into the marked corners.
- Next, in the future sandbox with fungus, you need to make the sides. To form them, several narrow boards are selected, connected into a shield, or one wide one is fixed. The quantity is not important; the average height of the side of a sandbox with fungus is 30 cm.
- After attaching the sidewalls, we move on to equipping the seats. This is easy to do - just nail it horizontally to the sides of the board. Usually they are installed around the entire perimeter of the sandbox in the amount of four pieces; if there is a lack of material, two benches can be made. In the future, they will serve as convenient stands for displaying shortbread cakes.
Important! All wooden elements of the sandbox with fungus need careful sanding. The absence of knots, splinters and nicks will prevent unnecessary abrasions and scratches for the child. To prevent your child from getting injured on the corner of the sandbox, it is advisable to make it round in shape.
Construction of a canopy
Having finished working on the box, they move on to the second important structural element - the canopy. It can be made in various shapes, but most often they settle on the fungus version. In addition to its decorative role, it perfectly copes with the protective function, be it the scorching rays of the sun or light summer rain. An interesting solution would be to arrange a small table around the fungus, serving as an additional place for storing toys in the sandbox. The sequence of actions is as follows:
- Prepare a hole to support the fungus. The stability of the sandbox canopy can be ensured by deepening the stem of the fungus into the soil by at least 1 m.
- It is recommended to make the leg of the fungus from a beam with a cross-section of 10x10 cm. As in the case of beams for the sidewalls, the wood of the fungus needs to be treated with antiseptic agents to prevent damage by rot or insects.
- To make a mushroom cap, you need to form triangles from the boards. The inner side of the parts is fixed to a support; it is advisable to sheathe the outer part with plywood or a thin board. The material is fixed with nails, and the next part is nailed in such a way as to hide the heads of the nails on the previous fungus board.
- For high-quality protection, the size of the fungal cap must correspond to the parameters of the sandbox.
- After connecting the cap and stem, the fungus can be installed in the prepared hole. The structure can be fixed by wedging the stem of the fungus with stones and filling it with loam.
- If you want to make a more durable mount for the fungus in the sandbox, a crushed stone cushion is prepared at the bottom of the pit. The fungal stem is installed at a depth of 0.7 m and filled with cement mortar.
Comment! If you plan to concrete the foot of the fungus, then it is better to do this before installing the sandbox box.
After connecting and installing all the elements, you can proceed to designing the sandbox. What kind of decorative decoration to make depends solely on the creative abilities of the parents, the main thing is that the finishing material is safe, and the children like the idea of decorating the sandbox.
Step-by-step construction of a sandbox with a lid
Option 1

- lumber;
- loops;
- nails.
- All boards are subjected to initial processing with a jointer.
- Using a router, we round the edges and clean the material with sandpaper.
- We paint the blanks.
- We knock down a couple of boards using a block and nails.
- We turn the boards from step 4 over to the other side, place 2 more boards on the bars and connect them with loops with self-tapping screws.
- We mount another third, with the fastening elements located at the bottom.
- We make the second half of the product in the same way.
- We assemble the box from timber or boards and paint it.
- Attach the lid to the base.
Option 2

- We cut the boards to size and process them using a grinder with an emery wheel.
- For the box we use a pair of boards on each side. We connect them with bars as in the photo. The protruding part will serve as a support.
- We fix bars at the corners to increase the strength of the structure.
- We paint all wooden elements.
- We fix 2 boards to the base with screws. We lay a couple more boards and install hinges to them.
- We place the next two boards on the box and fasten them to the previous ones using bars.
- We choose the length of the wooden elements so that when the lid is lifted, they serve as support for the backrest.
- To prevent the benches from sagging, we attach the part in the center of the first two boards as in the photo.
- We perform the second part of the lid in the same way.
- To protect the corners from moisture, we cover them with a wooden element.
- We prepare a place for the sandbox, install the structure and fill it with sand.
With roll-up lid
- We cut the boards to the required length, process them and cover them with protective agents.
- We prepare strips of thick rubber the same length as the boards for the lid.
- We assemble the shield using rubber to connect the boards.
Roof for sandbox
- We fasten vertical elements made of timber 50*80 mm and 150 cm high to the side walls of the box with self-tapping screws.
- We level the racks using a level and connect them with a horizontal block.
- Assembling the base for the roof.
- We cut the rafters 1 m long, lay them and secure them to the prepared frame.
- We cut out sheets from thick plywood or OSB and fasten them to the frame.
- We paint the roof in the desired color. If desired, the design can be decorated with different designs using stencils.
Types of sandboxes with a roof
First of all, you need to figure out which type of protective canopy is best suited. For a sandbox - a temporary structure that is built for several weeks of summer vacation by the sea or outside the city - you can use a fabric awning stretched on vertical posts. But if you plan to build a children’s sandbox with a roof with your own hands seriously and for a long time, then you will have to choose the appropriate materials. At least wood or plastic. For particularly complex roof structures, you will have to use a metal roofing scheme.
According to its design, a sandbox for children with a roof can be manufactured in several versions:
- A wooden box with a mushroom in the center of the playpen;
- Sandboxes with a gable roof on two or four posts;
- Boxes with a roof in the form of a frame for a soft roof;
- Children's playgrounds with a large metal canopy.
A soft roofing option will not save you from bad weather.
It is clear that the specific roofing option, roofing materials, and the size and shape of the sandbox box are selected to suit the needs of the children and the site location conditions. For the courtyard of an apartment building, you will have to build a sandbox with a very high roof, since the age category of the children will be quite wide, from 4 to 10 years.
Important! It is generally accepted that for a comfortable stay and play for two children, a sand backfill of at least 2.5 m2 is required, approximately 1.25-1.5 square meters per child. The size of the box is determined by the number of participants
Having estimated the approximate number of participants, they select the area of the sandbox and the size of the roof. Only after this can you choose the material and method of construction.
Wooden sandbox with roof
Often a children's game box becomes part of the landscape design of a yard. In this case, to build a sandbox with a roof with your own hands, photo, it is better to use wood and plastic.
This model is more of a landscape element than a place for children to play.
It is not necessary to copy the fairy-tale style and wood carvings, but, as practice shows, if you need to create a complex design, then you cannot find a better material than timber and plywood. In addition, you can experiment with unusual roof designs and methods of attaching them to racks, for example, come up with your own version of a sandbox with fungus.
Of the available schemes, the easiest way is to make a sandbox with a gable roof on a frame base. Instead of classic sheathing, use a frame made of timber, with a stretched awning made of synthetic fabric.
Models with synthetic fabric roof cladding
In addition to gable roofs, you can use single-pitch structures with adjustable slope and canopy height.
For those for whom it is important to make the roof of the sandbox “impenetrable” and as reliable as a fence, we can advise you to sew up the slopes with wooden slats like aspen shingles.
The same principle is used to build a roof with a gable roof, the only difference is that in this case one powerful rack is used on which the roof frame is mounted. This is the most successful variant of the fungus. True, to ensure the rigidity of the slopes, it is necessary to add a transverse brace.
Important! The fungus roof is considered one of the most convenient and safe, since the support structure occupies the central part of the sandbox, which always remains free. As a result, the space around the box is freed up, there is enough space for everyone.
Roof made of plastic
Despite their availability, plastic materials are used for roofing in limited quantities. Of all the possible options, only sheet polycarbonate is used, and only due to two main qualities:
- High transparency of the material, the sand in the sandbox receives enough heat and light during the day in order to dry and undergo sanitary treatment by the sun's rays, as a result, provide comfortable conditions for children;
- Polycarbonate scatters ultraviolet radiation well, so children almost never get sunburned.
But there are also disadvantages, for example, it is quite difficult to attach cellular polycarbonate sheets to a wooden or metal roof frame; you will need to install thermal washers and leave a thermal gap between the sheets.
Portable sandbox, option for garden beds
Important! In addition, according to many parents, it is quite hot in a sandbox under a plastic roof in the summer, so a removable soft fabric awning is often added to the plastic roof.
Polycarbonate roof structures do not have a special design; they are usually an arched canopy on a metal or wooden frame or a flat deck.
Metal roof
Metal roofing can be considered an ideal solution for large gable roofs. If you try to make a sandbox under a 2x3 m canopy, and this is a common yard option, then the weight of the wooden frame will be much heavier and more massive than the metal one. The weight of the roof should be reduced whenever possible, since this is a safety issue for those who play in the sand under a canopy.
A real yard sandbox with an “eternal” roof
Therefore, it is more expensive and longer to build a metal roof, but sometimes it is the only possible and safe option.