Spring is a difficult time for every owner of a summer cottage. During this period, many problems have to be solved. In addition to the fact that you need to find a place to store household waste during the entire time you use your dacha, you need to choose a method that will fertilize the soil. And although millions of summer residents face these problems, each of them overcomes the situation differently.
As garbage accumulates, some owners take it with them to the city and then throw it into the first garbage container they come across.
Some people don’t bother with this at all and send the accumulated waste into a ditch behind the fence. When it comes to fertilizers, there are many alternatives available. Some people increase the level of soil fertility with the help of fertilizers and fertilizing. There are also those who add manure or humus to the soil; more advanced summer residents resort to sowing green manure plants in the beds, the benefit of which is not only to increase soil fertility, but also to destroy soil pests and diseases.
However, if you think about it, you can find a solution that allows you to solve both of these problems at once. We are talking about installing a compost pit on the site, thanks to which the owner will not only have a source of organic fertilizers , but will also have the opportunity to save himself from the need to find methods for processing household waste and garden waste.
This option is also preferable because with its help you can not complicate relations with neighbors, and also not be ashamed of your actions, because from the majority of waste generated you can prepare fairly high-quality fertilizer for garden beds. You just need to remember that the vast majority of organic matter makes an excellent basis for creating nutritious compost.
However, even before constructing a much-needed and useful structure on the site, it is necessary to determine a list of requirements that such a pit must meet. First of all, this concerns the volume of compost and the speed of its production. These parameters will directly affect the design of the compost pit.
If the owner decides to create a compost pit to a greater extent to solve problems with the destruction of accumulating garbage, then he should choose one design for the device. If the most important thing for a summer resident is to obtain useful fertilizers from collected leaves, mown grass and garbage with minimal time, then you will have to choose a slightly different option for constructing a compost pit. What parameters will be key when creating a compost pit?
What are the benefits of a compost bin?
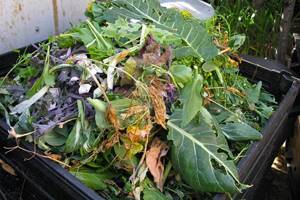
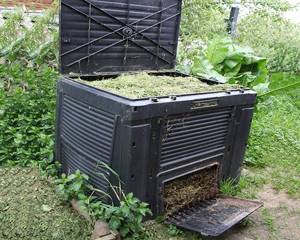
On a plot of land, compost pits are used to store waste and surplus food. Subsequently, they decompose and turn into fertilizer of fairly high quality. If you build a compost pit at your favorite dacha with your own hands at the beginning of the season, ready-made, incredibly useful fertilizer will be waiting for you in the fall. The average time for compost to “ripen” is three months. Of course, provided that the composter is made correctly and the pit is given due attention. Otherwise, the decomposition process may take 1-2 years.
What can you put in compost?
Compost increases soil fertility by saturating it with organic matter. In addition, with the constant use of this fertilizer, the composition of the soil changes - dense clay soil becomes more crumbly, and sandy soil will retain moisture better. The main thing is to know exactly what should be put in the compost pit, otherwise you can harm both the soil and the plants.
Main components of compost:
- Leaves, branches and roots of any trees and shrubs, wood chips, bark, shavings and small pieces of unpainted wood.
- Herbaceous plants without seeds: weeds, mowed lawns, wilted or dead flowers. The main thing is that all this material is not treated with chemicals immediately before being sent to the compost pit. For plants that spread by rhizomes, it is better to first dry them in the sun and only then put them in compost. Otherwise, bindweed or hops will soon appear in the garden beds.
- Tops of carrots, beets, horseradish, pumpkin, radishes, zucchini.
- Potato tops cause a lot of controversy among those who prepare humus with their own hands. The fact is that fungi that cause late blight persist on it for a long time.
When putting potato tops into the composter, you should remember that the fertilizer will be ready only after 3 years. In addition, when laying the pile, it is necessary to spill it with a solution of copper sulfate (2 tablespoons of vitriol per 10 liters of water) for complete disinfection. The same can be said about the tops of tomatoes, cucumbers, peppers and eggplants. If the plants have not been damaged by fungus, the tops can be safely put into compost.
- Cattle manure.
- Rotten or fallen vegetables and fruits, with the exception of those that have traces of scab, black rot or other disease.
- Food waste that does not contain animal products. It is very useful to throw used tea leaves or coffee grounds onto the compost heap. Such waste quickly rots and stimulates the composting process.
- Eggshells are a storehouse of natural calcium and are also thrown into compost.
- Wrapping paper, napkins, paper towels, chopped cardboard - that is, everything that rots without a trace.
We recommend: Washing Coca-Cola: life hack from Office Romance and modern remedies for soda stains
To quickly ripen the compost, the materials are crushed when laying and the pile is watered with a special preparation, for example, “Vostok EM-1”, “Baikal EM-1”, “Siyanie”.

Standards for the construction of compost pits
To build a good and reliable house, you need a thoughtful design. The requirements for a compost pit are not so severe, but they also exist. To speed up the ripening process of fertilizers, try to ensure a regular supply of heat, oxygen and moisture. Follow these rules:
- The pile should rise above the ground, and not be level with it or located below the soil. This is really important, because in this case the heap warms up much better, it is much more convenient to water and loosen it. We advise you to go deeper by 45-50 cm, but leave barriers of about a meter. The ideal DIY compost pit is 1.5 meters wide and 2 meters long.
- Keep in mind that if there is at least one source of water on the territory, it must be 25 meters or more from the compost pit. If the site has a certain slope, the pit is always built below the source. Otherwise, the water in it will no longer be drinkable.
- The compost pit at the dacha is located some distance from the living space or gazebo. You don’t want to greet the morning with an unpleasant smell or barbecue in the yard, inhaling completely different “aromas”?
- It’s great if there is some kind of large tree on the site. For composting, it is always recommended to choose a place that is in partial shade. This will protect the pit from drying out quickly.
- You should choose the size of the pit yourself, taking into account the volumes of garbage that are in the dacha and are planned to be added in the next two years.
- Fencing for a compost pit using Finnish technology must have a height sufficient for convenient loosening and collection of compost.
Never make a slate bottom or cover it with rubber or metal. These materials prevent the soil from rising upward, but the compost will dry out regularly. The bottom is made of earth, the walls are covered with any of the available materials.

Diagram of a ventilated compost bin
Using compost
Mature compost becomes dark and uniform. It does not emit an unpleasant odor. The fertilizer should smell like fresh earth. If such a smell is not present, it does not contain enough useful organic elements. Ready compost is used both in its natural form and as fertilizing diluted with water. In the first case, it is embedded into the soil with a rake at the rate of 5 kg per 1 square meter of soil. Unripe compost is used to mulch tree trunks. It is also used as biofuel for greenhouses and greenhouses. Compost is indispensable as a fertilizer applied at the root. To do this, one shovel of raw materials is diluted in 20 liters of water and left for a week. Suitable for both garden crops and indoor plants.
If you don't yet have a compost heap, it's time to move from theory to practice. As you can see, it is not difficult to arrange. And you will get multiple benefits from this.
What is allowed to be thrown into a compost bin and what is prohibited?
Building a composter with your own hands is half the battle. To get truly high-quality fertilizer, you need to know what you can’t put in a hole and what you can.
To achieve maximum efficiency, you can safely deposit the following types of waste:
- Bark and leaves, chopped branches.
- Grass, dried weeds.
- Manure that has long been rotted, droppings from birds and other domestic animals.
- Any fruits and vegetables, as well as their peeling.
- Leftover tea.
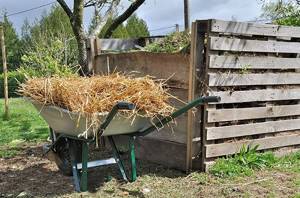
- Small sawdust, shavings, straw.
- Ashes that remain after burning wood.
Any video about the construction and further use of such structures will confirm that ash and even paper in any form can be placed in a compost pit: cardboard, napkins. When laying fresh grass, especially if it is a thick enough layer, the decomposition process extends for a year. To speed it up, we recommend covering the grass with soil.
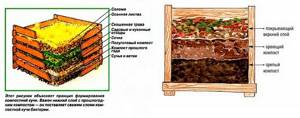
Compost filling scheme
Never pawn:
- Bones and very thick branches. They rot long enough.
- Inorganic products. In particular, these include rubber and polyethylene, metal and plastic, and synthetics.
- Tomato tops, since they are often infected with late blight.
- Plants that have previously been treated with chemicals.
Now you know for sure that you cannot put it in a compost pit under any pretext.
Rules for good compost
As in every useful undertaking, before starting a compost heap, you need to decide on the stages of its proper creation.
- Determine the place where it will be located: preferably away from fruit trees. As for the rest, it’s more a question of the aesthetic appearance of the site.
- Select capacity for storing useful waste. Which one is better to use? The easiest way to make a compost pit is using ready-made specialized plastic tanks. Or you can make the container yourself, and it’s even better and cheaper. For such a case, the following options are suitable:
- deep wooden boxes;
- an earthen pit dug about half a meter deep;
- concreted or cemented pit with air holes.
Rules for obtaining high-quality and healthy compost:
- If there are soil characteristics: containing a significant proportion of sand or clay, it is necessary to balance its properties by adding clay to the sand at the base of the hole, respectively, and vice versa.
- To regulate the degree of humidity in the thickness of the heap, you need to place small tree branches in the hole as the first layer, which will allow excess water to escape. In addition, pieces of bark and sawdust are suitable for composting. Then you can put fresh ingredients: cabbage leaves (unaffected by anything), nettles, tops in the weed compost without flowers and roots. Avoid throwing tomato and potato tops into the compost heap.
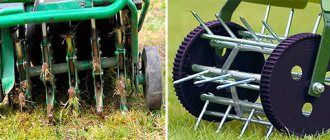
- The compost mixture must be ventilated. Therefore, air access is required. To do this, holes are made in the cement frames and a gap is left between the boards of the wooden boxes. In addition, the compost heap must be stirred periodically and not compacted in order to save space in the container.
When setting up a compost bin on your site, it is important to provide for ventilation.
- You should not make the container completely closed; “recyclers” - earthworms - should get there naturally. This option will not work if plastic tanks are used. In this case, it is necessary to add special compounds that help reduce processing time.
- You can start collecting waste in a compost bin regardless of the time of year. The only condition is the absence of frost.
Popular creation methods
For a do-it-yourself compost pit, all manufacturing options can be divided into several types. Let's list them.
Regular waste pile
It is not difficult to prepare this version of the heap. All you have to do is choose the most suitable place to place the compost heap. Then gradually place the waste. If possible, they are laid in layers. For example, food scraps can be mixed with straw, green grass and manure.
As soon as the height reaches a meter, you will need to make 3-4 indentations and pour compost liquid inside. It significantly speeds up the process, so the first compost will be ready in three months.
The option described above is one of the fastest ways to obtain compost at minimal cost.
All you need to create a compost heap is a wheelbarrow and a shovel.
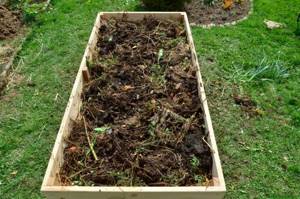
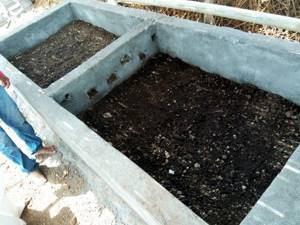
Classic pit
One way to make it is to dig a small, square-shaped hole in the ground. Cover your version of the pit with branches and hay at the bottom, as well as bark. Next, place food and vegetable waste. The temperature inside will not be very high, so it is recommended to immediately cover with film.
Please note that this option is the least successful of all. Firstly, such a pit warms up much worse. Secondly, the temperature in it is not always high. But it has a small area and is easy to arrange.
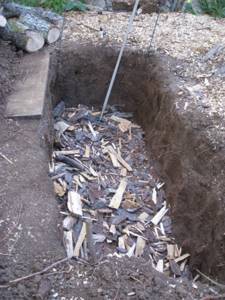
Classic compost pit
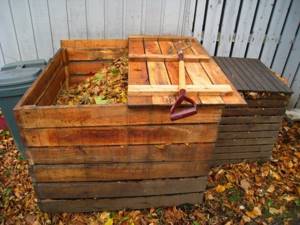
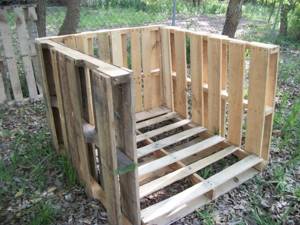
Building a compost box from wood
How to make a compost pit correctly so that the design is inexpensive and practical? To do this, you can use bars, sheets of metal with slate. The pit making process is as follows:
- You remove the top layer approximately 35-40 centimeters thick.
- Next, drive in pegs around the perimeter.
- A fence will need to be installed around the pit. You can make it from pallets, use wood blocks, boards and boards. It is also allowed to use other materials: flat and corrugated slate, polycarbonate, metal sheets.
- The height of the fence is no more than one meter. Otherwise, even with great growth, you will find it inconvenient to mix the compost.
- The structure is covered with plywood or film. Compost warms up well, so this design is considered optimal in all areas.
- This magical Moorish lawn
- Design on 6 acres
Types of composters
A simple DIY compost bin can be made in one day. No special materials or tools - whatever is at hand will do - boards, slate, plastic panels, plexiglass, mesh.
It is necessary to decide which method of making compost will be a priority: aerobic or anaerobic. If the first, then there are more options for making a compost heap with your own hands. If it is anaerobic, then every effort will have to be made to make the structure airtight. You may have to use concreting, but such a collar will last a long time.
Classic earthen pit
The compost pit in the ground is made as a depression no larger than 50 cm, so that it is convenient to care for the ripening mixture. The sizes are arbitrary. You can make any length and width.
More often, this design is used for anaerobic fermentation, but for this it is necessary to concrete the walls and bottom. The fact is that when plant residues decompose, liquid flows down. If the bottom is left open, the nutrients will disappear and be absorbed into the soil. But if you put a layer of earth, straw or peat on a closed bottom, they will be preserved and will benefit the plants.
The easiest way to make a compost pit is from a concrete ring. For this:
- Dig a shallow hole - 60 cm.
- The bottom is filled with solution and allowed to dry.
- Using a crane or tractor, a concrete ring 90 cm high is installed.
- Plaster the connection between the bottom and the ring.
The convenience is that the edges will rise above ground level and prevent sediment from getting into the compost. The concrete can be painted any color or decorated as you wish to create a beautiful compost pit - you can plant tall plants around the concrete ring with your own hands, and they will hide the storage. If desired, a ceiling with a hole for a hatch is installed on the ring.
Slate pile
If you have old slate lying around, you can strengthen it on boards and make walls for a compost pit. This will not be quite a hole, since it is located on the surface of the earth. More like a pile or a heap, but decorated and protected. A do-it-yourself slate compost pit is suitable for the aerobic (oxygen) method of making compost.
Stages of work:
- Select a location and make preliminary markings - length, width. The height of the pile should be no higher than 1.5 m. At a higher height, air will be less able to get inside and ripening will slow down. The raw materials may even rot or sour.
- Dig holes in the corners with a drill and place pillars.
- Nail boards between the posts to hold the slate.
- Using a drill, carefully make holes in the slate and attach it to the boards.
On one side, the height is made smaller to make it convenient to get ready compost. The roof must be done, because rain will disrupt the maturation of the mixture.
The bottom is made as desired - open or closed. Peat, soil, chopped branches or sawdust, and straw can be used as drainage.
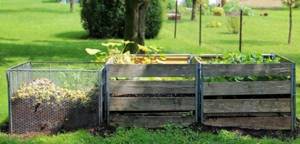
DIY board composter
A DIY compost pit made from boards is the most common method. First, markings are made and corner posts are installed. Below is one of the options:
- the arrangement of the boards is dense, without holes for air - more suitable for cold storage of manure or anaerobic composting;
- with air holes - they can be up to 5 cm wide.
It is better to make the composter mobile - on wheels, so that it can be hidden in a warm place in the winter. When the temperature drops, bacteria slow down their activity and the maturation of the mixture is disrupted. In warm weather, the process continues and by spring the fertilizer will be ready.
When using worms for composting, the most effective type is California red worms. They reproduce quickly and eat a lot, but cannot tolerate low temperatures. They die in mid-latitudes. Vermicompost is prepared in a warm room with good ventilation. In summer the box is put outside, and in winter it is kept warm.
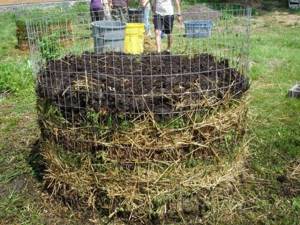
Mesh compost pile
An economical version of the composter is made from ordinary metal mesh. It is secured to poles or metal pipes dug into the ground. The advantage is that the collar is completely open on all sides to air. To speed up the maturation of compost, it is advisable to add a solution of EM preparations when forming layers.
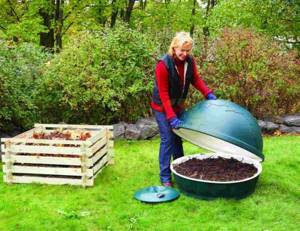
Sealed plastic container
Sealed containers are used for anaerobic fermentation of components or silage of grass. Such composters look presentable and aesthetically pleasing and do not spoil the appearance of the site. The downside is that you cannot increase the volume, and you will also have to loosen the layers when preparing aerobic compost.
Septic well as a composter
There is a technology in which fecal matter is processed by anaerobic bacteria and becomes organic fertilizer. But for this you need to comply with the following condition: do not pour water with detergents and chlorine into the well, as these substances cause the death of microorganisms.
Composting occurs in complete darkness without oxygen. The required amount of biological preparation is poured into the well. After a month, the drains are cleaned, solid particles are processed by bacteria, and the water flows into the next well and is disposed of through filtration fields.
The resulting mass is used to feed plants. It has no characteristic odor and the consistency is homogeneous. If your summer cottage has a multi-chamber sewer system and the drains are separated, you can get fertilizer this way.
Selection of materials for self-production
The best material for making a composter using Finnish technology is wood. This is the most common material and can be replaced at any time. Many summer residents use pallets, the advantage of which is that they are already treated with antiseptics against rotting and moisture. It’s easy to nail a couple more boards to the pallets to make the gaps smaller and control air flow.
The slate composter is a fragile invention. In addition, according to reviews, the compost takes longer to mature in it. Without prior experience, making holes for screws will be problematic.
A metal mesh is also suitable for composting, but it is installed on wooden or metal corner supports. To prevent the mesh from stretching, it is fixed with several boards around the perimeter.
For the construction of a stationary composter, foam blocks with holes are suitable.
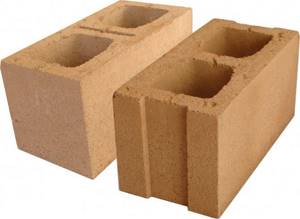
This is an environmentally friendly material that solves two problems at once - structural stability and compost ventilation. It is easier to make a roof and attach awnings to concrete than to slate. But you will have to buy material if there are no blocks left from the construction site in the storerooms, and also buy cement and a trowel to fasten the blocks together.
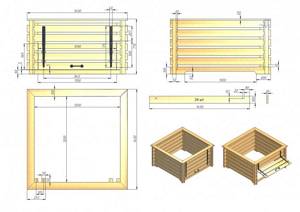
Scheme of a three-section box using Finnish technology
As already described above, the optimal dimensions of a composter are 1 m height, 1 m width, 3 m length. It will need to be divided along the length by two partitions. The dimensions of the common door are 1 m by 1 m.
The dimensions of the lower door are height 50 cm, width 1 m - it is mounted in a common leaf. The roof can be made sloping or gable, and divided in half by canopies, so that it is convenient to open the box, turn over the contents and lay in new ones.
If you make a larger box, then its height and width can be increased by 50 cm. The length remains unchanged. The length of any compost pit or heap is made arbitrarily.
Advantages and disadvantages of the method
To build a composter using Finnish technology with your own hands in the form of a three-chamber box, you need to provide for the availability of space on the site. Its minimum dimensions should be 1m x 3m.
Less is not possible, since in a small garden composter the substances will dry out quickly. In a large one, sometimes a fire occurs and all the fertilizer burns due to the high temperature. Therefore, it is important to maintain proper air access and exhaust to maintain the temperature at 65 - 70 degrees.
Finnish technology has practically no disadvantages, except for the moment when you need to transfer the mixture from one box to another. If you don’t want to tinker with aerobic compost, it’s better to build and concrete a compost pit in the ground.
Anaerobes will do their job longer, but without human intervention. This fertilizer has its advantages: it is more concentrated and needs to be applied less to the soil. During anaerobic decomposition of organic matter, all nutrients are retained, but it takes longer to mature.
For a purchased tank, you need to prepare a filler. Depending on how many people will use the device, more of it may be needed. In this case, it is better to immediately buy a larger waste storage tank. The body of the product is made of durable plastic and has an insulated seat. The only thing you will have to spend money on is compost accelerators.
Absolutely prohibited
There are several components that should never be thrown into the composter, as this risks not only poisoning the plants, but also clogging the soil.
- Pet excrement. Ideally, garden beds should be completely isolated from visits by pets. The excrement of your beloved cats and dogs contains a huge number of parasites, some of which are really dangerous to human health.
- Paper filters from air purifiers and vacuum cleaners. Various harmful substances accumulate in the fibers of this device, which take a long time to disintegrate in the soil and are of absolutely no value to plants. In addition, the filter absorbs all the toxins used in the creation of synthetic fragrances. This is not the healthiest addition to compost.
- Contents of dust containers. Household dust should only be thrown into the trash bin. It contains harmful chemicals that come from furniture, household appliances, deodorants and air fresheners. These substances have no place in natural fertilizer.
- Drywall. You can throw a little ordinary cardboard into the composter - and only if you shred it. Drywall is out of the question. This building material is saturated with toxins and is completely unsuitable for composting.
- Glossy magazine covers, paper with colored drawings or text. The use of printed materials as a component for compost will have to be abandoned. Otherwise, all the heavy metals along with the fertilizer will settle in the soil, making it unsuitable for growing healthy vegetables and fruits.
We recommend: How to remove cracks and squeaks in laminate flooring without disassembling the floor
Even in such a simple matter as arranging and filling a compost pit, certain rules and conditions must be observed. If you put only what you need into the composter, and not throw everything in a row, after the allotted time you will get an excellent natural fertilizer that will benefit both plants and soil.
Distance from the septic tank, toilet, cesspool and compost pit to the neighbor’s fence according to SNiP standards
In private houses, country cottages or at the dacha, the problem of drainage and sewage is solved by installing cesspools, septic tanks, street toilets, etc. on the plots. The construction of such facilities must be carried out within the framework of existing standards, which stipulate how treatment facilities should be installed, at what distance from fences, houses, water sources and other neighboring buildings. It is advisable not to break the rules, otherwise problems may arise with neighbors and supervisory authorities.