What are the benefits of fencing garden beds?
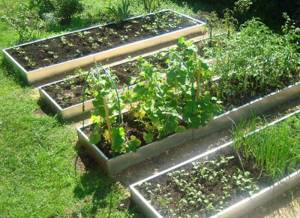
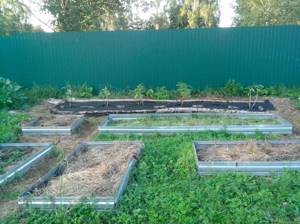
The practical benefits of a fence for garden beds will be demonstrated already in the first season.
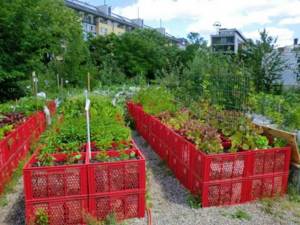
From an aesthetic point of view, places for planting seeds and seedlings of vegetable crops will look more well-groomed, noticeable, and expressive. They do not need to be periodically tidied up, deal with water leaks during irrigation, or maintain a horizontal plane on slopes.
From a practical point of view, there are also many benefits:
- fenced vegetable plots will have significantly fewer weeds than uncultivated areas;
- less physical effort will be required for manual weeding, digging, mulching, fertilizing and other work;
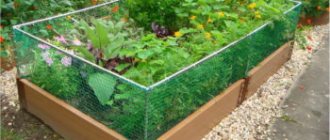
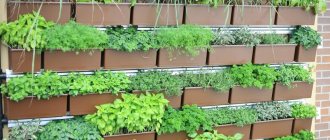
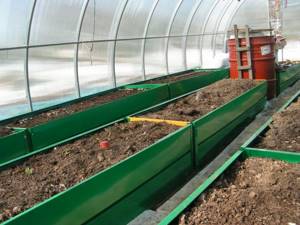
- It is more convenient to cover such structures with film; on high fences it is easier to attach arcs for a greenhouse in order to plant seedlings of vegetables and flowers;
- It is easier to do natural heating by creating a layered bed with biofuel for growing cucumbers, peppers and other vegetable plants that love warmth.
Fenced vegetable plots will have significantly fewer weeds than uncultivated areas.
Less physical effort will be required for manual weeding, digging, mulching, fertilizing and other work
It is more convenient to cover such structures with film
It is easier to do natural heating by creating a layered bed with biofuel for growing cucumbers, peppers and other vegetable plants that love warmth
Beds with sides: how not to make mistakes
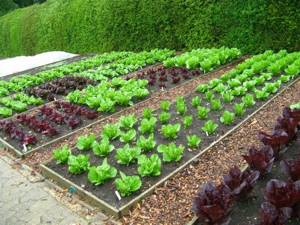
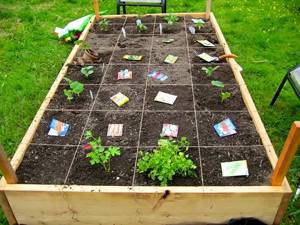
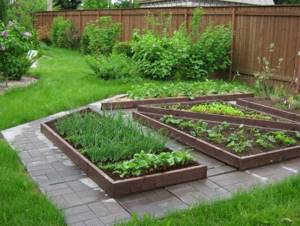
There are no strict requirements for what to fence with and how to arrange the beds at your dacha, but there are some important points that are worth paying attention to. Firstly, you need to choose the right height of the sides, since too high ones can block sunlight from entering. Secondly, the material that will be used must be dense and firmly installed - this will eliminate unnecessary water leakage during irrigation and prevent the soil from spilling onto the path. And the last important rule is that fenced beds must be of the correct geometric shape. This will help to plant the plants at an equal distance from each other and, by the way, will add aesthetics to the garden. Finally, the finished structure should look attractive and fit harmoniously into the surrounding landscape.
What are the functions of a garden bed fence?
Bed borders are a functional device. Their main purpose is to increase the volume of the fertile soil layer. The maximum effect is achieved by mulching the soil after watering, that is, covering the working soil with auxiliary materials, for example, tree bark, decomposed compost or inorganic mulch. Finally, such fences look attractive and can play the role of a full-fledged element of landscape design. They are also used to divide planting areas.
Practical experience shows that fencing for garden beds brings many additional benefits. Among the qualities of such a structure are:
- significant reduction in the appearance of weeds;
- light weeding, watering, fertilizing and other plant care;
- the ability to easily arrange beds in a greenhouse;
- there is no scattering of the fertile layer;
- neatness, beauty and aesthetics.
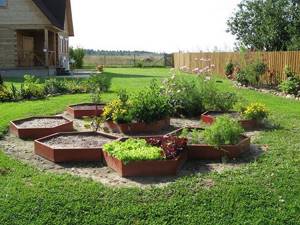
Obviously, the practicality of such structures will help any gardener grow anything without any difficulties. In addition, we can note the opportunity to apply a design approach and create beautiful living fences from flowers of various shapes.
Recommendations for arranging beds
Almost every person tries to fence garden beds with their own hands, but experience comes with time. Those who have decided to do something like this for the first time should listen to advice. First of all, you need to accurately mark the territory of the future garden bed. It is important to level the ground and fasten the edges. You need to pay attention to the material itself. Wooden products are most welcome in the arrangement of the structures described: the sides are very easy to connect together, and the structure for the beds will be moderately strong. The desired height and correct shape are also very easy to set. In addition, wood absorbs excess water, and in conditions of constant humidity there are practically no problems with leakage after watering.
How to make a fence for garden beds with your own hands
There are certain requirements for the walls:
- they should be low (height 10-30 cm) so as not to shade vegetable plants at the beginning of growth;
- neat - emphasizing the straightness or irregular, but attractive shape of the beds;
- dense - not allowing the fertile layer to spill onto the path or water to spread beyond the border of the zone for cultivating plants when watering;
- beautiful to fit into the overall structure of landscaping of a summer cottage.
They should be low (height 10-30 cm) so as not to shade vegetable plants at the beginning of growth

Neat - emphasizing the straightness or irregular but attractive shape of the beds
Dense - not allowing the fertile layer to spill onto the path or water to spread beyond the border of the zone for cultivating plants when watering
Beautiful to fit into the overall structure of landscaping a summer cottage.
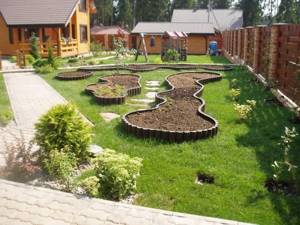
Fencing areas for growing vegetables can make a garden not only cozy, comfortable, well-groomed, but also original, maybe even unique.
The boxes with a thick fertile layer do not need to be dug up, so caring for the soil in them is the simplest - loosening with a hoe before planting seeds or seedlings.
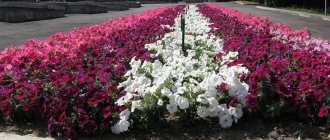
On flower beds and flower beds, borders made from living plants of the same species (rosemary, calendula, boxwood, hyssop and other low-growing perennial flowers, planted densely in 2-3 rows) look impressive, attractive, and stylish. Fences for areas with vegetables are also constructed from artificial and improvised materials - bricks, boards or wooden beams, stones, sheet metal, plastic, sawn slate and other construction waste. They can always be collected in the required quantities from nearby abandoned areas or bought cheaply in stores. Many summer residents, when asked how to fence garden beds inexpensively, answer unequivocally - with material from construction waste, cobblestones, a low picket fence and other items that can be found in construction dumps, on river shallows and in other places.
Available materials for fencing
You can use scrap materials that you have at your disposal to make fences.
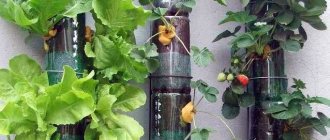
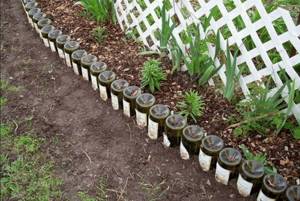
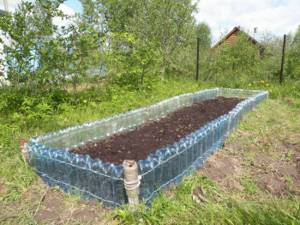
Plastic and glass containers
Plastic bottles are trash that constantly accumulates in any home. They can be reused as material for numerous crafts. There is an option to use them for the construction of borders. To do this, “one and a half” are dug into the ground with their necks no less than halfway. To make such a border durable and not fly away with the first wind, it is better to fill the bottles with sand or at least water. And to make the fence look like one whole, it can be painted.
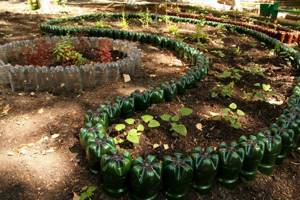
Such fences can have the most intricate shapes PHOTO: avatars.mds.yandex.net
Glass bottles do not need to be filled, they are already heavy. And they dig them in the same way, with their necks in the ground.
In the process of collecting material for such a border, it is important to protect your health PHOTO: 1000000diy.ru.
Plastic pipes
Plastic sewer pipes can also be used for borders. They, like bottles, are dug into the ground, and to strengthen the structure, you can fill them with the same soil. The result is a strong and durable fence.
The pipes can be cut lengthwise and installed this way PHOTO: 1.bp.blogspot.com
Car tires
Tires are another popular option for fencing flower beds and beds. They are cut in half and dug into the ground. Such a fence is purely decorative, so it is unlikely to be able to hold the soil. But here, too, you can use geofabric to hold it.
You can complicate the task a little by cutting the tires into strips and fastening them together PHOTO: roomester.ru
In addition, there is a short video course on modern fencing material: wood-polymer composite.
What kind of borders are in your beds? Maybe you can recommend some other materials for making them? Write about it in the comments, it's very interesting!
Discuss 2

DID YOU LIKE THE ARTICLE? Support us and share with your friends
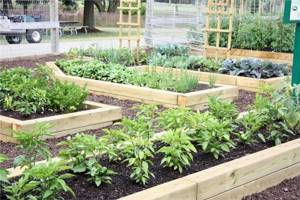
Wooden fencing for vegetable growing areas
Borders for beds made of wood are simple, familiar, and natural. Simple - because any wooden products for a summer house are a good design option. They are easily fastened with nails, screws, and glue. The pieces of wood are easy to assemble and just as easy to disassemble for moving to a new location.
It’s common - because there are a lot of wooden buildings around us.
Borders for beds made of wood are simple, familiar, and natural.
Naturally - because trees grow everywhere.
A fence for beds made of stumps, low logs of equal thickness or low wattle fence looks original. Most often, wooden border material for beds is a cut and unedged board that forms a capacious box without a bottom, into which all the necessary raw materials are poured.
You can make a box from individual panels, which are assembled from slabs, picket fences, old floor slats, clapboards and other types of lumber.
The shields are placed next to each other and secured with stakes driven in from the outside. This design can be easily disassembled and reassembled in a new location.
Wooden objects can be treated with protective impregnations against rot and insects, which will increase its service life significantly.
Until recently, it was believed that wood was short-lived and therefore impractical. But now wooden objects can be treated with protective impregnations against rotting and insects, which will increase its service life significantly.
Metal fencing for garden beds
A good option is considered to be metal walls for boxes made from worn sieves of the sieve frame of combine harvesters. Lightweight, strong, durable with many small holes for ventilation, they are easily cut with metal scissors to the desired size. Craftsmen who have a welding machine can easily weld a metal frame from scrap metal for a plant growing area from pieces of sheet iron of the required thickness.
Nowadays, construction stores sell special multilayer galvanized steel sheets with a polymer coating. Its height is 17 centimeters, and its length varies. It is convenient to make spacious boxes from it. Although its price is not cheap, considering its durability, it is worth buying. Walls for areas with vegetables made from it will last a long time.
Metal fencing is easy to install.
Metal fencing is easy to install. Places for planting seeds and seedlings of vegetable plants, framed by them, look neat, beautiful (you can choose a profiled sheet of different colors), and practical. But iron has a serious drawback - it is good thermal conductivity. The soil near the iron sides can heat up to a critical temperature, which will inhibit cultivated plants and dry out the soil. This disadvantage can be easily combated using any available means that have low thermal conductivity. You can line the inside of metal fences with cardboard, pieces of slate, and stones.
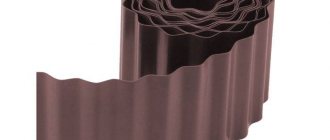
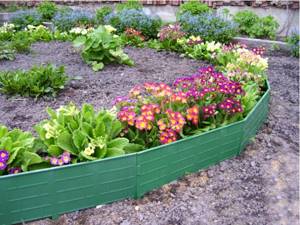
Plastic corner fencing for vegetables
A plastic fence for places where seeds and seedlings of vegetable crops are planted has a number of advantages. It will be light, durable, frost-resistant, resistant to sunlight and shock loads. You can buy curb tape in the store, which has an optimal balance of rigidity, flexibility, and high ductility due to which it can be bent at any angle. It is easy to install with your own hands and supports the geometry of beds, flower beds, and lawns well. For stability, it is secured with pegs driven in on both sides.
A plastic fence for places where seeds and seedlings of vegetable crops are planted has a number of advantages.
DIY beds made from plastic bottles
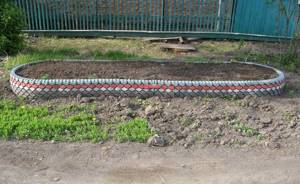
Plastic bottles are a widely used material at hand. If desired, you can easily collect them in sufficient quantities. The bottles are filled with any bulk material: earth, sand, small crushed stone, and then simply placed close together in one or several rows, in a trench dug along the perimeter of the bed, neck down. Plastic bottles can be used to make a permanent fence for a place with cultivated plants if they are laid horizontally on cement mortar. If you place plastic bottles on the beds with their bottoms facing out, the border will have an original multi-colored look. With the help of a rich imagination, you can realize even better ideas for crafts from plastic bottles for the garden with your own hands.
Garden bed fencing in different designs
Structures can be created from various materials and improvised means left over after repair or construction.
Blocks, bricks, artificial and natural stones, glazed and paving slabs, wood, car tires, polycarbonate, slate, sewer pipes and much more will be used.
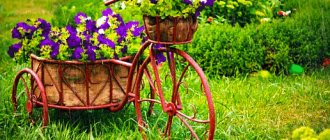
Original frames can be made from plastic or glass bottles, placing them neck down or in vertical rows.
The border for the beds is even created from tin lids and tape recorders. A fence in the form of a fence made from willow branches looks original and unusual.
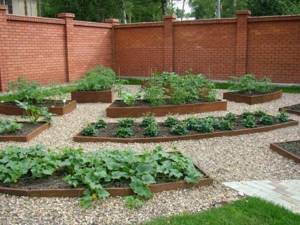
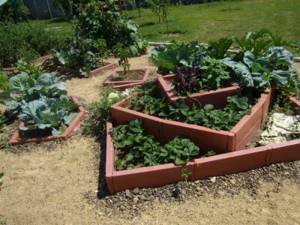
Brick border
Owners who have just finished building a brick house will be able to make stationary fencing for vegetable planting areas with their own hands from leftover bricks. Beds and flower beds framed with this building material will look like a single ensemble with a residential building. Brick can be dug in in different ways: on the edge at an angle; on edge in a row; The first row is flat, and on top of the solution the row is on edge. A decorative brick border largely depends on the imagination of the owners of the summer cottage.
A decorative brick border largely depends on the imagination of the owners of the summer cottage.
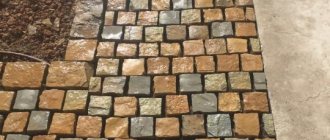
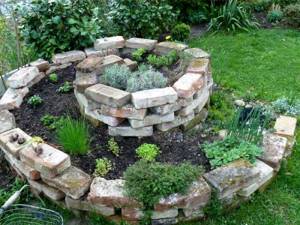
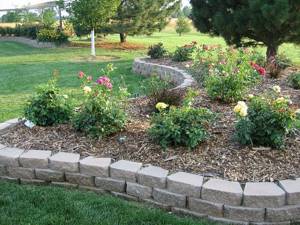
Natural stone - this is how you can inexpensively fence a place where you can grow vegetables in your dacha
You can find plenty of stones anywhere: on a river, on hillsides, in gravel pits. There are many options for making permanent stone curbs. The simplest and most affordable way is to fill the space between two mesh metal gratings dug around the perimeter of the box. Such a fence is called a pergon. In such a stone “bag” zucchini and tomatoes, cucumbers and beets will feel comfortable. And other vegetable crops that are grown in beds will be comfortable inside a natural, environmentally friendly fence.
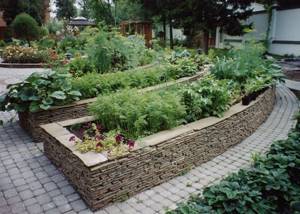
There are many options for making permanent stone curbs.
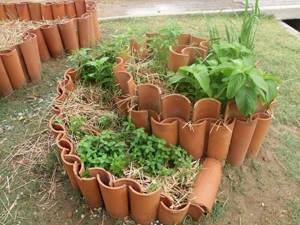
Wave slate fencing for garden beds
Wave slate, as a roofing material, has already gone out of fashion. It is everywhere replaced with corrugated sheets, different types of tiles, and soft roofing. But sheets of corrugated slate have become very popular among summer residents, who construct long-lasting, convenient, almost free fences and fences from pieces for areas where vegetables are grown. And if you decide: how to fence garden beds cheaply, then, perhaps, you won’t find a material cheaper than old wave slate. But first, the slate needs to be prepared for installation as a fence. Mark each sheet into pieces of the required size and saw them with a grinder. This work will not take much time. The process of fencing beds consists of the following steps:
- Marking the boundaries of future beds using strong twine and stakes driven into the corners. A trench 20-25 cm deep (on the bayonet of a shovel) is made along a stretched cord.
- Pieces of sawn slate of equal width are installed in the trench, leveled and slightly buried into the bottom of the trench by lightly tapping with a hammer.
- To stabilize the slate fence, stakes 0.5 m long are driven in from the outside to a depth of 30 cm. This creates a spacious box.
- For disinfection, the inside of the box is treated with slaked lime.
- The bottom of the box is lined with sawdust, dry grass and leaves. Then it is watered abundantly and fertile soil is poured on top.
- Next, you need to think about protecting the slate from direct sunlight, as it gets very hot in the sun and contributes to accelerated evaporation of moisture. If possible, slate walls should be watered more often. The buried part of the slate will become an insurmountable barrier against the attack of mole crickets.
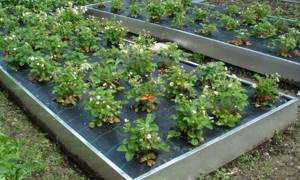
It is not difficult to build multi-tiered flower beds and beds from wave slate, on the tiers of which you can grow flowers, strawberries and other plants. Or you can fence off a small area of the garden in which to prepare compost from weeds and tops from vegetable crops.
Types and features of fencing
The fences used in the garden area are varied and differ in appearance, design, and materials. The main purpose of any option is to provide plant protection from weeds or flooding and crop separation. From an aesthetic point of view, fences are also important, because they allow you to properly organize the garden space and decorate the area.
Fences help maintain order in a summer cottage
For beds
Beds are present in many garden plots. To separate garden crops and ensure order in the dacha, you need borders for the beds. They can be made from various materials, but all designs are easy to make with your own hands. It is important to use high-quality and environmentally friendly materials. Otherwise, plants will not develop as efficiently as possible, because many artificial materials are unsafe for them.
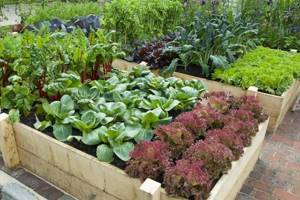
Wooden sides
Fences for plant beds are often made of wooden borders. This option is practical, easy to create and allows you to neatly divide the beds. The structures must have parameters equal to the parameters of the bed. Wooden products in the form of a box are made from boards with a thickness of 2 cm. The elements are fastened with self-tapping screws, treated with a wood preservative or painted. When choosing a material, it is best to give preference to larch, as it is more durable. Pine or other elements will also work, but processing is always necessary.

The sides prevent the beds from crumbling
Wooden fences are practical, environmentally friendly and simple, but have the disadvantage of fragility. Under the influence of moisture, ultraviolet radiation, and temperature changes, wood becomes cracked, deformed, or rots. Therefore, the boards need to be treated with antiseptics or painted.
Slate
Simple slate products are easy to make with your own hands if you already have the material. Old slate removed from the roof when replacing the roof is often used to create edges. The canvases are cut into long elements, the height of which corresponds to the thickness of the soil layer of the bed. The main advantage of this option is the availability of the material. The disadvantages are that old slate is very fragile and releases harmful components into the soil.
Slate strips are simply installed in loose soil and compacted
When creating sides, you need to additionally strengthen the slate elements with reinforcing angles or rods. They are installed along the length of the bed every meter; the rods seem to support the slate parts. The appearance of such fences is quite laconic; the structures can be painted with compounds intended for outdoor use.
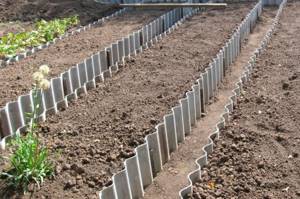
Metal fencing
Reliable fences for garden beds can be made from corrugated sheets or sheet metal with galvanized or polymer coating. The cost of such structures is high, but if such material exists, it is important to know its features. The sides are strips of metal that are fastened with special corners. A protective corner is also fixed along the upper edge, making the operation of the structure convenient, because the edges of the sheets are sharp.
Metal fences must be galvanized or coated with a polymer layer
Metal structures quickly heat up in the sun and contribute to the heating of the soil. This should be taken into account when using metal to separate beds.
Video: beautiful fences for garden beds, a selection of ideas
For bushes
Bushes of raspberries, currants or other crops need additional support, as their branches spread widely and lose their shape. For this purpose, fences made of wooden bars, PVC water pipes, metal and metal-plastic pipes are used. In any case, the structure consists of supports that go deep into the ground and provide stability to the fence. The branches of the bushes are supported using the upper part in the form of a hoop. This option is universal, in demand and easy to use.
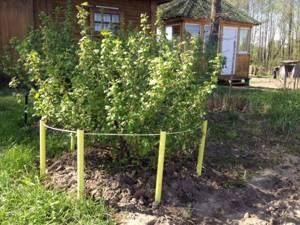
Fences support the shape of the bushes
Pegs and strong rope are often used as an easy option. Supports are installed in the ground around the circumference of the bush, and then the rope is pulled. The height of such a structure should be slightly less than half the bush. The structure allows you to raise the lower branches and make caring for the plant simple and easy.
The advantages of bush stands are as follows:
- preventing crop rotting, since the lower branches of the bushes do not touch the soil;
- ease of watering and caring for plants;
- more convenient harvesting;
- simplicity of designs from various materials;
- preventing the growth of bushes;
- the ability to form the required shape of the bush.
The disadvantage of this design is that it cannot be used for very voluminous bushes with heavy branches. In this case, more reliable options with reinforced supports and a square shape are preferable. Such products can be made of metal or wood, metal-plastic pipes.
Fencing front gardens and flower beds
A front garden or flower garden can be open or closed. In the first case, fences are not used, and in the second, a fence is necessary. At the same time, the design separates ornamental plants from the rest of the site and complements the landscape design of the area.
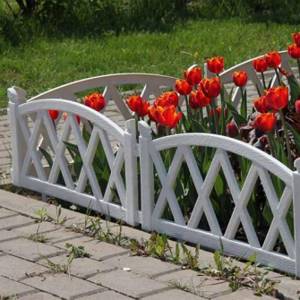
A small fence separates the flowers from the rest of the area
You can separate ornamental plants using a variety of wooden structures. A classic low picket fence is a universal option for any site. Metal fencing, which is made from strips of metal coated with a polymer colored coating, is also effective. Wrought iron fences for the front garden look beautiful, but are expensive.
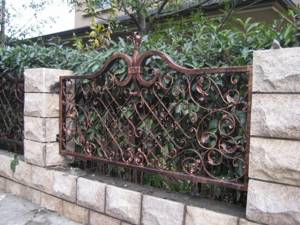
Forged metal fences easily combine with stone or brick
Any option for fencing a flower bed or front garden must be beautifully designed, because the decorative function is important when using such structures. The height is calculated depending on the size of the plants that need to be separated from the main area.
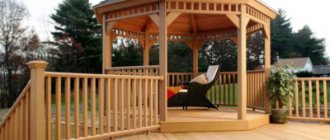
Supports for grapes
Grapes are often grown for decorative purposes. For this you need pergolas or horizontal trellises. Such structures can be in the form of a gazebo, bowl-shaped or arched. Wood is often used as a material for manufacturing, as it is environmentally friendly and easy to use.
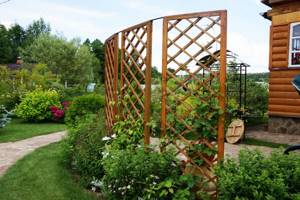
Pergolas for grapes are easy to make from wooden slats
It’s easy to make trellises from wood with your own hands, but when using metal elements you need a welding machine, fasteners with an anti-corrosion coating and other parts. Wooden elements treated with stain and varnish are fastened with nails or self-tapping screws, creating a structure of the required shape. In any case, the sizes of the trellises are selected depending on their location. It is possible that the finished gazebo on the site will serve as a support for the grapes.
Video: making trellises with your own hands
The general procedure for constructing a border for beds made of any material
The height of the fence depends on the purpose of the garden bed, as well as on the ease of caring for the plants:
- for fertile garden soil - 15 cm;
- for infertile soil - up to 30 cm;
- for potatoes and other nightshades - up to 40 cm;
- for compost with bioheating - up to 50 cm.
The recommended bed width is about 1 meter; length is arbitrary, taking into account the capabilities of the site and the preferences of the owners.
The sequence of actions when making a border from improvised means;
- We are clearing space for a vegetable growing area. We mark its boundaries using a cord and pegs, focusing on straight sides and right angles.
- We construct a strong, rigid box from boards or other material. To fasten them together we use self-tapping screws and a screwdriver, welding or a trowel.
- We line the bottom of the fenced area with crushed stone, gravel, pieces of dishes, stones, and bricks for drainage. Then we spread leaves, hay, and fresh grass in an even layer.
- We pour the prepared fertile soil into the box and level it. There should be no weeds in it. There should be 3-5 cm from the top edge of the curb to the leveled layer of soil.
- We plant seeds or seedlings of vegetable plants. Mulch with crushed bark of deciduous trees. The goal is to create an optimal microclimate and preserve moisture.
- If the box surrounds the lawn, then it is advisable to strengthen its bottom with a liquid blind area of water, cement and sand. The layer is small - up to 3 cm. For strength and beauty, bricks can be laid with a gap of 1-2 cm on the hardened blind area. Pour dry sand-cement mixture into the spaces between the bricks.
Many summer residents are categorically against the use of those materials for fencing garden beds, which are abundant in cities and towns: metal, concrete, brick. It is necessary to make borders from natural flowers, grass, stones and wood. It’s hard to disagree with this, but we shouldn’t forget about practicality either. The main thing is that it is useful, not harmful, contributes to high yields and is pleasing to the eye! Let's also not forget about the durability of borders and the ease of caring for plants.
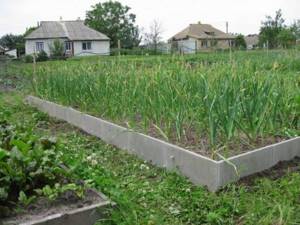
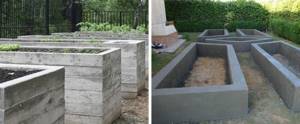
How to make a concrete bed
The work is divided into several stages.
Calculations and preparation
First, let's decide on the size of the future building by studying several recommendations:
- The minimum height of the bed on a mixed type of soil should be 25 cm. More is possible (preferably no more than 70 cm), but you should not build it below the structure. If the site is dominated by rocky, poor, too wet or poorly drained soil, then it is better to make the edge no lower than 30-35 cm. The height of the compost bed usually reaches 50 cm.
- The width of the bed should be from 40 to 80 cm. If you plan to grow large vegetables such as cabbage or eggplants in two rows, then it is better to increase the width to 100-120 cm. For one row, the optimal width is 50-60 cm. If the bed is one side borders the building (for example, it rests against the wall of a house or barn), then its width should correspond to the length of the arm.
- It is recommended to make the bed from 1 to 5 m in length. If desired, you can create a T-shaped, W-shaped and other complex structures. But we must remember that it should be convenient for the gardener to process the plants.
- It is not recommended to make the edge of the bed too wide (some people do this so that they can sit down). This will take up too much space, and the fence itself will look too bulky and will begin to attract attention.
Having decided on the dimensions, you can draw a plan for future buildings (with a reserve for formwork) and decide on the optimal composition of the cement-sand mixture. It is best to use so-called heavy concrete with reinforcement. Cement grade M400/M500 is suitable for this. Additionally, you will need aggregate (fine crushed stone or gravel) and washed river sand. Proportions – 1 (cement) : 3 (sand) : 3 (crushed stone).
You will also need to prepare:
- Reinforcement with a cross section of 6 mm. Welded mesh with cells 4.5x4.5 cm or 5x5 cm is also suitable.
- An electric drill with a nozzle for mixing mortar or a concrete mixer.
- Shovel and trowel.
- Clean water to create a batch.
- Boards, bars, plywood and other formwork materials.
- Nails for connecting formwork structures.
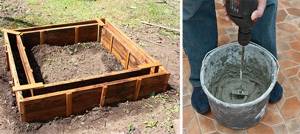
Construction of a bed
The algorithm for creating a concrete bed is extremely simple:
- Using a rope and pegs, we mark the location of the future bed.
- We dig a trench 15-20 cm deep along the perimeter. Place a layer of sand (about 10 cm) on the bottom and compact it well. This backfill will prevent concrete from cracking due to severe soil heaving. It is recommended to fill in sand if clay soil or black soil predominates on the site.
- We make formwork on both sides of the future sides. You can use old lumber, pieces of plastic, etc. The main thing is that the concrete does not leak out of the formwork, and the structure itself does not deform after pouring the solution. It is better to coat the inside of the formwork with any technical oil so that the concrete does not stick to the wooden structure.
- Mix the concrete and pour it in one go. After this, we immerse the reinforcing mesh into it. If the board is more than 20 cm, then two layers of reinforcement will be required (one is placed closer to the inner perimeter, and the other to the outer).
- After a few days (preferably a week), the formwork can be dismantled.
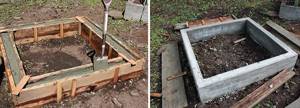
After this, all that remains is to sand down the uneven surfaces and finish the outer walls and ends.
To do this, you can use decorative plaster, create an imitation of natural stone, or simply paint the concrete. Some leave the beds unfinished, so they look no less stylish. Related publications: