Gladioli are a highlight in any garden, thanks to their bright and large flowers of unusual shape. On the other hand, gladioli are easy flowers to grow as they easily adapt to different types of soil. However, to enjoy summer flowering, you need to know whether you need to dig up different types of gladioli for the winter, when and how to do it.
Gladiolus is a perennial plant of the Iridaceae family. It is a very common genus, native to Asia, Europe and Africa.
Characteristics
Types of gladioli differ from each other in shape, size, color and appearance of flowers. It is a bulbous plant and is not grown from seed except for the production of new varieties. Its name comes from the Latin word "gladius", which means sword.
Gladioli in the garden
Gladioli bulbs in botanical terminology are called “corm”, or corm. Corm is a shortened and thickened section of the stem, surrounded by several layers of brownish fibrous sheaths. Every year a young corm is formed, drawing nutrients from the old one, which then dies.
The stems of the plant are erect, up to 1 m high, densely surrounded by leaves, long, leathery, with a slightly pointed end, bright green in color.

Gladiolus inflorescences
The fragrant spike of the gladiolus inflorescence consists of large, in most species, one-sided flowers that are bisexual. Each flower has two leathery green bracts. The sepals and petals are united into a tubular structure. The stamens are attached to the base of the funnel-shaped perianth. The color of the flowers varies: from white, yellow, pale pink to ruby red and purple, sometimes multi-colored, as in the case of hybrid varieties.
Growing gladioli
Caring for gladioli is quite simple. When creating comfortable conditions for plants, they will generously reward gardeners with luxurious flowers.
Gladioli in pots
What to pay attention to:
- Landing place. Gladioli love places in full sun and protected from the winds;
- The soil. They prefer moist, loose, well-drained soils rich in organic matter;
- Watering. It is carried out regularly during the flowering period and throughout the summer season (about twice a week). However, you should avoid getting moisture on flowers, even those that have not yet bloomed. The optimal method of watering is in grooves dug next to the plant to a depth of 5 cm;
- Feeding. Periodic feeding is required with complex fertilizers for flowering plants, diluted in water for irrigation. It is preferable to feed before flowering.
Important! During the first phases of growth, watering should be more abundant; after the first shoots appear, the amount of water for irrigation decreases.
Another feature when caring for gladioli is to remove weeds in time, as they take away some of the nutrients intended for the flowers.

Bouquet of gladioli
If gladioli are cut to make bouquets, it is better to do this when 2-3 blooming flowers appear. Cutting time is early in the morning or evening. It is better to make a diagonal cut, leaving 4-6 leaves on the stem remaining in the ground. Leaves are important for the proper formation of corms.
Weather for cleaning
Gardeners are advised to remove flowers and dig up bulbs at a time when the soil is not wet and does not stick to the planting material in a lump. Please note that the soil should not be dry. The weather with sun and no rain is considered optimal for digging up gladioli.
Important tips for cleaning
After flowering, at least a month should pass. This is a guarantee that the bulb will ripen and receive all the nutrients. If the plant is affected by a fungus, it is recommended to wash the planting material in a special solution.
- Dark varieties of gladioli are dug up first. These are plants with flowers of purple, black, cherry and other shades.
- When harvesting, the last thing to do is remove the baby plants from the ground.
- When digging, do not use a shovel so as not to injure the plants. It's better to use a pitchfork.
- You should not pull out the bulb that appears from the ground with your hands or pull it out. So, it is easy to damage the planting material and lose the babies.
Digging process
When digging up a gladiolus, the plant is dug in from all sides so as not to touch the root system. We pull and carefully shake it off the ground. After that, we raise children who seem more resilient.
If, when digging up the bushes, the stems of the gladioli are still green, then they are brought into the room and laid out on plastic film. In a few days, all nutrients will pass into the root system.
If the stems are yellow, then cut them off immediately, leaving only a 1 cm tail.
Video “How to dig and store gladioli”
Processing the dug up bulb
How to properly prepare gladioli bulbs for storage? After the bulb is dug up, the stems and roots are cut off, and the old bulb is removed. The planting material is washed under the tap to wash away any adhering soil. Clean gladioli bulbs without detergents.
- It is necessary to treat the planting material with a solution of foundationazole or a slightly diluted solution of potassium permanganate. Immersion in the antiseptic solution should take at least 30 minutes.
- When affected by parasites, gladioli bulbs are burned outside the garden plot.
- The resulting onions are dried for about a month at room temperature, laid out on a cloth in 1 layer. You can additionally dry them with a hairdryer at low temperature.
- At the time of sorting, only the healthiest bulbs without damage to the scales are selected from the children. They will grow faster and bloom.
Ideal time to harvest bulbs
What to do next with the plants when the gladioli have faded? Unfortunately, most species are not frost-resistant and must be dug up. Climatic growing conditions determine when to dig up gladioli. In general, you should be guided by the air temperature and the time limits of the plant’s flowering period.
Gladioli planting and growing
The optimal time for excavation in the temperate zone is mid-September, even if the leaves are still green. In this case, about 6 weeks should pass after flowering, the ambient temperature drops to approximately 10°C.
Leaving the bulbs in the ground for too long can lead to them becoming infected with various diseases and possible attacks by pests.
Important! If the leaves become covered with yellow and brown spots and dry out early, this may indicate that a fungus has attacked the plant. Then urgent digging is necessary, while there is still a chance to save it.
Weather for cleaning
You should dig on a dry, sunny day to keep the soil dry. Then the bulbs are easy to clean, and the likelihood of damaging them is reduced.
Step-by-step digging process
Digging is the main procedure that should be done with gladioli after flowering. When the time comes, you need to take a shovel or pitchfork and perform the following actions:
- The blade of the working tool must be immersed in the ground carefully, trying not to tilt it so as not to cut the bulbs;
- Dig up the plant and carefully remove it from the soil by pulling the stem. Shake off excess soil. If soil is stuck, it is recommended to rinse with warm water;
- Prepare an oilcloth or polyethylene film to lay out the dug gladioli on it. This way you can detect all the bulbs, including the babies;

Dug up gladioli
Important! When the stems have not yet turned yellow, the plants are left for 3-5 days on oilcloth, so that the remaining nutrients from the above-ground parts of the gladiolus migrate to the corms.
- Remove the old bottom of the corm. If it is ripe, then this is easy to do. Otherwise, let sit to ripen and dry;
- Trim roots;
- Wash and treat the bulbs with a strong solution of potassium permanganate (2-5 g per 10 liters of water). Keep in solution for at least half an hour.
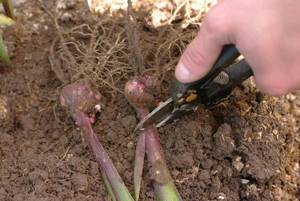
- Then the stem is trimmed with a sharp pruner. You can leave no more than 1-2 cm so that thrips, possibly present on the yellow stem, do not move under the scales of the bulbs, where they can safely survive the winter.
Carrying out work on the variety and region of germination of gladioli
The time it takes to dig up gladioli can vary from days to weeks to months. It is recommended to remove the bulbs no earlier than the onset of cold weather, so that the material hidden in the ground can accumulate the maximum of useful substances necessary for full growth and development next year. Neglect of the rules on the part of the gardener can lead to the death of the material during storage, minimal germination, lack of flower stalks, and a decrease in the shape and saturation of flowers at the beginning of flowering.

To carry out the work of digging flowers on time, you should follow 7 simple rules that allow you to determine the readiness of the bulbs for harvesting:
1) Bulbs receive maximum nutrients from the moment the stems and leaves lose elasticity. According to the observation of flower growers, a shovel for removing bulbous crops from open ground should be prepared when the tops are completely dry. To speed up the process, in order to have time to dig up the flowers before frost, the top part of the plant is cut off, leaving the bulb in the ground for 7 days. The trick allows the bulb to absorb the maximum usefulness necessary to begin the growing season in the spring, immediately after planting in a flowerbed or garden bed.
2) The variety of gladioli also plays an important role when digging up bulbs using a fork or shovel. From the moment of flowering to the removal of material from the garden bed, at least 30 days must pass. For some varieties, 1 month will be quite enough, for others - from one and a half to two months.
3) Young bulbs grown independently from children do not need to be dug up early. Regardless of the weather, removing material from the beds is recommended 2-3 weeks after the bulbous plants mature. During this period, the plants will have time to prepare, absorbing maximum usefulness and catching up with the perennial bulbs in size.
4) Dark bulbs are always dug up before light ones. Varieties that bloom with purple, blue or scarlet flowers are removed from the soil 14-20 days earlier than white, yellow and pale pink ones. The reason for the acceleration of the process is capriciousness and lack of resistance to bacterial diseases. Gladioli of rich tones survive changes in temperature worse, when a hot climate gives way to a cold one.
5) Firstly, adult bulbs are removed, which endowed the grower with beautiful buds and flowering throughout the growing season. The last ones left in line are bulbous crops that were unable to form flowers, having accumulated a maximum of useful substances in the germination material. If next year gladioli are again unable to form buds, the gardener should think about purchasing new planting material that is not susceptible to diseases and pests.
6) A month before digging, it is recommended to add nutritious organic matter to strengthen the planting material and saturate the bulb with the elements necessary for growth and development. After removing the flowers, the soil is dug up, restoring fertility with the help of green manure.
7) It’s worth paying close attention to the hydrometeorological center’s forecasts a week in advance. It is necessary that the soil is completely dry, and that the weather remains sunny and dry on the planned day.
Taking into account all the criteria for digging up gladioli, bulbous plants should be dug up no later than October 20, even if you live in a warm region of Russia, Ukraine or Belarus. When choosing a suitable favorable day, you should take into account the peculiarities of temperature indicators in order to prevent frostbite of the bulbs, the appearance of bacterial diseases and even rotting.
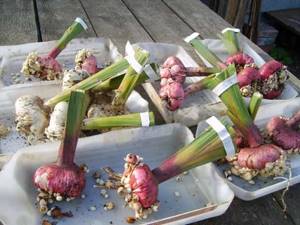
The work schedule for removing flower plants from a personal plot is determined according to the climatic characteristics of each region. Excavation periods can vary from several weeks to one month.
1) In the southern corners, namely: the Krasnodar Territory (Kuban), the Rostov region, the Caucasus and the Crimean Peninsula, agricultural technology is carried out slowly. Weather conditions allow you to delay the removal of planting material for storage for 2-3 weeks. Work is postponed until temperatures drop so that the bulbs can absorb maximum usefulness due to the drying of the tops.
2) In the Moscow region, Moscow region, Ryazan and Yaroslavl regions, digging up gladioli in 2021 is carried out from mid-September. Removal of the bulbs is planned from the beginning of the cold snap, until the sunny days give way to cloudy weather with heavy rains.
3) In cold regions, where the air temperature is not stable, the summer is short, and the autumn-winter period is long, they arm themselves with shovels at the end of August - beginning of September. The rule applies to flowers that grow in the Urals, Leningrad region and Siberia.
It is worth planning a favorable day for digging up gladioli bulbs in advance, when the temperature drops to 10-12 degrees Celsius. The set date will allow you to navigate without missing a moment.
Which gladioli are not dug up in the fall?
When to dig up daffodils after flowering
Sometimes you can find gladioli on sale, but digging them up, according to rumors circulating among gardeners, is not necessary. If you buy such gladioli, how to store and when to dig up will not be a problem. However, this is not always true.
Miniature varieties with small flowers are often considered winter-hardy. This is a misconception. All hybrid varieties of gladioli cannot tolerate Russian winters in the ground.
Only some types of gladioli can be frost-resistant. There are practically none of them on sale.
Frost-resistant types of gladioli:
- Tiled (Gladíolus imbricatus). In the temperate climate of Russia it can be grown without digging;
- Sowing (Gladíolus segetum);
- Common (Gladiolus communis);
- Byzantine (Gladíolus byzantinus).

Gladiolus imbricatus
As for the last three, although they belong to hardy species, in Russian conditions there is no guarantee of their successful wintering without digging.
When to dig
Bulbs are dug up no earlier than a month from the start of flowering. The timing of digging depends on the time of planting flowers in open ground in the spring. In case of late planting (for various reasons), flowering will begin a little later. That’s why they focus on the timing of harvesting from the moment of flowering. So, if the flowers began to bloom in August, it is necessary to dig up the bulbs no earlier than mid-September, maximum until October 7-10. The timing is tentative, again it all depends on weather conditions.
Why can't you dig late? At the end of September - beginning of October, the nights become cold, despite the absence of frost. The bulbs cool down in the cold soil and contract fungal diseases. In addition, in cold weather, unopened buds are unlikely to open. It’s better to cut the flowers, put them in a vase, then the gladioli will delight you with their flowering at home for another 1.5-2 weeks.
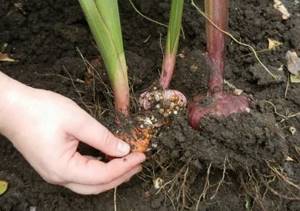
Preparation for storage
After harvesting gladioli in the fall and processing the tubers, proper storage will ensure their successful spring germination. Preparatory activities are carried out in advance.
Drying and sorting tubers
Drying is carried out in two stages:
- The tubers are placed for 7-12 days in a well-ventilated place at a temperature of 23-28°C. They are turned over twice daily to ensure even drying. This is a very important process on which the health of the plant and the germination of the bulbs depend. Sick and damaged specimens are rejected and immediately burned;
- At the next stage, the storage temperature drops to 18-20°C, so the tubers are aged for a month.
Important! When drying is carried out in an apartment and the temperature cannot be adjusted, the minimum holding time is a couple of months.
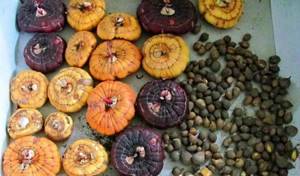
Various gladioli bulbs
Finally, the corms are cleaned, but the outer, tight-fitting scales are not removed, especially from the children.
The corms are then sorted. Children are placed in paper bags. Large bulbs are placed in cardboard containers, preferably without allowing them to come into contact with each other. You can also sort by placing large and medium-sized corms in separate boxes. If a second layer is placed, then after laying the newsprint. Sprinkling with ash and placing peeled garlic cloves in a box is allowed.
How to properly dig up gladiolus
To dig up gladiolus bulbs you will need:
- garden trowel;
- gloves;
- gardening scissors;
- plastic basket or box for collecting seed;
- small container for children.
Step-by-step instructions for digging up gladioli for the winter:
- Put on gloves, step back 10-15 cm from the base of the plant bush and dig a ditch with a shovel.
- Grab the bush with one hand, and with the other hand dig deep under it so as not to touch the bulbs.
- Take out the flower and lightly shake its roots off the ground.
- Inspect the hole - there could be children left in it. Collect them in a separate container for small onions.
- Inspect the stems. If they are still green, they should be left for several days so that they have time to transfer all the nutrients to the bulb. If they have already turned yellow, then cut them off with garden shears so that a stump no longer than 15 mm remains above the bulb.
- Trim the roots, leaving only 2-3 cm. Remove the old bulb by pressing on it with your thumb.
- Sort through the material and destroy all diseased and damaged bulbs. They will not be able to survive until spring, but will serve as other sources of infection. Place healthy adult bulbs in a basket or box, and baby bulbs in a small container.
The collected material is ready for further processing and preparation for winter storage.
Ways to store bulbs at home
When the corms are prepared, you need to decide how to store gladioli in winter. There are several ways to preserve bulbs until planting in the spring.
Important! Necessary storage conditions are periodic inspection of the bulbs and removal of spoiled ones. If they are in an accessible place - monthly, otherwise - at least 2 times during the winter.
Optimal conditions for storing gladioli:
- temperature – 3-6°C;
- air humidity – within 65-80%;
- lack of light.
When humidity is low, corms can dry out excessively by spring. In this case, they are soaked before planting.
Timing for removing gladiolus bulbs from the ground
The first pitfall in terms of organizing storage, which many people stumble over. If you carefully review all the information available on the Internet, it is impossible to find a definite answer to this question. Some authors orient the reader to the second half of September, others to the middle, or even the end of October. The most interesting thing is that each of them is right in their own way.
So what should you be guided by? Common sense and knowledge of the developmental features of gladiolus. No third-party advisors will help with this if they have no idea about the local climatic conditions and the specifics of the site.
You cannot dig up gladioli for storage earlier than a month after cutting the flowers. Otherwise, the tubers simply will not have time to ripen. But it’s also good to keep the bulbs in the ground at sub-zero temperatures, since they will freeze and will be unsuitable as planting material.
And here there are many nuances that need to be taken into account:
- If, for example, the daytime temperature is +5 ºС and the night temperature is -3, this does not mean that there is a risk of freezing of the gladiolus tubers. A drop in the thermometer below zero only indicates that a period of frost has begun. But this only applies to the surface of the soil. When planting in spring, it is recommended to deepen the bulbs by 3 times their height, which is at least 10 cm. And at this level, the average daily temperature is unlikely to drop below +2. It turns out that there is no need to rush too much with cutting flowers.
- There are quite a few varieties of gladioli, and all of them, among other things, differ in flowering time. By the way, this is also influenced by the climate in the region, the composition of the soil, the agricultural activities carried out and a number of other factors.
- It’s also not worth relying on someone’s many years of experience. No matter how useful it may be in general terms, it does not take into account absolutely everything. Especially those surprises that the weather can throw at us. Which, by the way, is what she has been doing all the time lately.
What to do? Study the long-term forecast from local weather forecasters and focus on the period when stable frosts on the soil are expected, and significant ones, at least minus 4 - 5. About 30 days from this date, you need to cut off the last gladioli flowers, no later. And after a month, begin preparing them for winter storage.

How long does the onion last?
If ideal parameters are provided, the tubers can be safely stored until spring planting and can even last for another year. But the healthiest plants will grow from them if stored for only one winter season.
In the ground
The method is not suitable for cold climate zones; it is more suitable for southern regions.
Before storing gladioli bulbs in the ground, you should choose an area that should not be flooded and where the soil has a loose structure.
A hole of 0.7 x 0.8 m is dug in the soil, and containers with prepared bulbs sprinkled with sawdust or sand are placed there, which should not be wet. Fill the containers with dry leaves or grass, cover them with polyethylene film and cover them with soil.
In bags or stockings
If you have a cool, dark room in your house, it is convenient to store the bulbs in synthetic stockings. This will provide them with open access to air. Stockings filled with tubers are tied and secured to the wall.

Corms in a stocking
On the balcony
A closed loggia or balcony is a suitable place to store tubers. Meanwhile, in frosty weather you cannot do without insulation. To do this, containers with gladioli are wrapped in blankets.
In the basement or cellar
There are good conditions for keeping corms in a basement or cellar, but it is important to follow a number of rules:
- do not place the bulbs near vegetables and fruits, because the air humidity there may become excessive;
- drawers are installed on shelves or grates to ensure maximum possible ventilation;
- the basement or cellar should not be too damp; it is better if ventilation is installed there.
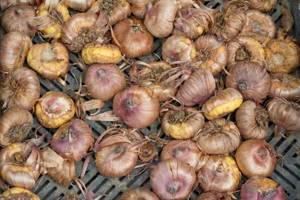
Gladiolus bulbs in storage
In a refrigerator
This method of storing gladioli at home in winter is suitable in the absence of a place with optimal characteristics. If there are a small number of bulbs, each one is wrapped in a paper sheet and placed in a fabric bag. The best storage location is away from the freezer.

Storing bulbs in the refrigerator
Why do you need to dig up gladiolus bulbs for the winter?
Not all bulbous plants require autumn digging; many crops successfully survive the winter in natural conditions. But as for this flower crop that we are talking about, it is imperative to dig up the bulbs ! This is especially true for regions with cold winters (Moscow region, Siberia, Ural). Why do you need to dig up gladioli for winter storage? There are a number of serious reasons for this. So, if you do not dig up the gladiolus bulbs, then:
- They will most likely freeze out in sub-zero winter temperatures.
- It will not be possible to sort and reject affected, diseased bulbs or to treat them. Because of this, they can infect all healthy plants next season.
- Even if the onion does not freeze in winter, spring thaws can easily cause it to rot and die.
- Since the bulb grows overgrown with children during the growing season, it will not be possible to separate them in the ground and plant them separately so that they turn into a full-fledged corm.
- They can become easy prey for mice or other rodents.
- Also, if they do not freeze and rot, they will still weaken and flowering in the next season will be sparse (if at all).
Bottom line: you can not dig up corms only in the southern regions, where in winter the temperature does not drop below 0 degrees . In this case, you just need to trim the leaves and stem, and then mulch them with hay, rotted sawdust or spruce branches.
However, even in this case, it is recommended to remove the bulbs!
Treatment of tubers against diseases and pests
Gladioli are susceptible to diseases and are often attacked by harmful insects. Bacteria and fungi can be found in the soil, and, for example, thrips live on the plant in the summer, moving to the bulbs in the winter. This necessitates the need to process the tubers before storing them.
Autumn disinfection of gladioli bulbs
Autumn disinfection consists of immersing the bulbs in a strong solution of potassium permanganate, which can be replaced by treating with a fungicide.
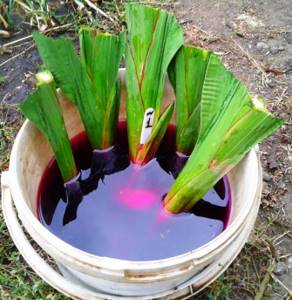
Soaking gladioli in potassium permanganate
To carry out prevention against harmful insects, after potassium permanganate or fungicide, the bulbs can be dipped in a solution of karbofos or another insecticide.
NO PESTS!
Most often, gladioli are affected by bacterial diseases, namely thrips. They feed on the juice of the bulb, making the planting material soft and lifeless in a short time. To avoid the death of the plant, during storage it is recommended to place garlic cloves between the gladioli. Its aroma will repel pests, making the flower crop protected.
An alternative to garlic protection is paraffin. The bulbs are dipped in a hot solution so that the surface receives an additional layer of protection throughout the winter. At the time of planting, the waxes are cleaned by hand, and the material is planted, following the recommended pattern.
Another protection option, but more expensive, would be store-bought Zineb or analogues of this product. Each bulb is dipped into the solution, dried and stored in plastic boxes or plastic bags with holes for ventilation.
Pest damage during storage
The main diseases that develop during storage of gladioli are associated with rotting of the corms. Almost all pathogens are resistant to low temperatures, but they do especially well in high humidity.
Important! For successful storage of bulbs, it is necessary to protect them from high humidity, sudden temperature fluctuations and contact with diseased planting material.
Therefore, periodic inspections are required, during which rotten and damaged specimens are removed. If they are not culled in time, neighboring corms will quickly become infected. The presence of peeled garlic cloves in a container with gladioli will also help fight harmful microorganisms due to their bactericidal properties. They need to be replaced with fresh ones every 2-3 weeks.
Timely digging and following simple storage rules will allow you to plant healthy and strong bulbs in the spring. They will grow into magnificent gladioli, which will decorate the garden with their bright blooms and, when cut, will add charm to the interior of the room.
Rules for harvesting bulbs
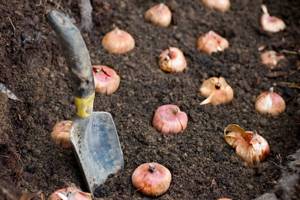
To keep the tubers safe, it is important to know how to dig up gladioli. They must be removed very carefully. The shovel is buried in the soil, retreating 15-20 cm from the bush to avoid damage to the bulbs. For safety reasons, many gardeners prefer to remove flowers using a garden fork. The flower is carefully pulled out by the green mass with the tool immersed in the ground.
As soon as the entire bed has been dug up, the green part of the plants is cut off, leaving stems no more than 2 cm high. This measure will protect them from possible infection by thrips. Next, the material is distributed by size, grade and, if necessary, excess soil is removed. Re-picking the bulbs does not in any way affect their ability to survive the winter, so many gladioli lovers do not take this point into account.
It is imperative to remove the roots from adult tubers, as they contribute to the evaporation of moisture. It is also necessary to remove the mother bulb, because its scales may contain thrips or spores of various infections that can infect the entire flowerbed next year. Young onions grown from children are freed from the roots, leaving only 1 cm of length.
When sorting babies, you need to separate the largest of them for storage and those that do not have noticeable damage to their scales. This material will be preserved better than others, and will bloom faster next season. After this, the prepared tubers are washed under warm running water to completely remove any remaining soil. Cut leaves, as well as old and unhealthy bulbs, are taken outside the site and burned.


