The Great Roman Empire left humanity a legacy not only of an aqueduct and baths. Great aesthetes and masters of landscape design, the Hellenes were proud of their decorative places - topia, topiaries, or skillfully trimmed tree and shrub compositions.
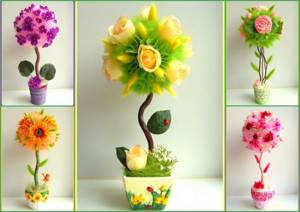
Modern topiary is a miniature that imitates a neatly trimmed tree. The compositions decorate the interior, formed in absolutely any style. They create a miniature topiary with their own hands from paper, fresh flowers, bird feathers, beads, rhinestones, coins, and even coffee beans.
The meaning of the European floristic tree of happiness, as topiary is called, is not only decorative. The miniature symbolizes wealth, fertility and strong spirit, pouring out the energy of happiness. A small tree tends to enhance the energy potential of the entire house, no matter in which room it is installed.
Manufacturing technique
In European countries, it is customary to give topiaries for any occasion - for weddings and name days, housewarming and New Year. Friends are given a miniature tree for no reason at all, but from the bottom of their hearts, when paying another visit. Moreover, all crafts are made by hand.
Topiaries are quite simple to make. Mini-trees consist of three parts - a crown and a trunk, fastened together and installed in a container. Pots, stands or baskets of various shapes are used as a base.
The crown can be round, oval, heart-shaped, letters or numbers. But most often they make topiary with a spherical crown.
The trunk is a strong thick wire or branch entwined with twine, bright floral ribbons or colored plastic. In some cases, a thicker branch is used as a trunk. The bark is removed from it, etched with stain and varnished.
How to make topiary from natural materials and moss with your own hands?
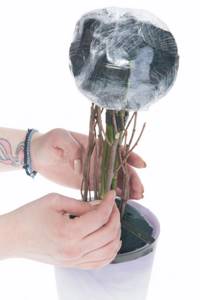
1. Topiary base. First you need to decide on the size and number of balls. I decided to make three, but there may be fewer (depending on the composition). Classic topiary with one crown ball. We choose a suitable pot, basket or any other base into which our tree will be attached. The diameter of the pot should not exceed the diameter of the crown ball.
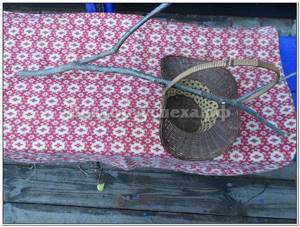
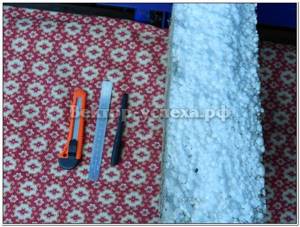
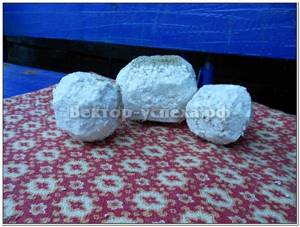
2. Crown ball Having decided on the dimensions, cut out the future crown from foam plastic using a paper cutting knife.
We outline the dimensions of the future ball.
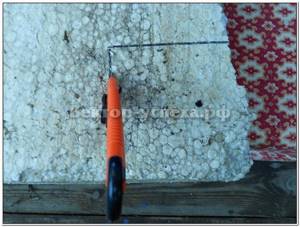
Cut and shape into balls.
Since foam plastic crumbles and becomes magnetic when cutting, it is better to do this outdoors.
Next you need to wrap the balls with threads or strips of paper to increase the adhesive surface.
Themed decor
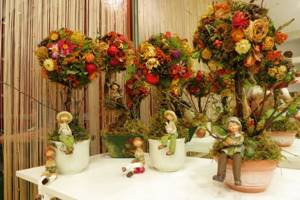
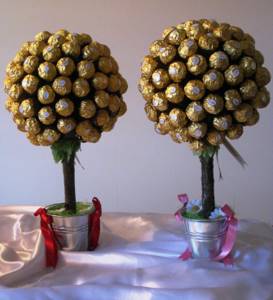
Ideas for topiary can be varied and fantastically beautiful, reflecting all kinds of artistic ideas of the author, and most importantly, created with your own hands. For example, when setting a festive table, paper mini-trees decorated with sweets, fresh flowers or fruits are used. Themed topiaries are made for the New Year's table. Their crown consists of cones, organza, satin ribbons, and artificial flowers.
Contrasting shades of blue, green and red in the decorative elements of topiary are perfectly emphasized by silver and gold threads. And flowers or figures in pastel colors will wonderfully set off the shiny elements in the topiary crown.
It is important to come up with a theme and choose beautiful material. The miniature should reflect its purpose and express the idea that prompted its creation. Shells, feathers, strings of beads and small coins allow you to create delicate, love-filled mini topiaries. Coffee and cereal beans, artificial flowers, lace and organza are suitable for creating compositions designed to decorate the kitchen space.
For a classic, gray-toned home interior, a topiary made from satin ribbons in blue or cool blue shades is perfect. For rooms decorated with sunny tones, compositions in dark colors are made.
Decorative trees in the interior of the house
This decoration will look original in the interior of any room. With such thoughts I crossed the threshold of a cozy home. Another cultural shock awaited me inside. The green fairy tale migrated from the garden to the rooms. Mini-trees and bushes of various shapes grow in pots. They are everywhere: in the living room, in the kitchen, in the bedroom. Indeed, topiary organically combines with all styles of room decoration. Here I found 10 detailed master classes on making topiary with your own hands.

Topiary art also involves the production of artificial decorative elements. This is already for those who are engaged in handmade fashion, which is now fashionable. Nowadays the following decorative decorations are very popular:
- tree of happiness,
- coffee tree,
- New Year's topiary.
There are a lot of options, you just need to use your imagination and create. They make such beauty from scrap materials: flowers, fabric, coffee beans, lace, rhinestones, etc. Each master of applied art has his own secrets and creative discoveries.
Having finished my coffee, I hurried home. I will not hide: my soul was slightly tickled by a feeling of envy. Good, of course! I really wanted to have such a topiary fairy tale in my own home. I firmly decided that I would definitely get a green trimmed tree. To begin with, I’ll make myself a coffee topiary, a photo of which I’ll post just below.
Details and elements
The trunk of a mini-tree plays not only a load-bearing role. In general terms of the composition, the trunk should be kept in the same spirit, both with the base and emphasize the splendor of the crown. Therefore, the trunk must be given appropriate attention - the material for its finishing must be carefully selected. If a bitch is chosen, then the tone of the stain with which it will be impregnated and matte or glossy varnish is selected. The coverage depends entirely on the type of composition.
The base can be of various shapes and made from any material - a small ceramic flowerpot or a fancy-shaped glass cup. In some cases, topiaries are placed in baskets, such as decorations for the Easter table.
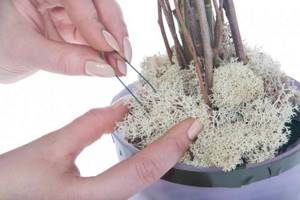
All parts are firmly attached to each other. The crown is glued, and the trunk is fixed in the vessel with pieces of foam plastic and filled with alabaster for strength. It should be remembered that alabaster hardens very quickly. Therefore, the consistency of the gypsum solution should resemble liquid sour cream. Then it will be easier to work with the material.
The crown is fixed to the trunk only after the gypsum solution has completely dried. During this time, the crown is made. To form the crown, use hot glue to secure the flowers, pins and skewers. After which the topiary is finally assembled.
Crown made of natural moss
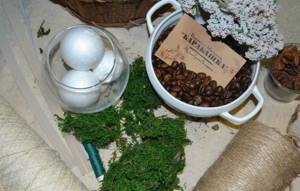
- Medium diameter foam ball
- Natural moss
- Jute twine
- Thin green thread
- Wire
- Hot glue gun
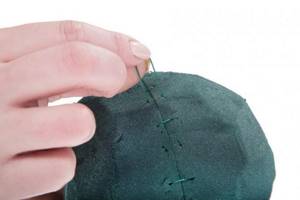
Using a well-heated gun, we apply glue to the ball and, until it hardens, apply a bunch of natural moss.
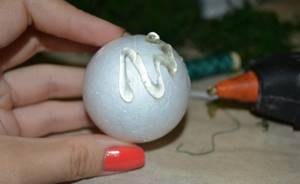
Tip: apply the glue gradually so that it does not dry out. They applied it, glued it, stuck it on, and so on all over the ball.
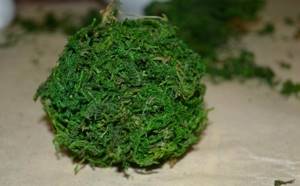
When the ball has become completely green, roll it in your hands so that the moss adheres more tightly to the foam.

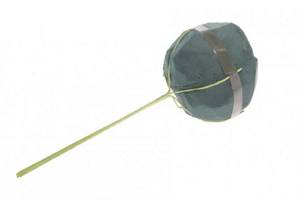
We take the wire and make a stem. We wrap twine around the future stem, sometimes fixing it with glue.
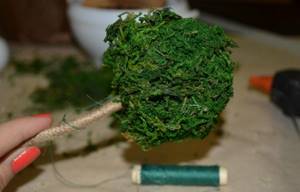
We tie a green thread to the end of the wire and insert the stem into the crown.
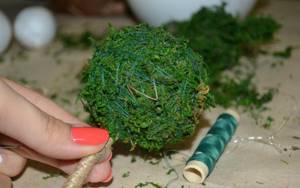
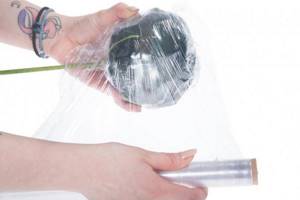
We wrap thread around the crown of the tree. This is necessary so that the moss does not fall off.
The thread should be as similar in color to the moss as possible (in the photo the color is distorted due to the flash).
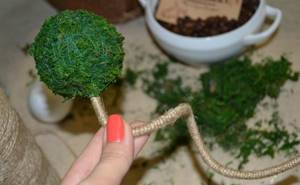
We twist the stem into a spiral to make it look more elegant.
Our first crown is ready.
Festive topiary
Topiaries are made for the holiday and as a decorative decoration for the interior of rooms. For example, interesting ideas for decorating a children's room for a child's birthday. Sweet large topiary in the form of a candy tree with funny souvenirs. In addition to the pleasure received, each child will be able to take home a small gift:
The autumn holiday Halloween spoils us with bountiful harvests. The symbol of the holiday is a pumpkin. This pumpkin topiary, created from pumpkin seeds, leaves, candy and ribbon, mounted in a tea tin, makes a stunning addition to your kitchen space for the holidays. The lower part is decorated with canvas fabric, and the witch figurine is located in the upper part of the topiary, recalling the mysticism of the holiday:
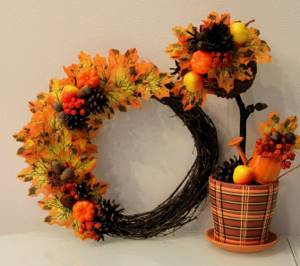
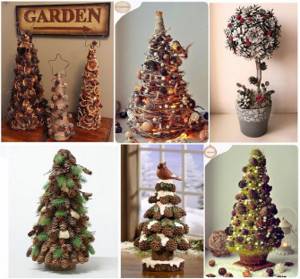
Christmas topiaries are formed from pine cones, holly berries, organza, pine needles and silk ribbons. They decorate mantelpieces and coffee tables in living rooms, as well as bedside tables in bedrooms:
On Valentine's Day, lovers prepare gifts for each other. A topiary in the shape of a quivering white and pink heart, decorated with valentines, feathers and satin ribbons, will add a touch of romance to your relationship:

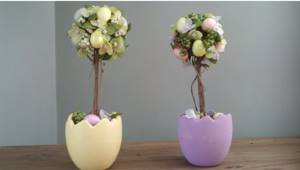
In anticipation of Easter week, you can create an Easter tree decorated with colored eggs, artificial flowers and satin ribbons. It can become the main decoration of the Easter table. And miniature topiaries, mounted in pots in the shape of eggshells, will be wonderful gifts for guests invited to the holiday:
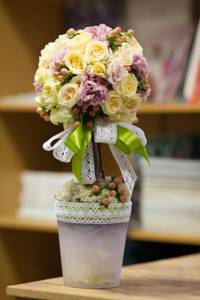
Instead of a bouquet for September 1, make your own topiary from fresh flowers
On September 1 and Teacher's Day, when almost every student gives flowers to the teacher, there is literally no room left for bouquets in the classroom. Flowers stand in armfuls and quickly lose their attractiveness. A completely different matter is a gift for the teacher on September 1 in the form of a small decorative tree - topiary. The flower tree stands in its own pot, and the flowers in the topiary do not wither for a long time. How to make topiary with your own hands? A step-by-step master class with photos of topiary for beginners is offered by specialists from the company Florist.ru.
Topiary is a beautiful tree that has a perfect shape. Even in ancient Europe, gardeners loved to trim trees and they cut out all kinds of figures from the crowns of trees and bushes: animals, birds, labyrinths, people, etc. The fashion for topiary came to Russia a little later, along with the passion for park art.
Today, topiary is a small artificial tree that is easy to make with your own hands. A standard topiary consists of a pot, a trunk, a ball crown and decorative elements. The decorative design of the crown can be made from different materials - topiaries made from coffee beans, ribbons, paper, pine cones, and shells are popular. It would be appropriate to make a topiary as a gift for a teacher from flowers.
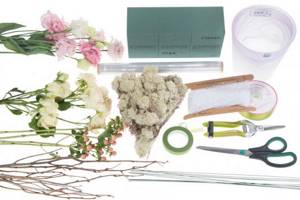
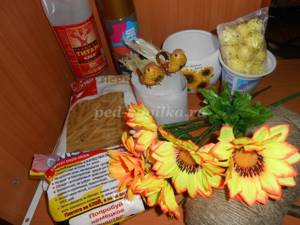
You will need:
- flower pot
- floral sponge piaflor
- gerbera wire
- stabilized moss
- flowers: pink lisianthus, cream spray rose, hypericum
- tree branches and rose stems
- stretch film, anchor tape, tape, satin and openwork ribbon, tools
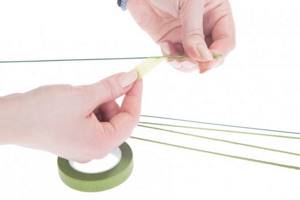
- Before we start creating a topiary from flowers, we prepare the necessary elements. We create the trunk of a future tree from gerbera wire: we take 5 wires, tape each one separately, connect it into one armful and wrap it with tape.
- It is not necessary to wrap the entire length of the trunk: we leave the wires in the upper part free, spread them apart and bend them in the form of a “fastening” for the tree ball.

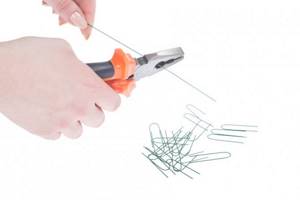
- Now we move on to creating a base from a floral sponge. To do this, we make special pins/clips from wire in advance - we cut the rods using wire cutters into small pieces of 7-10 cm and bend them in half.
- We prepare a base ball from piaflora. We soak the floral sponge in water in advance, lowering it into the container, but without submerging it with our hands. We wait until the water is absorbed and the sponge “sits to the bottom.” We divide the soaked sponge into three parts, cut out a hemisphere from each, and temporarily remove one. We connect the two hemispheres into one ball with the flat part and secure them using prepared pins.
- The ball is ready, all that remains is to insert it into the barrel. Carefully place the circle on the trunk and secure it with anchor tape.
- In order to maintain moisture in the flower topiary for a long time, it is necessary to wrap the resulting base with stretch film. Wrap tightly, leaving no holes.
- Now we prepare the pot. We put plastic film in it, and place the remaining sponge hemisphere with the slide up. Carefully cut off the excess edges of the film.
- In order to give the topiary trunk a finished look, we add rose stems and tree branches to it. We place them on the finished ball, fasten them with anchor tape and insert them into the pot.
- We cut the flowers at an angle of 45 degrees in advance - this way they will fit into the oasis easier and will be better fed with moisture. Since the base is tightly wrapped with film, it will be difficult to insert plants, so we make holes under the flowers with a skewer or toothpick.

- We fill the crown, alternating roses with lisianthus, adding hypericum between them in two or three places.

- Finally, we decorate the base of the topiary - we place stabilized moss in the pot, securing it with prepared paper clips.
- Using double-sided tape, glue the satin ribbon to the pot.
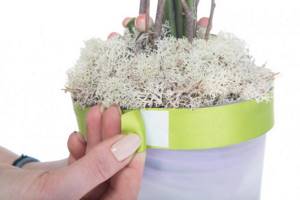
- Add an openwork ribbon on top of the satin.

- We beautifully tie a bow from the same ribbons under the crown of the tree. Our gift to the teacher - flower topiary - is ready.

Topiary in the interior
A fragrant coffee topiary, decorated with straw, pieces of canvas and thick twine will find its place in the kitchen. A mini tree made from napkins is also great for the kitchen:

Unusual in their beauty, topiary made from fresh flowers will decorate the festive table in the living room. Elegant miniatures in bright colors, made in accordance with the style theme of the room, will help you create a unique style for your guest room:

For the bedroom, original decorative compositions are created, as tender as feelings, from ribbons and beads, lace and organza in light pastel colors, reminiscent of spring haze. The basis for the composition is usually small transparent containers of unusual shapes:

In a girl's bedroom you can install a fabulous mini-tree created from corrugated paper. A boy who is a football fan will be pleased to see in his room a topiary photo from a nursery, where a mini-tree is made in the shape of a large soccer ball. For decorative decoration of topiary, butterflies, colored and mother-of-pearl beads, decorative bugs and ladybugs are used. The base is usually covered with floral mesh or artificial colored fabric:

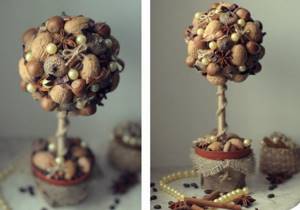
For new residents, a pleasant gift will be a tree made from hazelnuts and walnuts, large pumpkin seeds, beans and peas, symbolizing prosperity. This topiary is decorated with twine, pieces of canvas, and buttons:
For a gift to a close friend, a composition of delicate real roses is formed. Decorate with satin ribbons to match the inflorescences, silk fabric, corrugated paper:

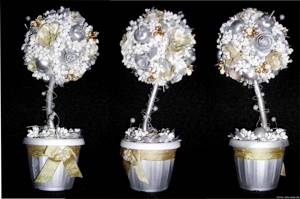
Wedding topiaries are real works of art. Traditionally created from large pearl beads, decorated with satin ribbons, lace and sisal, fairy-tale compositions keep memories of the most important day in life for a long time:
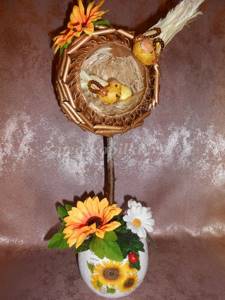
Topiary: DIY bird's nest. Master class with step-by-step photos
Master class on making topiary with step-by-step photos.
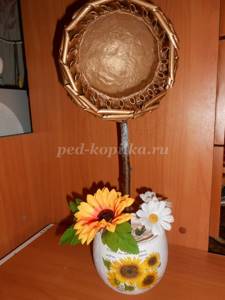
Author: Ashmarina Irina Vladimirovna MBDOU No. 108, Nizhny Novgorod. The master class is designed for high school students, parents, teachers and for all creative people who are ready to create interior decorations with their own hands. Purpose: interior design of group rooms, music halls, classrooms and for the home. Goal: making topiary “Birds’ Nest”. Objectives: to arouse interest in this type of activity, teach children to work with various materials: natural, construction, decorative elements; cultivate creativity and independence; develop children's imagination, fine motor skills, accuracy, and interest parents in joint activities with their children. What is topiary in decoration? Topiary, or as it is also called “European tree” and “Tree of happiness”, is a decorative artificial tree that can be used in any interior. Depending on its size and design, it can be installed both on bookshelves and on the floor; both in the kitchen and in the living room. Topiary is a decorative thing that depends only on the imagination of the creator.
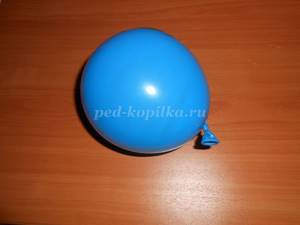
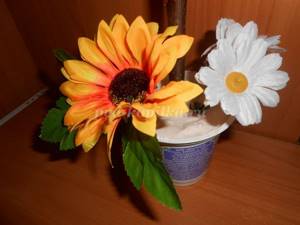
Safety precautions when working with glue: 1. Handle the glue with care! 2. Apply glue to the surface of the product only with a brush. 3. Do not let glue get on your fingers, face, especially eyes. 4. If glue gets into your eyes, rinse them immediately with plenty of water. 5. After finishing work, be sure to wash your hands and arms. 6. When working with glue, use a napkin. Materials: - toilet paper - balloon - wallpaper glue, "Titan" glue - "feather" pasta - acrylic aerosol enamel (red gold color) - stick (tree branch) 40 cm - yogurt jar (250 ml) - plaster construction - ceramic pot - decorative elements: artificial flowers, birds, eggs, ladybug, floral fabric.
Stages of work:
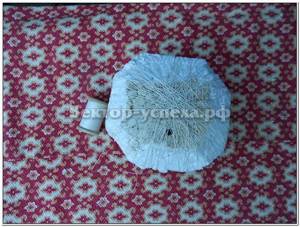
Inflate a balloon with a diameter of 46 cm.
Using the papier-mâché technique, we cover the ball, but not the whole one. I used toilet paper, cheap, grey, thicker. I glued it with wallpaper glue.
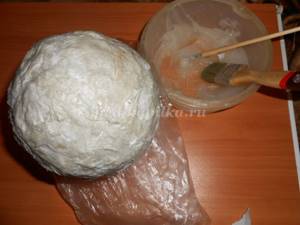
We make 7-8 layers of paper. We dry it on the batteries.
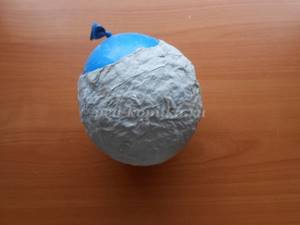
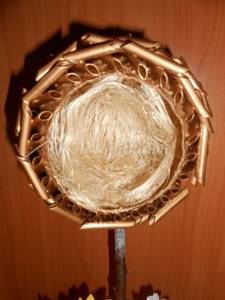
Deflate the ball using a needle. This created the base of the nest.
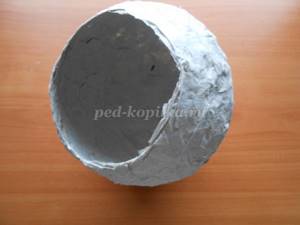
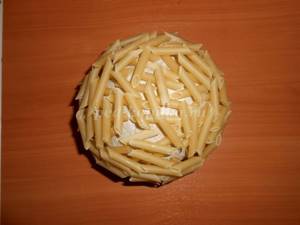
We begin to glue the pasta - “feathers”. Glue the first layer. We use Titan glue.
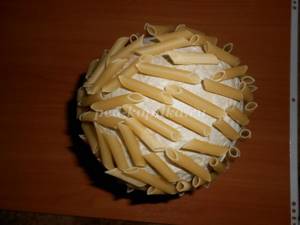
Now we glue the second layer across the first one. Let dry for 24 hours.
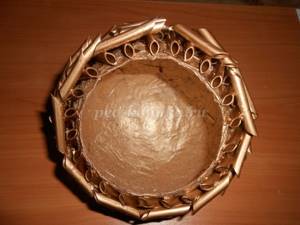
We paint the finished nest with spray paint in a well-ventilated area. Apply 2-3 layers of paint. Let dry for another 24 hours.
Glue the stick to the socket using Titan glue. Dry for 12-14 hours.
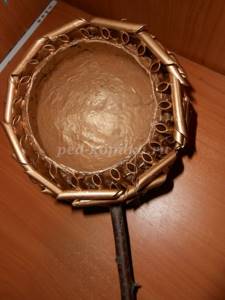
Secure it inside with a stick.
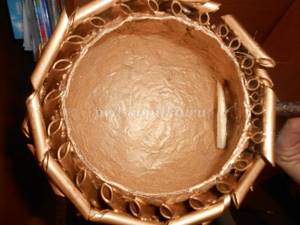
We dilute construction plaster in a yogurt jar to the consistency of sour cream. We insert a stick with a nest and decorative flowers.
We insert the jar with the nest into the ceramic pot.
After the plaster has dried, we decorate it with flower leaves.
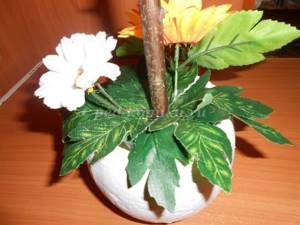
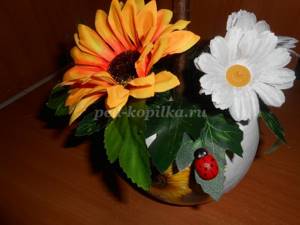
Glue the ladybug.
We put floral fabric in the nest.
We plant the bird, add eggs. We plant another bird on top of the nest (you can glue it).
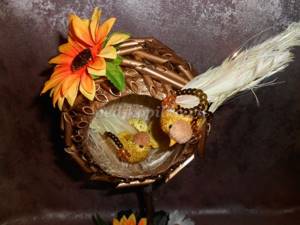
Glue the flower.

The topiary is ready!
We recommend watching:
DIY coffee tree DIY money topiary made from coins. Master class with step-by-step photos Topiary: DIY tree of love made of corrugated paper. Master class with step-by-step photos Do-it-yourself sisal topiary. Master class step by step with photos
Similar articles:
Topiary made of corrugated paper. Master Class
Autumn topiary. Master Class
DIY New Year's topiary. Master Class
Master Class. Topiary made from waste material
Topiary made of paper flowers. Master Class