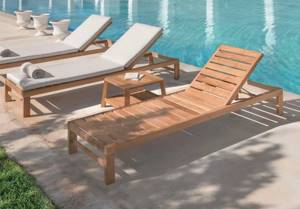
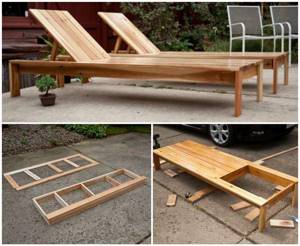
The chaise longue is intended only for relaxation, which means it belongs in the summer cottage. It is convenient to sunbathe on a sun lounger and just relax in the evening, when all the gardening and household work is completed. You can get great pleasure by making this piece of outdoor furniture with your own hands.
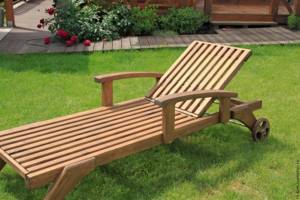
Monolithic structures presented in garden shopping centers are usually made of plastic. For independent production, it is more convenient to choose a wooden beam. The chair can be easily made mobile by placing it on wheels.
The first step in manufacturing is to make a drawing and decide on the design. She will tell you how to make a chaise longue with your own hands that is durable and comfortable.
What types of sun loungers are there: design features
A comfortable garden chair has three basic types of design:
- monolithic non-folding;
- portable, clamshell type;
- soldered, with fabric inserts.
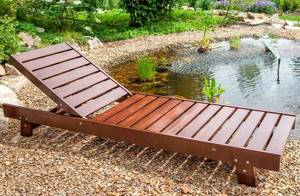
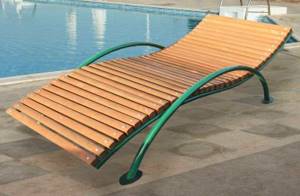
The monolithic design of the sun lounger makes it truly durable. Transporting the chair will not be easy: it will not fit into the car. You will also need a lot of space for winter storage: you cannot fold such a chaise longue. There is also no mechanism for adjusting the backrest tilt. On the other hand, the absence of these components makes the chair reliable and not prone to breakdowns. A chaise longue made of durable plastic doesn’t even need to be removed from the garden for the winter.
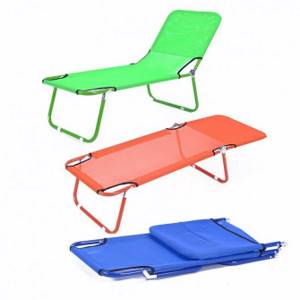
The portable lounge chair folds up like a cot. In this form, you can take it on a trip to nature, rearrange it around the site and put it away in the house. In addition, set a comfortable tilt for the back of the chair. The main advantages are convenience and mobility.
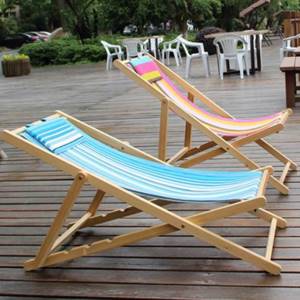
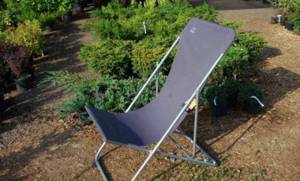
The soldered version consists of lightweight metal tubes and waterproof fabric inserts. You can make the frame yourself from pipe scraps. For a sun lounger you need to take the most durable fabric. The quality of work determines the service life of the sun lounger.
Materials
For soft seats, dense, water-resistant fabric coated with polyurethane is suitable. Tarpaulin is also suitable, as is any thick fabric. The rigid structure is made from natural materials (wood, wicker) or plastic.
Array
There are tree species, the solids of which look noble and have good mechanical properties. These are larch, ash, beech, oak. It is from them that durable garden furniture is made. A folding or monolithic chair made of valuable wood will decorate the garden.
Hevea
Garden furniture made from Hevea is resistant to moisture and is not afraid of wood-boring beetles. In terms of its properties, this wood is not inferior to oak. It is classified as a hard variety. The material contains rubber, so a chaise longue made from hevea does not dry out.
Plywood
It is made from wood veneer. Its layers are glued together with special glue. Durable fabrics of different thicknesses are obtained. Plywood is suitable for making garden furniture. It is not expensive, it is not difficult to purchase. It is available in all construction stores.
Reference! For a sun lounger, take sheets 15 mm thick.
It’s easy to work with plywood; you can:
- to nag;
- glue;
- paint;
- decorate.
Tools and materials
Making a wooden sun lounger does not require special tools or skills. Most likely, you already have everything you need: the boards and beams were left over after the renovation.
- Surface for carpentry work.
- Boards with a thickness of 2.5 cm, bars 4.5 cm x 4.5 cm, made from timber.
- Hand or electric saw, screwdriver, self-tapping screws.
- Metal corners, sandpaper for finishing.
- Impregnations for wood, stain, varnish.
The easiest way to work is with pine. To make a sun lounger you will need boards and timber for the frame. These materials can be found on any construction market, and most likely they are already waiting in the wings in your garage or storage room.
Chaise lounge functions
It is no coincidence that more and more summer residents are thinking about making a sun lounger. This device attracts them with its functional features:
- A garden lounger provides the most comfortable conditions for resting the spine and the muscles located next to it. In the reclining position, the back muscles, which are subject to particularly high loads when working in the beds, relax as much as possible.
- The sun loungers are not only easy to use, but also easy to fold, allowing you to move them from one place to another.
- Design features allow the owner to effortlessly change the backrest tilt from a sitting to a lying position.
- A wonderful decoration for a summer cottage that will look great not only in the garden, but also on the veranda. A chaise longue can give a country house a stylish and beautiful look.
- A great way to relax for people of different sizes. Due to their high reliability, such devices can easily withstand up to 100 kg of live weight.
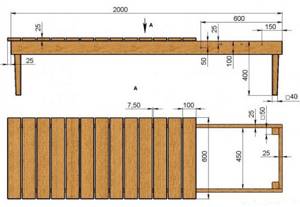
Chaise lounge dimensions. Manufacturing stages
The dimensions of the chaise lounge are determined by the height of the tallest member of the family plus 20 cm. Standard options are produced with dimensions of 190 cm x 60 cm - you can make a chair using these dimensions. It is necessary to make drawings in order to calculate the consumption of materials and provide for the order of manufacture of the main components. It’s not difficult to make sun loungers yourself, and each subsequent one will turn out better than the previous one.
When you have measured all the materials and drawn a working diagram, you can begin production.
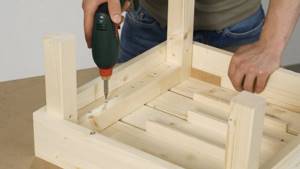
- First you need to make the frame of the lounger.
- The timber laid along the perimeter forms the sides.
- Secure the six timber legs using self-tapping screws.
- The surface of the sun lounger must be sanded.
- A monolithic lattice is made of wood using a jigsaw. The team is made from slats.
- The standard dimensions of the crossbars are 60 cm x 8 cm.
- Fix the finished grille on the frame, making gaps of a few centimeters.
- The finished structure must be sanded, impregnated with wood and covered with a final layer of varnish or paint.
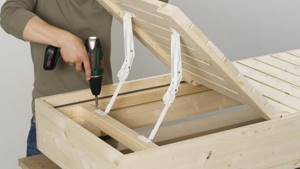
To make a wooden chaise lounge foldable, provide two parts of the lattice. For the folding version you will need hinges.
Instructions
1. The diagram according to which I made a chaise longue with my own hands in the photo below:
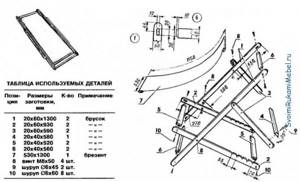
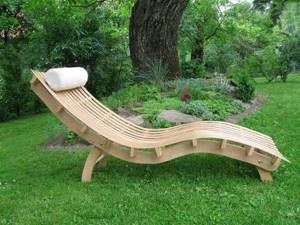
But it seemed to me that 20×60 pine timber would not hold up; I also refused oak due to its fragility and poor “elasticity”. Since the chaise longue (according to my forecasts) should withstand at least 100 kg and bend a little, I decided to make it from ash. Therefore, I slightly reduced the width of the 1st, 2nd and 3rd positions to 42-45mm.
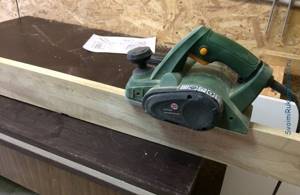
2. I found dry ash blanks 1500x110x23 mm for only 47 rubles per meter, but they were not planed (and if they were, the price would be from 60 rubles per meter). I planed all the pieces at once so that I could trim them a little later.
During the planing process, 0.5 to 3 mm of wood is usually removed, so select the material taking into account its geometry after drying.
Please be patient, this operation is quite tedious.
3. We saw all the blanks for the sun lounger lengthwise and cut them according to the dimensions from the drawing in the first point.
In addition to parts numbered 4 and 6. It is better to select their width locally, since there is an error of 1 mm and the chaise longue may not form “one thickness”.
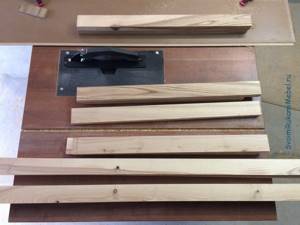
Be sure to number the parts so that you can connect them correctly when assembling the folding chaise lounge with your own hands.
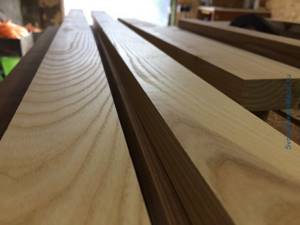
4. Next, you need to remove the sharp edge from all parts using a router and end mill.
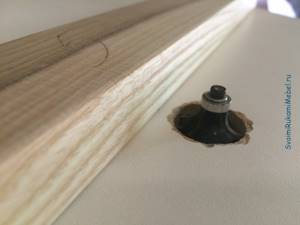
You need to guide the workpiece towards the movement of the cutter and press it evenly, otherwise in some places the rounding will be smaller than you intended.
5. My plane planes very cleanly (photo below), so I sand only the rounded corners by hand.
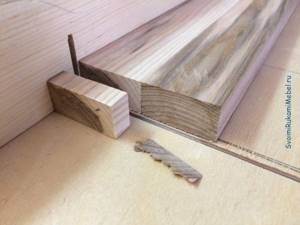
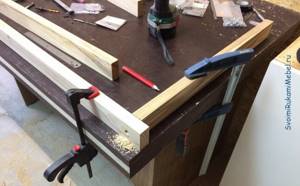
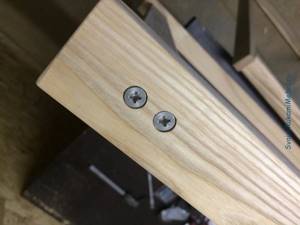
6. According to the drawing, the parts of the chaise lounge need to be fastened with one 6×60 screw, but this seemed unreliable to me, so I secured the parts to which the chaise lounge sheet itself will be attached with two 5×60 screws.
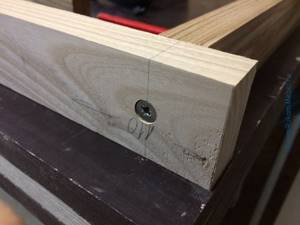
We fix the parts at an angle of 90 degrees and make an indent of 20 mm. This way we make the structure more reliable due to the fact that we make the hole not at the end of the part. Later, the part can be rotated 90 degrees and tightened with a screw. It’s just that in this form as in the photo, the details are easier to capture.
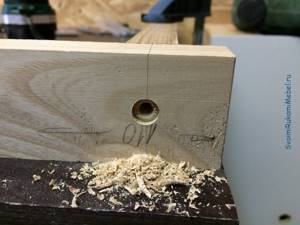
First we make a hole with a small drill, then countersink. If you don’t have a countersink, you can replace it with a feather drill. I drilled with a 16 mm feather drill, but 15 mm would have been enough - I just didn’t have it on hand.
We fix it with one 6x60 screw.
Fastening critical parts with two 5×60 screws.
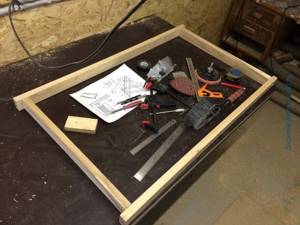
7. After assembling the chaise lounge rectangle from parts 2 and 5, it is necessary to accurately measure the width along the entire length of the rectangle in order to saw off parts No. 6 as accurately as possible. I got 56.6 cm, i.e. 6 mm more.
8. Now we mark the drilling locations to connect parts 1 and 2.
It is necessary to widen the hole under the bolt head and nut. In part No. 1 you need to widen the hole from the outside, and in part No. 2 from the inside. Don't repeat my mistakes