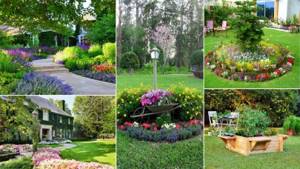
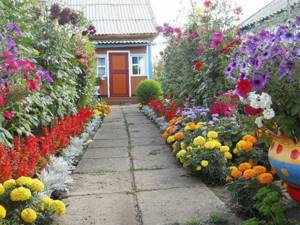
What is a dacha without flowers and greenery? Flowers can turn even the most dull yard into a garden of Eden. Making flower beds with your own hands is not at all difficult and not expensive. To transform the site, you will need a little time, available materials and, of course, seeds or plant seedlings.
To create a beautiful flower bed, any materials are suitable:
- stone, crushed stone, brick;
- wooden blocks, bars, boards;
- sections of ready-made garden fencing or self-made fences;
- car tires;
- glass and plastic bottles;
- a variety of containers, for example, old basins, washbasins, troughs.
Variety of formats
You can create beautiful rose gardens yourself, the design of which is carefully selected to suit the features of the adjacent landscape and the architectural style of the residential building, in various configurations:
- alpine slide;
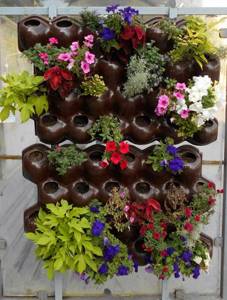
- hanging tanks
- floor flowerpots.
- discount
- mixborders;
- islets;
- modules;
- front gardens, etc.
A flower garden is a huge variety of varieties of flower arrangements, which are sometimes difficult to understand even for a specialist. Beginning gardeners must first master simple techniques for planting ornamental flora.
The easiest way is to arrange flowers in a flowerbed of rectangular geometry, or use any unnecessary objects instead of flowerpots, and then place them in front of the facade. Before you start purchasing seeds or seedlings, you should develop a project for future flowering islands, linking them to the landscape of the site.
Setting up a simple flower garden
If you decide to create a flower garden from scrap materials, then you can immediately move on to the next part. Well, here we will describe the creation of a simple flower bed.
To create the simplest flower garden you will need:
- Shovel.
- Fertile soil.
- Natural stone for the border.
- Cement mortar.
We determine a place for the flower bed and use stone and mortar to create a border. To begin with, a choice of shape is made - a geometric object or some kind of complex figure. After this, we mark the boundaries with ropes, and dig a shallow trench into which we fill with crushed stone, after which we fill in the solution. We make a border from stones on top.
Then the soil is filled in and the plants are planted. If there is no mortar, the stones can be half dug in or simply stacked on top of each other if they are flat. In addition, such a flowerbed will be easier to disassemble and move to another place if it is not needed.
When choosing a place, it is worth considering many factors - what flowers will grow, because some of them love the sun, others love dark places, and also how exposed the place is to winds. It is worth remembering that even the most beautiful flower garden located in an inappropriate place will lose its attractiveness. Choosing a location is a very important and responsible stage.
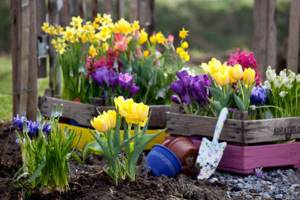
After the shape of the flower bed has been formed with a border, soil is poured into it. You must wait two weeks before you start planting. During this time, the soil will settle and become denser, so it will have to be replenished. After this is done, you can sow flowers. For the border, you can use bottles buried upside down, neatly cut and painted boards, and fences of the same size. It is worth remembering that when creating several flower beds, the material for the border should be the same.
Project development
Professional landscape designers, when creating rose gardens and flower beds, first develop projects. Beginners should also start with this. At the project stage, it is necessary to select areas for arranging flower beds.

In this case, the configuration determines their location. If you create long and rectangular flower beds at your dacha with your own hands, it is important for beginners to understand where to place them. Strips along the fence are best suited for this. You can place such long beds around the perimeter:
Note!
- Kinusaiga technique for beginners: what is it, a description of creating paintings from threads

How to weave a figurine from rubber bands: how to learn to weave animals, toys and what you can make from rubber bands on a slingshot
- How to make flowers with your own hands from paper, fabric and scrap materials. We create bouquets of homemade artificial flowers
- round flower island;
- Houses;
- garden paths;
- lawn

To do this, a plan is drawn up and the most optimal spots for seedlings are located on it. If they are planted in pots, then it is necessary to develop a landscape design for the flower bed, selecting flora with a suitable stem height, size and type of inflorescence.

Various worn-out items and even trash are used as portable potties, saving on the purchase of new equipment.

During the development of the project, pictures of flower beds are created, suitable species and areas for placing floral decorations are selected. If you think through everything carefully before work, then implementing everything drawn will be easy and simple.
Advice! At this stage, a working estimate is drawn up, which will only include the cost of planting material. Therefore, you should immediately decide whether seedlings will be purchased, or whether a beginner will try to grow them from seeds himself.
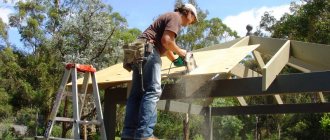
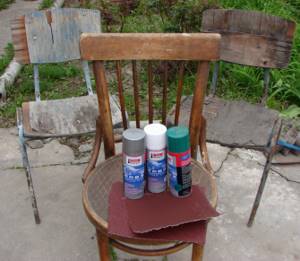
Master Class. DIY flowerbed made from old chairs
To make such an original flower bed, prepare:
- old chairs;
- spray paint;
- sandpaper.
What is needed to make a flower bed
All other materials depend solely on your imagination. You can, for example, use a wooden box instead of a pot. In any case, first remove the old paint from the chairs and sand them thoroughly.
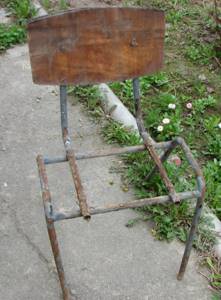
The chair is cleared of paint and sanded
Clean the chairs from dirt and dust, and then paint. It is quite obvious that it is better to do this outside, because there is no doubt about the toxicity of the paint.
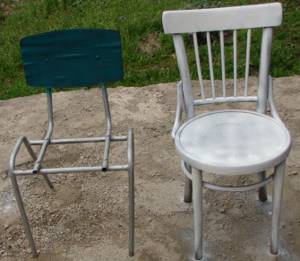
Painted chairs
If necessary, you can also paint the flower pot.
Flower pot
When the paint is dry, you can paint the chairs. We recommend using acrylic paints for this, included in the paint-by-numbers kit. These do not wash off and do not require varnish.
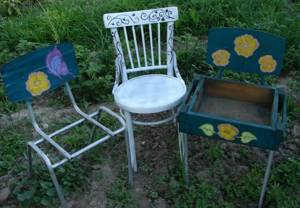
If desired, the chairs can be painted
When the painting is dry, set up the flower pots, fill them with soil mixture, plant the flowers and have fun!
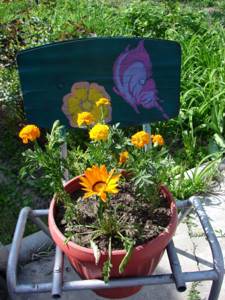
A pot of flowers placed on a chair
Chairs as flower beds

Another example of a flower bed
Thanks to such original flower beds, it is quite possible to create entire compositions.
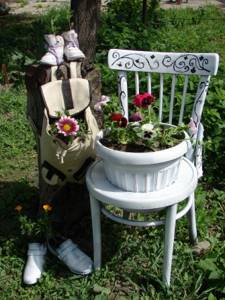
Composition of a chair, backpack and old shoes
This one, for example, is made from old shoes and children's sneakers that no one has worn for a long time.

Children's sneakers used for this composition
And in conclusion - a few more photos of original and beautiful flower beds.
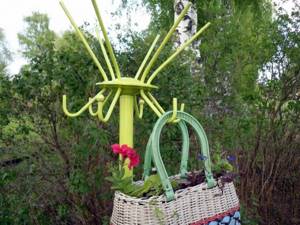
A small flowerbed in the form of a bag on a hanger
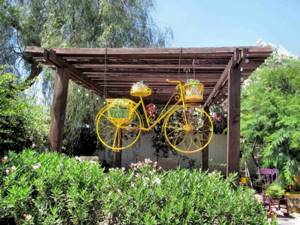
Flowerbed from an old bicycle

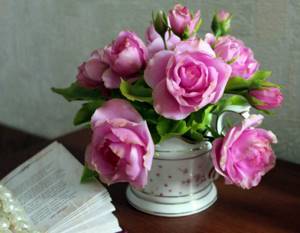
Composition of teapot and cups
As you can see, you can make a beautiful flowerbed with your own hands, and there are really many options. We hope the master classes offered here will help you with this!
Manufacturing process
After creating a plan and working estimate, you should consider a set of seedlings for each zone. To do this, you must take into account the following rules when organizing flower beds in your dacha:
- plant flower stalks with a tall stem only in the center;
- all flora planted in one place must match each other in terms of flowering time, type of care, color scheme;
- For planting, choose a well-lit place to maximize the decorative effect.
- the distance between seedlings in the center should be more sparse, and along the perimeter more dense.
Note!
How to make flowers from cold porcelain: chic floristry and DIY crafts for the New Year step by step
- How to make cold porcelain from potato, corn starch, liquid, without soda. Recipes and cooking methods
- How to properly make a birdhouse with your own hands from scrap materials: we create an original birdhouse according to sketches
As materials, you can use any worn-out items on hand, including leftover building materials, and even junk.
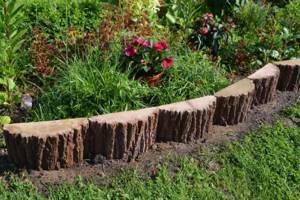
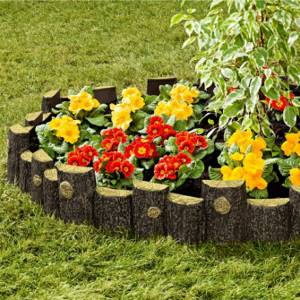
Wooden flower beds
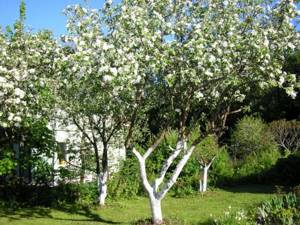
Wooden flower beds are not as durable as stone ones, but they look amazing. To create them, hardwood is suitable - acacia, oak, walnut, fruit trees.
Stages of creating a flower garden from wooden logs:
- The wood is sawn into logs 25-35 cm high and approximately the same diameter.
- In the marked area, dig a trench around the perimeter of the flower bed with a depth of 15-20 cm.
- The bottom is covered 1/3 with sand or small gravel. Before this, the trench can be covered with geotextiles. Film or roofing felt are not suitable in this case, as they retain moisture and the wood will begin to rot.
- The logs are tightly installed in the groove. All voids are filled with sand or crushed stone, which is well compacted.
Examples:
From hemp
Curtains made from natural materials look great. A log or a stump left after cutting down a tree is suitable for this. A hole is made in it, soil is poured into it and seedlings are planted.
If you are using an old log, you will need to first cut it into segments that will have indentations for the soil. The log can be sawn completely lengthwise. Then you will get two long containers for planting. Then you will need to make a hole for the soil.
Advice! When planting in such containers, you should choose seedlings with a shallow root system.
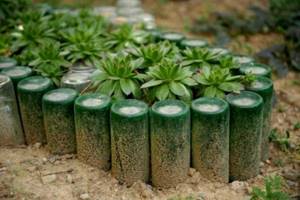
Bottle flowerbeds
Waste materials such as plastic or glass bottles can also be turned into yard decoration. A border for a flower bed made from identical containers dug up with the neck down looks good. Glass bottles are an interesting alternative to conventional bricks; they are laid on cement mortar.
Using junk
Even ordinary trash, such as an old window, would be an excellent option for living decor. If the frame is cleaned and painted with bright paint, then the blank part of the facade is hung, it will transform even a nondescript house.
Low-growing perennials or lush annuals are planted in such structures, which will create a dense surface cover on the soil surface.
You can create the following original landscaping on the facade of a residential building from old window frames:
Such a window will become an excellent decoration if you hang boxes under it and plant there:
- petunia;
- nasturtium;
- clematis;
- gypsophila.
As an original design for landscaping, they take damaged furniture, which they were planning to use for firewood for a long time. If you place an old chest of drawers near the front wall or fence and pull out its drawers with a ladder, then this composition will result in an original and low-cost design solution.
Curtains of this kind are decorated using lush varieties that form a voluminous cap above the surface of the ground. If you choose the same shades of blue, you get the effect of a flowing floral waterfall. Just boxes left over from furniture products are also suitable for this purpose.
They are placed like a train along garden paths, with squat flowers that look like a carpet planted in them. If fragrant phloxes grow along the path, then the seeding of flower stalks planted in boxes is selected to match their colors.
Such combinations of tall phloxes with low border flowers of suitable shades create a beautiful composition without much effort.
You can build a multi-tiered bed from boxes, planting beautiful types of vegetation in it.
Almost all the junk found in every dacha is used as an original flowerpot or hanging planter:
- worn out shoes that are out of order;
- holey dishes and discarded kitchen utensils;
- plastic bottles;
- leaky basins and buckets.
All this, with the help of creative imagination, turns the garden house into a corner of paradise, immersed in delightful flowers from spring to autumn.
Ways of original design of flower beds in the garden
Many flower beds of different beauty and attractiveness can be decorated at the dacha by selecting and combining different flowers and plants.
A flower bed in the center is the simplest option for decorating a flower arrangement. The flowerbed is created in the shape of a circle and around the circumference; plants are planted in several rows, contrasting in the color of the buds and leaves. It is preferable to select flowers of the same height for such a flower bed.
Flowerbed - a flower suitable for decorating the central part of the garden. A flower garden designed in the form of a six-leaf leaf will not leave anyone indifferent.
Patterned flower bed. There are no limits to imagination here. The flowerbed can depict any pattern. Sun-loving, perennial plants will look harmonious in this composition.
Deciduous trees in landscape design: purpose and application
Planting and caring for thuja occidentalis - detailed instructions with tips for properly growing thuja (photos and videos)
- Do-it-yourself vertical flowerbed - learn how to make a beautiful and original flowerbed yourself (photos and videos)


Corner flower bed. It can be located either in a corner of the site or in any other free place. Here the plants can have different heights and colors.
Alpine slide
Spectacular do-it-yourself crushed stone curtains, as in the photo, are made from bulk materials remaining after repair or construction. Crushed stone will be an excellent base for alpine slides:
For such a breakdown, it is required that the greenery grows in a lighted area, but is not constantly in the sun. Crushed stone is poured onto a pre-prepared base made from soil.
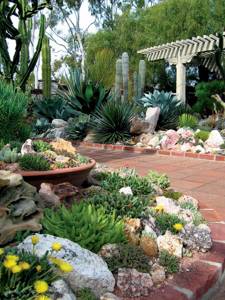
To prevent it from crumbling, lay out a frame of large stones or broken bricks. After this, the resulting area is filled with building materials and they begin to plant decorative seedlings.
You need to plant varieties with decorative lush foliage and small flowers:
- Gray fescue;
- Garden ferns;
- Youthful;
- Garden spurge;
- A tenacious creeping creature;
- Host.
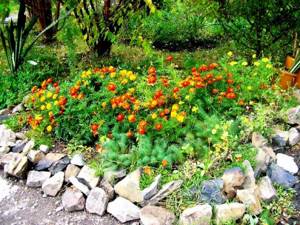
Rock gardens or flat areas covered with gravel make a country garden look well-groomed and stylish. It is better to plant perennials on them; this solution simplifies the task of landscaping. The gardener will need to properly organize the watering and wintering of the rock garden so that its green inhabitants are comfortable during the cold period.
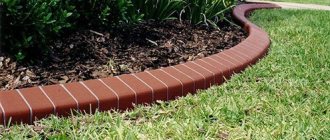
Flowerbeds made of stones and bricks
Stones go well with any plants and fit into almost any landscape. A flower garden using stones can be raised, flat, in the form of a rock garden or an alpine slide.
The easiest way to make a rock bed with your own hands is to lay cobblestones around the flower bed. To make the structure look neat, a narrow groove is first dug around the perimeter, into which a border strip is laid, after which stones are placed on top.
Slightly raised flower beds with a stone or brick border look very beautiful. To make them a little more complicated:
- On the cleaned and leveled area, the contours of the future flower garden are drawn.
- A trench is dug along the perimeter 10-20 cm deep and a width equal to the bayonet of a shovel. Old film, roofing felt or geotextiles are placed on the bottom.
- The dug trench is filled 1/3 with sand or small gravel.
- Bricks or cobblestones are placed tightly on top. If a higher border is needed, lay out several rows, fastening them with cement mortar.
- Leave the border to harden for a couple of days. Soil is poured into the resulting frame, after which the plants are planted.
Examples in the photo:
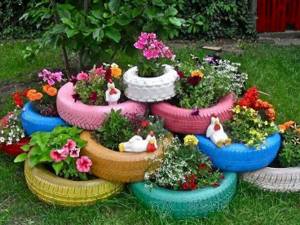
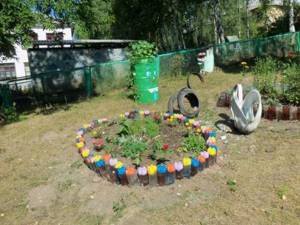
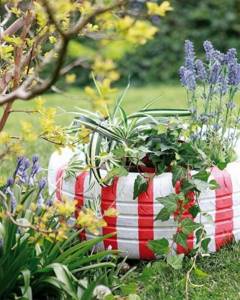
From old car tires
Traditional flower beds allow you to decorate your yard without extra costs. There is such rubbish in almost every dacha today. Planting seedlings will solve the problem of its disposal.
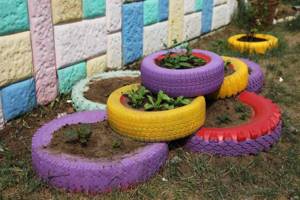
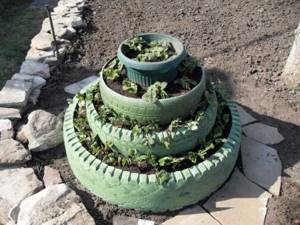
Advice! To prevent such products from taking up a lot of space, you can build multi-tiered structures from them by stacking three tires of different diameters.
A dugout is laid out inside the rims. You need to pour more of it into the upper tire so that it presses the structure, giving it stability. It is better to plant hanging ones in it, which will lower with a cap and cover the base of a multi-tiered flowerpot.
You can hang such rubber wheels on a chain, simply making vertical consoles out of them that will accommodate lush views. Having understood what a flower garden is, it’s easy to turn any junk into a real masterpiece of landscape design.
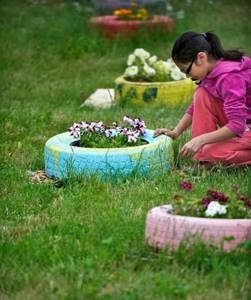
An ordinary tire laid flat on the ground will become a beautiful front garden. If you plant one variety of flora in it, for example, perennial clematis, which will create a lush cap of star-shaped inflorescences and leaves, then a picturesque island will be formed.
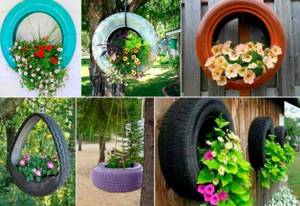
The ampelous petunia looks good, descending in a lush wave of flowers to the ground from all sides. When arranging unnecessary things for flowerpots, it is important to choose the right seating arrangement and place for its constant growth.
The better conditions are created for her, the deeper she will reveal her beauty, which can give an attractive appearance even to things that have fallen into disrepair.
Every novice gardener can make flower beds with their own hands. To do this, you will first need to conduct an audit of your dacha, selecting specific items. Then a design project with a drawing is developed, and after that a suitable seating arrangement is searched for and agrotechnical work begins.
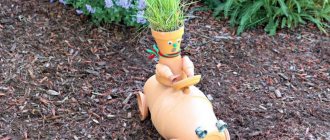
Master Class. DIY flowerbed “Turtle” made from car tires
We offer another interesting option for creating a beautiful garden flower bed. Step-by-step instructions are given below.
Table No. 2. Instructions for making a flowerbed “Turtle”.
| Steps, photo | Description of actions |
| Step one | The finished flowerbed of tires will look something like this. |
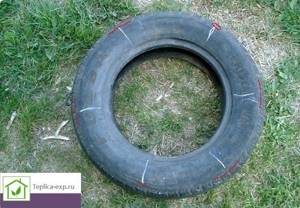
| Step two | To begin, prepare: - tires with spikes (2 pcs.), always one without steel cord; - screwdriver; — paint for external work, brush; — self-tapping screws 3.5x55 mm (15 pcs.); - a large knife. |
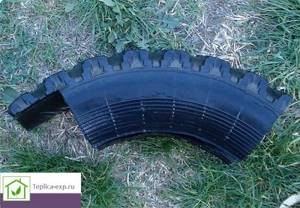
| Step three | In a tire that does not have a steel cord, cut out the bead on both sides and cut it into four identical fragments. |
| Step four | As a result, you should have the following elements from which the paws will be made. |
| Step five | Cut a couple of rectangular sections on each of the blanks. |
Step six | As a result, the workpiece should look like this. |
Step seven | The second tire, from which the body will be made, may be slightly larger. Mark it into six equal parts, make slits at the border of the sidewall and tread - one narrow (for the tail), one round (for the head) and four wide (for the paws). |
| Step eight | Insert the pre-made paws into the corresponding slots, fix each with two self-tapping screws. |
| Step nine | Here is another photo, from a different angle. |
| Step ten | Connect the edges of each paw as shown in the image: on one side with a self-tapping screw, and on the other with a wire staple (similar to a stapler). As a result, the paw will be narrow near the body, and voluminous on the other side. |
| Step eleven | Take a piece of tire, make a tail out of it and attach it with the same screws. |
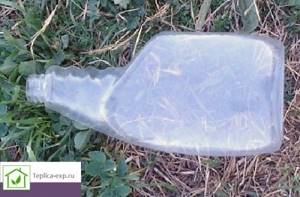
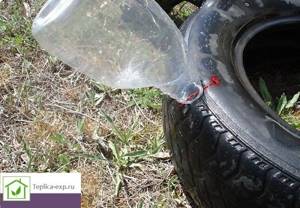
Step twelve | You can use a spray bottle to make the head. |
Step thirteen | The hole for the head that you made earlier should be such that it itself is located at an angle of 45 degrees. Secure the bottle with a self-tapping screw (it should go right through, as in the image). |
| Step fourteen | When assembled, the flowerbed should look like this. |
| Step fifteen | Paint the flowerbed (you can use two colors, as in the example). Tread elements can be used to emphasize the texture of the turtle. If the tires are “bald”, come up with your own design. |
| Step sixteen | Color your head too. The turtle, as you can see, is smiling contentedly. That's it, the flower bed is ready (just wait until the paint dries)! |
Flowerbeds of annuals - diagrams
Flowers for flower beds are selected according to color, variety and many other factors. And to make flower beds from annuals, the diagrams of which you will find in the article, yourself, you do not need to have the skills of a landscape designer. The main thing is that everything is correct
See photo/video examples - how to make flower beds with your own hands
Please repost
0