An increasing number of people are installing greenhouses on their garden plots. The benefits of using these structures are obvious.
You can grow seedlings and then transfer them to the ground, which allows you to get early vegetables from your plot, or you can generally grow vegetables and herbs all year round, regardless of weather conditions.
Choosing a greenhouse is the right choice
Commercially available greenhouses do not always meet the requirements of amateur gardeners. Therefore, one of the best options for installing a greenhouse on your own site is to build this structure on your own.
Material for greenhouse construction
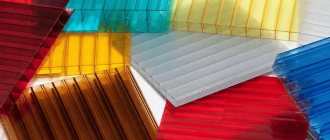
Before starting to build a greenhouse, it is necessary to resolve the issue of the material from which it will be constructed. Considering modern materials for constructing greenhouses, I would especially like to highlight sheets of cellular polycarbonate.
What is remarkable about this material?
- Durability. Polycarbonate sheets can withstand loads well and resist mechanical stress quite effectively.
- The light transmission of this material is 90%. This is more than enough for a greenhouse.
- The arrangement of cellular polycarbonate sheets forms a kind of air layer, which is a good heat insulator.
- Internal ribs provide sufficient rigidity of the structure and the sheet can be bent quite easily.
- The lightness of this material allows you to do without constructing a powerful foundation and a heavy stiffening frame.
As you can see, there are plenty of advantages.
Size and shape - the solution to the problem
Let's move on to the main question - how to build a polycarbonate greenhouse with your own hands?
You can’t do this without a clear plan and drawings. But first it is necessary to resolve the issue of the size and shape of the future greenhouse.
As for the size, this question is directly related to your wishes, capabilities and size of the site. Therefore, we will not focus our attention on it; it is up to you to decide.
But as for the shape of the future structure, this issue needs to be considered in more detail.
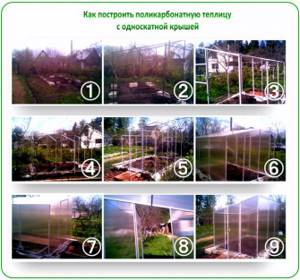
- Looking through information about the construction of a polycarbonate greenhouse with your own hands, videos and photographs of various structures, you can see that they mainly show greenhouses in the form of arches.
- As many have noticed, the greenhouses offered for sale have an arched shape.
- More interested readers have noticed that in the recommendations on how to build a polycarbonate greenhouse with your own hands, two specific forms stand out: an arched structure and one with straight walls.
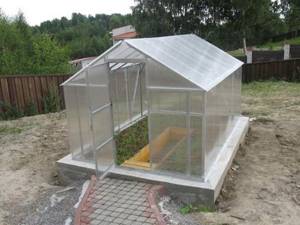
Greenhouse with straight walls.
Build speed is not the main thing
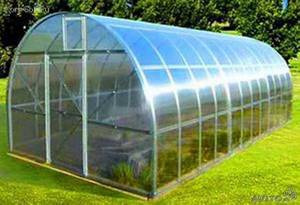
Arched industrial greenhouse.
When describing the first and second designs, as a rule, the first option is praised much more than the second.
The merit of the first, arched one, is mainly given to:
- Ease of construction. I folded the sheet and secured it.
- Lack of a large number of strength frame elements.
- Good resistance of the structure to snow loads.
Everything said is right and true. But if you pay attention to the described advantages of this structure, you will not find a word about the functional capabilities of this structure.
In other words, the recommendations say that assembling a polycarbonate greenhouse with your own hands, with an arched shape, will cost you much easier and will be completed much faster.
So stop. We have a question. Are we taking part in a competition to see how fast we can assemble greenhouses?
Or are we building a polycarbonate greenhouse that should perform its functions 100%?
You will not get an answer to this question, for one simple reason: although the arched form of a greenhouse is assembled much faster and with a minimal frame of rigidity it can withstand external loads well, but in terms of its functional qualities, namely providing plants with sufficient heat and light, it is much inferior to a similar greenhouse with straight walls.
Irregular shape
Given the same size, you will spend much more money heating an arched greenhouse than heating a greenhouse with smooth walls.
It's all about the light transmittance of bent and straight polycarbonate sheets. In this article we will not consider this issue in depth, especially since on the pages of our resource in one of the articles we described in detail the effect of reflection of light photons by a bent surface.
Our information is that this recommendation does not apply to large-area greenhouses. Since during their construction the polycarbonate is bent to a small radius and the reflectivity in this case is minimal.
In other words, today we will build a greenhouse not for speed of construction, but to obtain a functional greenhouse in which we will grow vegetables and herbs at minimal cost.
When choosing a shape, you need to take into account one feature of polycarbonate, namely, that in a curved form it reflects more sunlight than in a straight one. Therefore, a greenhouse with straight walls will be warmer, which will contribute to better plant development, especially if additional heating is not provided.
DIY greenhouse construction
Where to begin?
Material size matters
First, we will need, to construct a polycarbonate greenhouse with our own hands, drawings and all the necessary materials and tools.
- To make a drawing of a greenhouse, you first need to decide on its size.
- When determining the size, keep in mind that a standard polycarbonate sheet has a size of 2100x6000 mm.
- When drawing up a drawing, it is important to take this fact into account; this way you will avoid unnecessary trimming.
Given this size, what can you do?
- You can get 4 sheets with a size of 2100X1500 mm.
- As a result, you can build a greenhouse with a straight wall size of 4200x1500 mm.
- Or 2100X1500, there are many options.
- The width of the structure will directly depend on the slope of the roof slope, provided that one cut sheet is used to cover it.
As for the height.
- In this case it is 1500mm.
- If you raise the foundation by 200 mm, the height of the straight wall will already be 1700 mm, this does not take into account the height to the ridge.
Interior layout is a top priority
We did not try to offer you a specific size for arranging a greenhouse.
We simply examined the general principle of the device with the production, during installation, of a minimum amount of polycarbonate sheet waste.
We think the principle is clear.
- When designing a polycarbonate greenhouse, the layout of the internal plant layout is also important.
- Therefore, first distribute your crops inside, and only after that can you complete the drawing of the entire structure.
- When setting up a greenhouse, take care of its orientation relative to the position of the sun in your region.
- The more light, and therefore heat, you receive from the sun, the lower the cost of maintaining the desired temperature inside the greenhouse, and this also has a positive effect on plant growth and maturation.
Important - when working with polycarbonate sheets, pay attention to the position of the stiffeners. A polycarbonate sheet is relatively easy to bend in one direction and completely impossible in the other. Knowing this will allow you to properly arrange the supporting frame of the greenhouse.
Choice of frame material
All the main issues have been resolved, it’s time for the material.
- It is best to use a metal profile for the frame.
- Using wooden beams is also possible, but it will require additional treatment against dampness and will not last as long as a metal profile.
- Sometimes a metal corner and pipes are used for the frame.
- Working with this material requires the use of welding.
- Not everyone can do welding work, and not every household has a welding machine, but assembling a greenhouse frame from this material using fasteners is quite a long and tedious task.
The choice is made
Therefore, we suggest that you use a metal profile, which is usually used for installing gypsum board sheets.
- The advantage of this profile is lightness and durability.
- Working with him is easy and simple.
Many may wonder whether a greenhouse made from this profile can withstand a large snow load?
We are not saying that this greenhouse can withstand a layer of snow over 500 mm thick, but if you are going to grow plants all year round, this assumes that you will clear the roof of snow. Otherwise, your plants will not see the sun.
Project #1 – polycarbonate greenhouse made of pipes
Stage I. Preparation of building material
So, in order to build greenhouses using polycarbonate, it is important to assume that all standard sheets are produced in 2.10 m wide and 12 m long. And this has its own advantage - if the greenhouse is built 3.5 m wide, its roof can be covered with one whole sheet of polycarbonate.
In order to protect the polycarbonate from dust, dirt and moisture getting into its honeycombs, which “steal” the transparency of the shelter, it is advisable to cover the edges with a plastic U-shaped profile - it can be purchased in the same place as the polycarbonate itself. In general, his appearance will only improve aesthetically from such manipulations.
Stage II. Installing the base
Now you need to make markings using planed pegs and a cord. Then, with an ordinary garden drill, you need to make 4 holes with a depth of 1.2 m along the length of the greenhouse and 2 holes at the ends, already at a distance of the width of the doors.
Next, the prepared asbestos-cement pipes need to be cut into pieces 1.3 m long and installed vertically in the dug holes. The cracks need to be filled with sand and compacted well.
Planed beams need to be cut into equal pieces 1.5 m long. In each beam, one end must be rounded with an ax to a diameter that would be equal to the internal diameter of the asbestos-cement pipes themselves.
Stage III. Construction of greenhouse walls
The pillars must be impregnated with protective impregnation and installed vertically in the pipes. From smoothly planed boards, it is necessary to knock down a rectangular frame for a polycarbonate greenhouse, which would fasten the support pillars in the lower part.
Also for the roof, you should plan the rafter frame, as in the step-by-step photo, and cover it with protective impregnation for durability.
To fasten the pillars at the base, you need to nail the bottom trim. In order for the greenhouse to withstand snow loads well in winter, it is better to make as many as two supports inside it to support the ridge beam.
Stage IV. Installation of polycarbonate
So, strips 25 cm wide, made of galvanized iron, should be nailed to the bottom of the frame along the perimeter of the greenhouse. You can cut them with special metal scissors. They should ultimately overlap each other by 5 cm. And after that, you can sew up the side walls of the entire greenhouse with polycarbonate sheets.
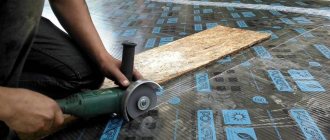
To do this, you need to drill holes in the polycarbonate sheets, then cut the sheets themselves with a sharp knife according to the size of the roof and screw them with self-tapping screws to the rafters according to the rules as in the picture:
In order to make it convenient to work and prevent the polycarbonate from accidentally being pressed under the weight of your elbow, you can make a handhold in the shape of the letter “T” from old boards and hook it to the ridge of the roof.
For the roof you will also need iron strips - you just need to cut them into 15 cm pieces to make the roof ridge. However, you can buy ready-made plastic ones in the store. If the skate is still made by hand, you will also need to bend the strips at an angle of 120° using a mallet. It is necessary to leave a small gap between the sheets for thermal expansion of the sheets, and it is advisable to cover the gaps themselves with special tape for thermal insulation.
After all this has been done, you can now cover the end walls with polycarbonate, leaving only open openings for the doors. By the way, to make the greenhouse especially warm, it will be possible to make another layer of polycarbonate inside it over time.
Stage V. Making doors
The prepared boards need to be cut in half using a saw and made into doors. Now you need to screw good hinges to the resulting doors. Now the doors should be placed on a polycarbonate sheet and the latter should be cut to size with a knife. After this, the sheets can be screwed to the doors themselves.
Once the doors are ready, you can hang them and install handles, securing hooks and latches on them. And that’s it – the greenhouse is ready. All that remains is to level the ground around it and make beds inside.
Our drawings - your dimensions
Understanding the complexity of developing this design without the necessary experience, we resolved this issue as follows.
- Below is a do-it-yourself polycarbonate greenhouse, drawings without dimensions.
- All you have to do is set the dimensions you require and get to work.
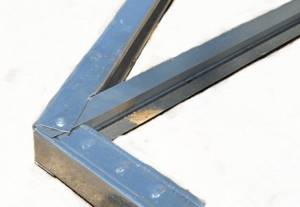
Profile for frame - size and shape
- To assemble this structure, a section profile of 50X40 mm is used.
- Therefore, it is necessary to purchase two profiles of a rack-mount PS and a guide PN.
- The guide profile is slightly wider than the rack profile.
- The connection of these two profiles will be tight.
- All horizontal frame elements must be made using the PN profile.
Durability at its best
There is no need to doubt the strength of this design.
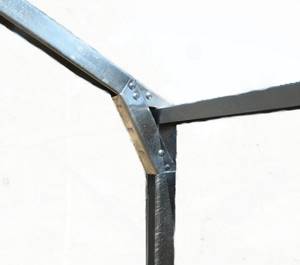
As can be seen from the drawing, special attention is paid to the stiffeners.
- Please note that this design contains a large number of triangular elements.
- This tells specialists that after assembly this structure will have sufficient strength and rigidity.
Fasteners - the choice is yours
We figured out the design and material for the frame, now it’s time to attach these elements.
There are two ways:
- Self-tapping screws
- Riveting
Both methods are good, but the use of self-tapping screws is preferable when you plan to further remodel your structure or dismantle it to move it to another location.
This question is up to you to decide for yourself. As for the sizes of screws, self-tapping screws of size 4.2X16 with a flat head are available for sale. They are best suited for this type of work.
Tool for the job
To work you will need the following tool:
- Electric screwdriver
- Straight cutting scissors for metal
- Roulette
- Level
Foundation - we solve the problem
We will not dwell in detail on the foundation for this greenhouse. Articles on foundation construction are available on the pages of our resource (see Foundation for a polycarbonate greenhouse).
Also, we will not consider in detail the question of how to install a polycarbonate greenhouse on a foundation with your own hands.
Our task today is to assemble the greenhouse.
Assembling the greenhouse frame
This structure must be assembled as follows:
- Cut the profile to the required length for one frame
- Using self-tapping screws or rivets, assemble the first frame
- For those who have encountered gypsum plasterboard, this will not be difficult for them. In any case, if your hands are in the right place, assembling such a frame will not be a big problem.
Profile connection method.
- Carefully measure the resulting frame.
- After making sure that everything is correct, cut the entire purchased profile to the required size for all other parts.
- Assemble all the frame parts.
Frame assembly.
- Now you can connect the individual assembled frame elements into a single frame.
Method of fastening the frame.
The do-it-yourself polycarbonate frame for a greenhouse is ready.
GCR profile service life
A small digression. Some people believe that the metal gypsum board profile will not last long.
This is motivated by the fact that when cutting and drilling, the outer protective coating is damaged, into which moisture gets in, and corrosion can occur in these places, contributing to the destruction of the profile.
Our certificate is a complete misconception. The metal profile is specially designed to be cut and drilled. This does not affect its durability in any way. If polycarbonate sheets are designed to last for 15 years, a greenhouse frame made from a gypsum plasterboard profile will last no less.
We fasten polycarbonate sheets
Installing a polycarbonate greenhouse with your own hands involves installing polycarbonate sheets on a frame. Let's get to it.
There are many ways to attach polycarbonate sheets.
Correct fastening - excellent results
Regarding the fastening of polycarbonate sheets, opinions are also divided.
Some believe that polycarbonate is unsuitable for a greenhouse due to the fact that temperature changes break the tightness of the connection and warm air flows into the resulting cracks and cold air penetrates (for more information on heating a greenhouse, see Heating a polycarbonate greenhouse).
All fears and assumptions are completely in vain; the whole point is not in the polycarbonate panels themselves, but in the method of fastening it and sealing the joints.
The first method of fastening is lining
In the first case, polycarbonate sheets are attached to the greenhouse frame using overlays.
- Strips of rubber are laid on the frame of the greenhouse in the areas where the polycarbonate sheets adhere.
- Next, polycarbonate sheets are installed on the rubber pads.
- Metal plates are installed on top of the joint and secured with self-tapping screws.
- The self-tapping screw passes between two adjacent polycarbonate panels through a rubber lining.
- For additional tightness of the connection, the seams can be treated with sealant.
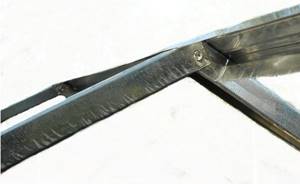
Second fastening method – H-profile
The second method involves the use of an H-shaped profile.
The H-shaped profile can be detachable or non-detachable.
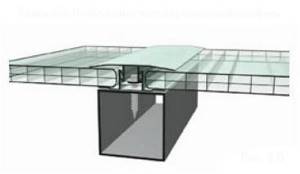
Detachable mount.
How to secure a polycarbonate sheet using this profile is clearly visible in the figure. The only thing I would like to add is, do not be lazy for better tightness and in this case use rubber linings.
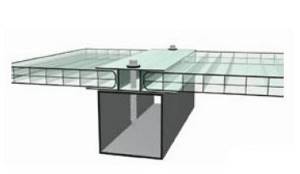
Permanent fastening.
Subtleties of fastening and installation devices
Our advice is that if you need to attach a polycarbonate sheet with a screw passing through it, use thermal washers in this case. The thermal washer will eliminate the cold bridge between the self-tapping screw and the polycarbonate sheet and additionally seals the connection. The hole in the polycarbonate sheet should be 2 - 3 mm larger than the diameter of the self-tapping screw, this achieves compensation for the expansion of the polycarbonate sheet due to climatic influences.
Our information - thermal washers are made of polycarbonate, their service life is 15 years.
Decide the step of fastening the screws yourself; of course, you shouldn’t overdo it and screw on a bunch of screws, but you shouldn’t be greedy either, everything should be in moderation. Also on our resource you can learn in detail about the assembly of such greenhouses as Orange, 2dum and Perchina.
Installing a polycarbonate greenhouse with your own hands on a foundation is best done while assembling the frame, but sometimes the frame is assembled in one place and then transferred to a prepared place. Both methods do not contradict the assembly, with the only exception: by immediately mounting the frame on the foundation, you can cope with this task alone. In the second case, you will definitely need helpers.
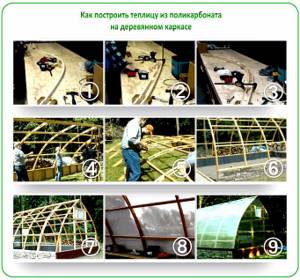
Project #3. Wood construction
Let's now look at how to build this durable and eco-friendly polycarbonate wood frame greenhouse. Use any wood as a material, except spruce - in places where there are knots, the lamellas can easily break. Everything else will do. Here are the detailed instructions:
- Step 1. Using self-tapping screws, secure the guide bars with a cross-section of 25x5x5 cm. Place one at the bottom of the left edge of the template, and three at the bottom of the right edge. Fix the fifth block, already with parameters 5x5x5 cm, at the top point of the template.
- Step 2. Now we prepare slats with a cross-section of 2x5 cm, up to 4 m long, and bars 10x3x5 cm to connect the entire rigid frame. For each arc you need two bars 25x5x3 cm.
- Step 3. Next, we make arcs for the greenhouse. We lay the first lamella by inserting it into the guide groove between the bars, and then sliding it behind the upper guide. We fix the second edge of the lamella under the leftmost bar.
- Step 4. Apply the second lamella and install the jumper bars. If possible, tighten the lamellas with bolts along the edges and in the central part.
- Step 5. Make a cut at the left end of the arcs exactly at an angle of 60°C.
- Step 6. We build the foundation and assemble the frame of the greenhouse.
- Step 7. Carefully assemble the spans, lift them and tighten them with bolts in the ridge.
- Step 8. Now we attach the ends. Be sure to leave openings for ventilation ducts.
- Step 9. The last step is to cover the greenhouse with polycarbonate and arrange it inside.
Such a greenhouse will serve you for a very long time, and no snowfall will break it. And most importantly, the total cost of this beauty is ridiculously low!
Advantages of a homemade greenhouse over a finished structure
Many materials are used to create a greenhouse, but some of them are too expensive, while others require skills and special tools to work with them:
- A universal material that can be worked with without difficulty is cellular polycarbonate.
- Thus, anyone can make a polycarbonate greenhouse with their own hands.
Note. An important advantage in favor of self-production is the opportunity to save money, since purchasing all materials will be cheaper than a ready-made greenhouse from a store.
- Often the area for its installation has a non-standard size, and it is impossible to find a finished product that meets such parameters.
Therefore, making a greenhouse with your own hands from polycarbonate is more preferable, because you can take into account all the requirements and bring them to life.
Good luck to you and a rich harvest!
Features of foundation construction
The foundation is the basis on the quality of which the strength and reliability of a polycarbonate greenhouse will depend. A wooden or concrete base can be prepared for future construction.
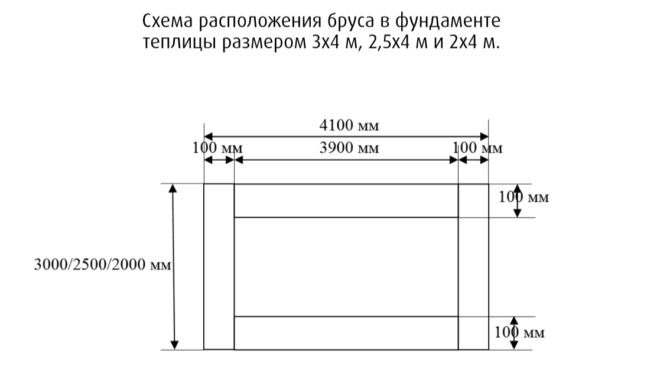
Approximate layout of timber in the greenhouse foundation
The wooden base is the most common due to the ease of its manufacture. The foundations are first prepared from bricks or concrete blocks on which the timber will be laid. The beams are measured according to the size of the greenhouse and the cutting location is marked with a marker. It is more convenient to use a gas or electric saw for cutting. It is necessary to cut at a right angle.
To obtain an even frame of the greenhouse, a level is used when laying the beams on the base. The beams can be connected groove to groove, but most often they are fastened with metal corners. Next, soil is poured under the beam, thus closing all the cracks.
For a concrete base, formwork is made into which concrete is poured. The construction of the structure begins only after the foundation has completely hardened.