Pros and cons of raised beds
Before you make a final decision about whether to add raised beds to your garden or not, you need to study their strengths and weaknesses. Of course, they have enough advantages, but we must not forget about the disadvantages. So, what's good about tall plantings:
- convenience of sowing, further processing and harvesting. This is especially true for people with constant back pain. If you make the bed high enough, you won’t need to bend over to pull out weeds or harvest;
- You can plant seedlings 2-3 weeks earlier. Raised above the ground, the beds warm up more, and if you also put arcs in such a mini-vegetable garden and cover them with film, then you can enjoy the harvest much earlier;
- cleanliness of the area. If you arrange high beds according to all the rules, then the garden will always be orderly and well-groomed, without scattered earth on the paths;
- the ability to grow vegetables in the absence of a vegetable garden. The soil in such beds is poured separately, so they can even be built on a concrete foundation;
- good drainage to optimize watering and soil moisture. Thanks to this, the soil will not become waterlogged, moss will not grow on it, and plants will not rot;
- a regular garden plot needs to be dug up every autumn. With the introduction of high beds, this procedure will need to be carried out every 3-4 years;
- the opportunity to bring your design skills to life. You can create an entire landscape composition on your site, giving the beds an unusual shape and decor.
The undoubted advantage of high beds is the convenience of sowing, further processing and harvesting.
As you can see, high beds have plenty of advantages. Now let's look at the negative aspects. During dry times, raised plantings need to be watered more often. Firstly, they are located closer to the sun, and secondly, moisture will drain out faster through the holes in the fences.
You will have to spend money on material for arranging fencing, but perhaps there is something suitable lying around in the garage or shed. Raised beds require considerable effort to install. In addition to the fact that you will need to build boxes, you also need to fill them with a sufficient amount of soil with plant components.
You will have to change the soil periodically to maintain its fertile properties. Insects love hills, especially mole crickets, so you need to be prepared to fight this pest.
Now, having weighed all the pros and cons of raised beds, you can decide for yourself whether it would be rational to build them on your site or, as before, to hill vegetable crops in a regular low-lying garden.
Box beds according to Mitlider
The Mittleider method of making beds has long been loved by gardeners. Proper beds are long and narrow boxes with wide passages between them, thanks to which you can easily approach the plants from all sides.
The width of the correct beds according to Mitlider does not exceed 45 cm, and the length - no more than 9 m. The width of the passages is large: 80-90 cm. Just as when constructing ordinary box beds, we first mark out the garden. Then we fence off the narrow beds. We make the distances between plants and rows taking into account the characteristics of each crop.
The advantages of this growing method:
- good ventilation,
- plants do not block each other from light,
- They are easy to approach for care and harvesting.
Growing cucumbers, tomatoes, peppers, cabbage, and eggplants according to Mitlider is especially effective.
According to Mitlider, plants are grown not only in box beds with fencing, but also in ordinary ones. However, there are some nuances here. The beds are made at the same level with the passages, but they must form earthen sides 8-10 cm thick. The surface must be strictly horizontal.
When caring for plants, only the bed itself is loosened, but not the passages. The soil in the passages must be well compacted, according to the Mitlider method, it should not be covered with stones or tiles, so that the roots of the weeds can be easily removed. Water the plants only at the roots.

According to Mittleider, mineral fertilizers are used for fertilizing. However, they can be replaced with organic ones. It is important to select fertilizers that are suitable for each type of plant and not to apply excess amounts. An option for applying fertilizer is in the form of a strip in the middle between the rows of plants.
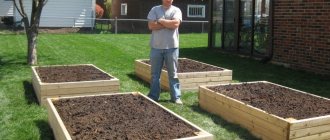
Principles and rules for creating raised beds with your own hands
Arranging raised beds requires following certain rules. Their further exploitation and the quality of the harvest depend on this. Requirements for the beds are also put forward for the correct placement of seedlings on the site; local climatic conditions, the range of plants grown and much more must be taken into account.
Dimensions
The size of a raised bed varies quite a lot. First of all, you need to decide for yourself what is more important, ease of operation or saving on the “stuffing”. The fact is that the higher the bed is raised, the easier it is to cultivate, but more land and fertilizers will be needed, and these are extra costs.
For perennial plants, the optimal height is 20-25 cm. For annuals, you can make a garden bed at the dacha even higher - 50-60 cm, but not more than 1 m. Fences that are too high will require significant financial expenses for backfilling the soil.
The width varies between 0.6-1.2 m. If there is an approach to the bed from only one side, then the optimal width will be 70 cm. When the side does not matter, you can increase the distance to a meter.
The length of the elevated section is chosen based on your own considerations. The only limitation is the size of the garden or yard itself. Traditionally they make 3-5 m with a width of up to a meter.
The soil
The main goal of raised beds is to increase productivity and harvest fruits before anyone else. The main component of elevated areas is soil. Savings are inappropriate here, otherwise all the work will go down the drain. The better and more nutritious the soil in the box, the better the development and fruiting of vegetable crops. The “stuffing” must match the type of plant. Each of them requires certain fertilizers and fertilizing.
Location
To place raised beds in your dacha with your own hands, it is best to choose areas open to the sun. There should be no trees nearby that will create a lot of shade. The overall layout should also be taken into account. The location of the boxes should not be to the detriment of other buildings or movement. Another important point for arranging ridges is climatic features. It is advisable that the plantings are not exposed to strong winds.
To place raised beds in your dacha, it is best to choose areas open to the sun.
Fencing material
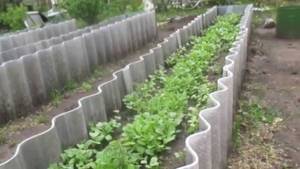
You can build beds on hills using absolutely any materials. If it is not possible to make fences from high-quality wood, that’s okay. Even remnants of old slate or plastic vegetable boxes are suitable for these purposes.
In those regions where there are frosts at the beginning and end of summer, you need to consider a system for protecting vegetable crops. To do this, you will need a pre-assembled structure for a greenhouse, and the materials used are metal fittings, metal-plastic pipes and a polyethylene top covering.
In those regions where there are frosts at the beginning and end of summer, you need to consider a system for protecting vegetable crops
What is important to know
It is known that different crops require different soil composition, humidity, and shading. Some plants cannot stand being next to each other. Therefore, in order to get a good harvest, you need to take the arrangement of garden beds seriously.
There are two approaches to growing fruit and vegetable crops in dachas:
- traditional,
- ecological.
The traditional approach is based on digging twice a year, applying mineral fertilizers and using herbicides.
An ecological approach to arranging beds is considered more natural. At the same time, the use of mineral fertilizers, herbicides, and insecticides is eliminated or minimized; instead of digging, loosening of the top layer of soil is used; mulching is recommended to control weeds.
Beds can be not only of a traditional shape, that is, located on the ground. To rationally use the space in the garden, you can arrange vertical or multi-level structures, such as the unusual and decorative pyramid bed in the photo. They will also help you make optimal use of sunlight.

It is recommended to fence beds located on a slope so that they do not crumble or be washed away by rain. These box beds can be made from different materials. On a slope, they should be placed crosswise so that water does not drain, but accumulates in the spaces between the rows. This will help save on watering costs.
To achieve a certain yield, consider how much fruit can be harvested from a bush or square meter and plan accordingly sized beds.
If you are planting perennials, keep in mind that they can grow quite large and overwhelm other plants. Such growing herbs include thyme and lemon balm.
The beds are best located from south to north. This way the plants are more evenly illuminated by the sun, and in the morning, when the most valuable rays of the sun can be received, the shadow of some plants does not fall on others. If there are several slopes on a summer cottage, then the south is chosen for arranging the beds, and shrubs are planted in the north. It is recommended to plant the tallest plants on the north side of the site.
Manufacturing options and materials
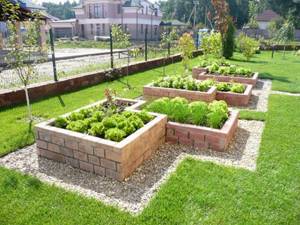
The differences between high beds are in their geometry, sizes, shapes and materials. In addition to traditional rectangular ones, there are also round structures with a “cutout” in one place for convenient access to plantings. Irregularly shaped beds, built according to a certain pattern, can create a beautiful design.

Round raised beds
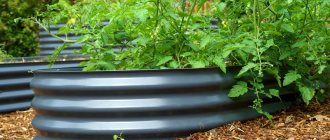
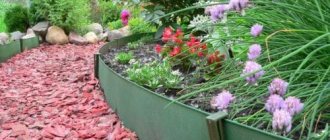
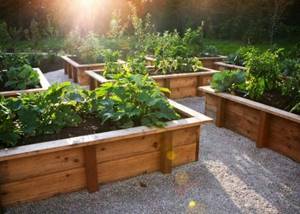
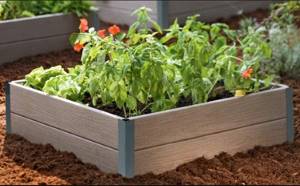
For fencing, you can take anything that can hold the soil. Wooden walls look beautiful. These can be boards, plywood sheets, OSB, wood concrete sheets (wood concrete), etc. The advantages of wood are availability and ease of processing. You need to choose from durable wood species: larch or oak. They tolerate temperature changes and do not collapse or rot. The only drawback is that they are difficult to process, and such material is not cheap. Very often, raised beds are made from WPC. This is a wood-polymer composite, distinguished by its beauty and durability.
Plastic beds solve two problems at once: economy and quality. Polycarbonate, corrugated polymer sheeting or plexiglass are used for fencing. The advantage of plastic is its long-term use; it does not rot, does not decompose, and is resistant to moisture and weather conditions. The downside is that it can crack in severe frosts, so plastic beds need to be covered for the winter.
Slate is also popular, but less environmentally friendly. In addition, the material has a significant drawback - it is fragile. If you have no experience working with it, then during construction you can damage the sheets.
Material for beds - what to make high beds from
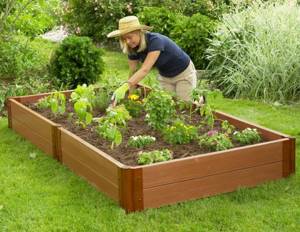
High bed
is a frame of a certain size. The inside of the frame is filled with compost, soil, and fertilizers. The shape of the frame can be different; the most common is a high rectangular bed.
Material for making beds - boards, slate, plastic, branches and others
.
Tree
- the most accessible, easy to install and fairly inexpensive material. To assemble a bed you will need timber, boards, or small logs.
The main disadvantage of wood is its fragility, which requires additional protective treatment.
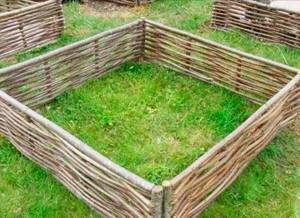
Twigs and vines
– original, cheap material. The woven walls of high beds look attractive, and the shape of the bed itself can be made to any shape.
Such a frame has a very short service life and you need to know how to weave a vine.
Brick and stone
– durable, reliable material for beds. But such beds are difficult to dismantle and construction takes a lot of material and time.
Plastic frame
- an alternative to wood. Plastic is easy to install and disassemble, durable and strong.
But some types of plastic contain harmful substances and cannot be used in the garden.
WPC beds
— frame for beds made of wood-polymer composite. Beautiful appearance, durable material, connected using joining elements. The disadvantage is that the material is very expensive.
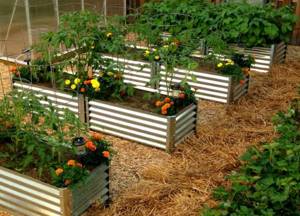
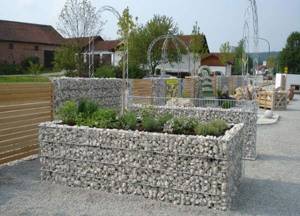
Metal
– durable, convenient material for creating beds. You can easily change the appearance of the frame by painting it in any color. To assemble such a frame, you need to have the skills of a welder; the material is quite expensive; surface treatment will be required to protect it from corrosion.
Slate
- a budget option for designing beds. Installing such a bed is quick, slate is durable, and you can paint the surface any color. The disadvantage is the fragility of the material; care is required during assembly.
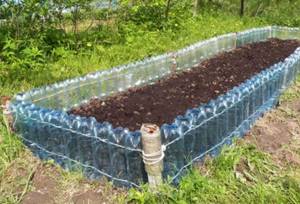
plastic bottles and old plastic boxes to build raised beds
.
Video - Raised beds made of slate
Technology and stages of creating raised beds
Let's consider two options for building an elevated vegetable garden: from slate and raised beds from wooden boards. For work you will need the following materials and tools:
- slate or WPC boards;
- wooden beams 50x50 cm;
- metal fittings or pipes;
- fasteners;
- Bulgarian;
- welding machine;
- building level;
- hammer;
- shovel.
The further progress of work depends on the selected material.
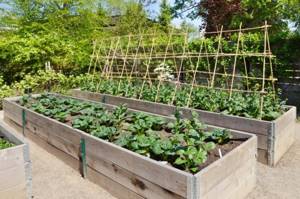
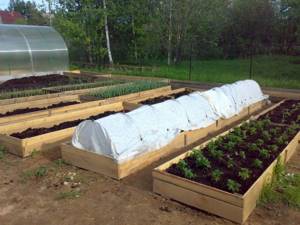
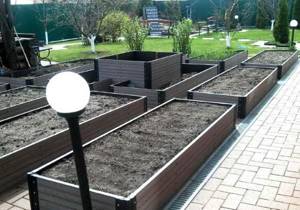
Raised beds made of boards
Making raised beds from boards
The first step is to select a suitable place to place a tall vegetable garden. Based on the size of the plot, the size and shape of the boxes is planned. They should be at some distance from each other so that it is convenient to walk between the beds.
The area is cleared of debris and stones, and the rhizomes of weeds, if any, are uprooted. Further arrangement technology is carried out according to the following scheme.
- Fences for high beds made of WPC are being prepared. The material is cut so that there are 4 elements of 1.5 m each and 4 elements of 3 m each. 40 cm bars are also prepared.
- The ends of the boards are cut at an angle of 45 degrees.
- All prepared parts are impregnated with an antiseptic to prevent rotting processes and damage to the material under the influence of moisture.
- WPC boards are initially sold beautifully, so they do not require additional varnishing or painting. For decorative purposes, patterns can be applied to the surface.
- Now you can begin assembling the box. The boards are knocked down in pairs and connected to each other with bars. The long sides of the frame are additionally reinforced with transverse bars in the center.
- The finished box is transferred to the installation site, set according to the markings and the location of the bed is checked using a building level. Additional leveling is carried out using pegs or excavating excess soil.
The finished structure of the high bed should stand as level as possible, with all corners at the same level. Strengthen the walls by adding soil around the perimeter and compact it so that there are no gaps left. Now you can fill the box and plant vegetables in it.
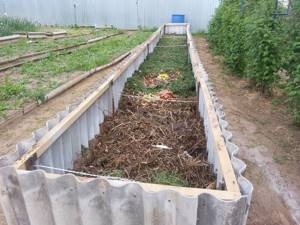
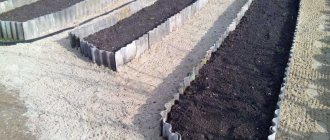
High bed made of slate
Raised beds made of slate
The construction of fences for high beds made of slate begins with marking and placing beacons on the site. Narrow grooves are dug along the perimeter to the depth of a bayonet. If the soil is fertile, its top layer is removed and left for further filling in the box.
Now you need to cut the material into individual elements. Sheets of slate are laid on a flat surface, the required length is measured and markings are made using chalk. Next, cut them with a grinder along the marked lines.
The parts for the racks are being processed. If these are wooden pegs, they are impregnated with bitumen mastic, and if they are metal rods, then they are treated with anti-corrosion agents.
When everything is prepared, installation is carried out.
- The first sheet of slate is installed vertically in the groove, starting from the corner of the marking.
- The second sheet is placed to the first one overlapping on one wave and leveled, beating it on top with a rubber hammer. Both sheets should be at the same level and at the same height.
- Using a building level, check the location of the upper edge of the slate and, if necessary, add or remove soil from below.
- The walls are supported with metal rods or pegs, which are driven in on both sides to a depth of 0.5 m.
- By analogy, all the sheets of the frame are set up, the trench is filled up and the horizontal level is checked again.
- At the end of the work, the soil near the walls is compacted and the excess is removed.
Slate raised beds do not need decoration, but if you really want to, you can paint their walls some color.
The nuances of filling the beds
Building a box for the future tall vegetable garden is half the work. Now it needs to be filled. Usually, agrofilm is laid at the very bottom to prevent weeds from germinating. If rodents live on the site, then a metal mesh should be placed on the film.
Now the box is filled with fertile composition in layers.
- The first layer is laid out sawdust, tree bark, moss, coarse sand or other materials that create loose soil at any humidity.
- The second layer is fertilizer. Ideally this should be compost and then a layer of last year's leaves. This will create favorable conditions for the proliferation of microorganisms beneficial to plants.
- The third layer consists directly of soil, which is thoroughly mixed with humus in advance until a loose, homogeneous mass is formed. The height must be at least 25 cm and be level with the edges of the walls.
The resulting “layer cake” is well moistened and left to settle. After this, the bed is ready for planting seedlings or sowing seeds.
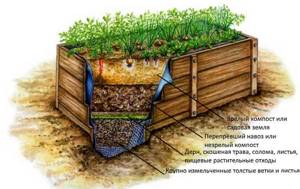
Scheme for filling a high bed
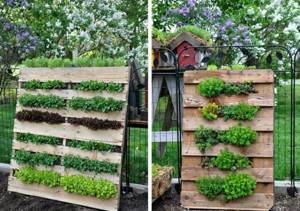
Vertical beds
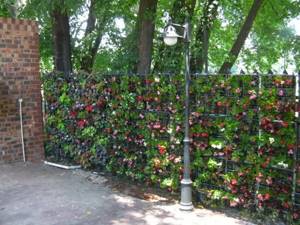
An unusual way to plant plants is in vertical beds. With their help you can save space and decorate your garden, because they look very original. They can be made from a variety of materials. This way you can grow a wide variety of crops.
Important! Beds located on the wall of a house or other building should face south.
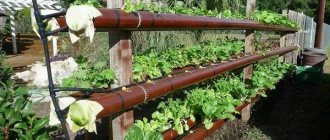
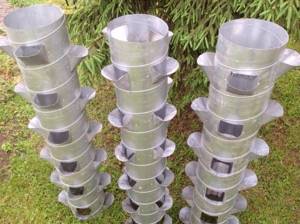
- From plastic pipes. This option is suitable for growing strawberries, wild strawberries, and herbs. To do this you will need two pipes, a wide one and a narrower one. A narrow pipe is used for irrigation; holes are made in it 2/3 of the way. Holes are also made in a wide pipe, but large ones - about 20 cm in diameter, so that plants can be planted. Then the narrow pipe is inserted into the wide one with the end down without holes, having previously been wrapped in burlap. Gravel is poured into a wide pipe to fix the narrow one in a vertical position. Next, the wide pipe is filled with soil and plants are planted.
- From pots. You can make several options for unusual vertical beds from flower pots. The easiest way is to take several pots of different sizes, fill the largest one with soil, place a smaller container on it, and so on.
- Another option is to take several identical pots and one larger one. The largest pot is filled with earth and placed on the ground. The rest are strung on a metal rod, which is stuck into the base pot, and also filled with soil.
- If there is an old dry tree, stump or post on the site, you can use it as a base for an unusual bed. It is better not to attach pots to a living tree.
- A vertical bed can be made from construction metal mesh. To do this, it is bent into the shape of a cylinder, straw is laid along the walls, and the inside is filled with compost. It is good to grow potatoes in this design. To do this, the first layer of tubers is placed at a height of 50 cm from the bottom, then another 50 cm of soil is poured and the next layer is placed. This way you can make a tower of several floors.
Planting planning and care of beds
It is better to arrange high beds in late summer or autumn, and in winter cover them with plant debris and cover them with black plastic film. In the spring, under such a blanket, the earth will quickly warm up, which will make it possible to plant plants early, and then harvest before anyone else.
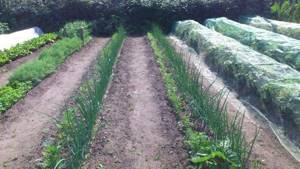
Almost all vegetable and flower crops can be grown in raised gardens. Strawberries are also grown there. Moreover, plants can perfectly coexist with each other in the same area. For example, radishes, green onions and lettuce can be planted around the perimeter, and the middle filled with tomatoes. Thus, tomatoes that love warmth and windlessness will receive additional shelter.
If you still have doubts about arranging raised beds at your dacha with your own hands, you can start small. Build a small garden, about 1.5x1.5 m, and plant simple plants on it, for example, carrots, onions, and herbs. Take care of them as usual, and when harvest time comes, you can evaluate whether it is worth increasing the number of raised beds or whether this activity is not for you.
Build raised beds wisely
What to plant in raised beds? Anything you want. And don’t worry - such structures can be quite spacious, you just need to correctly distribute the crops on them. For example, if you plant cold-hardy plants, such as lettuce, radishes or green onions, around tomato seedlings, then all of these plants will be equally comfortable in a raised bed.
Raised beds are suitable not only for vegetables, but also for flowers
In addition, no one said that only vegetables should grow in the beds. For example, tomatoes coexist very well with coreopsis. And some plants with such mixed planting do double duty: for example, chard decorates boring garden beds, and then becomes an excellent ingredient for salad. Calendula, planted along the edge of the bed, not only adds color to it, but also protects the plantings from pests.