Determining the composition of the soil
This is a very important point in the initial planning of a vegetable garden, as we must understand which vegetables and berries will grow well on our site, and for which we will need to form separate beds with imported soil or add the necessary fertilizers.
The most important soil characteristic is the pH level. The soil on your site may be acidic, neutral or alkaline. For the bulk of vegetable crops, the optimal reaction of the soil solution is within the pH range = 5.8 - 7.2.
It is best to determine the composition of the soil in a laboratory (they are available in every regional and some district centers), especially if there are not too many skills in farming. If you want to determine the composition of the soil at home, I recommend the following method: take soil in a jar and pour vinegar into a couple of tablespoons of soil. If there is a hissing sound and the earth begins to “boil” with bubbles, it has a neutral, non-acidic reaction. If nothing happens, then the soil is acidic. Signs of acidic soil include good growth of buttercups, plantain, willowweed and horsetail. Acidic soils must be deoxidized by adding lime and ash to obtain full yields.

Depending on the results obtained, you can decide which plants are best suited for growing in your soil, and which ones you will have to tinker with to achieve good yields.
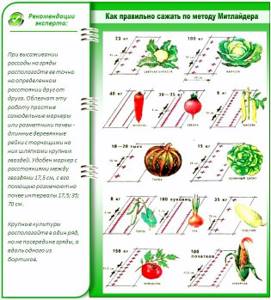
I want to give you a small sign to help you know what kind of soil certain plants prefer.
| Culture | Optimal pH Range |
| Onion | 6,4-7,9 |
| Beet | 6,5-7,5 |
| Cabbage | 6,2-7,5 |
| Peas | 6,2-7,5 |
| Corn | 6-7,0 |
| Carrot | 5,5-7,0 |
| Beans | 6,0-7,0 |
| Melon | 6,4-7,0 |
| Dill | 6-7 |
| Cucumber | 6,4-7,0 |
| Zucchini, squash | 6,0-7,0 |
| Radish | 5,5-7,0 |
| Tomato | 6,3-6,7 |
| Celery | 5,5-7,0 |
| Potato | 5,5-6,3 |
| Pepper | 6,3-6,7 |
| Salad | 6,0-6,5 |
| Eggplant | 6,4-6,7 |
| Beans | 6,0-6,5 |
| Sorrel | 5,0-6,0 |
| Parsley | 5,5-7,0 |
Kinds
Vertical
A vertical bed will be a good solution for a small area. You can build it from scrap materials, for example, from boxes. But it is worth remembering that not all types of garden crops are suitable for growing in such a bed. The following types are suitable: strawberries, onions, lettuce, tomatoes, cucumbers.
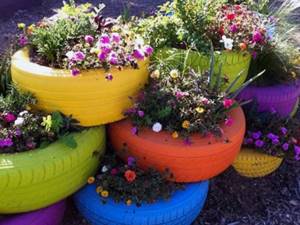
From car tires
To do this you will need several rubber tires from car wheels. First you need to prepare them: clean them from dirt and paint them. Then soil with organic and mineral fertilizers is poured into the tire. The following types of crops are suitable for cultivation: parsley, dill, radish.
Green wall
If there is a fence or other building on your site, then to give it an attractive appearance, you can try to build a so-called green wall. There is nothing complicated about this, you just need to attach the boxes to the fence or to the wall of the building, cover them with soil and plant the plants.
You can also go a more original route and use simple plastic bottles instead of boxes. To do this, screw plastic bottles to the required surface, then cut a hole in the top of the bottle and fill it with soil. After this, you can plant the necessary crops.

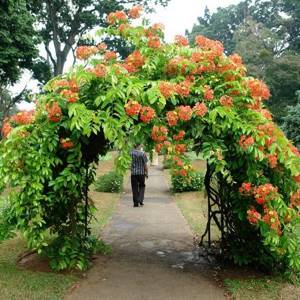
Weaving arch
At your summer cottage, you can build an arch from weaving types of crops, for example, cucumbers. To do this, we need several boxes where we fill the soil and plant the cucumber seedlings. Then you need to build an arch from small pipes (if you are making an arch yourself, then you cannot do without the ability to work with welding). After the arch is ready, the boxes with seedlings must be placed at the bottom of the structure. As the cucumbers grow, they need to be tied up.
Spicy
A spice bed in a country house plays a special role, because the crops growing on it can be used as medicinal, seasonings for dishes, or simply playing the role of ornamental plants.
Attention! The spice bed is best placed in those areas of the site where sunlight predominates.
Spicy herbs will be an ideal solution for creating an original landscape design. Spicy crops do not require close care from the gardener; they will also help protect the garden from various types of pests:
- lavender will help prevent the spread of aphids on rose flowers;
- a thyme border around the perimeter of the bed will prevent the spread of pests on vegetable crops;
- Yarrow will give carrots a sweeter, richer flavor.

Suitable plants
- Melissa;
- thyme;
- yarrow;
- sage;
- fennel.
Ornamental plants
- common basil;
- lemon balm;
- mint;
- parsley;
- medicinal rosemary;
- thyme;
- caraway;
- Salvia officinalis;
- coriander;
- fragrant onion.
We choose a place for planting on the site.
This is one of the most important stages of garden planning. After all, no amount of time, effort and money will yield results if the place for the garden is chosen incorrectly.

When planning a garden, you need to consider the following rules:
1. The beds should be located from north to south to receive maximum sun during the day.
2. It is advisable to organize a vegetable garden out of the blue. If this does not work out, then choose the southern or southeastern slopes for planting.
3. The beds should be easily accessible for watering (it is advisable to be able to throw a pump into a ravine with a river - this will greatly save your costs and efforts on watering and extracting water). If you have to water them manually from a watering can, you will soon regret that you did not think through the watering system in advance.
4. For a garden you need breathable soil with drainage so that the roots of the plants receive oxygen and do not suffocate. If the site has heavy clay soils, before organizing the beds, you need to take care to add a leavening agent - sand, black soil, peat. In principle, loams are one of the most nutritious soils; you don’t need to be particularly afraid of them, the main thing is to be able to make friends with them.
5. Vegetable beds should be located away from vertical hedges and trees - then they will receive maximum sun and will not be in the shade.
We are planning the design of the beds and placement on the site.
Layout of standard beds
Take the word of the person who redid the beds - don’t be greedy. In the picture I show how NOT to make beds in width.
The most important thing is that the beds are convenient for processing. At one time, having just received a dacha and started gardening, I made a big mistake by organizing beds 1.2 m wide. with narrow passages between them. Processing them was a complete nightmare. In the spring, it was still possible to somehow pull the weeds and take care of the plants, but in July the vegetables grew and it became impossible to push through these thickets and do anything. After a few years, I had to spend a lot of effort and money to completely redesign the garden.
In order to make it convenient to cultivate the beds, you need to make them quite narrow, high and leave a wide passage between them, ideally so that a cart can pass (under the weeds, to bring fertilizer, for scoops and rakes) - this is very convenient and forgiving , If you bend down to weed and loosen, you won’t break the plant from the garden opposite with your butt.
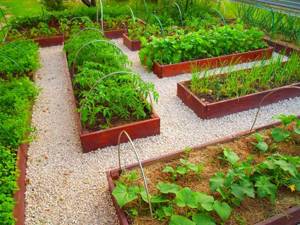
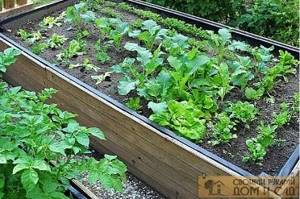
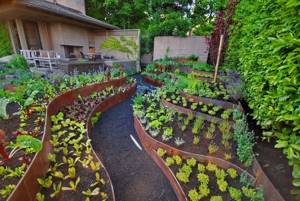
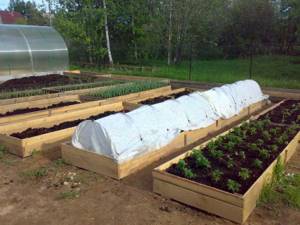
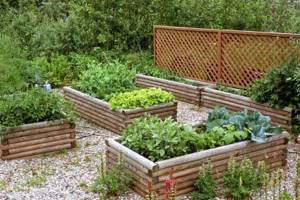
DIY raised beds
High beds rise 30-50 cm above the ground level, which is why they are also called raised beds. They simplify the process of caring for plants, look decorative and have a fairly simple design. Almost any material can be used for raised beds, but it is desirable that it be durable and reliable.
The soil in high beds warms up faster, so the harvest ripens earlier and is more abundant.
Most often, raised beds are made of wood. And here fantasy can really run wild. See bright ideas in the slideshow!
High beds made of other materials will also look beautiful and practical: stone, brick, metal, slate, etc.
Why are high beds convenient?
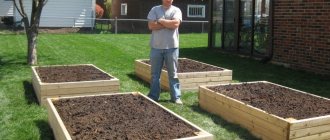
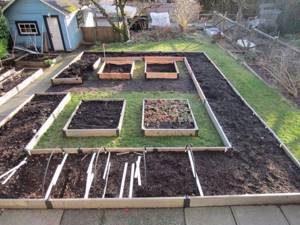
I can talk for a long time on this topic, but it’s better to tell you point by point how I set up raised beds, why and what I got from it.
1. I planned a vegetable garden on paper depending on the plot and the needs of the family (what we eat, what we can store and what we can’t, what we will eat and what we will buy).
2. I laid out the beds and the passages between them. I made the beds 90 cm wide, 20 cm high (the size of the board for sale) and an additional 30 cm deep. The width of the aisles is 1.3 meters, I could easily carry a cart, carry a watering hose, boards for other beds - I liked it. Also, I didn’t think about how to plant plants in these beds so that some would not shade others.
3. We bought a board for the beds and put together a box with screws and corners.
4. To suit the size, we dug the ground to a depth of 30 cm, laid 2 layers of non-woven fabric inside, and nailed it to the sides of the beds with a furniture stapler. Believe it or not, I have stopped getting weeds from all the cracks. We place the non-fabric loosely, as the earth will press it tightly - it is necessary so that it does not come off.
5. Then we brought good black soil and rotted manure, we don’t have a plot, but only clay, a clay master used to work there)). I mixed the excavated soil with black soil and manure, added fertilizers and got amazing beds for vegetable crops. And I used the remains to build a vertical bed for strawberries - you will see its analogue just below.
If it were possible, I would now make beds at least 40 cm high. It would be easier to handle them, because they are 20 cm - you still have to crawl on your haunches, but it is still very comfortable.
There are many designs for high beds - slate, wood, blocks, brickwork - everything is limited by your imagination, means and time.
Below are design options for raised beds.
And now I want to talk more about non-standard beds.
Layout of non-standard beds
I don’t know about you, but I’m always itching my head in search of interesting and functional solutions for the garden that will help me harvest more and make my work easier.
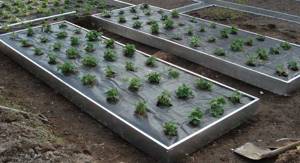
As you understand, I am lazy by nature, and therefore I strive to get the maximum with a minimum of effort. This also applies to growing strawberries. The idea is not mine, I spied it on the Internet, the photo is also not mine, since the dacha is far away now and I’m not going to go and take pictures) But the principle is exactly the same.
Here is such a wonderful bed for strawberries. At the same time, there is also a watering organization scheme, I didn’t use this, I just watered it and that’s it, without bothering, because strawberries have a very small root system, it’s not like a tomato - maybe a meter in diameter. Such a bed for strawberries will decorate any area, especially during flowering and fruiting. And it will be easy to care for strawberries, because not every slug will climb Everest for a strawberry, but will go to the neighbor’s plot)).
Well, fertilizing and watering in such a bed is also more economical and targeted; whether there are no weeds or pulling them out is easy and convenient. Plus, the plants do not shade each other and receive optimal lighting.
There is also a sufficient amount of trash left on the site, such as leaky buckets, barrels and branches after pruning, a lot of weeds and mown grass.
I came up with portable beds that can be organized on any spot on your site.
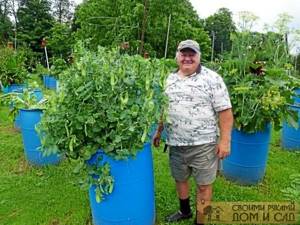
After replacing the barrels, we were left with 3 ownerless, leaky 200-liter barrels and one shabby, but intact.
I put a whole barrel in a corner of the garden, dumped weeds and mown grass into it, filled them with water and let it sit for a week or two, I don’t remember. And I also covered this barrel with a lid (from a new barrel), because I realized that the smell from fermentation would be unpleasant, and there were neighbors nearby). As a result, the tincture became a wonderful green fertilizer for my plantings. Tomatoes, peppers and eggplants simply grew from it by leaps and bounds. And I sanded the top of the barrel and painted it green, painted tacky flowers on top and it delighted the eye with its appearance all season.
From the rest of the holey barrels I made vertical beds - all summer, autumn and even part of the spring I stuffed cuttings of branches, dry leaves, carrion apples and other waste into them. By spring, they had settled, half-decomposed, and were the first to warm up, which I used for planting.
We need to compact the resulting compost properly and sprinkle fertile soil mixed with fertilizers and decomposed manure on top. And we get a warm, well-heated bed in any convenient spot in our garden.
It is convenient to grow cucumbers and peas in a barrel; you can also grow zucchini, but they already grow under your feet without any hassle.
Look at the photos for various planting options, and take note of them - you will make compost, adapt the barrels, and harvest the crop, most importantly - no hassle. In the spring, seedlings can be covered with non-fabric and a twine tied around the barrel so that the material is not blown away by the wind, and in the fall these barrels can be easily freed from plant tops and covered with film until the next season.
It’s tricks like these that brighten up our life and keep our brains from getting sour).
Types of beds

Currently, there are a huge number of unique and innovative solutions that allow you to quickly set up garden beds on your site.
However, it should be noted that there is no universal type of bed on which all plants and crops can be grown at the same time. That is why each type of plant has its own types of beds. After all, a lot here depends not only on the landscape of the site, but also on the type of plants that are planned to be planted. In any case, farmers who are not inclined to serious experiments prefer simpler options. After all, the main function of the beds is to obtain a bountiful harvest, and only after that they act as an addition to the landscape design of the site.
Classic version
Such a system can be found in almost every area. A classic ridge has a small width (up to 2 m) and a length of up to 8-10 m. The paths between such ridges are up to 40 cm wide. A convenient option for small areas.
No special skills or equipment are required to create. You just need to choose a suitable place, loosen the soil, fertilize, water and plant seedlings. Vegetables such as potatoes, cabbage and other large root vegetables are best suited for growing in classic beds.
Box shaped
You can create a more complex structure with your own hands, which is called a ridge-box.
This is a very convenient, neat, isolated type of bed, and, importantly, a universal way of arranging a site, thanks to which you can create an isolated piece of land for planting any crop. To make a box yourself, you will first need to prepare a place for planting and fertilize the soil, and then mark the boundaries using any material - boards, plastic, slate, etc. It is best to choose a durable and strong material for creating a box, which will allow the beds to last for several years without replacing material.
Using drainage
If the dacha plot is located in a lowland where liquid constantly accumulates, it is best to make ridges with drainage. To create them, you will need to determine the boundaries for planting plants, stretch out a layer of soil by 50-70 cm, then lay a layer of sand about 25 cm at the bottom of the ridge. Then pour sawdust on top of the sand, flavor it with humus, and lay on top high-quality soil that is most suitable for planting the selected crop.
Raised beds
Recently, high beds have become popular among advanced gardeners - an ideal option for wet and marshy areas. Any vegetable crops and decorative flowers can be planted in high beds.
To create a high ridge, which can reach from 30 to 100 cm in height, you will need to do the following:
- Create a box of any size. Here the question arises, what is the best material to make garden beds from - of course, from the most durable and long-lasting material. Brick, metal, oiled boards or plastic may be suitable for these purposes.
- Next, you need to install a strong mesh at the bottom of the structure, which will protect the ridge from rodents.
- After this, lay geotextiles in the stack - it will protect the ridge from weeds, a drainage layer (about 10-15 cm), and a layer of soil. After filling the box, there should be about 5 cm left at the edges of the sides. At the end, seedlings can be planted.
Warm ridges
By creating warm beds, you can get an early harvest. Moreover, this type of beds is an excellent alternative to the usual greenhouses. The bottom line is that the garden bed is provided with warmth by organic matter that constantly releases energy.
To make a warm ridge, you need to choose a suitable place, remove the top layer of soil by 50-60 cm, and lay a metal mesh on the bottom. If desired, you can separate the boundaries of the ridge using a box. After this, sawdust, previously scalded with potassium permanganate, is laid down. The layer should be 15−20 cm. A layer of organic matter (manure, turf, droppings, etc.) is placed on top. All layers are thoroughly compacted, a nutrient mixture is poured on top, for example, peat, sawdust, sand and fertilizer, so that the fertile substrate is about 20 cm thick. This system of creating a ridge allows you to prepare crops for early planting.
Narrow shape
Ideal for open areas and greenhouses due to their small area. They are made in such a way that the width does not exceed 110 cm. This allows the gardener to easily reach the center of the ridge from any side. No fencing or drainage is required, and the height of the bed can reach 10-20 cm.
Option for the lazy
“Lazy” types of beds are perfect for beginning gardeners. To independently prepare a site for planting, you just need to choose the right place, thoroughly weed the site, dig up, fertilize and water the soil, after which you can plant the plants. That's it, the lazy ridge is ready. If you wish, such a bed can be fenced with a small fence , or you can simply leave it as is.
To refine the structure and give the ridge a finished look, you can make small fences. You can use any available material as a fence - pegs, metal, tiles, brick, plastic and much more. It all depends on the capabilities of the owner of the site and his imagination.
In fact, there are many other, more difficult to implement, options for arranging a site. However, they are most suitable for experienced summer residents who know all the nuances and subtleties of gardening.
Crop rotation
An important point in planning your garden and plantings. If you grow the same plants in one place for a long time, the soil is depleted, those substances that are necessary for this type of plant are washed out of it and, due to their lack, it gets sick, becomes smaller, and pests also accumulate in the soil.
To avoid this, they use crop rotation or, as it is also called, crop rotation, as well as planting green manure (such as mustard, lupine), which enrich the soil with nitrogen and act as a green fertilizer. Plants feed on what their predecessors left them, so first strong plants are planted on strong soil, then medium ones, and in the third year weak ones that consume few substances. The soil is then fertilized and the crop rotation cycle begins again.
In order not to suffer, use a planting rotation sign, this will help you have an excellent harvest and a unique look for your garden every year.
| Crops planned for planting | Previous cultures | ||
| favorable | neutral | unfavorable | |
| potato | cucumber, legumes, early cabbage, cauliflower, green manure | carrots, greens, cabbage, beets | tomato, potato |
| tomato | cucumber, cauliflower, turnip, greens, green manure | onions, cabbage, beets | tomato, potato |
| early and cauliflower cabbage | early cucumber, onion, peas, beans, beans, green manure | carrots, tomato | cabbage, root vegetables, turnips, radishes |
| medium and late cabbage | cucumber, early potatoes, carrots, peas, beans, beans | carrots, tomato | cabbage, beets |
| beets | early potatoes, cucumber, greens, green manure | tomato, carrots, onions, early and cauliflower cabbage | beets, cabbage |
| pumpkin | legumes, garlic, onions, cabbages | cucumber, early potatoes, beets, greens | tomato, carrots, late cabbage |
| legumes | cabbage, onion, cucumber, early potatoes | tomato, root vegetables, green vegetables, green manure | legumes, perennial grasses (clover) |
| onion | legumes, cucumber, early potatoes, early and cauliflower cabbage, green manure | tomato, onion, late cabbage, beets | green, carrots |
| green and aromatic herbs | legumes, onion, cucumber, early and cauliflower cabbage, green manure | tomato, early potatoes, beets, greens | late cabbage, carrots |
Pyramid bed
You will need old wooden boxes of different sizes, but always without a bottom, and a metal pipe (choose the required length). Holes with a diameter of 15 mm are drilled throughout the pipe in a checkerboard pattern - when watering, they will allow the water to be evenly distributed throughout the entire bed.
Afterwards, the pipe is buried in the soil and boxes are strung on it, starting with the largest. Each box is covered with earth after installation. The result is a peculiar design that resembles a children's pyramid with a pipe in the middle. Garden strawberries (strawberries), greens, and various vegetable crops are planted on the steps of the pyramid.
The advantage of a pyramid bed
- Allows you to get an additional harvest anywhere, even outside the garden.
Disadvantage of a high bed in the form of a pyramid
- A rather labor-intensive process of creating a structure.
Combined plantings
During its life cycle, each plant releases various biologically active substances into the environment. By planting various plants and flowers nearby, you can protect them from pests and help better absorb nutrients from the soil. In addition, intensive planting of vegetables, which is part of organic farming, sharply reduces the need for watering, as the plants cover the ground with their foliage and the evaporation of moisture on a hot summer day is reduced.
I will again give a table of compatibility when planting different crops in the same bed.

When forming combined plantings, it is necessary to take into account a number of points:
1. Timing for harvesting each vegetable. You can plant onions and carrots together, but onions are harvested faster than carrots and, in addition, they have different agricultural techniques during ripening; regardless of friendship, they must be planted in different beds.
2. Plant height and lighting. When planting together, it is necessary that tall plants do not shade their short, useful counterparts.
I’ll add some lists, some things will overlap, there are also flowers here, because our garden should not only be fruitful, but also beautiful.
Compatible fits
- Broccoli - beets, sage.
- Peas - eggplant, calendula, corn, cucumber, radish, carrots.
- Pear – spruce, calendula, hemp, raspberry, tansy, tomato, dill.
- Strawberries - marigolds, borage, lettuce, beans, garlic, spinach.
- Calendula, garlic – gladioli, strawberries, roses, currants, tulips.
- Head cabbage - anise, potatoes, onions, peppermint, rosemary, chamomile, beets, celery, dill.
- Cauliflower – celery.
- Kohlrabi – onion, lettuce, beetroot, cucumber, spicy crops.
- Corn - peas, potatoes, cucumber, pumpkin, beans.
- Onions and garlic - strawberries, carrots, chamomile, beets, celery, tomato, savory.
- Raspberry – plum, apple tree, calendula.
- Carrots - peas, onions, radishes, radishes, rosemary, lettuce, tomato, sage.
- Nasturtium – most vegetables, phlox.
- Cucumber – peas, corn, sunflower, radish, beans, tomato, cabbage.
- Parsley – asparagus, tomato.
- Sunflower - cucumber.
- Radishes – peas, nasturtium, cucumber, lettuce.
- Radish - beets, spinach, carrots, parsley, tomato, pumpkin, cucumber.
- Turnips - peas.
- Salad – strawberries, carrots, cucumber, radishes.
- Beets - kohlrabi, onions, radishes, cabbage, beans, beans, lettuce.
- Celery – cabbage, onion, tomato, beans, cauliflower, leek.
- Tomato – calendula, leftover, onion, nasturtium, parsley, celery, asparagus.
- Pumpkin - corn.
- Dill, spinach – radishes, turnips, cabbage.
- Beans - cabbage, potatoes, carrots, cucumber, savory and most garden crops, except beets.
- Phlox - nasturtium.
- Apple tree - see pear.
It is good to plant red rowan in the corners of a potato field, leave a spruce among an apple orchard, limiting its roots, plant early-fruiting tomato varieties under apple trees on the south side, or scatter tomato stepsons among currant bushes. Incompatible landings
- Eggplant – other nightshade crops.
- Cherry - raspberry.
- Peas - gladioli, potatoes, onions, garlic.
- Strawberries - cabbage.
- Cabbage – strawberries, tomatoes, beans.
- Onions, garlic – peas, beans.
- Carrots - dill, parsley, celery and other umbrella plants.
- Cucumber – potatoes, zucchini, aromatic herbs.
- Pepper - beets.
- Sunflower - potato.
- Beets - beans, spinach.
- Tomato – other nightshade crops (including potatoes), cabbage.
- Pumpkin - potatoes.
- Beans - gladioli, onions, garlic, beets.
Not a single plant can tolerate the proximity of fennel and hyssop - they are planted separately.
Bed location
This science comes not only with experience, but also with elementary calculations made with a pencil in hand. The science of how to properly make beds in a greenhouse must certainly take into account several important components:
- ease of maintenance of plants (to make it convenient to collect vegetables, care for plantings, remove excess leaf mass);
- The location of the beds depends on the selected crop and variety. Beds in a polycarbonate greenhouse intended by the owner for tomatoes must take into account the height of the bush and the number of stems. This determines the correct garter and yield;
- When planning beds in a polycarbonate greenhouse, they take into account the degree of illumination for different plant varieties and the need for a certain temperature. It also depends on solar heating;
- if you make the number of bushes planted per square meter more than the specified optimal one, the yield will not increase, but will decrease due to the fact that the plants will interfere with each other;
- If in the spring or autumn, when setting up a warm garden bed, you make special structures for plastic film under a small greenhouse, even in the open air, the amount of greenery will increase and the ripening period will decrease. Then it will be possible to plant a second echelon of crops;
- It is imperative to take into account the compatibility of plants: often the lack of harvest is explained by an inappropriate change of crops.
Photo of a beautiful vegetable garden.

In the village
Even just making a bed for cucumbers can double the yield. But when a gardener builds a warm, smart and beautiful garden bed (that is, truly correct), everything needs to be done very competently, starting with the most basic preparation.
Irrigation system
An important factor when planning plantings and a vegetable garden, because with a watering can in your hands you can’t run around even on 6 acres.
It is necessary to think in advance about places for barrels with green fertilizers, as well as for barrels with warm water for irrigation, because everyone knows that it is impossible to water with water from a well or a well - we will kill the roots of plants with ice water.
If you have a water supply system at your dacha, from where water is supplied centrally, this is beauty, but not everyone has such happiness.
To collect water, we placed 4 barrels around the perimeter of the house, into which rainwater flowed from the roof, and also filled the barrels from the well using a pump. Then, using a mini-pump and a hose, I watered my plantings with warm water. I confess that I used cold water on the trees and shrubs, but they were not harmed by it))).
I also saw drip irrigation systems and many other different ones, but they are expensive and the plantings do not last forever. Next year I will want to plant other crops and the watering scheme will be different, so I went with a hose - in general it is fast, convenient and not too troublesome .
Making beds
How beautifully to decorate the beds at the dacha so that gardening brings not only a harvest, but also gives aesthetic pleasure. Below are tips on how to beautifully decorate your garden beds with your own hands.
In order not to invent fancy forms, you can borrow ideas from various printed publications or the Internet, which widely contain photos of beautiful garden beds.
We recommend watching
What is the lunar landing calendar used for: features and rules for using the lunar calendar
- Ideas on how to make an ax - choosing a workpiece and a step-by-step description of the process of creating an ax with your own hands (110 photos and videos)

Proper planting of trees - ideas for proper planting and selection of placement plans in landscape design (80 photos)
If the dacha is intended for recreation, and a large number of beds are not planned, you can decorate the beds with lawn grass.
For original planting of plants and crops, combine different shapes and materials for fencing.
If the beds are located in the center of the plot, make them round and divide them into sectors with a sand embankment.
If the garden occupies a large area, then rectangular or square beds will look better.

By taking a responsible approach to the location and design of the beds, you will, of course, achieve success in harvesting!