Gladiolus is a plant native to the tropical forests of Africa and the Mediterranean. This representative of the Iris family is very popular among gardeners because of its bright, unusual flowers. Another name for gladiolus is sword.
The flower has a cute, fragrant relative - acidanthera, popularly called fragrant gladiolus, but it belongs to the Iris family. Used in breeding with gladuolus to obtain new varieties with delicate odors.
Description of gladiolus
Gladiolus is a perennial. Its round corm consists of many glossy scales and is renewed every year. It can be white, black, burgundy or red. The stems are elongated, straight, do not branch and have an arrow-shaped shape. They reach a height of about 50-170 cm. The elongated leaves are thin, pointed towards the end, grow 40-90 cm. Their color varies from bluish to rich green depending on the species and variety. They maintain the strength of the shoots by connecting at the base. Inflorescences are found either one-sided or two-sided, or spiral-shaped.
The shape resembles ears of up to 80 cm in size. The flowers have six lobes of different sizes closed together, which differ in shape and shade. The fruit is a capsule consisting of three valves, with small round seeds, black or brown.
Gladioli care
No less important in growing flowers is caring for gladioli. In the first weeks after planting the bulbs, it is recommended to water the flowers every two or three days so that the peduncle is well formed. On dry days, water every evening, then when the soil dries out a little, it must be weeded and weeds removed. It is good if the water for irrigation is rain or settled.
When the first leaves appear, they will be very happy to be sprayed. It is important to water not in the row with the flowers, but between the rows. This way the bulb will not fester and will receive the amount of moisture it needs. Gladioli also need to be fed in the spring. In fact, this procedure is carried out five times during the spring-summer season. First, when the first leaves appear, nitrogenous fertilizers are applied for better formation of greenery.
When six strong, green leaves have grown, they are fertilized with potassium-phosphorus compounds. The third time, fertilizing is applied when buds are already forming on the stems. The fourth time during flowering, and the fifth time after cutting the stems after flowering. Also, once or twice a month you need to apply organic fertilizer. But only bird droppings, animal manure is not recommended, especially horse manure.
Bird droppings are used as follows: fill a bucket of organic matter with two buckets of water and leave for ten days. Then the finished mixture is added one liter per bucket of water. After the flower has bloomed, it must be cut off. But not completely, because the bulb is still developing. You need to cut the stem and leave 4-5 leaves until autumn.
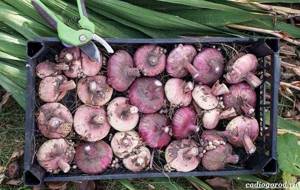
The plant remains in the ground for another month after cutting. Then, from mid-September, you can start digging up the bulbs. The soil should be dry. First of all, early varieties are extracted, then later ones, and children. After removing the tubers, you need to carefully examine them for the presence of any diseases.
Carefully cut off the roots and arrange them depending on the variety. Then rinse under running water, preferably treat with an antiseptic solution, wash again, let drain and lay out evenly in rows in one layer to dry. Choose a sunny, well-ventilated place for drying. The procedure will take three to four weeks.
Without removing the scales, the gladioli bulbs are stored for winter storage. At first they are separated from each other, the old ones from their replacements, the children. Then each one should be wrapped separately in paper.
Immediately separate and write down which variety is which, so as not to get confused in the spring. Small children are also placed in paper bags and put away for the winter. Can be stored in a closed container on the bottom shelf of the refrigerator.
If you have grown quite a lot of tubers, they are stored in boxes, folded in one layer, in a cellar or basement. Maintain a temperature range of 5 to 10 degrees Celsius. It is very important to maintain the required storage temperature to avoid early germination of flowers.
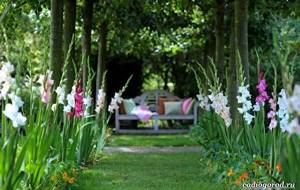
Types and varieties of gladioli with photos and names
Selection of swords is well developed, which is why the Gladioli genus includes 280 species and even more varieties.
| View | Description | Varieties | Flowers. Peduncle |
| Large-flowered | A thick, durable stem is 90-150 cm tall, the leaves are elongated, dark green, and have a glossy sheen. |
| 5-20 cm in diameter, triangular, with variegated petals up to 28 in one inflorescence. There are purple, pinkish, red, yellow petals with a white or gray base. It is characterized by a large size of about 90 cm and a straight spicate shape. |
| Butterfly | 50-100 cm, strong, medium-height greenish-gray stems, sometimes slightly deflected under the weight of the inflorescences. The xiphoid large leaves are elongated towards the end, yellow-green with a white tint. |
| Large sessile with intense color: yellow, pink, purple, burgundy, lilac-white with a slight orange tint. The petals are wavy, curved, lacy. The throat is lighter. Around 15-20. Elongated, thickened at the base. |
| Primrose | 70-120 cm long, compact appearance with elastic, non-branching stem. The leaves are thin, narrow, light green in color, covered with vegetable wax. |
| Most often plain red, white, pink or purple. There are also bright yellow ones (Leonora). 4-8 cm, triangular or round in shape, the petals are thin, have slightly wavy edges, and the upper ones are slightly curved and resemble a hood. There are 18-23 colors. |
| Dwarf | A small-sized species (50-80 cm) with large dark green glossy leaves. The stem is dense, slightly rough, striated. |
| Exotic, various shapes, with folded petals. Orange, purple, red, yellow, pink with a whitish sheen and a pronounced throat. Compact, arranged alternately. |

When to plant gladiolus bulbs in the spring, depending on the region
Gladiolus is planted on the site in late to mid-spring. Depending on the region, planting times vary.
| Region | Period |
| Central Russia (Moscow, Moscow region). | It is advisable to plant with the arrival of warm weather to exclude the possibility of disease and frostbite of the corms, that is, April 25-May 10. However, this may be a later date, given the continental climate, the temperature should be +9...+12 °C. |
| The middle zone, including the Leningrad region. | The weather is colder, severe cold or unwanted precipitation is possible, so the landing time is shifted: May 10-July 1. There is no need to rush, it is important that the corm takes root and the soil has time to warm up. If frost does occur, smoke can be used for protection. |
| Siberian region and the Urals. | The climate is unstable, the period during which there is no sharp temperature change is only 90-120 days, which complicates planting in open ground. Dates vary around May 28-July 1. To protect against cold weather, agrofibre or a special film should be placed on the flowerbeds. Plants in this region rarely survive until next year. |
| South lane. | Growing gladioli is not particularly difficult, since this is an area with the most favorable climatic conditions. Disembarkation time: March 20-April 15. You should not wait for the heat to come; the corm may not take root and die. |
When to plant gladioli in open ground in spring
There are certain rules when to plant gladioli bulbs in the spring. And this depends not only on the terrain and climatic conditions. Recommendations and specialized literature indicate that planting should be done no earlier than when the soil warms up to +8 °C. It is better to listen to these tips, because early planting leads to rotting of the bottom. But you shouldn’t delay planting in open ground too much. In spring, the soil quickly loses moisture and before the gladioli emerge, you will have to water the flowerbed frequently. Flowering in open ground is delayed, which is critical for some regions.
To understand when the time has come, you can rely on the lunar calendar. In spring there are favorable days to plant flowers in open ground. Gladioli are usually planted from April to June. The table below shows dates that are good for planting in the spring. All numbers that are not included in the calendar are considered unfavorable; it is better to abstain and not plant.
| Month | Favorable days for planting gladioli |
| April | 6-8, all days from the 20th, except 26-28 |
| May | 6-8, 15-17, 21-23 |
| June | 1-3, 9-11 |
In addition to the lunar calendar, you can focus on the climate of the area and specific recommendations for the regions. In the south of the country there is no point in delaying planting in open ground; in the spring the soil quickly loses moisture under the scorching sun, so it is customary to plant gladioli in early April.
In the Central region and the middle zone, gladioli should be planted in open ground from late April to mid-May. Do not be afraid that frosts are possible on the soil in the spring. They are not harmful to plants that have not yet hatched.
But it is customary to plant gladioli in open ground in the Urals and Siberia only from the end of May to the beginning of June. Spring in these parts is long and harsh; there are often prolonged rains or severe frosts. Therefore, it is better to play it safe and plant later.
Some gardeners grow gladioli in the spring in open ground by a certain date, so in order for them to bloom at the right time, it is important to know the variety and the timing of its flowering. Calculating the time to plant is not difficult. Early flowers produce a flower arrow in the spring after 2-2.5 months. Some even delay flowering; it begins after 78 days. Medium varieties bloom in open ground after 75-85 days, and medium-late varieties - after 3 months. Late gladioli will bloom only after 100 days.
Based on this information, you can calculate the required time to plant plants in open ground in the spring. However, it is also necessary to take into account the climate of the area. In regions with very short summers, only early and mid-blooming gladioli are planted in open ground.
Preparing gladiolus bulbs for planting
Preparation should be carried out 2-3 weeks before planting in open ground.
First, you need to carefully remove excess husks from the corms and carefully examine the surface so that there is no rotting or malignant growths on it.
If any appear, they need to be cut off, and the cut areas should be disinfected with brilliant green or a weak alcohol solution and covered with crushed charcoal and cinnamon. Also check if any damage or painful ulcers have appeared, which should be anointed with a weak solution of iodine or brilliant green.

The bottom of the bulbs, that is, the area where the roots grow, needs to be measured. The best size for planting is considered to be 2-4 cm. Young corms quickly take root and are resistant to cold or disease. Old ones, the bottom of which is more than 4 cm, are most often used for growing sprouts for propagation (babies), as well as to renew material for planting.
After a thorough examination and selection of corms, they are placed in a brightly lit place, placing raw sawdust with the addition of vermiculite underneath. You can also use a regular box, regularly moistening the bottom. Eliminate the possibility of drafts and temperature changes. With proper care, sprouts appear in 1-2 weeks.
It is important that bulbs of especially valuable varieties can be divided into 2 parts for greater productivity. This must be done so that the bottom and sprout are preserved on each half. The cut areas should also be covered with coal chips or honey.
1 hour before planting in open ground, the corms must be placed in a solution of potassium permanganate with a consistency of 0.5%. Then let the bulbs dry and plant them on the site.
Planting gladioli and subsequent care
Flowerbeds should be placed on the sunny, well-lit side, on a small hill. The location of the flowers must be changed every year to prevent infection by parasites, diseases, or depletion of the nutrient medium. It is also undesirable to plant gladioli after corn and cucumbers, which are causative agents of fusarium. The most favorable soil remains after potatoes and beets. It is necessary to add ash, sand, peat, organic matter and mineral fertilizers to the substrate.
It is worth considering the acidity of the soil: it should be neutral.
You need to start preparing the site from the end of autumn: loosen and dig the soil to a depth of 40 cm, weed out weeds and root deposits. Thus, the soil will become loose and will easily allow oxygen to pass through. Planting is carried out in several stages:
- In the selected area, dig depressions of 10-15 cm.
- Add nitrophos in a consistency of 80 g. per 1 sq. m.
- The gaps between the corms are about 10-15 cm, taking into account that adult plants need to be tied up.
- The bulbs are grounded no more than 13-14 cm. If placed deeper, the skewer will produce many inflorescences; higher, a large number of children will appear.
There is another planting method: thickened. It allows you to avoid tying up gladioli, the flower beds turn out lush and bright. With this method, the gaps between corms are reduced to 5-8 cm.
The soil is abundantly fertilized with pine needles, sawdust and phosphorus, nitrogen or potassium fertilizers.
When the swords take root and adapt to new conditions, they need to be properly cared for. Watering should be carried out no more than once a week, make sure that the water does not stagnate, otherwise rotting will begin, and also avoid getting drops on the flowers. Regularly loosen the soil and remove weeds. Gartering, if required, should be done before the flower stalks grow. You can use ordinary wooden cuttings.
Planting and propagation
Gladiolus is a perennial plant, but since it is heat-loving, it does not tolerate Russian winters and frosts. Therefore, every year the tubers are dug up and planted in the spring. If this is your first year of growing these flowers, it is very important to purchase high-quality planting materials. Buying gladioli is not difficult. A lot of them are sold in specialized flower shops and on the market.
Experienced flower growers also have a huge number of different varieties. In the future, the very next year, children will appear on the purchased tubers, and you will have your own grown tubers.
When purchasing gladioli bulbs, inspect them carefully. They should be relatively the same size: medium or large, fairly hard. With a smooth, undamaged surface, uniform color.
There should be a lot of root tubercles on the bulbs. This is a good sign that the flower will withstand any climatic changes and will be quite strong and healthy. Meet your standards, which is very important in the work of landscape designers and compilers of flower arrangements and ikebana.
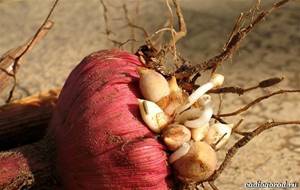
Gladioli bulbs should be smooth, strong and with root tubercles
Now you need to decide on the age of the bulb you are buying. The most in demand are young people. Which are already a year old, two years old, grown from small children of gladioli. They take root well in any soil. Outwardly round, slightly flattened, with small tubercles over the entire surface, like truffle candy. They have one flower bud, and the bottom of the bulb is small.
Medium bulbs for planting are two or three years old. Slightly larger than a tennis ball, slightly flattened, with several flower buds, the bottom the size of a nickel. Mature bulbs - they have already reached five years of age. Large size, about the size of a tennis ball, with a large bottom. They are practically not suitable for planting flowers. Their stem will grow weak, low, there will be very few flowers, small, dull. They are used to raise future children from them.
The second stage when planting gladioli is to choose the right place. This is a sun-loving flower, so the clearing should be sunny. It will grow in shade or partial shade, but will be small, not strong, with weak flowers.
Or in general, when several leaves appear, it will stop growing and die. The soil should be loosened; the roots love air. Grows well on chernozem, semi-sandy and semi-clayey soils.
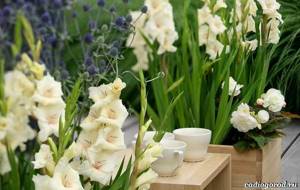
Also, the acidity of the soil should be low; it is reduced by adding chalk or unslaked lime to the soil. It would not be bad if legumes grew in the place for gladioli the previous year. They will not only enrich the soil, but also protect the future flower from the wireworm pest. Also apply fertilizer in the fall. And change the place of planting flowers every 2-3 years.
When preparing gladioli for planting, the bulbs are cleaned of unnecessary scales; if there is a damaged or sore spot, you need to carefully cut it off with a sharp knife and be sure to cover it with brilliant green. If the bulbs are from last year, then the boxes with them are brought in a week before planting in a warm place, well lit, but with diffused light. Folded in one row, with sprouts pointing upward, they will germinate until the sprout reaches a height of 5-10 cm.
The root tubercles should also grow more than two millimeters. If the bulb has no sprouts or tubercles, feel free to throw it away, it is unsuitable for planting. Then they need to be treated for one to two hours, using a weak manganese solution, or any purchased solution.
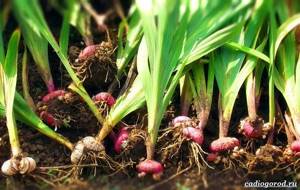
The tubers are prepared, the location is selected, we proceed to planting gladioli in open ground . An important question is when to plant gladioli. Depending on the region, when the earth is already sufficiently warmed up, from late April to mid-summer.
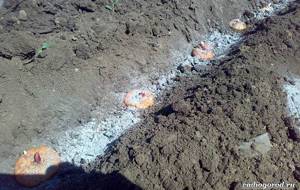
Loosen the soil well, clear it of weeds and roots. Plant each bulb to a depth equal to three times the diameter of the tuber, up to approximately 15 centimeters, with the flower bud pointing up. First pour a little sand on the bottom, plant a gladiolus, sprinkle with sand, you can also add wood ash, then soil. The distance between them is 10-15 cm.
The width between rows is at least twenty-five centimeters. Children of gladioli are also planted in the spring. First dig rows up to five centimeters deep and plant future flowers, according to the principle of adult tubers (sand, sprout, sand, soil), five centimeters apart.
The planting depth also depends on the composition of the soil. The denser it is, the shallower the depth. A small planted plant can give abundant growth to children, but with a weak stem. Which will then need to be tied up. A deep-planted bulb may grow, but will not please you with its flowering. Water the planting site with a weak solution of manganese.
Feeding
During the entire period of growing gladiolus, only 5 feedings are carried out. They include various mineral, organic and chemical substances.
| Application periods | Fertilizers applied |
| First | Use organic matter, namely humus. During the rainy season and during watering, it actively releases nutrients to the corm. |
| Before flowering | When at least 3 healthy leaves appear, you need to apply nitrogen fertilizers. Nettle infusion is also good. With further development, you can feed with a universal mixture for garden plants. You should also spray the shoots with a solution containing boric acid in a ratio of 2 g per 10 liters of running water. |
| Bloom | With the appearance of inflorescences, increase the amount of mineral fertilizers: potassium and phosphorus. It is recommended to use ash, sand and pine needles to increase the nutritional value of the soil. |
| After flowering | Prepare a solution of 15 g of superphosphate, 30 g of sulfate and 10 liters of water. Water your gladiolus with it until the end of summer. |
| Final | Mix 5 g of potassium permanganate with 10 liters of water. Fertilize with this solution in early autumn, before frost sets in. |
Planting gladioli in the ground in spring
The soil for gladioli must be nutritious, so they grow well on chernozem and light loamy and sandy loam soils. If the site is located on clay and sandy soils, it is necessary to fertilize them with peat or humus.
In the fall, phosphorus-potassium fertilizers are applied to the soil, and in the spring the area is dug up with a shovel, simultaneously adding nitrogen fertilizers.
Rules
Proper preparation of the bulbs plays a key role in planting (Figure 6). About a month before planting, planting material is brought into the house and inspected. All damaged copies are removed.
For prevention, all healthy bulbs are soaked in potassium permanganate or garlic solution (250-300 g of chopped garlic per 10 liters of water). After processing, the bulbs are dried and laid out for germination in a cool, bright place. Before planting, the bulbs are soaked in a stimulator for 10 hours.
Adviсe
In our latitudes, it is recommended to plant plants at the end of April, when the ground temperature is 8-10⁰C. In spring there is more moisture in the soil than at the beginning of summer, which allows the bulbs to germinate faster and develop better.
As a rule, flowers planted so early begin to bloom in July-August. When planting in June, you need to water more often, but the main thing is not to overdo it, so that excess moisture does not provoke the development of fungi.
Gladiolus sits at a depth of 10-12 cm with a distance of bulbs from each other of 10-15 cm. If desired, you can make a hole for watering near each bush.
When to dig up gladioli
Gladiolus needs to be dug up before the first cold weather arrives. This usually happens in mid-autumn, but each region has its own timing.
| Region | Period |
| Central Russia (Moscow, Moscow region). | Produced from September 15 to October 10, or later if comfortable climatic conditions remain or flowering continues. There is no need to disturb the skewer until the temperature drops below +8 °C. |
| The middle zone, including the Leningrad region. | The weather here is more unpredictable, so the dates are shifted to September 1-20. |
| Siberian region and the Urals. | Gladioli should be dug up before the end of September, between the 10th and 15th of the month. |
| South lane | Since the temperature here drops slowly and is still warm in the fall, corms are removed from the soil between October 20 and November 5. However, there is no need to delay the deadlines, otherwise rotting will begin and the plant will die. |
How to store gladioli
After digging, the corms are placed in a well-heated room, at room temperature +22…+25 °C. They must be turned over daily to prevent damage. The bulbs should be dried for no more than 3 weeks, during which time the scales dry out and acquire a glossy sheen. After this period, the tubers are moved to a cooler place. In an apartment this could be a space on the floor next to the balcony door, and in a cottage it could be a basement or cellar.

It is better to store in cardboard or plastic containers with air holes. Corms can be placed in several layers, lined with newspapers or loose paper. The best temperature will be +3...+10 °C, air humidity at least 70%. It is necessary to regularly check the bulbs and get rid of any diseased or dried ones.
It is worth remembering that at the end of winter, gladioli begin a period of active growth, which needs to be slowed down. To do this, you can place mint leaves and green apples in containers.
Reproduction of gladioli
There are several ways to propagate fennel, the most popular of which is vegetative:
- Using a disinfected knife, separate the ripe baby and sprinkle the cut area with coal chips or cinnamon.
- Dry small corms and plant them in open ground in early May.
- Dig a furrow about 5 cm deep and place the babies in it.
- Sprinkle the soil with peat and ash and water generously.
- Cover the top area with plastic wrap.
- After 1 month, when the stems grow to the film, it needs to be removed.
Another method is to divide the bulb.
- Choose a suitable corm with a large bottom and a small number of corms.
- Cut vertically with a disinfected knife into 2 equal parts.
- Dry the shares by placing them in a well-lit place for several hours.
- Treat the cut with charcoal or potassium permanganate solution.
- Plant the resulting corms in open ground.
The seed propagation method is not so popular, but interesting. It can only be done in comfortable conditions.
- First, you should prepare a substrate consisting of sand and leaf humus; you can also add peat and pine needles (in equal quantities).
- Before planting, the seeds must be placed in a 0.01% solution of sodium humate or heteroauxin.
- Plant seeds in containers with drainage holes at the end of February.
- With the onset of warm weather, the pots are placed in greenhouse conditions with constant high temperature and bright light until full ripening.
How to get gladioli seeds
Gladioli seeds are formed in seed pods and only after the pollination process has taken place. In nature, the process of independent pollination of these flowers is difficult, since there is a difference in the timing of pollen maturation in the stamens of flowers of male plants and the opening of the pistil in female flowers.
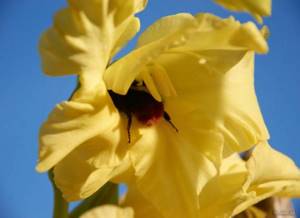
Insects and also the wind can “help”, although in these cases there is no need to talk about the purity of pollination. Bees and gusts of wind carry pollen to different gladioli flowers, without particularly thinking about selection work. Therefore, to obtain seeds, you will have to carry out pollination, and then wait for the seed pod to ripen.
What do gladioli seeds look like?
Many people, and even experienced gardeners, may be confused by the question of what gladioli seeds look like. Indeed, everyone knows about the bulbs of these flowers and their children, but the seeds are a problem. Outwardly, they look like small flat brown plates, no more than 2 mm in size. Upon careful examination of the plates, you can see the plant embryo inside, under the shell.
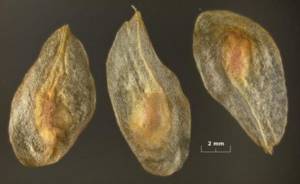
The number of seeds in a seed capsule reaches 180-200 copies. After collection, they are preserved quite well in room conditions.
ON A NOTE! Gladioli seeds should not be stored in a very dry place, as they may lose their viability if they dry out.
Rules for pollination
Manual pollination allows you to cross selected plants with each other. To do this, the necessary flowering bushes are selected in advance, and it is desirable that the pairs have more or less uniform shades. Professional breeders know certain rules of crossing, the percentage of resulting hybrids according to given characteristics.
It is difficult to obtain gladiolus of certain parameters, since genetics has its own laws and characteristics. In general, it is noted that gladioli most often produce plants with an alternate arrangement of inflorescences, with flowers of an overhanging upper lobe (and not open, like Edel), with a non-corrugated edge.

By color: the color scheme of the new variety will summarize the color of the flowers of the parents. At the same time, there are dominant colors: purple will surpass the lilac color, crimson will surpass the pink color, and so on. That is, a more saturated color will “cover” a more delicate one.
To carry out pollination, first select the “dad” plants, from which the anthers are carefully cut off. They are placed in a dry room (on shelves, table) and on clean paper until ripe. As soon as the pollen ripens in the anthers, it is poured onto a sheet of paper. It must be collected and then used to apply the “mother” plant to the stigma of the plant.

First, the anthers are removed from the inflorescences of those gladioli from which the seeds will be taken, and the flower itself is covered with a fabric bag (you can use gauze).
This is done so that pollen from other plants is not accidentally transferred to the pistil ahead of time.
As soon as the stigma opens, the collected pollen is placed on it with a brush. After this, the inflorescence is covered again until the seed capsule is formed.
IMPORTANT! No more than two or three inflorescences can be pollinated on one gladiolus plant.
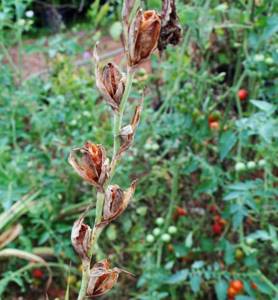
Usually after about a week the flower fades, and the ovary noticeably increases in size. Seeds ripen in boxes for about a month (35-40 days). Externally, a ripe box begins to change color (becomes yellow, brown) and even cracks slightly on the sides.
You may be interested in: When to dig up gladioli in the fall in 2021: the most favorable days for digging up bulbs Dates for planting gladioli in the spring according to the 2021 calendar of gardeners and gardeners Growing gladioli in pots outdoors
What to do if the seeds are not ripe, and the weather forecast predicts colder weather? The flower stalks are carefully cut and placed at home in containers with water. The seed pods ripen successfully at home, and then you just need to pick them and put them in storage.
Methods for controlling diseases and pests of gladioli
| Disease | Manifestation on leaves and other symptoms | Elimination methods |
| Fusarium disease | They turn yellow and become covered with a whitish coating. | If the disease occurs during the growing season, the plant is unlikely to survive, so it should be removed along with the surrounding soil. To eliminate the occurrence, treat the bulbs with a manganese solution before planting. |
| Sclerotinia | They wither, dry out at the base, and the stem rots. | Dig up affected gladioli immediately to prevent spread. If the disease has just begun, treat the flower with a solution of fungicides: Ordan, Hom, Previkur. |
| Scab | Black markings on corms and all parts of the skewer. | Increase soil acidity and remove infected flowers. |
| Viral infection. | The stem may become covered with brown lines. Black dots appear on the outside. | It is impossible to completely cure. You should get rid of the infected plant to avoid spreading the infection. |
| Shield. | Sprouts die. Covered with spots. | Use Permethrin, Bi 58, Phosfamide, Methylmercaptophos or soap solution. |
| Aphid. | Green small insects on the surface, stem. Philodendron is dying. | Lemon juice tincture, Intavir, Actofit. |
| Spider mite. | The stem and leaves are enveloped in a thin, thick white web. | Water regularly, apply Neoron, Omite, Fitoverm according to the instructions. |
| Thrips. | Thin white stripes appear. The plant droops and withers. | Use Fitoverm, treat with Aktara, Mospilan, Actellik or Calypso. |


