Do-it-yourself hiller for walk-behind tractor
Hilling up plant crops is an agrotechnical measure that improves yields and reduces the cost of pesticides and irrigation. This procedure is effective on small farms where the soil is depleted but is intensively used. Without such treatment, it is difficult to obtain a high yield of a number of crops, especially potatoes. Hilling up beds with a hoe is a troublesome and time-consuming job. Therefore, additional attachments are used on mini tractors or walk-behind tractors.
Additional units are not included in the scope of delivery of agricultural machines. The equipment of the latter can be expanded by purchasing additional equipment. However, the price of ready-made kits is unreasonably high, or they are made of metal of inappropriate quality. This forces craftsmen to look for alternative options. It is better to make a hiller for a walk-behind tractor with your own hands.
Types of attachments for walk-behind tractors
The hiller demonstrates effectiveness when planting potatoes. This attachment is used on walk-behind tractors, which reduces the labor intensity and time of planting potatoes. Tillage tools come in various designs and are suitable for any planting conditions. Potato hillers for walk-behind tractors are not included in the standard equipment of the unit, but you can make them yourself.
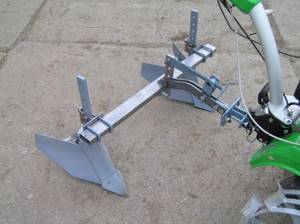
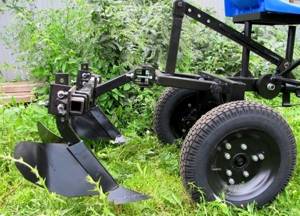
Lister hiller
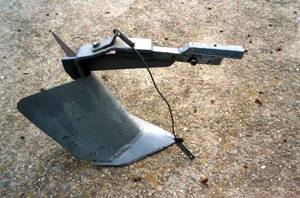
This species is widespread among farmers. Its wide blades give it an external resemblance to a butterfly. The latter are made of steel sheet. They are located on both sides of the axis. During operation, the equipment lifts the soil with a cutter, and the dumps distribute the soil from the center to the edges, forming a ridge. The tip of the device is lowered below the soil level to a preset depth. The latter is set using a retractable leg located at the rear of the mechanism.
In the factory design, the width of the soil collapse has a fixed value (on average 25-30 cm). Limiting the processing distance complicates the hilling of crops with row spacing of 40 cm or more. To change sizes, a movable structure is used. The variable-width attachment has an adjustment mechanism that expands or contracts the blades. This allows you to adjust the tool to the desired row spacing. However, a larger processing area leads to increased power consumption.
For your information!
If the working width increases, a weak unit will not be able to form a ridge of the required height in one pass. One bed will require several treatments.
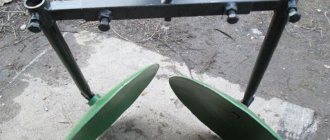
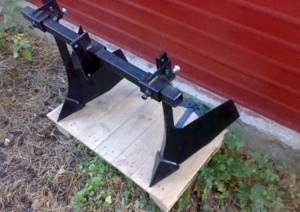
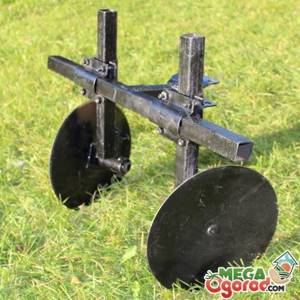
Disc hiller
Universal disc weeder for processing the arable layer. The working body is concave disks made of sheet steel. They enter the ground at a given distance, loosen it and form a ridge. For effective use, it is necessary to install the discs at an angle in the vertical plane, as well as relative to the direction of movement. Positive sides:
- Setting the processing width. The distance between two disks mounted on the frame is set depending on the size of the row.
- Combination with all types of walk-behind tractors. Even low-power units will perform soil cultivation, and the mounting design allows the equipment to be installed on any of them.
What types of hillers are there?
Tools for hilling beds can be purchased at an agricultural equipment store or made with your own hands.
There are such types of this technique:
- single-row;
- double row;
- propeller;
- rotary;
- disk;
- lister.
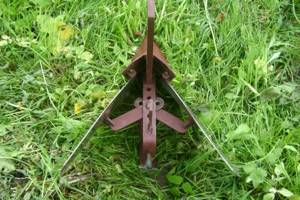
Single row
This type of hiller is often used for light soil types. Furrows can be made after preliminary loosening of the soil with a cultivator.
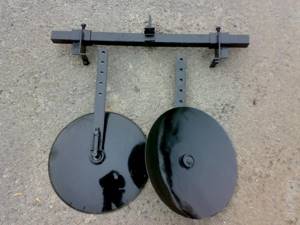
Double row
Before planting crops, he cuts a couple of furrows. In addition, it is used for loosening and hilling soil. The device includes a frame on which two hillers are attached at once. Due to this feature, the processing process with such a tool significantly saves time. It can be secured to the walk-behind tractor using a hitch. However, this type of hiller needs a lot of resistance to work. Therefore, it is often used together with lugs.
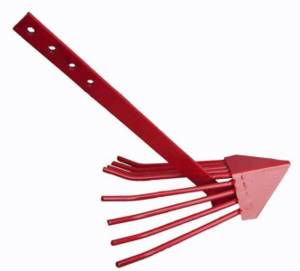
Propeller
Such hillers operate using special propellers. Under their influence, they dig up the soil and remove weeds, and only then can they begin to loosen the beds. This option is used for walk-behind tractors with front-wheel drive and a pair of speeds. This is due to the fact that at the last speed the power increases to almost 200 rpm.
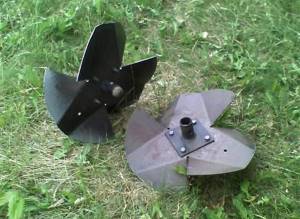
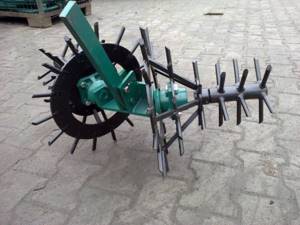
Rotary
This tool replaces the wheels with rotors with helical teeth. In practice, this hiller shows an impressive level of performance when creating furrows, loosening the soil and hilling potatoes. Can be used on a three-speed walk-behind tractor (two speeds and reverse). At the lowest speed, the tool hills up the planting, and at the next speed, it throws away the soil from the space between the rows.
Disk
It is universal for soil cultivation. The working part is steel concave disks. By plunging into the soil at a given distance, they loosen it, thus forming a ridge. To make use more efficient, you need to install the disks at an angle vertically and relative to the direction of movement of the equipment.
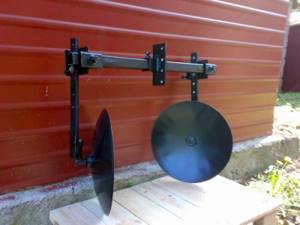
Making a disk hiller for a walk-behind tractor with your own hands is described below. Drawings and dimensions along with photos are attached to the description of how to make the tool.
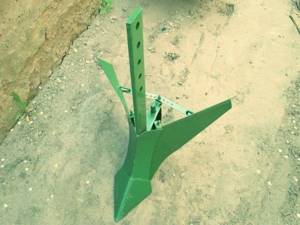
Listerny
Equipped with a fixed tillage width. It is often used on rather weak walk-behind tractors, whose power does not exceed four horsepower. It can cultivate beds about 30 cm wide. It has a thin stand and a pair of side wings. The stand protects the tool itself from overload and mechanical damage. This type of hiller can only be used on dry soil - soil adhesion will greatly interfere with the operation of the moving parts of the structure.
You can also find lister attachments on which you can control the width of the tillage. They are intended for more powerful walk-behind tractors - from four horsepower. This tool can also be used to work with moist soil.
Nuances of single- and double-row devices
You can install one or two hillers on a walk-behind tractor. Single-row ones include lister and propeller, while all types can be used in pairs. Depending on their quantity, the nature of cultivation changes. When processing a bed with one hiller, the passage is made on each side, and the wheels of the walk-behind tractor are placed in the rut between the plants. This method of cultivation does not allow obtaining high productivity.
Double-row hillers for walk-behind tractors increase cultivation efficiency. In one pass, a ridge is formed on both sides of the bed. However, during operation, the user has to control the contact area from both sides. This often leads to damage to plant roots. The convenience of such models is the ability to adjust the width of the hilling, which allows you to adjust it to the desired parameters.
For your information!
For winding beds, the use of a single-row processing method is more suitable.
How to make a propeller hiller?
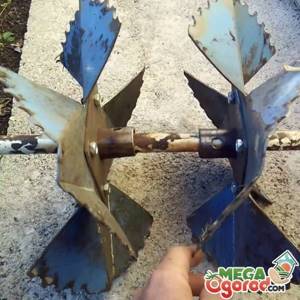
The active type of propeller-type device is similar in its parameters to the disk version. But all parts of the device are welded. The disks must have additional metal blades and bushings with brackets. The wings must be bent outward. The angle of inclination is varied by the worker depending on the location of the rows of potatoes. Attach additional parts with hinges or rods.
The propeller type hiller is suitable for walk-behind tractors with two gears.
Then it will be easy not only to loosen the soil, but also to transfer it into the furrows between the rows. It is best to use rotors with propeller-type teeth on devices. Then it is easy to form beds using technology, loosen and hill up the potatoes.
The serrated blades are aggressive against weeds; it removes them from the ground by the roots. Inventive summer residents will be able to make themselves a reliable assistant from scrap materials.
Making your own hiller
Instructions will help you make a hiller with your own hands, as well as clear sketches of parts with the required dimensions. They are fairly simple designs. Any subtleties and features can always be seen in the photo or video of the manufacturing process. This will allow you to install all components correctly and quickly, so as not to have to redo the work later.
Required tools and materials

For work, you should prepare a number of tools: metalworking (vise, hammer, chisel, wrenches), electric (grinder, electric drill with a set of drills, welding machine), marking (tape measure, caliper). You also need to stock up on consumables: abrasive wheels, welding electrodes. Markings are applied with chalk, pencil or felt-tip pen. It is convenient to use a text proofreader in the form of a ballpoint pen for these purposes. It is easy to apply, and due to the formation of a thin line, cutting accuracy increases.
If almost every craftsman has the required minimum working tool (or you can ask your friends for it), then the situation with the necessary materials is more complicated. Depending on the design adopted, a different assortment of metal and its quantity will be required. The master does not always have such an assortment at hand. You'll have to buy it. However, a store or warehouse may refuse to sell such a small quantity. In this case, you need to look for alternative sources in production, repair shops or scrap metal collection points. For production you will need:
- sheet with a thickness of at least 3 mm;
- strip 40 x 4, 50 x 5 mm;
- profile pipe 15 x 15, 30 x 15 mm;
- fasteners (bolts, washers, nuts).
How to install equipment on a walk-behind tractor
When installing a hiller with your own hands to a walk-behind tractor, you need to orient it correctly so that it is directed parallel to the line of the beds in the garden with the optimal angle of attack and furrow width. Then the furrow will be deep and symmetrical, and the ridges will be the same in shape. Therefore, the device must be adjusted. Before work, it is installed in the walk-behind tractor hitch and secured with pins or bolts.
For your information!
For quick installation of attachments, it is convenient to use hollow axles with cotter pins.
You can adjust the angle of attack of the disc hiller by tilting its frame in relation to the cultivator. This indirectly affects the depth of cultivation. The latter is adjusted by moving the sole in a vertical plane through mounting holes drilled in the rack. By moving the brackets you can adjust the width of the passage between the furrows. If sliding blades are installed, they are used to adjust the furrow parameters and ridge height.
How to set up a hiller?
Using washers and bolts on the hitch bracket. The hiller is attached to the walk-behind tractor. If you are working with an adjustable hiller, it is important to consider parameters such as the depth of immersion into the ground and the width of the immersion angle. The disc hiller must be positioned so that its legs are positioned vertically.

Next, you will have to adjust the width of the angle and the depth of immersion; for this, lanyards and special screws are used, which regulate all indicators. You will have to configure it for specific crops for which hilling is carried out.
Tips for using equipment
Before work, it is necessary to check the tightness of bolt connections and the settings of the unit. To do this, treat an area free of plants. During the test run, the operation of individual components is closely monitored. If deviations are detected, loose connections are tightened or the attachments are re-adjusted. All problems must be corrected immediately.
Before you begin, you must study the operating instructions and safety recommendations for using the walk-behind tractor. When processing beds, observe the following rules:
- They don't make sharp turns.
- Transfers are carried out in transport position.
- The unit is moved over long distances in a disassembled state.
Reviews
Roman, 46 years old
I have been using a walk-behind tractor for 5 years. During this time, I managed to make more than 10 devices to make gardening easier. Among them is a 2-sliding disk-type hiller. Using old gas cylinders as blanks is an interesting idea to reduce the cost of purchasing materials.
Oleg, 61 years old
I have been using this technique for cultivating my garden for a long time. A walk-behind tractor is a good assistant when planting and harvesting crops. This is especially true for potatoes. I have tried more than 6 hillers alone. Now I use a lister with adjustable blade width.
A self-made tool has an advantage over purchased models: it can be easily assembled, upgraded and repaired. In addition, the cost of its production is an order of magnitude lower.
Disc hiller: step-by-step instructions
Cultivation with a disk hiller is more efficient, but it is more difficult to build. The stages of work take place in the following sequence:
- Based on a cardboard template, halves are cut out of a steel sheet.
- The workpieces are bent so that the outer side of the disk is parallel to the radius.
- Having connected the parts with a union of radii, they are welded.
- It is necessary to process the seams with a grinder to remove seams and irregularities.
- If the fastening seems unreliable, carry out the welding machine again at the joint.
- The seams are sanded with sandpaper.
- Assemble a leash in the shape of the letter T, stands and lanyards for adjusting the rotation of the device.
- When installing disks, maintain symmetry by connecting the wheels with adapters.
- All parts of the hiller are attached to the bracket using bolts with washers and a stopper.
It is important in the manufacture of a disk hiller that the surface of its parts, especially the disks, is clean, smooth, without nicks or potholes. It is better to give the disks a streamlined shape. This way they will turn out the soil less, and the drying out of the soil will slow down. A self-made hiller will last a long time and has more advantages even over purchased models.