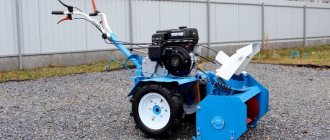
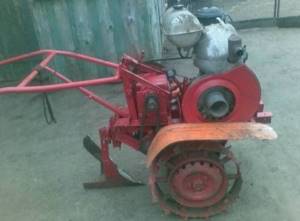
The most effective equipment for a summer cottage in rural areas and for a country house is a walk-behind tractor. Just as a device in itself, the walk-behind tractor is useless. In order to work with it, you need attachments.
For the owner of small plots, buying canopies for his walk-behind tractor will not be very profitable. But for the owner of a large plot, the purchase of high-quality equipment will quickly pay off. But what to do if you already have a walk-behind tractor on your farm and are not able to buy additional equipment for it? The answer is simple: make attachments for walk-behind tractors with your own hands.
How to make attachments for walk-behind tractors with your own hands
In principle, most equipment is very simple in design and can be easily made from what is at hand. However, you still have to buy a hitch for awnings. And you can make other devices like a potato planter, potato digger, lugs, seeder, hillers yourself.
Homemade hiller for walk-behind tractor
To make homemade hillers for a walk-behind tractor, you need to take two metal disks 2 mm thick and place them opposite each other so that they open outward.
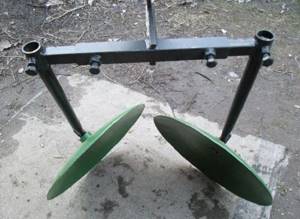
When we have selected the correct angle of the disks, we need to secure the hiller with bolts or simply weld it.
Now we need to secure it to the hitch we bought to the walk-behind tractor and off we go!
Homemade potato planter
The structure of a homemade potato planter is somewhat reminiscent of a hiller. Here, too, there are two disks at the bottom, but on top there is a special bowl into which potato tubers are poured. From a hole in the bowl, the tubers fall into the ground, and the discs of the potato planter are designed to bury them with each step.
In order to make a homemade potato planter, we need to assemble the frame, wheels and wheel axle, steel pins, tuber hopper, sprockets and adjustment mechanism. When making a canopy, pay close attention to the frame, because this is the main organ of the potato planter.
All other organs are attached to it. Cover the front wheels with a metal plate; without it, the potatoes will fall out of the hopper when we don’t need it.
Correctly select and configure the adjusting device of the potato planter. This is necessary in order to correctly distribute the planting material in the soil. Tighten the bottom of the hopper with rubber so that the potatoes do not fall out in vain. The potato planter can operate on a variety of wheels.
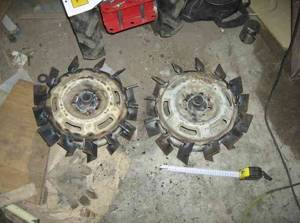
How to make lugs for walk-behind tractors with your own hands
In order to make them yourself, you need to have several blanks, a grinder and a welding machine.
To make lugs, you can use old car rims. Take out the steel corner, it will then become our teeth on the lugs. Take the axle shaft and attach the bearing to it.
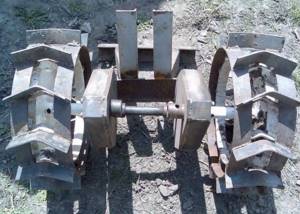
Weld a square plate into the center of the wheel rim so that its corners touch the edges of the rim. To be sure, we make holes in the plate and additionally bolt it to the disk. We attach the axle shaft from the inside of the disk to our plate.
When our wheel is ready, let's work on the hooks for it. We said earlier that you need to buy a steel angle in order to then remake it by hand. So, we cut the corner into pieces with a grinder, fold each two pieces into a corner and fasten them with a welding machine.
The hooks that we have obtained must be placed on the rim of the disc at a distance of 15-20 cm from each other.
The second method of making homemade lugs
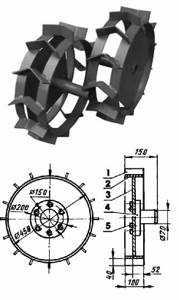
There is another way to make wheels with lugs. It will come in handy if you have an old unnecessary gas cylinder and no lugs. We cut a circle (rim) from the balloon with a width of five to seven centimeters, the circumference of the rim should be 30 cm.
After this, we make hooks from a 40 mm metal plate and, just as in the previous version, fasten them at a distance of 15 cm from each other. In addition, we weld an additional plate to each hook in its center, which creates an additional “tooth” of the lug.
We add another 60 cm to the edge of each hook - this is for greater penetration into the soil. We weld a square plate to the rim of one of the metal disks, on which there will be a lug axis.
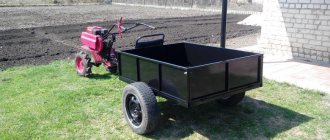
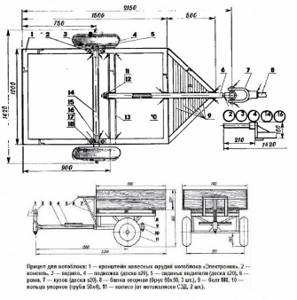
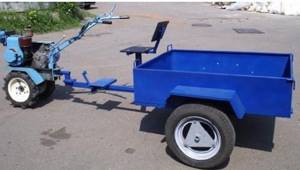
Homemade trailer for walk-behind tractor
Now let’s look at the design and capabilities of a homemade trailer for a walk-behind tractor. Sometimes manufacturers themselves do not make them for the walk-behind tractor they sell, or they make them of poor quality; they often bend when transporting cargo, where the trailer connects to the wheels. The best thing is a homemade trailer for a walk-behind tractor; it will be 2-3 times cheaper and, accordingly, more reliable.
First, we make the body of the future trailer. To do this, we take steel pipes with a rectangular cross-section or we can use corners as in the case of lugs. We need to use a grinder to cut the pipes at right angles and then we can sheathe the body with wood or metal. We attach a driver's seat to the front. This way you can operate a walk-behind tractor with a trolley while sitting and holding it by the walk-behind tractor control handles.
When our body is ready, it’s time to think about how our cart will ride. We need to make a wheel axle by taking the rear axle from a passenger car and removing the gearbox from it. You can also use a metal rod turned around the edges as an axle so that you can put on the wheels for the cart.
When the trailer is ready, you still need to attach it to the walk-behind tractor. Hitch the trailer to the walk-behind tractor using a swivel unit. To make it, we take a pipe with a rectangular cross-section and weld it to the lower edge of the cart so that a regular triangle is formed, and the edge of the body is the base of this triangle.
We also mentioned the manufacture of a rotating unit. It is a cylinder with a console on two bearings. This design of the device allows the wheels of the cart and walk-behind tractor to move independently of each other.
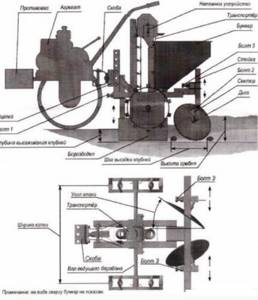
Below you can see drawings of a standard trolley for a walk-behind tractor
Homemade attachments - cutters and plow
One of the main attachments for a walk-behind tractor are cutters and a plow. Only cutters are used only on soft and constantly cultivated soil, and the plow is used on virgin soil. Also, the plow is more expensive and not every summer resident can afford it. But, in principle, this article itself was created for those who want the entire set of attachments and do not want (or cannot) pay for it.
For a homemade plow, take a metal plate with a thickness of 3 to 5 mm and a pipe, the walls of which should be 5 mm thick. We will also need to make the body of the plow.
First, we take a metal plate and sharpen it as if we were sharpening a scythe. Let's make a blade out of the plate. To do this, you need to cut it out with a grinder. The ploughshare looks like a trapezoid; you can see a sample of it below. Now we attach the pipe. And we also need a homemade ploughshare. We will replace the purchased one with a circular saw blade. All the parts we have made are now attached to the plow body and connected to the walk-behind tractor via a hitch.
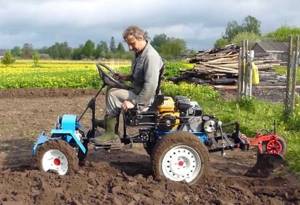
How to make a walk-behind tractor from a cultivator
Cultivators and walk-behind tractors belong to agricultural machinery and act as indispensable assistants for the population of the private sector, as they are multifunctional and practical. Many people believe that a cultivator and a walk-behind tractor perform the same function and do not see a significant difference between them. The cultivator is intended only for soil processing, while the walk-behind tractor has wide functionality and is aimed at performing various works on a summer cottage. However, the heaviness of walk-behind tractors leads to rapid fatigue of people who use them to work on their plots. In this article we will tell you how to make a walk-behind tractor from a cultivator in order to greatly facilitate the work of land lovers.
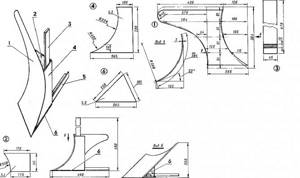
Making a reversible plow for a walk-behind tractor with your own hands
Previously, we considered the possibility of using a plow (homemade) instead of a milling cutter as an attachment for a walk-behind tractor. Both the cutter and the plow perform similar functions, but differ in the quality of processing. The reversible plow also differs from the standard one.
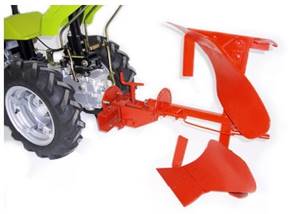
This plow has a complicated design, in which the body on top is equipped with a curved feather. Thanks to this structure, the reversible plow not only plows the ground, but also turns over the layer of soil that it plowed. This can be useful when working with heavy soil. The design of a reversible plow is much more complex than that of a conventional one, and only a professional can make a reversible plow on his own. It can be very difficult to choose the right quality workpieces and not make a mistake anywhere in the process.
In order to assemble such a plow yourself, you need to know what to assemble from, that is, what parts you need to make first.
To make a Zykov plow with your own hands, you need to make a stand with which you will attach the plow to the walk-behind tractor, a plow body with a ploughshare, a field board (thanks to it the plow becomes more stable) and a feather with which to turn the earth. The blade of this plow is made from a pipe half a meter in diameter with a wall thickness of 5 mm. We turn on the welding machine to cut out the blade, which we then grind with a grinder. For the birch body, a steel plate 2-3 mm thick.
Why do you need to modernize your cultivator?
The cost of a cultivator is several times lower than that of a walk-behind tractor, so many people prefer the first option. However, when performing various tasks with the ground, they are faced with the problem of low functionality of the cultivator, which is not oriented towards shallow digging of the soil or harvesting. Having design skills, you can solve this problem by converting the cultivator into a walk-behind tractor, while saving the family budget.
If you use attachments such as hillers, plows, and the like, then a reduction gear is extremely necessary. Because you need increased torque at low speeds. To do this, it is necessary to accelerate the engine to higher speeds, since the cultivator is designed to work with only one cutter and in order to provide the opportunity to install diverse attachments on it, it is necessary to make a walk-behind tractor from it. To get a low gear on the cultivator, it is advisable to install a special gearbox on it. Initially it seems that this is a complex technical device that can only be made in a factory using special equipment.
However, in fact, remaking a transmission mechanism that converts angular velocity into one or more mechanical gears with your own hands is not a difficult task.
First you need to establish yourself with the basic operational parameters of the power plant. The technical documentation indicates the number of revolutions of the crankshaft. This is the main value that is necessary for making calculations when converting a cultivator into a walk-behind tractor. To create a reduction gearbox for a cultivator you will need the following tools and materials:
- Bulgarian;
- welding machine;
- drill;
- sandpaper and drills;
- ruler;
- vice;
- hammer;
- metal sheet approximately 5 mm thick;
- pipe for fixing bearings.