Options and Benefits
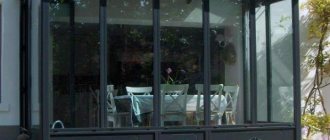
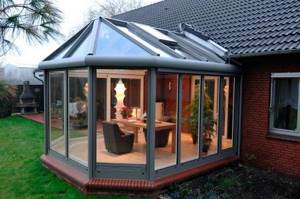
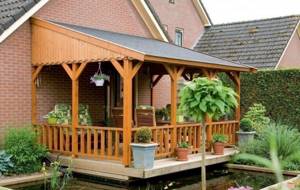
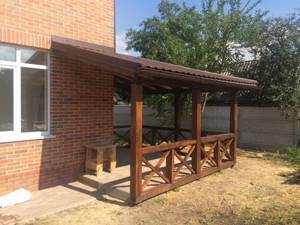
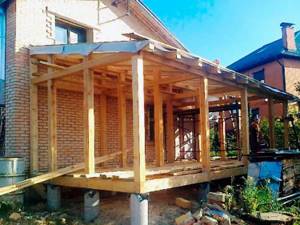
Gazebo attached to the house
The type of gazebo differs from other structures in terms of the type of extension. The veranda is an integral part of the building and is installed on a common foundation. The canopy over the site acts as a decoration for the yard.
The attached gazebo is installed on its own foundation. This is a lightweight structure, so there is no need to build it on a tile or massive strip foundation. It is much easier to support some parts of the structure on the main wall and install the terrace on piles or pillars. The advantage of this solution is the ability to complete the gazebo at any time.
The style of the extension, roofing and finishing materials are chosen in accordance with the design of the facade. By choosing the right design and design, you can modify the building.
There is another unusual advantage. If the open structure is the “summer” part of the building, then a closed, and even more so insulated, gazebo turns into a comfortable and elegant guest house or can even be used as an additional living room.
There are many options for extensions.
Open
A closed gazebo on one common foundation.
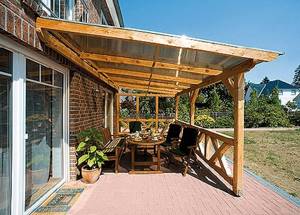
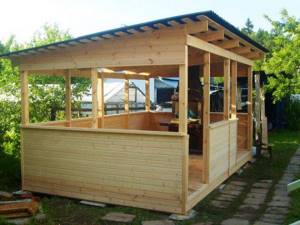
Depending on the type of structure, open and closed gazebos are distinguished. The first option is the easiest to set up. It is enough to attach the canopy to the wall and support it on the opposite side on the posts. If you supplement them with a fence, you get an excellent garden gazebo placed near the wall of the house.
An open veranda provides access to fresh air and sun. Door and window openings are often complemented with curtains. This design does not protect from wind or heavy slanting rain.
Closed
Involves glazing - full or partial. The window openings here are much larger than in the house, sometimes reaching the level of the basement, so the structure looks light and open. But at the same time, the glass reliably protects the gazebo from wind, rain, and snow.
Winter closed verandas can be turned into living rooms. To do this, install metal-plastic windows, insulate the floor and walls. If they want to use the room in winter, they provide heating or install an electric heater.
A closed, insulated building costs significantly more. However, the foundation for it is still made light, so it costs less than the same area of a residential building.
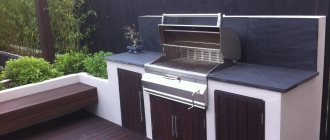
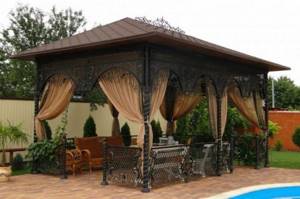
With barbecue
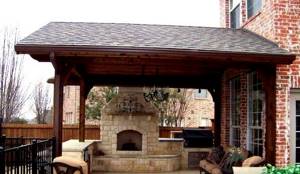
Gazebo with brick barbecue
In country houses, you can complement the terraces with stoves and barbecues. They do not replace the kitchen, but allow you to organize outdoor parties with a pleasant addition in the form of barbecue.
The grill is placed on a separate area under a canopy not far from the terrace. The grill is an open structure, and direct proximity to a fire is not allowed next to a residential building.
Another option is a stove with a barbecue. This structure is much more massive, acts as part of the veranda and stands on its own foundation. However, the structure is closed, the fire is visible, but accessible only from one side, and the fire safety of a brick oven is much higher than a barbecue. But this option is only possible with a large gazebo area.
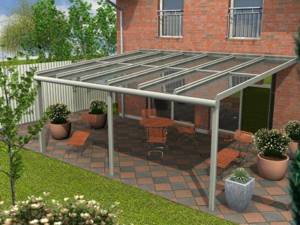
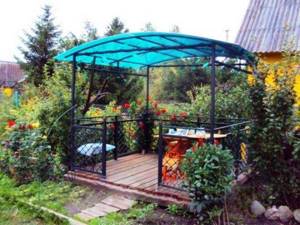
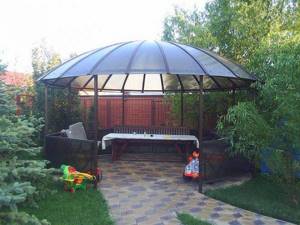
Polycarbonate
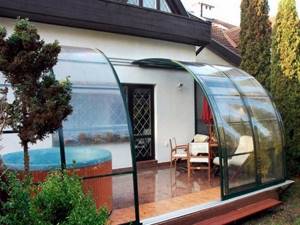
Gazebo with a sliding roof made of polycarbonate
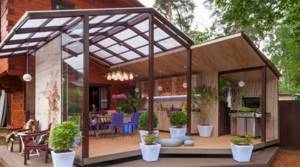
If the extension is a decorative addition to the building, the best option for covering a gazebo built into a country house is polycarbonate. It is a transparent, extremely durable plastic that is flexible and heat-retaining.
Polycarbonate can be bent to a large radius. This allows you to give the roof and the entire gazebo the most unusual shapes - round, arched, pointed. The material is produced in different shades and varying degrees of transparency, so it can be used for roof cladding, fencing and window openings.
Polycarbonate retains heat very well. A closed veranda of this type does not need insulation in the fall. However, in summer it is very hot here.
With a roof made of different materials
The roof of the extension is not connected to the roof of the house, so you can choose any option for covering. Most often they use the same one to emphasize stylistic unity. But sometimes they deliberately choose a more interesting option:
- soft tiles - gives the gazebo comfort and homely charm;
- wooden tiles, especially complemented by a carved cornice, emphasize the ethnic style of the building;
- reed, planks, shingles are an interesting addition to large open terraces in the Mediterranean style.
You should not take cheap material for the gazebo, like slate or corrugated sheets - it is not attractive.
Non-standard shape
Extension of unusual shape
The standard extension has a rectangular outline. This form is the simplest to construct and the easiest to adjust. But if desired, the design can be given a more interesting configuration:
- polygonal - reminiscent of bay windows and quite easy to install;
- with a round or oval base - such a platform is often placed under a canopy;
- with an arched or rounded roof - here, on the contrary, the upper part is given an unusual shape;
- The entire gazebo can have semicircular outlines.
The more complex the project, the more time and money will have to be spent.
Decoration and arrangement
You can decorate a gazebo canopy in a variety of ways.
A relaxation area is usually set up inside - for this purpose, chairs, benches or swings, and tables are placed. If metal was used in construction materials, then it should also be used in decorative elements. These could be, for example, shaped candlesticks or stands for plants. Did you know? If today polycarbonate is known as a building material for roofs, walls of greenhouses, etc., then initially it was used only in the space and defense sectors. It began to be produced in 1955 to create some parts of military equipment, spacecraft, and aircraft.
You can hang flowers in pots around the perimeter of the roof.
Lights should be provided to the gazebo. Typically connected to the home's electrical source. Considering that midges will flock to the lamps at night, you need to install a mosquito catcher or cover the structure with a mosquito net. Instead of the latter, you can also use special curtains.
So, the simplest option for arranging a recreation area in a dacha is to build a gazebo-canopy directly next to the house. To implement the idea, it is better to take materials such as wood and polycarbonate. They are cheap, easy to use and look quite attractive.
Designing a gazebo
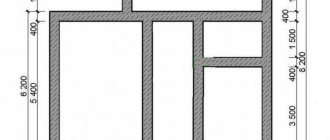
Construction begins with the design and development of a drawing. The following is taken into account.
- Structure - if it is a canopy on supports, for example, you can do without a foundation. It is enough to support the roof on the support posts and level the area. If it is a glazed structure, you will need to build a base.
- Dimensions - usually the terrace is located along 1 wall. But there are options placed along 2 walls, around a corner, and bay windows.
- Layout - if a stove or barbecue is being added, it is necessary to find the correct location for the structure and provide special finishing for this part of the site.
- The shape - a simple rectangular canopy and an arched structure with semicircular walls require a different approach. The latest model project is more difficult to implement.
- Material – wood, brick, stone, blocks, like foam blocks, metal. The material determines the type of gazebo and appearance.
You can make a project for a gazebo-extension to your dacha yourself if it is small in size and has a regular shape. To calculate complex structures, it is better to contact specialists.
Preparing the construction site and laying the foundation
Choose a picturesque place to build a gazebo, clear it of foreign objects, level it, if necessary, uproot or replant the plants. It is good if the lower edge of the shed roof for the gazebo is located above the edge of the site, because rainwater will flow there, forming a puddle. When the place has been selected and cleared, mark it using a tape measure, twine and pegs, mark the location of the foundation pillars, for a rectangular gazebo there should be at least 6 of them, take the distances between the supports to be 1.2-1.5 m.
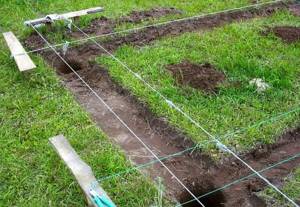
After you have carefully examined the drawing, completed the markings and checked their correctness, you can begin pouring the foundation. You can calculate the required volume of concrete by knowing the number of pillars, their depth and dimensions. In places marked with pegs, dig or drill holes to the depth of soil freezing (50-60 cm in central Russia), make formwork 25x25 cm, 20 cm high from scrap boards. Pour sand and gravel into the hole, place reinforcement there and fill with viscous concrete mixture
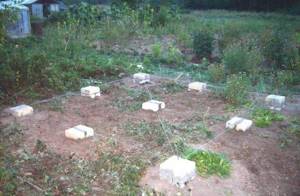
It is very important to measure the heads of the foundation pillars according to the building level. After you have filled the holes with concrete, leave the foundation for 3-5 days for it to harden and gain strength.
Tools and materials
Extension to a house on a pile foundation
The choice of tools depends on the construction material and the type of foundation.
Since the gazebo weighs little, a pile or column base is constructed. To do this, take metal or wooden piles, brick or asbestos-cement pipes, which are then filled with concrete.
To build brick walls you will need a trowel, a spatula, a level, a slope, and masonry mortar.
For a wooden terrace you need carpentry tools and timber of the appropriate diameter.
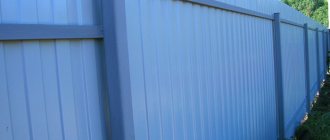
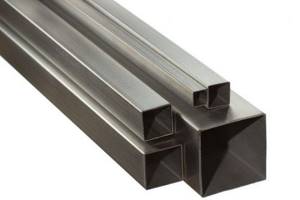
When building a metal model with a polycarbonate roof, you will need a welding machine, an angle grinder with a diamond blade, a steel profile, and special fasteners for polycarbonate.
How to simply and beautifully attach a gazebo to your home?
Recreation in the fresh air is necessary for a person, and one wants to spend it in complete comfort. The solution would be to build a gazebo, which should be connected to the house. It’s not difficult to make such a structure on your own, because it won’t take a lot of money, but the result will certainly please you, and the process of work can be enjoyable.
DIY construction
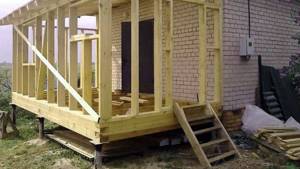
A gazebo-extension to a country house is most often made of wood. This material is cheap, accessible, and very easy to process. Installation is quick. At the same time, the decorative possibilities of wood are very great.
Foundation
Extension on metal air piles
For wooden gazebos, it is enough to build a light foundation - pile or columnar. The easiest way is to arrange a pile one. To do this, holes are drilled in the ground at the corners of the future site. Sand and crushed stone are compacted to the bottom and piles - metal or wooden - are driven into the ground.
Columnar takes more time. It is necessary to dig trenches under each post, compact a drainage pad to the bottom and lay out brick pillars. Such a foundation is more durable than a wooden one.
The upper parts of the posts or piles are connected with a grillage or timber frame. It touches the wall, but is not attached to it.
Installation of the structure frame
Construction begins with waterproofing the foundation. Typically, 2–3 layers of roofing material are used for this. Further steps are determined by the selected material.
The simplest frame is assembled from timber with a cross-section of 100*100 mm. Vertical posts are placed in the corners, and if the gazebo is long, then every 1.5–2 along the outer wall. The upper parts of the frame are tied with horizontal crossbars. Then the timber for filling is cut. It is recommended to mount the main racks on metal corners, but experienced craftsmen use a tie-in.
A brick gazebo takes longer to build. Standard masonry with dressing is performed. The brick wall is adjacent to the wall of the main building, but is not integral with it.
Creating a roof and roofing
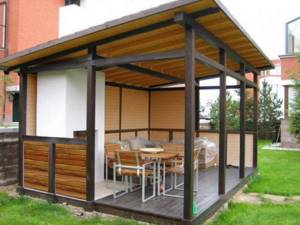
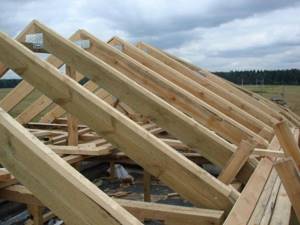
An attached gazebo most often has a pitched roof.
A gazebo attached to a house is most often equipped with a pitched roof. This is rational: its dimensions are not large, and the installation of one slope is much simpler than a more complex structure.
The angle of inclination of the slope is chosen taking into account weather conditions.
- The structure is installed on the Mauerlat. In a wooden gazebo, this role is played by the upper reinforced frame, in a brick gazebo - by a reinforced brick row.
- Rafters are cut from timber or boards. If the harness is wooden, grooves are cut in the legs for landing.
- The rafters are secured to metal corners.
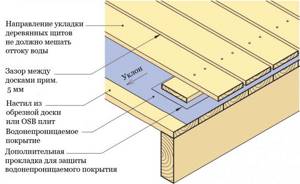
- A solid or lattice sheathing is installed, waterproofed if necessary and sheathed with suitable roofing material.
If this is a closed building, then the work continues: window and door frames are inserted, floors are laid, the ceiling is sewn up and finished.
Types of roofs
When starting to add additional premises to your house, you should first figure out what types of roofing can be installed on them.
Important! Flat types of roofs are not made on extensions. In winter, a large amount of snow accumulates on them, and during rainy periods, leaks may occur - this will inevitably lead to the rapid failure of not only this structure, but will also negatively affect the condition of the load-bearing wall to which the additional room adjoins
In total, there are 3 large groups that would be advisable to use in this matter:
- single-pitched;
- gable;
- hip or half-hip.
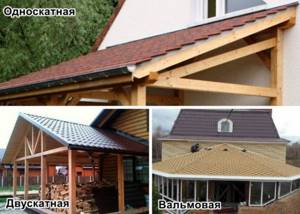
Each of them combines several varieties.
They are selected depending on the purpose of using the extension and in accordance with the general style in which the private house is decorated. A pitched roof is one of the simplest options. Its first variety is mounted on poles. Mainly used for premises that will not be residential, i.e. for covering a veranda, summer kitchen, terrace, garage or outbuilding. The design does not imply the presence of an attic compartment, so it will be cold and not suitable for regions with harsh winters.
We recommend that you familiarize yourself with the features of eco-style in landscape design.
All heat from the extension will escape through the walls. But if the room will be used as a summer kitchen, and not all year round, then this drawback will only be useful. The design does not require complicated calculations. It is enough to install supporting pillars and place the building at the required or acceptable slope. More often, such roofs are mounted at a low angle. The rafters are fixed with a mauerlat and overlapping beams, so even such a simple structure will withstand the largest roof.
The second option of single-pitch roofing is used when the extension is planned to be equipped with heating appliances. It assumes a steeper location of the slopes. Then the rafter system and the attic compartment will be located at some distance from each other, which will make it possible to lay insulation material in this place.
Find out also how to design a rectangular area.
The design is quite complex and requires a thorough approach to calculations and installation
In this option, it is important to ensure that one part of the rafters is adjacent to the ridge of the roof of the house. This type of fixation requires strengthening the load-bearing partition, on which the load will significantly increase due to redevelopment
Regardless of the type used, the pitched roof type does not require a too large slope. On average, the angle is given in the range of 5–45°. A gable roof on an extension is installed much less frequently, as it is quite difficult to implement. It consists of 2 slopes connected to each other and forming a triangular top. One of the gables of the structure is fixed to the wall. It is usually used for installation on extensions at the end of the main building.
15b21a2450f159b8e4808a02326eba22.jpe

276cab0c2f93263a6950a41092eb0623.jpe
7b63619227a3b3f66bbd3ace38c68e2b.jpe 33bc76fa537d20003a561fb2aa2b709d.jpe
Did you know? The prototype of modern tiles, according to scientists, are flat clay cakes, fired on fire and used as roofing material by the ancient Egyptians, that is, from about the middle of 4 thousand BC. e.
Hip and half-hip roofs are mounted on extensions built on one side of the living space, but having a larger width. Such structures are used even less frequently than gable ones, and they are designed in advance, parallel to the house. In this option, the support beams that will form the basis of the rafter system are placed on the wall of the general building, which significantly increases the load not only on it, but also on the foundation as a whole. From the above information it follows that you can install a pitched roof on the veranda yourself, without resorting to the help of specialists, which will be discussed below.
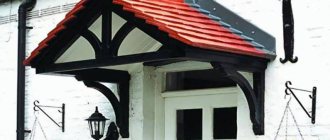
Decorative design
Decorating a gazebo in techno style
A gazebo for your home can be very beautiful, not only comfortable and practical. It’s easy to decorate, you just need to choose a style.
- Most often, in a country house they prefer the rustic style and its variations. The gazebo is made open, wooden floors are laid, and lamps in the form of lanterns are hung. The terrace is decorated with flowering plants. The gazebo is complemented with light striped curtains and awnings.
- Design in a constructivist style is fashionable. This veranda has strict rectangular outlines and excludes fencing. Blinds and fabric roller shutters are allowed as sun protection. Plants are placed only outside, and the furniture inside is designed in the same style.
- High-tech suggests rounded, unusual shapes. A gazebo is often built with a metal frame and lined with polycarbonate, as this material is more flexible. The extension is glazed as much as possible and gives the impression of being transparent. Curtains are excluded here.
- A gazebo in a rustic or chalet style will allow you to install lattice fencing and decorate the structure with intricate carvings.
A gazebo attached to a house is a good solution for a small summer cottage or allotment where a large area is occupied by a vegetable garden rather than a garden. It is very pleasant and convenient to enjoy evening tea, throw parties and receive guests.
Selecting the type of design
When planning to make a gazebo with a single-slope roof, you need to thoroughly consider the issues of the degree of enclosure, the choice of building materials and the shape of the object.
Degree of closure
Based on the degree of closure, recreational facilities can be divided into groups:
- open (easily built and used when it’s a fine day outside or raining without wind);
- half-open (there are “windows” left in the walls, but despite them, rain splashes and wind almost do not get inside the object);
- closed (comparable to a summer kitchen and fully assembled, which makes them suitable for relaxing even in bad weather).
Overview of base materials
Finding suitable building materials is an important point. If you approach this matter incorrectly, you will have to reap the rewards - repairing the gazebo within a year after construction.
Most often, a gazebo is built from wood, since it is simple and familiar
The frame of a gazebo with a pitched roof can be created from beams, metal pipes or corners.
Having firmly decided that the structure will be wooden, you need to find beams with a cross-section of 10x10 cm. They will become the pillars of the structure. The front wooden supports should be half a meter higher than those installed at the rear.
63fec01a2076292b971b1cd1518a985b.jpe
The lower edges of the beams, which will be hidden in the ground, are coated with a compound that protects the wood from rotting. Such a product can be an antifungal primer or machine oil. And to enhance the effect, it doesn’t hurt to use roofing felt, which is used to wrap the pillars before pouring liquid concrete.
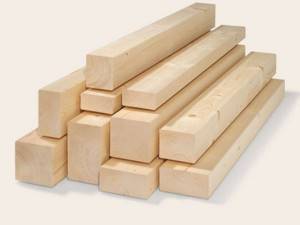
To build a gazebo, it is preferable to buy beams of standard length
Having decided to make the frame of a light gazebo metal, you need to take only profile pipes with a cross-section of 5x5 cm or metal corners 3 mm thick. And if you are determined to build a gazebo from heavy material like slate, it is better to find stronger pillars - pipes with a cross-section of 7x5 cm.

Profile pipes are used as racks in the construction of gazebos
Wooden gazebos are chosen by traditionalists.
A wooden gazebo with a pitched roof inspires confidence, as it has long gained a good reputation
Supporters of alternative solutions like metal buildings, because a structure made from profile pipes looks special and does not rot, unlike a wooden structure.
A metal gazebo with a pitched roof is chosen by those who do not want to deal with wood rotting
And some home craftsmen have even more modern views: they make a gazebo out of polycarbonate. The sheet of this material is large in size - 2.1 × 6 meters. Therefore, they manage to cover a significant area without creating many seams.
When building a gazebo, polycarbonate often becomes a roofing material
If there are no special requirements for the material for the walls of the gazebo, then the choice of roofing building materials must be thought through to the smallest detail.
The wooden base for the roof material can be boards with a section of 10×5 cm and auxiliary elements with a section of 3×5 cm, located at a distance of 35–60 cm from each other. Exactly what the gap should be depends on the weight of the building materials.
If you plan to make a metal gazebo, then to construct the roof grid you will need thin pipes with a cross-section of 2x2 cm.
To create a sheathing for the roofing material, use the thinnest pipes, since the frame of the gazebo will not withstand the weight of large metal products
Construction form
You shouldn’t get hung up on gazebos that are shaped like a square or rectangle. Of course, building a structure with edges like a simple geometric figure is easier and faster. But non-standard shaped structures are much more conducive to relaxation.
A circular gazebo is more interesting than a rectangular structure
It is possible to make a gazebo with a single-slope roof semicircular. And if you wish and have the opportunity, you can move even further from traditions - create a triangular or even hexagonal building.
Construction of a gazebo adjacent to the bathhouse
The first stage of construction work is the construction of the foundation. The type of foundation is selected depending on the planned extension. The foundation allows you to protect the floor of the extension from the influence of rain and the accumulation of water.
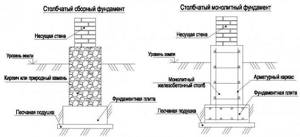
The most common foundations are the following structures:
- concrete strip;
- reinforced concrete platforms;
- columnar bases made of logs or asbestos pipes.
After installation and hardening of the foundation base, the process of installing the walls of the structure begins. Depending on the chosen project, installation can be made of wood, brick or stone. When constructing an open gazebo, it is necessary to erect pillars at the support points on which the roof of the structure will rest. Railings are mounted between the pillars to limit the space of the gazebo.
The final stage of construction is the installation of the roof structure and fastening of the roofing material.
The roof connection can be of two types:
- With dismantling of the main roof.
- Without dismantling the main roof.
If the main roof cannot be disassembled, then the attached roof should have a height lower than the main one. When adding a roof, the best option would be a pitched roof adjacent to the finished wall. The junction of the roof and the wall is covered with sheets of tin, which should bend along the corner of the junction and lie on top of the roofing material of the adjacent wall.
When dismantling the main roof, the connection consists in the fact that the rafters of the new roof are laid on the existing rafters and secured, after which the roofing material is laid.
After the construction of the extension to the bathhouse is completed, you can begin to improve the surrounding area. For this purpose, you can use climbing plants, plants planted in flowerpots and placed around the perimeter of the building. This method of landscaping allows you to create an excellent oasis in place of the gazebo, relieve fatigue and invigorate a person after a hard day.
What should be the distance from the gazebo to the house
The Land Code of the Russian Federation and SNiP clearly define how many meters there should be from the gazebo to the house and other outbuildings.
Important! The distance can be measured from the projections of protruding fragments of buildings that fall on the ground.
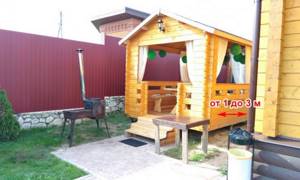
When constructing this building, maintain the following distance:
- Bathhouse or residential building - from 1 to 3 m.
- The red line of the road is 5 m.
- Neighbor's fence - 1 m.
- Outdoor toilet - 12 m.
- Large trees - 1 m.
- Apiary - 2 m.
- Well or artificial pond - 1 m.
- Buildings housing poultry or small livestock - 4 m.
Correct measurements are taken from the base or wall of the building, but this is provided that other elements of the building do not protrude more than 50 cm.
This could be:
- porch;
- bay window;
- canopy or overhang.
Did you know? The ancient Israelites had a harvest festival. During it, a feast took place under temporary structures made of branches covered with greenery.
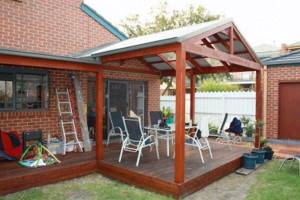
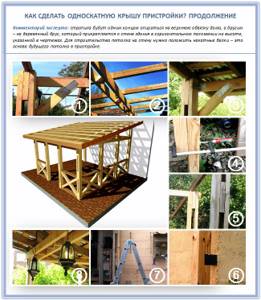
How to build a shed roof for an extension?
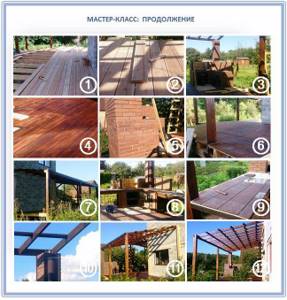
To answer this question, we have prepared detailed master classes for you. Let us just note right away that for extensions with a pitched roof, it is best to use the same coating as on the house in order to maintain aesthetic unity, or metal sheets with a double lying seam.
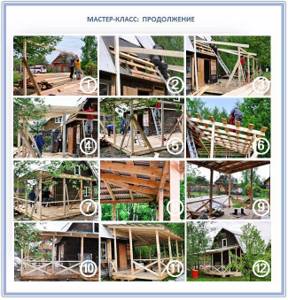
So, the width of the roof for this terrace is 4 meters.
- Step 1-2. The foundation is being poured. To do this, we dig asbestos pipes into the ground 1.5 meters and install studs in them.
- Step 3-4. We make the frame for the future terrace from planed larch 15x15 cm.
- Step 5-6. The foundation for the barbecue is being poured in the corner of the future terrace.
- Step 7-12. We fasten the beam along the entire perimeter to the studs, and then install the frame on it.
- Step 1-7. We lay out the floor, leaving 6 mm gaps. We treat the wood and decking boards with rosewood-colored wax.
- Step 8-9. We assemble the walls of the gazebo so that we have two entrances.
- Step 10-12. We are building a staircase and a barbecue with a tabletop.
As you can see, nothing complicated:
If you have no time for building stoves, but would like to simply add a bright veranda to your house, then everything will be even simpler. Please note that in this project, the shed roof of the extension had to be connected to the roof truss system of the house, because she was too close to the ground. A risky step, but it will do for a country house.
The dimensions of such a veranda were 3 meters long and 4.2 meters wide. The height is 2.5 m, and the slope of the pitched roof is only 10°.
6b8940222e9179b4045d9f3a336af197.jpe
8e1699c86c66c36c735c8ca1e5fe8df1.jpe
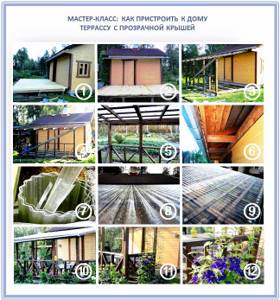
- Step 1. Place the transparent roofing covering directly under the ondulin cut on the roof of the house.
- Step 2. For the sheathing we use inch boards 20 mm thick.
- Step 3. We make a columnar foundation for such a terrace: we insert roofing material into each tube, twist the roofing material and insert three 8 mm reinforcing rods welded together into it. Next we fill it with concrete.
- Step 4. You need to fasten the polycarbonate through the wave, for which we use special plastic inserts.
No other coating can be used here. After all, here the pitched roof was practically hooked onto the roof of the house, thereby significantly increasing the load on one of the walls. Therefore, the roofing covering can only be very light, so as not to cause even bigger problems. And modern polycarbonate is a wonderful solution in this regard.
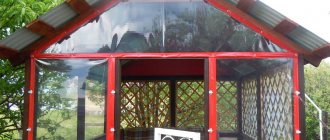
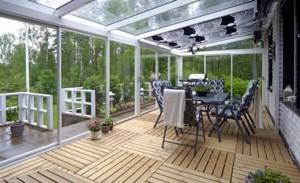
You can also add a closed veranda, like here:
This technical solution is even simpler if you just want to drink tea in the evenings in your cozy garden:
In this project, the cross beam was attached to the house using anchors.
- Step 1. Add intermediate rafters on each side to the outer posts.
- Step 2. We fix the cross beam with anchors directly to the wall. It is preliminarily fixed with clamps, and the racks with jibs.
- Step 3. We make the sheathing for the corrugated board. Be sure to check the horizontal level with a laser level.
- Step 4. Raises the sheets and secures them with self-tapping screws.
- Step 5. Final work.
Here's another simple and great example:
Exciting ideas, aren't they?
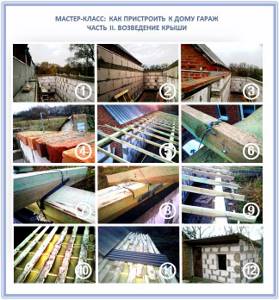
And now - more complicated options. So, in this project everything is done carefully, step by step:
- Step 1. We knit the reinforcement frame in 4 threads.
- Step 2. We install panels from edged boards, which we use as formwork.
- Step 3. We tighten the formwork with M6 studs.
- Step 4. Using a laser level and thread, we align everything.
- Step 5. Pour concrete with crushed stone.
- Step 6. Poke the concrete with a shovel to let the air out.
- Step 7. We tamp the floor of the future garage and apply sand. We carefully level it and tamp it layer by layer.
- Step 8. We build walls from blocks in the tongue-and-groove system, placing them on edge. The width of the wall is 20 cm.
- Step 9. We make an armored belt: we mount M12 studs on the sides, and put another row of blocks on them. On top there is another row of bricks to distribute the load.
- Step 10. Now we work with the rafters. We treat them with protection.
- Step 11. In the Mauerlat we make special cuts for the rafters.
- Step 12. Install the roof.
- Step 13. Lay the gables and cover the cornice with moisture-resistant OSB.
This is what it looks like: