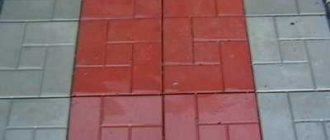
Advantages of coating
This coating has many advantages. With the right choice and proper installation, it contributes to:
- Insulation of ground cover, dirt;
- Improvement of landscape design of the territory;
- Leveling the surface;
- Makes it easier to get rid of weeds every year.
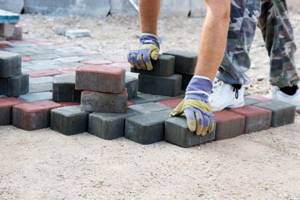
You can lay the tiles with your own hands, but before doing this, it is very important to choose the right tiles based on types, manufacturing technologies and load characteristics. After all, it seems that any material will do here; many private yards involve not only walking, but also the entry of vehicles, including those with high operational loads - trucks.
How it is made
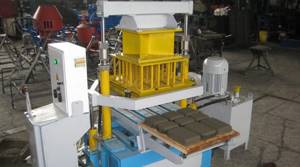
Paving slabs can be created by several methods - vibrocompression, vibration casting, hyper-compression from concrete grade B22.5; B25; B30; B35.
- Using vibration casting, you can make tiles with your own hands, since the equipment for this process is quite affordable in home production conditions.
The technology consists of pouring the concrete mixture into a plastic container and placing it on a vibrating table. Due to continuous vibration load, it is compacted until liquid appears on the surface of the mixture. Then the mold is placed on a flat shelf and packed in film or placed in a room with high humidity and a temperature range of 20 to 60 degrees Celsius. After a day, the tiles are stripped and can be laid, however, the concrete will gain final strength only a month after production.
These tiles are suitable for paving paths in parks and squares; they can also be used to lay out courtyard areas without vehicle access, in general, on surfaces with low pedestrian traffic.
The manufacturing technology also implies the possibility of adding any color dye.
- Vibrocompression - when a concrete-based solution is placed in a special mold mounted on a vibrating frame. A vibrating punch presses on top of the mold to compact it. At the end of the specified cycle, you will receive a paving product ready for installation, which can be laid in places of high load use.
This product has a narrow color spectrum, however, it is very wear-resistant.
- Hyperpressing is the process of producing tiles under a very high hydraulic press without the use of vibration technology.
Of course, vibro-cast tiles for laying in the courtyard of a private house look much more attractive - they are glossy, have a wide range of colors, but from a practical point of view, vibro-pressed tiles are much more strong and durable, moreover, vehicles can freely pass over them without the risk of destruction of the coating .
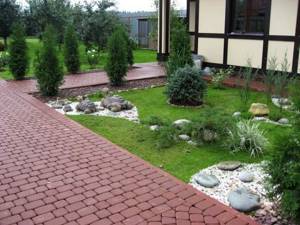
Laying paving stones with your own hands: step-by-step instructions for work
Coating in the form of paving stones has many advantages. Among them, the following qualities stand out:
- compressive strength;
- long service life;
- attractive appearance;
- abrasion resistance;
- wide range of applications, including paths, rest areas, pedestrian walkways, parking areas and traffic areas;
- high level of resistance to temperatures, both low and high.
The rest area is made of cement paving slabs
Paving stone sidewalks: how to lay the covering and where to start
Before laying paving stones, preparatory work should be done. The list of these works includes the following procedures:
- Determine the condition of the pavement surface.
- Select a scheme in accordance with the planned loads.
- Prepare the surface for work.
- paving stones or paving slabs;
- a mallet with rubber pads or a hammer with a similar coating;
- building level;
- grinder with sets of discs for cutting tiles;
- tape measure, shovel, brush, rake;
- container (metal);
- block of wood;
- watering can, wheelbarrow;
- sand and a special sieve for sifting it;
- protective hand gloves and goggles.
To carry out the work, you will need to prepare the appropriate tools and additional materials:
Before you start laying tiles, you need to prepare all the necessary tools and materials.
If you correctly calculate and design the site or path, in the future you will insure yourself against rework, and therefore from additional costs for the purchase of material. At this stage, the shape of the paving stones is selected. How to properly lay this covering option will depend on other factors: paving scheme, mosaic, color scheme, surrounding landscape, as well as the base.
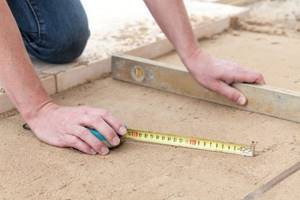
Using a tape measure, a set of wooden pegs, construction cord and a level, mark out the area for laying out the site or paths. Instead of a building level, you can use a level.
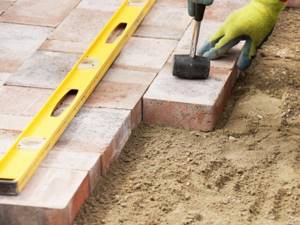
During the paving process, you can’t do without a rubber mallet and a building level.
After this, you need to calculate the consumables:
- cement;
- paving stones;
- curbs;
- crushed stone;
- gravel;
- sand.
Substrate preparation: how to lay pavers on sand and gravel
The quality of the future coating is largely determined by how carefully you think through and prepare the base.
The first stage involves preparing the soil. To do this, remove the top layer (turf) from the surface of the earth. After which you will need to remove a layer of soil 20 cm thick. Pipes can be placed under the base of the future coating, which will subsequently be used to lay elements of communication systems. This way, you don't have to break paths to lay communications.
Preparing a site intended for paving with paving slabs
Then the resulting depression is filled with gravel with large fractions or crushed stone. This is done to form a cushion for laying paving stones. Depending on the purpose of the tracks, a certain thickness of this layer is selected. For laying a pedestrian path, it is recommended to take a thickness of 10-15 cm. If it is planned to build a parking area and a driveway for cars, then this figure should be increased to 15-20 cm.
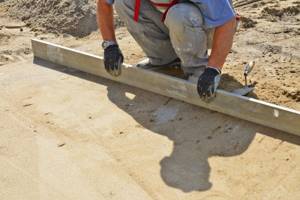
To shrink the crushed stone cushion, you can use a vibrating machine or a regular compactor. An intermediate layer of sand is poured on top of it, after which it is leveled with a rake and compacted a little. It is allowed to use a dry sand-cement mixture with a ratio of these components of 1:5, respectively.
Leveling the base using a cement-sand mixture
Additional recommendations for arranging the foundation
To ensure that the base is correct and well-planned, it is recommended to install guides that will eliminate unevenness. For these purposes, it is best to take slats or pipes; excess material from the top layer will be screeded along them.
Geotextiles are laid on top of the crushed stone. This type of material should be laid in 2 layers for greater efficiency. Advantages of using geotextiles:
- the material does not allow layers of crushed stone and sand to mix;
- normal outflow of water is ensured;
- the base is durable and more durable;
- the likelihood of weeds growing between the paving stones is eliminated (plants contribute to the destruction of the paved surface, reducing its service life).
If you follow all the recommendations for forming the base, this area will become an excellent basis for laying tiles or paving stones. Thanks to strict adherence to technology, the platform or paved path will be durable and will not sag over time.
The final result will directly depend on the quality of preparation of the base.
Do-it-yourself paving stones: video. How to lay borders
There is no more suitable material for paving paths in the courtyard of a country house than paving stones. Many owners of such cottages know how to lay this type of covering with their own hands. After all, this is a great way to save on arranging your local area and make it comfortable and beautiful. To ensure that the paths have a complete appearance, curbs should be installed before paving the paving stones.
The border will perform several functions at once:
- decorative (the coating receives a beautiful frame and harmonious appearance);
- limiting (the paving stones will not spread to the sides due to the outflow of water);
- strengthening (the base becomes stronger and more stable).
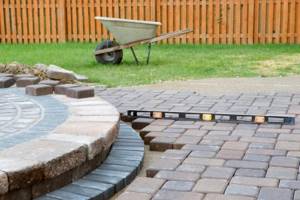
Before installing curbs, use wooden pegs to model the area or path you are going to build. Mark all bends, turns and intersections.

A path with curbs looks neater
Next, all the pegs need to be connected to each other using a rope or cord. Be sure to use a building level or level when doing this. Dig a groove so that the curb installed on the cushion rises about 1-2 cm above the rope. Concrete mixture should be placed at the bottom of this groove.
The border is installed on the prepared cushion, after which it should be hammered in by lightly tapping it with a rubber hammer or mallet until the surface is level with the tension level of the rope.
When installing a curb, you should control its position. Each element is necessarily checked for verticality, to which it must strictly comply. After which the gaps between the curb elements are controlled. These parts should be installed as closely as possible to each other. The groove itself should be filled with sand from the outside and compacted thoroughly.
In some cases, designers do without using curbs during the installation of paving stones. Videos on how to properly place material in such conditions can be easily found on the Internet. In fact, paving is carried out flush with the lawn or 1-2 cm above it.
Tile size range
When choosing a coating, it is very important to focus on its dimensions, since tiles can only be laid in their entirety, without trimming.
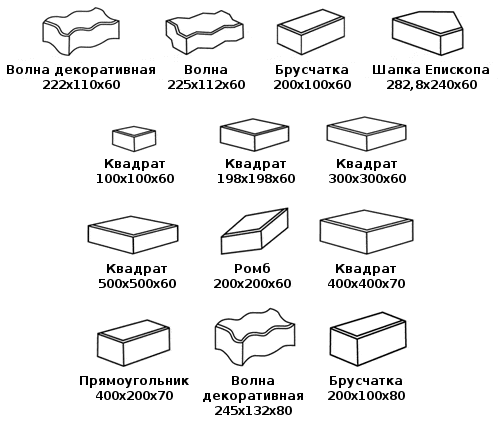
The following standard sizes are mainly in demand:
- 50x50 cm for paving blind areas around the perimeter of the house, as well as laying garden paths. This is a very convenient product when you need to make a passage for one person, but it requires very high-quality preparation of the capital foundation, otherwise it will begin to collapse under heavy loads;
- 40x40 cm is ideal for a double row of garden paths. The most popular types of tiles of these sizes imitate textures - “Parquet”, “Planks”, “Antique” and so on;
- 30x30 cm - thanks to the ideal ratio of weight and size line, it can withstand significant pressure and serious loads;
- 10x10 cm - so-called paving stones for courtyards.
A correctly laid tile carpet can withstand certain loads according to its thickness:
- 4 cm - for pedestrians, in particular suitable for courtyards of private houses;
- 6 cm - for cyclists and other small vehicles;
- 8 cm - withstands cars, you can lay tiles before entering a private garage;
- 10 cm - capable of holding even freight vehicles without deformation changes.
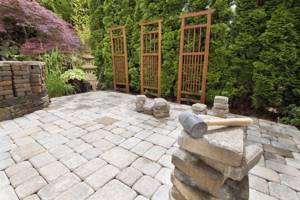
Pros and cons of different paving methods
There are several methods for laying paving. The owner of a country property chooses the most optimal one for himself. We will tell you about all the advantages and disadvantages so that each of you can draw the appropriate conclusions for yourself.
Back to Contents
sand cushion
The technology for laying paving slabs in the yard on sand is the simplest of all known. It is not labor-intensive and does not require special financial resources. Laying paving slabs on a sand bed is quite simple, which allows you to quickly get the job done. However, this paving method is suitable for courtyards:
- on the territory of which active movement of transport and large numbers of people is not planned;
- having reliable soil and correct relief.
Also, a disadvantage of the sand cushion is its ability to be washed out by rainwater, which can lead to the appearance of dips in the canvas.
Back to Contents
Laying on the prance
Gartsovka or a cement-sand mixture is needed to create a base for paving, if there is a desire:
- obtain high strength of the canvas;
- prevent deformation of the paving under loads, as well as in the presence of slopes.
The relative disadvantages of working with a pliers are the need for prompt and very careful actions, since quick coupling of building materials does not contribute to the correction of inaccuracies and errors.
Back to Contents
Laying for elimination
Screenings or waste materials from ordinary crushed stone are practical to use because:
- gives a slight shrinkage;
- easy to level and compact;
- is a quality ingredient when creating a concrete mixture.
But in the presence of “floating” soils, it is not capable of becoming a reliable drainage layer.
Back to Contents
Creating a concrete base
A concrete pad is required when creating a canvas that can withstand heavy loads. As a rule, it is formed in combination with reinforcing components in the form of reinforced plates. This coating turns out to be very durable. The only disadvantage of using a concrete base may be the high cost of the work performed.
Back to Contents
Vibro-pressed or vibro-cast
In order to choose the coating that is optimal in your opinion, you should consider a comparative analysis of the different criteria for the production of two types of tiles:
- Cost - vibropressed tiles are cheaper because they are produced on a production scale, cast tiles are often more expensive and are produced mainly using manual labor;
- Calibration - pressed tiles are strictly identical along the geometric dimension line, while vibrocast tiles may differ slightly in height;
- Frost resistance is higher for vibration-pressed ones, due to the absence of capillary pores in the structure and the semi-dry manufacturing method;
- The strength of vibratory casting is lower, since it is characterized by non-uniform compaction due to the fact that it is produced only by vibration without pressing;
- Quality – the nature of pressed production means stricter quality control;
- Slip - the cast surface has a glossy surface, which provides lower adhesion of the shoe to the surface in the presence of a small icy crust than the rough vibration-pressed one;
- Color and shape - vibratory casting has a much more extensive choice.
Although these criteria testify in favor of a vibro-pressed product, they do not mean at all that you need to choose it; you can lay any tile in the yard if it meets your needs and operational loads.
Tool for laying paving stones
List of tools and equipment that I used when laying paving stones:
- Hydraulic level (10 m). If you don’t have a laser level, which costs a lot of money, buy a hydraulic level that costs 100-200 rubles;
- Construction level 1 meter long;
- Metal profile with a section of 20 x 40 mm: a piece 2 meters long and a piece 6 meters long;
- Steel pins and wooden stakes;
- White nylon cord;
- Large rubber mallet (mallet). Most likely, one hammer will not be enough. For example, I broke two Chinese hammers. At the end of the work I had to buy a third one, already made in Russia;

I did the bulk of the work with a hammer, which was all wrapped with electrical tape. At the end of the work I had to buy a new hammer, the third in a row
- Master OK;
- Two tape measures: one for 2 meters, the other for 10 meters;
- A broom for sweeping seams between paving stones;
- Clamp and heavy steel angle - a device for securing paving stones before cutting;
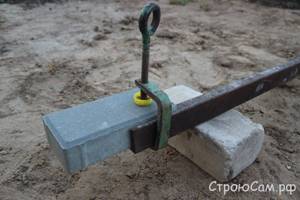
Securing paving stones before cutting with a clamp
- Grinder with a steel disc with a diameter of 230 mm. I advise you to use a steel disc rather than ordinary abrasive cutting wheels. When purchasing, I had a choice: buy a Chinese-made disk for 350 rubles or a Russian one for 500 rubles. I decided to buy a more expensive disc;
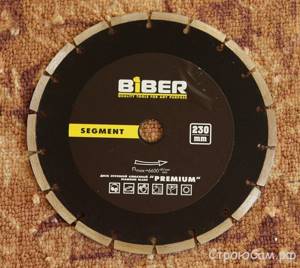
Steel blade (diameter 230 mm) for cutting stone and concrete
This disc cuts paving stones without any problems, although there is a lot of dust flying around.
Additional selection criteria
When buying very bright, colorful tiles, the consumer takes a risk, since a large amount of coloring pigment reduces the strength characteristics.
It often happens that a person seems to buy ordinary, good tiles, but soon after installation they begin to crack. This means that it was not stored correctly and is oversaturated with moisture. To avoid this, you need to take 2 tiles from the package and lightly tap each other. A booming sound will mean a low degree of drying, a ringing sound will mean a high degree.
The designations on it are alphanumeric:
- The first number is the standard size;
- Letter - form;
- The next digital sign is thickness.
For example, 4K7 means that products are presented in 4 standard sizes, square in shape and 7 cm thick.
After choosing the required type of product, you need to carefully read the step-by-step instructions for its installation. You can lay out a tiled carpet or path in different ways, but basically the least labor-intensive and simple technology is used.