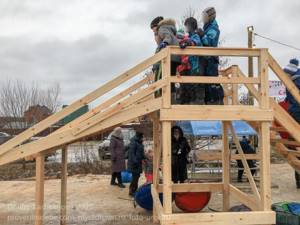
One of the coolest slides in the city is near the Yeltsin Center, which was built by. Professionals make slides from wood and evenly sawed pieces of ice.
The director of the company, Natalya Tumakova, told 66.RU what and how to build a slide yourself correctly and safely.
Natalya Tumakova, director:
— There are many different nuances. The main thing is that the slide is safe, so that the possibility of sticking your finger somewhere or getting stuck somewhere is completely excluded. You can build a wooden slide, fill it and ride. The main thing is that all conditions are met.
So, the main points of instructions for installing a slide in your yard.
Why you should build a snow slide in your yard
Sliding down a slide is laughter, fun, positive emotions. This is a physical activity. These are vivid memories, cool photographs, communication between parents and children, children and grandparents. Children with each other. Parents with each other. This is much more useful than sitting for hours in a chair in front of TV or, staring at the screen of a smartphone or tablet, planning to sign up for a yoga class.
Building a snow slide is an excellent exercise, an opportunity to work together with children, discuss, show creativity, and make a common decision, weighing all the pros and cons.
Building a slide is a really great idea that will strengthen both your health and your family. So why aren't you outside with a snow shovel in your hands yet? I see - are you sitting in a comfortable chair or on a sofa, looking at your computer or smartphone screen, reading this text? And you probably think: it’s good for him to write all this, but we have so many problems! Nothing will work out. There are no snow shovels, and there is no place for construction (everything is filled with cars). Free time, even more so.
Even if we build a slide in the courtyard of an apartment building, it will be torn up and broken on the same day. And if you build on your own plot, there will be only beds, lawns and greenhouses. There is almost no free space... So, the theory may be good, but how to bring it to life if there are so many problems?
What can I tell you about this? I'm not forcing you. If you don't want it, don't build it. Do you think we live in ideal conditions? Alas, we also have our problems and limitations. And there’s not a lot of free time. But building a snow slide is not as difficult as it might seem. For example, we did not die during construction. We did a little every day. The main thing, as in all other projects, is setting a goal, motivation (so that the neighboring boys will burst with envy), a schedule, and the ability to see and evaluate the result.
As a result, we not only got a slide. We successfully shook off the extra pounds gained during the New Year holidays and received a charge of positive emotions. Nobody forced me. They did it for themselves. As if by order, the evenings were quiet, windless, warm (the temperature did not drop below 3-4 degrees below zero), sometimes there was snow, which looked very beautiful in the light of the spotlights.
As for physical activity, we worked hard. First they took off their jackets, then they stayed in just T-shirts and pants. The neighbors watched us from their windows and almost certainly thought that we were not quite normal. But you can’t imagine what a thrill it is to leave the snow with a shovel, fill a garden wheelbarrow and bring it to the construction site. Sometimes such beatings are more than beneficial for the body. Especially for those who lead a sedentary, passive lifestyle, have a sedentary job and always think that it would be nice to buy a subscription to the pool or go to yoga.
In a word, we did it. Decide for yourself whether you do it. In the meantime, look at what types of slides there are and how you can build a snow slide in your yard.

How to make a snow slide: choosing a location
You should start this business by choosing a place for the slide. It is advisable that it be away from roads. For example, in the yard or in some public garden. This is primarily necessary for the safety of children. This area must be cleared of debris. The optimal size for a slide is from 5 to 7 meters. A slide that is too high and steep can be dangerous for children. But if it’s too small, it’s inconvenient to ride, and it’s of no use.
After the place has been chosen and prepared, you should throw the snow in the shape of a slide and slowly begin to compact it. The slope angle of the slide should not exceed 50 degrees. It can be adjusted by adding snow. How to make a snow slide so that it is comfortable for children to climb? It is necessary to build steps. To prevent anyone from slipping, they should be laid out with planks. For the safety of children, it is imperative to make sides along the entire length of the slope of the slide.
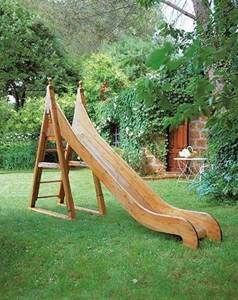
Why is a snow slide better than a wooden or ice slide?
The main advantage of snow slides is that they are free ! After all, a wooden one, even the simplest one, costs money. Moreover, in the spring it must be disassembled and stored somewhere. This is not always convenient.
True, a wooden slide can be quite high with a small mass. If you build one of the same height from snow, it will be much heavier and can lead to subsidence of the ground. Therefore, snow slides are usually built low. With the right approach to construction, you can also travel quite far from them.
You can order an exquisite and really beautiful ice slide. You can do more than just ride with this one. It, made of bluish ice blocks of a certain shape, will be an excellent decoration for a summer cottage. This slide is not afraid of thaws. You won’t need to disassemble it and think about storing it - it will melt on its own in the spring. But the price is from 30,000 rubles. has a sobering effect. You will need to pay about the same for the wooden version. Or even more.
You can build a snow slide completely free of charge. All you need is to have some tools. If you don't have them, you can buy them. In any case, this will be cheaper than ordering an ice or wooden monster.
Video: DIY snow slide
The theme of snowy towns and ice games has always aroused great interest among Russian artists. Great masters painted paintings that attracted art lovers with the originality of their execution, the beauty and naturalness of the sparkling snow and the brightness of the clothes of its participants.
Modern forms of constructing snow and ice compositions differ from those adopted in the past. Ice slides made of snow blocks have replaced ancient castles, and the fortress walls of the forts have now become space rockets. But this does not overshadow the children’s joy from riding the roller coaster.
The snow castle tower becomes the starting point for those who love fast sledding or ice sledding. Its structure is assembled from snow blocks, fastened together with a “solution” of water. For the round towers surrounding the launch pad, you can use a frame made of wooden sticks or branchy branches of old trees. All main dimensions of the ice slopes of the tetrahedral tower are shown in the figure and drawing.
The picture shows a simple-shaped slide, the beginning of which is an arch made of snow blocks. The staircase for climbing to the launch pad is made of boards of inclined ramps. Colored balls attached to the side of the ice path were used as decorative decorations. Stars are engraved on the walls of the arch.
The center of the composition of the snow play complex is a round tower, imitating the watchtowers of the fortress walls. It was assembled from snow and ice blocks. By the way, the ice blocks in this case act as a fastening belt, which makes it possible to give the tower vertical stability.
From the tower there are two inclined, curved paths covered with ice. One of them passes through an arch, the other passes by two small mushroom-shaped towers.
As decoration, you can use decorative colored balls painted with bright paint.
In some cases, you can use the walls of wooden summer play complexes as a load-bearing frame. They are partially covered with white snow, and the icy descent paths are filled with water. This symbiosis of wood and snow becomes a reliable and safe slide. Arches with snowflakes can be a winter decoration. To prevent injury, arches and ice rings can be reinforced with polyurethane foam or soft fabric. A simple ice slide is made of snow. To give it rigidity, it is necessary to use a wooden frame (bars, slats, dry tree trunks).
The connection and interweaving of vertical and horizontal elements is carried out using jute rope or cable. This constructive solution will allow you to create a strong snow-ice monolith, which will be the basis for a slide of any shape and decorative decorations.
What you need to build a snow slide
To start, you need at least one human power. In principle, if you do not set any super-tasks, then one adult will be able to cope with the construction. For example, a grandfather living in the village can give a great surprise gift to his grandchildren and children who come on weekends. Of course, this is true if the grandfather himself is doing well and strives to lead an active healthy lifestyle, has discount cards in sports clubs, and not in pharmacy chains.
In our particular case, the creation of the slide involved the efforts of two people aged 49 and 7 years... (the problem of fathers and children? What are you talking about?). 8 days passed from the start of work to the first test descent. It could have been done faster if there was more material. But this year the winter does not spoil us with snow. We literally had to collect it from the entire site and transport it on a cart to the construction site.
I think if I had worked alone, the result would have been achieved a couple of days later. Or I would have to work longer every day.
Next, you will need at least one snow shovel. You can use the engine to speed up the process of initially collecting snow into a pile. If you have a mini tractor with a scraper, you can generally get the job done in one day :). At first we made do with one snow shovel, then we went to the store and bought another one. By the way, my son rejoiced at this shovel - his own - in a way that he did not rejoice at the toys given for the New Year. The work went faster.
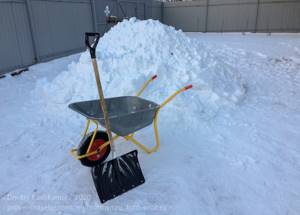
To deliver snow to the future hill, it is advisable to have some kind of vehicle. At first we carried snow with shovels, but over time we realized that we were working ineffectively. I spent too much time walking. We started loading snow onto the ice boat, but you couldn’t carry much on it either.
Then we remembered the garden wheelbarrow . They pulled it out of the barn and started moving snow in it. The work went pretty quickly. If you also have a car or something like that, you can complete the task faster.
Thus, we see that nothing supernatural is required to build a snow slide. Just time , desire , a couple of snow shovels and a garden wheelbarrow . And, it may happen that you can do without a car. If the winter is snowy, then there will be enough building material in the immediate vicinity of the construction site.
How to make a snow slide for children with your own hands?
It often happens that some problems occur during the construction of a slide. It collapses, falls apart, and pits and irregularities appear in the most inappropriate places. Next, you will learn how to make a slide correctly. So that it is durable, reliable, and most importantly, comfortable.
Materials for building a slide
To build successfully you will need the following:
- Frost outside the window
- A large amount of pure snow
- Shovel
- Broom
- Quite a decent amount of water
- Watering can, ladle
- Positive attitude
- Scraper or spatula
An example of building a slide for collective use
To build a slide, you must follow a few simple rules:
Safety
.
Choose a safe location for the future structure. This is necessary so that your child does not get hurt during the descent, so that there is no tree, fence, road, bushes or other obstacles on the way. You should not create an object of entertainment under the roofs of old houses, from which an icicle, slate, brick, etc. may fall.
Slide height, inclination angle
.
Determine the height of the future slide based on the age of the children. For very young children, up to about three years old, a slide one meter high is enough. For older children, the most optimal, safe height is two to four meters. You should also adhere to the correct angle of inclination, such that it is no more than forty degrees.
Pure snow
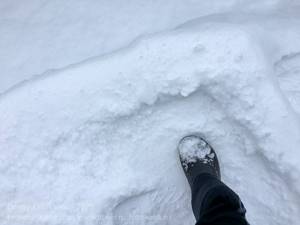
.
When constructing a slide, you must use clean material. Because your child may smear things. Try to prevent children from getting hurt. The problem arises if there is debris, branches, sticks, etc. in the snow.
The procedure for creating an ice slide:
- Once the location and size are determined, we begin work. Using shovels, you need to throw the required amount of snow. For example, a meter-long slide can be built in about thirty minutes. It is advisable to make the foundation of your snow slide using rolled large balls of snow. This way you will already have the base of the slide created.
- Next, we proceed to the formation of our slide. Using a spatula or broom, give it the desired shape. We make the optimal angle of inclination of the slide, straighten the area of descent of the snow slide.
The base of the formed snow slide
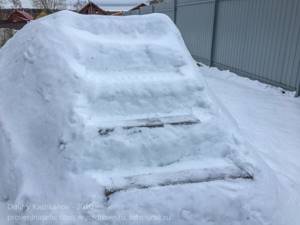
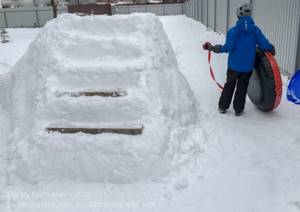
- If the slide is high, make steps using a spatula (scraper) or shovel. To make the steps stronger, strengthen them with your feet so that the snow settles, and only then shape them with an auxiliary tool. They should be comfortable and small so that children can easily climb up.
An example of making snow steps
IMPORTANT
: The acceptable width of the step is at least twenty-nine centimeters.
Don't forget about the sides. Their height should be approximately ten to thirty centimeters, depending on the age of the child. The sides can be made using a shovel. Also, in order to give them shape it is necessary to use manual work. During it, do not forget to wear gloves as protection from the cold.
If you have the desire and time, then add decor. Decorate the slide with snowmen, various figures, and paint it with patterns. Or do everything to your liking, a lot depends on your imagination.
Construction stages
Choosing a location for a future slide is a particularly important task . It is important to have enough free space here. Our slide is approximately 8 meters long and 4 meters wide (we count only the slide itself, and not the ice track on the horizontal surface of the earth).
You understand, putting a slide on top of a flower bed or, God forbid, beds is a thankless task. It is very good if, when designing your garden plot, you left room for a slide in advance, sowing it with a simple lawn. That’s exactly what we did, so this is the second year we’ve been putting the slide in the same place.
It would be logical to use the natural slope of the terrain, if present. If the site is completely horizontal, then you will have to make the hill higher in order to go a sufficient distance. On our site there is a very slight slope, but even this allows us to drive about 40 meters, sliding down a hill that is only one and a half meters high.
Once the location has been determined, we simply begin to shovel building material there. At first, we didn’t even try to give the future slide any shape. What we ended up with was just a bunch of snow with completely different asymmetrical slopes.
Creating the base of a snow slide
Then, over the course of several days, we simply poured new portions of snow on top of the old layers. The hill grew. The lower layers were compressed under the pressure of new ones. We didn't try to climb up to test the slide's strength. Everything has its time.
It’s great if during these days daytime thaws alternate with night frosts. During the day, the hill melts a little and “settles”; at night, frost grips it, forming a dense mass. The next day more and more layers are added.
I know some will say that they could put something massive at the base of the snow slide. For example, old car tires. Or logs. Or something else. That would probably be really nice. It would just require less snow mass. But we took into account last year’s experience and decided not to use anything in construction except the snow itself. Why? More on this later.
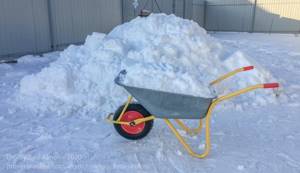
Over time, there was no more snow nearby. We had to transport it from the far corners of the site. As I already wrote, we used a garden wheelbarrow. She really helped a lot, allowing us to bring 10-12 shovels of snow per trip.
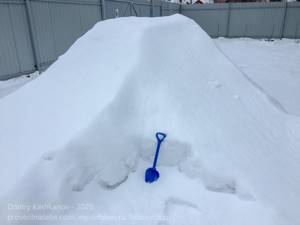
As a result, we ended up with a large pile approximately 2 meters high.
The next step is cutting off the top
No matter how sorry it was to reduce the height of the structure, we had to take this step. After all, it is necessary to make sure that a person who has climbed to the top of the slide can calmly stand on his own and put a cheesecake next to him. We ended up with a platform about one and a half meters long and one meter wide.
You can cut off the top with a snow shovel. We used the released excess snow to level the slope.
Next - we form the descent
If you skip this step, then the cheesecake with the person on it can go down in any direction. And not necessarily where you planned. It’s good if there are no obstacles on the way. What if at full speed into a tree or a fence?
It is best to organize some kind of chute along which ice cubes and cheesecakes will descend. First we just make it flat, cutting off excess snow with a shovel, then we form the sides. Just pour snow on the edges and pat it down. The result, after some time, is some kind of track. The descent in this way will take place exactly where we ourselves planned, and not where the cheesecake comes into our heads :). No one is stopping you from making a curved track rather than a straight one. Then the sides, of course, must be higher so that the descent occurs along the planned trajectory.
I pay special attention to the fact that the descent should be as sloping as possible . Smoothly transitioning into the soil surface. On the one hand, this allows you to travel far enough. On the other hand, it is more convenient and safer. Make sure that the slope does not form a noticeable angle with the surface and that people descending on ice floes do not hit the surface of the ground, displacing their spinal vertebrae. This, by the way, is often the problem with wooden slides. It gets to the point where it becomes unsafe to ride some of them.
You and I can easily make a very smooth transition from the descent to the surface of the earth. All you have to do is not be lazy and bring more snow.
My son and I decided that our slide would have two descents. One is fast and long-range. Another one with springboards.
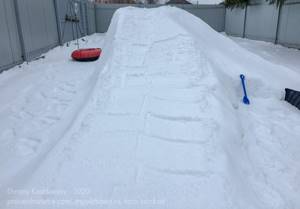
Ladder
There should be a staircase on the other side. Its steps can also be cut down with a snow shovel. The length (depth) of the steps should be such that an adult’s boot (or felt boots) could be placed along the entire length of the sole. If you make the steps short, you will have to climb on your toes, which will increase the pressure on the edges of the steps. They may collapse.
You understand that you can’t walk up the stairs right away. It is best to leave it alone for a day.
If you can't wait to ride, you can use planks to distribute the person's weight over the entire step. Over time, when the snow has compacted sufficiently, they can be removed, and everyone skiing, under pain of being removed from the slide, can be warned not to step on the edges of the steps. They can collapse even a few days after the start of operation.
Another method is to compact the steps by hand. The most convenient way is to use your fists, constantly adding new portions of snow. We were very lucky - on the day we made the snow staircase, there was a thaw. We managed to give the steps almost stone hardness. At sub-zero temperatures you will have to be patient.
Upper platform of the slide
Next, we begin to form the upper platform. Its special feature is the sides, which will prevent the cheesecake or ice cube with its rider from rolling “in the wrong direction.” You understand, if a child unsuccessfully plops down on a cheesecake and it rolls back onto the stairs, the consequences can be quite sad.
Forming the sides of the upper platform is very simple. You need to climb up the stairs (when it becomes solid) and just stomp on the top of the slide. Of course, you will fail a little. The main thing is not to reach the edges of the site, leaving a small edge around. You will get some indentation.
The presence of such a side will help you avoid troubles while riding. Unfortunately, sometimes in the heat of play children trample it. Don’t be lazy, restore the fence as soon as possible. To give it strength, you can pour water on it.
In a word, it is necessary to make sure that a person who plops down on a cheesecake at the top of a snow slide has only one way - to go down.
Test descents
Next we begin test descents. During the first ones, it becomes clear how well you have formed the route, whether the cheesecake is going there, and whether it is touching any plantings on the ground.
If something goes wrong, you need to correct the gutter and form snow sides on the ground so that the cheesecake stays within the frame when descending and does not go where it shouldn’t.
After this stage, the slide can be considered half finished. You can already ride on it. At the same time, you should not be particularly upset if dips or other irregularities form on the stairs and on the slope itself. As long as we haven't filled the slide with water, it's all very easy to fix. It is enough to pour snow on the problem area, pat it with a snow shovel and ride on the cheesecake a couple of times.
Purely theoretically, construction can be completed at this point. For example, in our particular case, flooding the slope with water is not required. We're already about forty meters away. We measured it specifically with a laser rangefinder. The natural slope of the area takes its toll.
But if you want to go even further, then you can move on to the next stage.
Getting ready to create a slide
First of all, you need to find a safe place. You should take care that:
- There was no road nearby;
- There were no sewer hatches or technical structures nearby;
- The path of the ride was not blocked by bushes;
- There were no sharp objects sticking out of the ground around.
You should also look for some kind of natural slope. So nature will do part of the work for you. You just enlarge the little slope you've already found a little and you'll be done.
Create such fun in a spacious place so that you can easily walk around the slide.
The slide can be any size. But if you are building it for small children, then it is better not to overdo it. After all, safety also plays a role here.
How to properly fill a snow slide with water
I don’t know who was the founder of this crazy idea, but in recent years there has been a rumor that hot water freezes faster in the cold than cold water. Like, if you put two glasses of hot and cold water outside, the hot one will freeze faster. The coolest thing is that this nonsense is repeated by radio announcers.
It would be better not to disgrace ourselves. They would just take it and check in practice that this is as far from the truth as the fact that Jupiter is a satellite of the Moon.
But I know where this nonsense comes from. The fact is that when the skating rink is filled, you need to pour really hot water. While it cools, it will have time to spread evenly over the entire area. If you pour it cold, you will end up with an icy hole. Cold water will not have time to spread. Especially if it is very cold outside.
The same misconception exists about pouring slides. And here you and I, as relatively literate people, must immediately understand which slide to fill with which water.
Let's think logically. If we climb to the top of a snow hill with a bucket of boiling water and throw it onto the slope, the water will “pierce” the snow layer all the way to the ground. The slide will immediately become unsuitable for riding. Additional snow will be needed to restore it. It wouldn't hurt to hit the smart guy in the ears, who listened to enough of the mediocrities on the radio and brought hot water here.
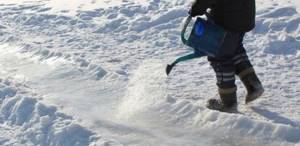
The snow slide should only be filled with cold water . It would be a good idea to do this in severe frost, and the water, before throwing it out, must be additionally cooled to almost zero temperature. Only then do we have a chance not to make holes in our layer cake.
It is highly advisable to apply water in several layers. First, very thin - with the help of some kind of spray. If you have an oscillating sprinkler, you can use it. The water from the well is just the right temperature. Spraying like a fan, it will lie on the surface of the slope in an even layer, which will quickly turn into a crust. This will be a much better option than pouring water in buckets. If you don't have a sprinkler, use a watering can. Apply water evenly, avoid thick streams. Then the surface will be even and smooth.
It would probably be unnecessary to hint that the upper landing and stairs should not be flooded.
As for filling the slides with hot water , this, oddly enough, is also true. But only if the slide is wooden . This trick won't work with snowy ones.
Types of commercially available slides
Metal
Metal slides are most often found on sale. Metal structures are very durable structures and have a high degree of wear resistance.
However, the disadvantages of metal structures include:
- high risk of injury by small users;
- Under the scorching summer sun, a metal structure becomes very hot, which can lead to a thermal burn.
Plastic
Plastic structures are easy-to-use structures that do not have sharp corners. The height of such slides usually reaches one meter, which is quite enough for use by the smallest children.
The designs presented in specialized stores will satisfy the wishes of most customers, since plastic structures are presented in various colors, have different dimensions, type of structure and cost.
Inflatable
Inflatable structures are suitable for children's fun for children aged 1 year and older. The inflatable structure allows you to slide down the slide directly into the inflatable pool, which fills the children’s summer holidays with joyful moments.
Inflatable slides come complete with inflatable pools, so their placement does not bring much inconvenience to the owner. If the need arises, the inflatable pool with a slide can be moved to a more convenient location.
All structural elements are made of hypoallergenic materials, do not have sharp corners, and do not get very hot in the sun, which prevents the risk of child injury.
Wooden
All elements of such structures are made of wood. You can complete such a construction yourself if you have the necessary building materials and construction tools at hand.
Necessary building materials for building a slide:
- Wooden timber measuring 100*100 mm (the length depends entirely on the size of the planned structure);
- Cross beams made of wood measuring 80*120 mm (they serve as the base of the floor);
- 30 mm edged board for making floors and 50 mm for making stair steps;
- Fiberboard sheet, wooden lining (will be used for finishing the structure;
- Self-tapping screws;
- Anchor bolts;
- Construction nails from 60 to 120 mm.
Required tool:
- Wood hacksaw;
- Electric planer;
- Electric drill;
- Hammer;
- Roulette;
- Building level.
At a pre-prepared site, a square is marked, in the corners of which 4 posts, 3 meters long, are dug to a depth of 0.4 m; the dug part of the timber should be treated with mastic. The beams are leveled using a level and they are fastened with transverse beams at a level of 1.5 to 2 meters.
Making stairs
To construct the stairs, use an edged board or cross beam.
First, the stringer is made: take 2 boards, put them on top of each other and fasten them with self-tapping screws.
Markings of the location of the cuts, indicating the location of future steps, are applied to the prepared stringers using a pencil. Using a hand hacksaw, cuts are made in the stringers.
Steps are inserted into the prepared cuts and secured with self-tapping screws. Next, under the top, middle and bottom steps, holes are drilled using a drill, with the help of which the stringers will be pulled together.
The floor of the slide is laid out from boards and a parapet is installed. If desired, you can make a roof for the slide.
Descent
The optimal solution would be to purchase a plastic escapement in a store or have it made to order.
You can order a plastic slide element of the required size and design, which, if desired, can have several turns.
The received order is mounted on a wooden blank and the slide is ready.
A homemade water slide brings many pleasant moments on hot summer days. With the help of this structure you can have fun in your free time and feel like a child.
Of course, the water slide is sold in a modern store. However, you can save a lot of money by making it yourself.
The first thing you need to do is purchase film. To do this, visit any hardware store and find a roll of plastic product there, the size of which reaches 3x30 meters.
Lay down some film on the hill because gravity will work in your favor. However, you can place the product even on a horizontal surface.
Press the film with a material that is not painful to hit. These can be bags filled with sand or water balls.
The path needs to be wetted with water from a hose. Place it so that the liquid constantly flows onto the slide. You can ride even when it’s raining outside. However, thunderstorms can be dangerous, so please refrain from entertaining in such weather.
Snow slide and safety
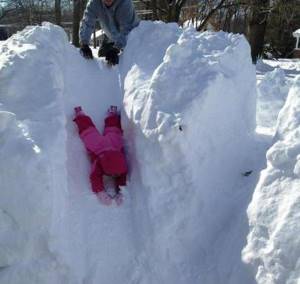
A DIY snow slide is usually less tall than its wooden counterparts. If it is built in your own garden, then the most important cause of injury - crowding - disappears. If you’ve seen children ride on “common” slides in parks and courtyards of high-rise buildings, you’ve probably noticed that some don’t want to wait their turn. They rush right through, pushing aside the diligent skaters.
At the same time, they are not very interested in what happened to those whom they just famously pushed away. And he could have slipped, fallen down the slide, and knocked over several more children... The jostling at the very top also does not lead to good things. Flimsy railings and sides, alas, do not always save you from falls.
Another cause of injury is the sluggishness of children who have already moved out. Sometimes they just continue to sit after finishing their descent. It’s even worse if they run back along the same icy path that they just slid down themselves and along which someone else is already going down.
I especially like mothers who send their children to ride, while they themselves huddle in groups and begin to sharpen their lasses. Or they stare at the phone. But a three-year-old child does not always understand the rule “if you roll, go away.” He continues to sit and could easily be knocked down by the next person skating.
My son himself once ran over such a kid. He (the son) was simply pushed down the slide when he was already sitting on the cheesecake. Naturally, he couldn’t stop on his own, and I, standing near the slide, also couldn’t catch and hold. Somehow unexpectedly everything happened. As a result, even though the cheesecake’s speed was almost off, a collision occurred; The baby hit the ice with the corner of his head and started a roar (I mean, roared). The mother began to squeal like a chicken and jump on my son.
I had to hold an explanatory conversation among her and her hot young husband who had jumped up. If you come to the slide with your child, watch him and don’t scratch with your tongue while standing on the sidelines. This time the option “everyone is to blame except them” did not work. Other parents took my side. They, too, had long noticed an “orphan child” who constantly stuck out on the descent and slowed down the dynamic process of skiing.
On an individual slide everything is much calmer. There is no need to rush, no one is pushing, no one is standing below, blocking the way. No one tries to show off their stupid prowess by running up a hill straight down the slope, leaving deep marks in the latter. Nobody jumps in line. And there is no queue at all. Ride as much as you like, as you like. And if you get bored, you can invite trusted friends who will behave like normal people, and not idiots who constantly create problems for themselves and others.
However, you should also be careful on your home slide. It's like jumping on a trampoline. If you follow simple rules, everything will be fine. The rules are simple: don’t rush, sit down carefully, don’t roll back.
Sleds, ice skates, cheesecakes and snow slides
If the slide is not flooded with water and does not have an ice covering, then ordinary plastic ice skates will not go well on it.
The sleds leave furrows, although they go quite far. The slide will need to be constantly adjusted.
The record holder is soft ice cubes. Their smooth sliding part provides excellent riding and excellent results in the distance of descents. But there is one problem. If the ice is not large enough, the legs hanging in the air begin to scatter across the surface of the slope and leave grooves on it. You have to adjust the slide from time to time. Not that much of a problem, but a shovel and some snow should be somewhere nearby.
The best choice is an inflatable cheesecake-tube sled. If she is normal, she also goes far enough. At the same time, the legs and other limbs hang in the air and do not spoil the slide.
If the slide is flooded with water and has a hard ice layer, then you can ride on anything except a sled. The latter can unpredictably turn around on the slide and capsize along with the rider.

Slide size
The width and height of the future structure will depend on the available amount of snow, your own reserves of strength and patience. If you plan to make a slide for very young children, don’t get too carried away. For the little ones, a structure of the most modest size will be enough. So what should the dimensions of the slide be? As practice shows, the optimal ratio of the height of the structure to its length is 1:4.
How to properly fill a snow slide with water? In addition to the descent itself, you will need to create a rollout. The latter is a flat, trampled and icy territory, along which sliding will continue for some time until it comes to a complete stop.
Conclusion
We are very glad that we made a snow slide . Both during construction and then during the riding process we received, are receiving, and will continue to receive a lot of positive emotions. We are moving. They say it’s a little more useful than lying on the couch with a smartphone in your hands, making your feasible contribution to the global process of commenting on new posts on social networks.
This is the second slide we are building on the site. Last year, it was too late to boast – already at the end of February. And then everything worked out for us and we were able to ride a little. However, when sunny spring days arrived, the descents had to be stopped. Not because the slide itself melted. She stood there for a long time. The paths along which our shells slid after descent simply melted. No matter how much we covered them with snow, we couldn’t defeat spring.
But then we converted the slide into a snow house. We just dug corridors inside - it turned out to be an excellent play area. It was at that moment that we were glad that we had not put old tires, stumps, logs and other massive things into the base of the structure.
Unlike last year, we now have a modernized version - a snow slide with two slopes. Fortunately, the territory allows it. I'll have to think about it and do something more interesting next year. We make no promises this year. We have one more construction planned - a snow house.
You don't sit idly by either. You can make a very small snow slide for kids, or a larger structure for older kids. Now you and I both know that there is nothing complicated about this. There would only be space, time, desire and snow. I hope both processes - building and riding - will make you a little more active and happier.