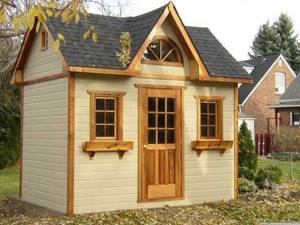
Have you bought a summer cottage and don’t know where to put garden tools and firewood, put a bicycle, remove excess building materials, or where to set up a workshop? Building a convenient utility block will help solve many problems at the same time, and combining a utility block with a toilet and shower will be a real boon for a small summer cottage.
An excellent solution for small dachas is to combine all kinds of rooms. Such buildings are easy to use and maintain, do not take up much space, and allow you to compactly place several objects for various purposes under one roof.
Today it is easy to buy ready-made versions of buildings of various sizes and shapes, but building a toilet, shower and utility unit for your dacha with your own hands is much more enjoyable!
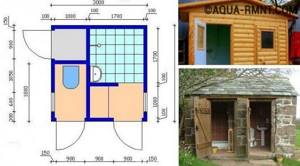
Plan
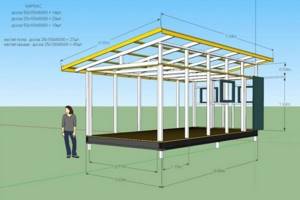
Before building a utility block for a dacha with a shower with your own hands, you need to draw up a detailed plan of the facility. It will allow you to visually see the future structure on the ground, draw up an estimate and calculate the full cost.
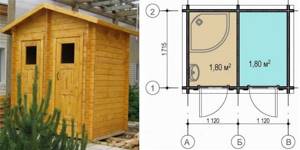
Construction of a utility block with a toilet and shower for a dacha with your own hands will allow you to conveniently place several sections for various purposes under one roof:
- shed for storing equipment;
- shower;
- toilet;
- garage.
The size of the utility unit with toilet and shower depends on its purpose and versatility. Before starting construction you will need:
- choose a convenient location for the utility unit in accordance with legal regulations;
- make a list of necessary materials, calculate their quantity and the total cost of construction.
Calculating the construction of a utility block with a toilet and shower in various variations will allow you to choose the most acceptable and affordable option.
The plan - the design of a utility block with a toilet and shower for a summer residence includes a detailed development of the main construction elements:
- choosing the optimal size of the building;
- materials for walls, roofs and floors;
- roof shape;
- number and location of windows;
- type of foundation.
Design features of the structure
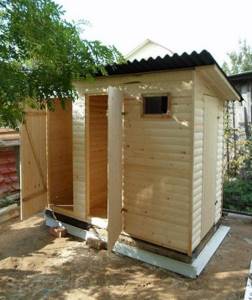
Organizing household facilities in one building makes it possible to reduce the cost of purchasing materials, ensure functionality, and achieve the aesthetics of the plumbing structure. A standard change house is an expensive purchase that not everyone can afford. Let's look in more detail at how to build a shower and a comfortable toilet for your dacha under one roof. Having construction skills, a little patience and a desire to improve your property, it is not difficult to build them with your own hands. The main features of the design of a shower combined with a toilet are:
- their location in a common structure, which is separated by a partition;
- separate entrance to each room;
- the presence of a common foundation;
- a common cesspool, which should be located no closer than 20 meters from water sources.
Fulfillment of these requirements will ensure the necessary operational characteristics of the structure.
Foundation
Before choosing the type of foundation, you need to find out the terrain and the nature of the soil:
- When building a utility block for a summer residence with a toilet and shower made of heavy materials, a strip foundation is used.
- Lightweight frame structures can be installed on a columnar basis.
- Loose soils and swampy soil require a slab foundation to ensure the integrity of the utility block with toilet and shower.
- On difficult soils and unstable ground, it is better to use screw piles.
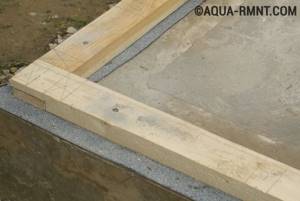
Tape shallow
An excellent option for building a utility block with a shower is a strip foundation.
It is suitable for the construction of utility buildings from a variety of materials:
- stone;
- bricks;
- foam blocks;
- croaker;
- metal;
- plastic;
- timber;
- boards.
The construction of a strip foundation for a utility block with a toilet and shower with your own hands consists of the following steps:
- Clearing the area of debris and marking.
- Digging a trench to a depth of about 50 cm. The width of the trench depends on the thickness of the future walls.
- Forming a dense sand cushion 15 cm high. To compact the layers, you can use a vibrating plate or timber.
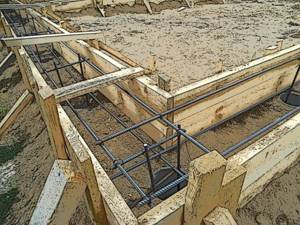
- Installation of formwork 30 cm protruding above ground level. For a strip foundation, you can use removable formwork, assembled from scrap materials or non-removable, made of wood or polystyrene foam.
- Formation of a reinforcing frame made of metal rods inside the trench.
- Preparation of durable concrete mortar. This will require cement, sand and crushed stone, taken in proportions 3:1:5, and clean water without impurities.
- Pouring concrete mixture around the entire perimeter of the foundation.
- Cover the entire surface of the foundation with film until completely dry. To avoid cracks and to form a durable surface, concrete is periodically moistened with water.
Complete drying of the foundation occurs within a month. After this, you can proceed to the next stages of work.
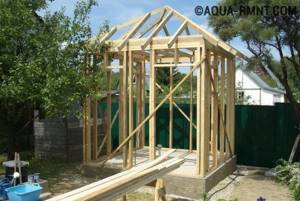
Wooden frame
Construction of objects for various purposes using frame technology is the most inexpensive and fastest option. This also applies to the construction of a utility block with a toilet and shower for a summer residence with your own hands.
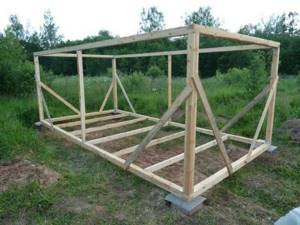
To build a wooden frame you will need:
- dry timber;
- wooden racks;
- board for forming the rafter system;
- construction corners;
- anchor bolts.
Before construction begins, the entire surface of the timber must be treated with several layers of antiseptic impregnation, which protects the wooden surface from rot, mildew and mold.
How to assemble a wooden frame from timber for a utility block with a toilet and shower with your own hands can be seen in this interesting video:
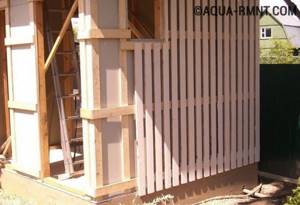
For the outer cladding of the frame use:
- siding;
- plywood;
- OSB;
- edged board.
The internal lining of the utility block with a shower for the dacha is made of moisture-resistant materials:
- edged board;
- OSB boards;
- clapboard;
- PVC panels.
However, you can do without interior decoration.
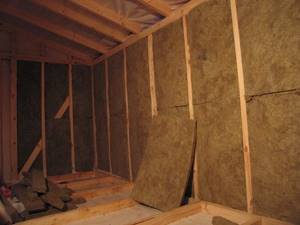
If you want to comfortably use a utility room with a shower during the cold season, you should take care of high-quality insulation of the structure. For this use:
- ecowool;
- expanded polystyrene;
- expanded clay;
- mineral wool;
- Styrofoam.
Step-by-step insulation with your own hands using the example of a chicken coop can be seen in the following video:
As a result of high-quality insulation, you get a warm utility block with a toilet and shower, which is convenient to use even in cool weather. Installing a heating system in such rooms allows you to operate the shower all year round.
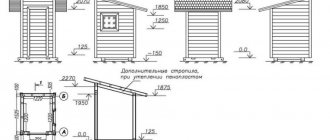
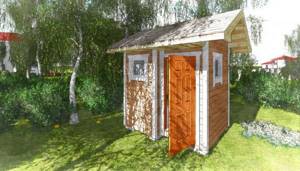
Project of a country toilet and shower under one roof
A toilet is good, but a toilet with a shower is even better. Both of these buildings create the comfort necessary in a dacha setting. By combining these designs you can save a little on material. Let's consider the project of a country toilet with a shower and its execution.
The toilet and shower have a common wall: this will help save on building materials
The proposed diagram shows that the toilet and shower have a common wall. This is the saving of building materials. This project is designed for the installation of a dry closet. If a cesspool is used, the design is slightly modified.

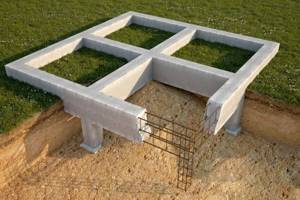
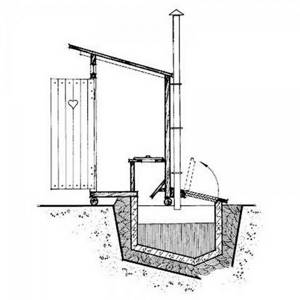
To build such a structure, they first dig a foundation pit and strengthen its walls, and only then begin the construction of the building itself
Preparing the foundation for construction
First of all, a square pit with a side of 4 meters and 0.3 cm in depth is dug for the construction and covered with gravel to about 0.2 m.
After thoroughly compacting the base, formwork from wooden panels is knocked down for a foundation 0.3 m wide and 0.5 m high.
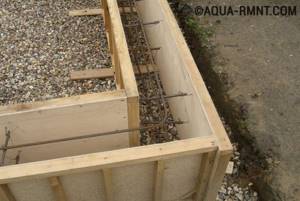
To make the foundation more durable, it is necessary to reinforce it
A sand-cement mortar is prepared and poured into the formwork. Crushed stone is used as filler. When the concrete has set, remove the boards and cover the defects with mortar.
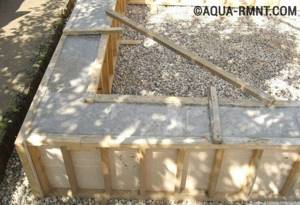
After removing the formwork, defective areas are sealed with mortar.
At the next stage, sewer pipes are installed. Then the base under the floor is covered with sand and compacted thoroughly.
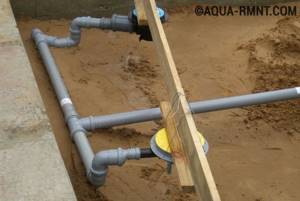
For sewage use pipes with a diameter of 50 mm
To keep the room warm enough, foam is laid on top of the sand. The base is reinforced and filled with mortar.
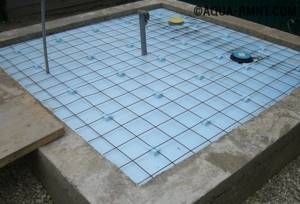
Polyfoam makes the room warmer, which allows it to be used even in cool weather
When pouring the solution under the shower, do not forget to make a slight slope
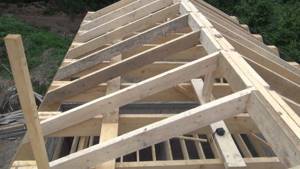
Construction of walls and roof of the structure
A beam is fixed on top of the foundation around the perimeter. To do this, use long pins with a diameter of 1 cm, or reinforcement.
Roofing material is laid under the timber for waterproofing
Then they build a frame for the walls and a roof sheathing from edged boards (0.5 × 1 m).
During the construction of walls you need to use a level
When making the roof sheathing, extend it beyond the gables by at least 0.3 m
The roof is sheathed with edged boards. Frontal boards are attached to the end parts of the sheathing.

For the strength of the lathing, metal corners are used
After which they begin laying the roof.
For the roof, you can use soft bitumen tiles, slate or other covering
After finishing work on the roof, wind protection and wall sheathing are installed.
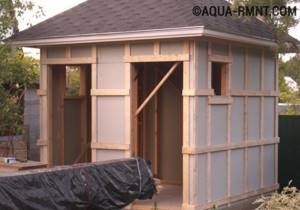
The sheathing of the structure is necessary to ensure ventilation
The outside of the building is sheathed with edged boards (0.22×1 m). Doors are made from it (2.1×0.9 cm). Windows are inserted and trims are sewn on.
The sheathing will be sheathed with edged boards. Wooden elements must be treated with an antiseptic
A large container is dug under the sewer drain and a pipe is connected.
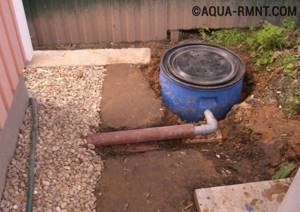
The sewage container should protrude slightly above ground level. This will prevent rainwater from entering it.
This material will help you decide on the choice of antiseptic for your country toilet:
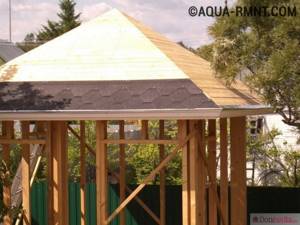
Roof
During construction, various types of roofs are used, differing in design features.
The most common options for constructing outbuildings for a summer residence are:
- single-pitched;
- gable;
- attic structures.
For the roofing of outbuildings with a toilet and shower in summer cottages, the following is often used:
- slate;
- tiles;
- galvanized corrugated sheeting;
- corrugated sheeting with polymer coating;
- ondulin;
- roofing felt
The rafter system is covered with a dense layer of waterproofing and a sheathing is installed on top. Depending on the size of the material and the features of its installation, the lathing pitch is selected.
Construction options suitable for a summer residence
Independent creation of household extensions can be carried out in several ways. The design of buildings may vary depending on their type.
Building with waste pit
It is designed in the form of a house, under which there is a cesspool. Be sure to dig a pit and reinforce its sides with concrete rings or a monolith. There is a plastic container in the hole. The toilet house is built of wood or brick, and a toilet seat is installed in it. The waste accumulated in the tank is removed with a pump or ordered pumping from a sewage disposal service.
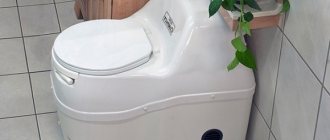
Powder closet without pit
There is a container located under the building for waste. The best option is two tanks of different sizes. The smaller one, with small holes, is placed in the larger one. Excess liquid is removed through drainage and partially absorbed into peat or sawdust. Waste is removed from the filled tank by removing the product through the hole in the back of the house.
Shower
In the shower stall, it is necessary to install a low tray for draining water, placed in a pre-prepared recess, and lay out a grated floor made of wooden slats. You can’t live in a shower without a reliable drain. To form a drain, you can use one of the options:
- cesspool;
- drainage well;
- septic tank
The shower is a room with high humidity, therefore it provides for the formation of a ventilation system that ensures free air circulation.
Shower equipment
One of the simplest options for installing a shower in the country is to install a dark water tank on the roof of the utility block. The size of the tank is chosen based on the number of people living in the country.
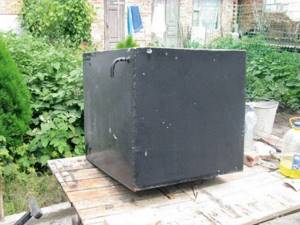
A flat-shaped tank painted in dark colors is best suited for this. The following types of tanks are used to equip showers in summer cottages:
- plastic tank;
- stainless steel;
- made of galvanized material;
- made of ordinary black steel.
Automating the filling of the tank with water will eliminate the wasted time required to fill the tank manually.
However, the option of a shower with a tank on the roof is convenient only on hot summer days. On a cloudy day, as well as in the cool season, summer residents are deprived of the opportunity to take hygiene procedures. An excellent solution for providing hot water to the shower regardless of weather conditions is to install a heated tank.
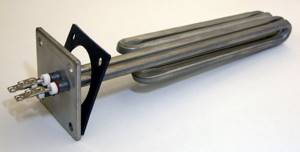
To do this, you will need a metal tank equipped with a heating element. You can take a regular tank and install the heating element inside the system yourself. For constant access to water in the absence of a centralized water supply, the installation of a pumping station will be required.
To heat small volumes of water it is convenient to use various water heaters:
- flow-through;
- accumulative type.
Heating water for showers in the country can be done using solar storage water heaters. In such systems, water is heated from solar energy at any ambient temperature.
The final stage of work
After completing the construction of the frame, you can begin to perform the overlap. Installing a gable roof will make it difficult for snow to accumulate on it and will ensure good water drainage. The basis of the roof will be wooden blocks installed at intervals of half a meter. The surface frame should extend beyond the perimeter of the building by 30 centimeters. Use metal tiles or slate as a covering. For the construction of the ceiling, planed boards with a thickness of 20 mm are suitable. To install the floor, use boards 4 cm thick, secured to the base with self-tapping screws and fixed with corners. You can build a raised seating area in the sanitary block or use a toilet. It is important to place them directly above the hole. Comfortable temperature conditions in the room will be ensured by sheets of foam plastic located between the board and the frame. At the final stage, hang doors that can be locked with a key. All that remains is to connect the communications to a container of water and paint the finished structure. The construction of a shower and toilet on a summer cottage, constructed as a single building under one roof, is economically justified. The convenience of an ergonomic and comfortable construction will be appreciated by the owners of dacha properties. By following the recommendations given, it is not difficult to build a utility unit yourself.
Article Rating
Cesspool for toilet
The construction of a utility block with a toilet requires the construction of a durable cesspool. To do this you will need:
- Dig a large hole measuring at least 2x2x1 m.
- Strengthen the walls with red brick, fill them with concrete or install ready-made concrete rings to prevent the walls from collapsing during use.
The placement of the toilet must be planned in such a way that a sewer truck can access it. It is best to place the toilet box slightly forward, leaving the cesspool slightly behind the toilet.