Home Tips for summer residents
You can make a compost pit using any available materials, turning a mountain of garden waste into valuable fertilizer. The variety of manufacturing options allows each summer resident to choose the most suitable material according to the size of the plot, price and convenience.
- 2 Metal barrel
- 3 Chainlink mesh
- 4 Pallets
- 5 Slate
- 6 Concrete
Wooden boards
Quite convenient and inexpensive material for a composter is ordinary wooden boards. Such a pit can be moved to another place at any time or removed if you want to make changes to the landscape design of the site. The construction procedure is divided into several stages:
- Make a mark at the selected location and remove the top layer of soil up to 10 cm deep. Then dig a hole: width - 1.5 m, length - 2 m, depth - 1 m.
- Install wooden blocks in the corners, retreating 20 cm from each wall.
- Leave a gap of 3-5 cm to improve air exchange inside the structure, then attach the boards to the posts.
- Divide the structure into two parts using a wooden panel.
Before construction begins, wooden boards should be treated with special wood protective solutions to create a durable barrier and provide protection from moisture, rot and frame failure.
Possible manufacturing options
A do-it-yourself compost heap can be made in several versions. Let's list them all, indicating the features of each of them.
An ordinary pile in which waste is placed
- Select a place on the site where the compost pile will be located;
- As various wastes accumulate, they are placed in the selected location. In this case, it is advisable to lay organic matter in layers. Alternate food waste with grass and manure;
- When the height of the pile reaches 1 meter, make several depressions in it, into which pour a special compost liquid. This will speed up the ripening of the compost;
- With regular loosening and watering, the compost will mature within 3 months.
This is an ideal option for those who want to get by with minimal effort but still get some compost. It is advisable to form several such heaps, each of which will rot gradually.
Related article: Cleaning a geyser
Simple pit
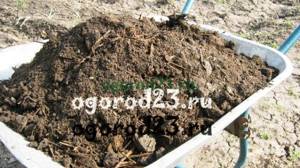
A simple do-it-yourself compost pit at your dacha will be provided by an ordinary pit dug in the chosen location:
The photo shows one of the options for a compost pit
- The depth of the pit should be shallow, which will ensure easier care of its contents. It's better to make it wider;
- Branches, hay, and tree bark are placed at the bottom of the pit;
- Next come layers of food and vegetable waste;
- Since the temperature in the pit is not very high, it is advisable to cover it with film.
This is the least successful way to set up a compost bin. Mixing its contents will require more effort, and the pit will warm up less. The advantages of such a pit are its small area and simplicity of design.
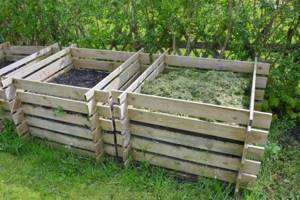
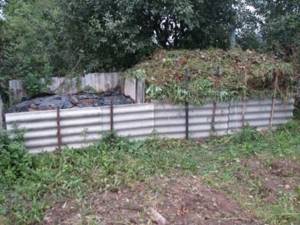
Box made of wood or other material
How to make a compost pit with your own hands so that it is convenient and inexpensive? Use boards, bars, slate, sheets of metal, etc. for this.
The order of arrangement will be as follows:
- The top layer of soil about 40 cm thick is removed from the soil;
- Pegs are driven in around the perimeter of the pit;
- A fence is installed around the pit. It can be wooden (boards, pallets, panels, bars) or any other. It is allowed to use any material: flat or corrugated slate, polycarbonate, metal sheets;
- The height of the fence should not exceed 1 m. This is necessary for the convenience of mixing the compost;
- The top of such a structure is covered with plywood or film.
This design allows the compost to warm up well, so it is considered optimal for use on land.
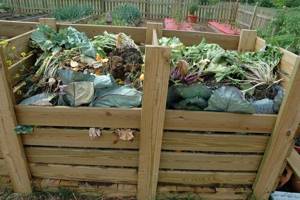
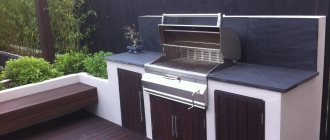
A popular and effective option for organizing a composter on the site
There is an original version of a wooden box. Its lower edges do not reach the soil surface by 25-30 cm. That is, boards or other material are attached at a certain distance from the ground. In the lower part of such a box, the compost matures faster, since it was laid earlier. As the compost matures, it is removed and the pile settles downwards. Such a pile practically does not need to be loosened. There is always the opportunity to get some ready-made compost.
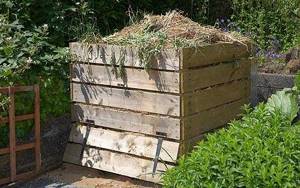
You can also provide a hinged door at the bottom of the drawer.
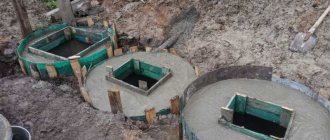
Concreted pit
If you decide to build a durable structure that will last for decades, then use the advice on how to make a compost heap in a concrete pit.
The structure is set up like this:
- the site for future construction is marked out (approximately 2x3 meters);
- soil is selected at 60-80 cm;
- formwork about 10 cm thick is constructed around the perimeter of the future building;
- concrete solution is mixed;
- concrete is poured into the formwork;
- after the concrete hardens, the formwork is removed;
- waste is placed in layers in a concrete pit;
- From above, the pit is covered with wooden shields or covered with film.
Article on the topic: Life hacks for the vegetable garden: 15 examples of country house cunning and resourcefulness
This is the most expensive method of constructing a compost pit in terms of effort and investment. Such a structure should be placed where the pile will definitely not create any difficulties, since it will be impossible to move it to another place.
Tip: It is recommended to divide the compost facility into at least 2 sections. While you put fresh waste collected in the current season into one of them, last year’s compost will decompose in the second section.
It should also be noted that there are options for organizing a compost pit from a barrel or special plastic containers for compost, but you will additionally need to use drugs that accelerate waste processing, or add Californian worms.
Metal barrel
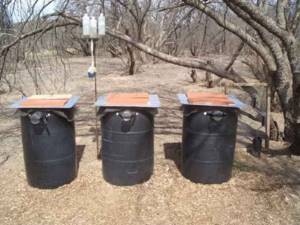
You can store organic garden waste inside an old metal barrel to create compost. To do this you need:
- Cut out the top and bottom, then place the barrel on the prepared soil.
- Paint the container black to attract UV rays and maintain suitable conditions for the successful decomposition of organic matter.
- Place layers of fresh grass, weeds, wood ash, tea leaves, sawdust and any other organic waste into a metal barrel.
- The finished fertilizer is taken out from below by lifting the container.
The barrel reliably protects the fertilizer from wind, excess moisture and other adverse conditions.
How to make a compost heap
To properly prepare the heap ingredients you need:
- Prepare the necessary components by grinding them as finely as possible. Branches can be broken and plant debris can be chopped up with a shovel. The smaller the components of the pile, the faster the compost will mature.
- Lay the components in layers, the thickness of each layer should be up to 15 cm. In this case, it is imperative to alternate the placement of food waste, wood residues and green plant matter.
- The layers can be covered with manure or droppings, or commercial liquid fertilizers can be used. Compost stimulants are also used at this stage. It is better to use cow or horse manure for the heap, and the best poultry manure is chicken manure.
- The top of the pyramidal compost heap is covered with straw, spandbond, boards or plant stems. This is necessary for free air circulation. Gardeners often cover the pile with polyethylene, but this is not recommended: when covered with plastic film, the compost will overheat without access to air. And this is fraught with the appearance of a putrid, unpleasant, persistent odor.
Rabitz
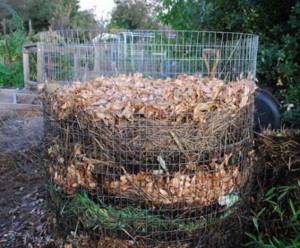
If you have a little extra chain-link mesh, you can make a conveniently shaped compost pit. The main thing for which gardeners value the structure is that the fertilizer will not affect the rotting process due to regular ventilation. To make a fence, a metal or galvanized mesh is taken, from which a cylindrical container is made. The work plan consists of the following actions:
- Calculate how much mesh you will need, taking into account the desired diameter of the compost heap and add approximately 20 cm of allowance for overlap.
- According to the size of the mesh, obtain a piece of garden textile.
- Fill the thickness of the chain-link mesh with the selected material.
- Secure wooden posts to provide stability. It is important to deepen them into the ground by about 50-70 cm.
This lightweight structure can be assembled in a matter of minutes and can be quickly dismantled if you need to move it to another convenient location.
What is compost
In order for the garden to be well-groomed and produce a good harvest, it simply needs to be fertilized. You can do this with the help of chemical fertilizers, or you can get by with your own free, useful and safe product.
Compost is a natural organic fertilizer that is obtained by fermentation under the action of earthworms and bacteria.
To obtain such fertilizer, a compost heap is laid. Often it is done by simply digging a hole in the ground, but it is better if it is a specially equipped place - a composting site.
Compost bins are made in the form of closed or open containers, but you can also purchase special plastic boxes equipped with a lid and door.
The prepared compost is applied to the holes before planting garden crops in open ground or for planting in greenhouses. Or it is scattered over the area before planting the seed and lightly mixed with the soil.
Pallets

It’s quick and easy to build a compost pit with your own hands from wooden pallets. This will not require any special financial costs or strength. Pallets can be obtained for a nominal fee at any construction site. The stages of construction work are as follows:
- At the site where the fence is installed, you need to loosen the soil.
- Make a cube out of pallets so that the long side is horizontal to the ground surface.
- Connect the pallets at the top and bottom with nails or large screws. 1-2 pieces are enough for each corner.
The structure will last for several years if the pallets are coated with non-toxic paint or an antiseptic before construction to avoid rotting of the wood.
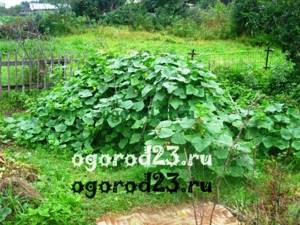
Making a compost pit from wicker branches
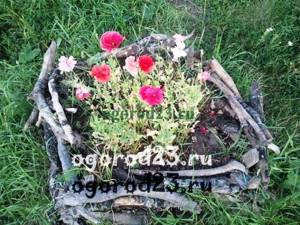
Drive a dozen and a half pegs around the perimeter of the pile. Collect the longest branches from cut branches of lilacs, grapes, and fruit trees and braid a pile of garbage outside. The result will be a wattle fence. It is not necessary to do this often - rare weaves will also hide from prying eyes all the ugliness of the compost heap. Loosen the ground in front of the driven and braided pegs and throw in a few morning glory seeds in the spring - now such a wide variety of varieties are sold in any store. In a month and a half you will get a beautifully blooming wattle fence. I assure you, you and your guests will admire the compost pile!
Below are a few photos of how you can design a compost pit.
In the fall, when digging up your garden, cover your pile with a small layer of earth. You will cover exposed dry branches and improve the decomposition process of the contents of the compost heap.
Next year you will have to find another place for a new pile where you will begin to place the current season's waste. And last year’s heap can again be improved with fast-growing morning glory or planted with pumpkin, zucchini or cucumbers. Plants from the pumpkin family are very fond of “fat” fertile soil, rich in large amounts of minerals.
The fine roots of a large, branching root system will do a good job of loosening a pile that you haven't shoveled. And if you periodically water the compost heap, your pumpkins, zucchini or cucumbers will grow to record sizes.
By the third year, your garden will already have three beautiful baskets with flowers or pumpkins - it’s hard to call it all a hole or a heap. Thus, the fourth season will quietly come from the beginning of your experiment in producing compost in a pit-heap, made without much effort with your own hands. You can continue to weave baskets, but for greater benefit, dismantle the very first compost pit, or rather, the wattle fence on it - rotten pegs and twigs will easily break with a little effort.
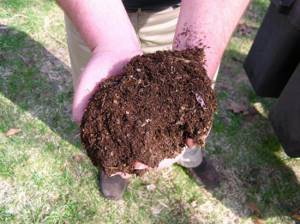
Sort out the resulting humus using a small spatula or large scoop, taking away unrotted branches to the side.
Take the humus to the beds, flower beds, under bushes or trees. By the way, please note that there is much more humus - compost - than you would get ash if you burned this garbage three years ago.
Take twigs, pegs remaining from the former fence, as well as unrotted remains to a new place where you will form a new compost pit.
This is waste-free production when recycling waste after pruning in the garden and cleaning in the garden. And, mind you, no ugly piles or wasting time shoveling. In addition, your garden or vegetable garden will always have an unusual decoration. To avoid carrying compost far, make a pile closer to the place where it will be used.
How to use compost in the garden? Scatter it over the dug up soil before winter, add it to holes when planting potatoes or seedlings, and mulch the beds. And be sure to compare the harvest results obtained with or without its use. Very soon you will see that the gardeners’ saying “Compost is black gold” is justified.
Here is another option for using nutritious, fertile soil from a compost heap. After removing the fence, simply rake the pile and form it into a new bed or flowerbed. You can use ready-made compost to create a flower bed directly on the lawn.
Slate
A compost bin made of slate is famous for its long service life, unlike a wooden structure. This roofing material is ideal for constructing a structure that is designed to collect and process organic waste into compost. To make a fertilizer box on your own, you need to complete the following stages of work:
- Choose a suitable location and take measurements to determine the desired size of the hole.
- In accordance with the marks, dig a small recess, at the corners of which it is necessary to install supports. You can use metal pipes or wooden blocks.
- Along the perimeter of the ditch, deepen sheets of slate, pre-cut to size.
- Divide the box into 2-3 parts using the same sheets.
Occasionally, wooden lintels will need to be replaced. To extend their life, it is recommended to treat them with special anti-rotting agents.
What materials are suitable for the box?
When making compost pits, it is permissible to use many materials that are familiar to us. In fact, it's a box without a bottom. Boards, bricks and concrete, pallets, sheets of slate or metal, and fine-mesh iron mesh are used. Some gardeners create their fertilizer in sturdy trash bags.
Compost from fallen leaves
Separately, I would like to mention compost made from fallen leaves, which is also known as “leaf soil”. The basis of this type of compost is fallen leaves, which lose minerals before falling, so that only hemicellulose and lignin remain in their tissue. These substances decompose very slowly, although they are one of the most valuable components of humus. When making a compost heap from leaves, you should know that they contain another difficult-to-decompose substance - tannin. It has astringent-disinfecting properties, which greatly inhibits the processes of compost formation. Large concentrations of tannin are found in beech and oak leaves; the tannin content is especially high in chestnut, willow and sycamore leaves. Because of this, the foliage of these tree species is of little use for compost and can only be used to cover the pile.