Almost every owner of a country house sooner or later faces the issue of laying paving slabs. Of course, you can use the services of professionals, but if you have the time and desire, you can do this work yourself.
In this material we will tell you how to correctly lay paving slabs so that they please the owner of the site for decades. In order to get a smooth surface, you just need to follow certain rules, which we will discuss below.
Features of material selection
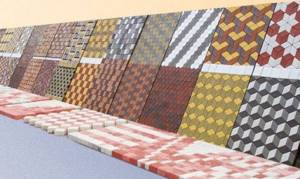
Paving slabs are one of the most popular materials for covering paths and entrances to buildings. This material is beautiful, aesthetic, easy to use, durable and, moreover, inexpensive.
Laying tiles is easy; this work can easily be done with your own hands. But not everyone knows how to lay paving slabs, and this often becomes the cause of numerous problems.
When choosing paving slabs, most buyers are primarily interested in the price-quality ratio. Cheap tiles, as a rule, do not look particularly attractive and quickly fail, but you will have to pay more for high-quality material
But in order for the path to serve for many years, it is better not to skimp and immediately purchase high-quality tiles than to regret your wrong choice for years.
It is important to determine what the thickness of the tiles that you are going to lay on the site should be. Pedestrian paths, as a rule, are covered with tiles 40 millimeters thick, and for laying a car park you need much stronger tiles - from 60 to 80 millimeters. The same tiles are laid on the road near the site. The thicker it is here, the longer it will last.
Rules and tips
When buying tiles, the site owner should take into account that some of the material will turn into waste. First of all, this is explained by the cutting of paving slabs, which depends on the shape and dimensions of the elements used, as well as the method of their installation.
In addition, it is advisable to consider the following points:
- It is not recommended to build paths at a distance of up to 70 cm from trees. As the root system of the latter develops, it can seriously damage the created surfaces.
- If the traffic intensity on the paths is average, then in most cases a width of 0.8 m is sufficient.
- In situations where the owner of the site plans to use paths for transporting luggage in wheelbarrows or moving a large number of people, the width of the created coating must be increased by at least 20 cm.
- To ensure that subsequent work is carried out with the least difficulty, it is advisable to mark the outlines of future paths using a thin cord stretched between the pegs.
It should also be noted that paths laid out on a dry mixture or mortar on a crushed stone bed can support the weight of a passenger car. If you lay the materials on a base that is reinforced 1.5 times, you can get a path that even a medium-sized truck will not be afraid of.
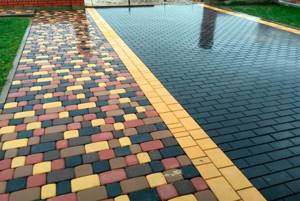
Options for laying paving slabs
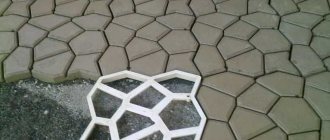
There are many different schemes for laying paving slabs. Even if the tile is a single color, it can be placed parallel to the direction of the path, perpendicular to it, diagonally, or in the form of some complex pattern.
Let's look at the most popular methods of laying paving slabs:
- Linear . All elements are laid out parallel to each other, usually along the track.
- Brickwork . The direction of laying remains the same as with linear design, but each next row of tiles is shifted in relation to the previous one by half or by ¼ of the paving element.
- Christmas tree . The bars are laid at right angles to each other.
- Block . The bars are laid in blocks, two at a time. Inside each block, the bars are parallel to each other, and the blocks themselves are turned perpendicular to each other.
Multi-colored tiles can be laid according to the Chessboard . The bars are arranged in blocks, in pairs, with dark blocks surrounded by light ones.
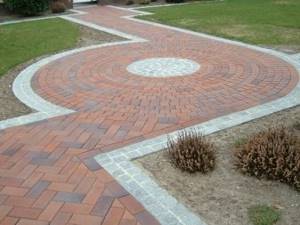
There are many options for laying paving slabs. This allows you to choose an option ideally suited to the exterior of the site.
On large flat areas, you can lay the bars in a circle, in a radius pattern, or in an even more complex pattern, which is better to draw first.
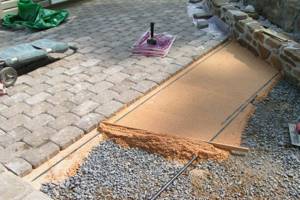
Sand base
Laying paving slabs in a country house on a sand base has its advantages.
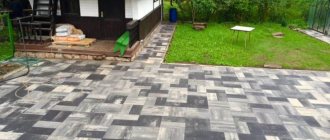
Path laid on sand
This cushion acts as drainage, which allows you to remove excess moisture from the surface of the paving stones. To increase strength, cement is added to sand. The dry mixture is prepared in the same way as the liquid solution, but without adding water (recommended proportion 1:4).
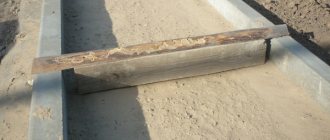
The sand cushion is laid on top of the previously laid base. All operations envisaged by the work technology should be carried out carefully. There is no need to violate the integrity of the sand cushion. It is enough to simply deepen the tile a short distance to fix it. Correction of its placement is controlled using a level. A wooden mallet should be used to dislodge the pavers.

Wooden mallet
After installation is completed, the country paths are covered with the same mixture. The rules for laying paving stones involve filling all joints with cement and sand. During the operation of the coating, it is recommended to add this mixture periodically.
Procedure for laying tiles
To lay paving slabs yourself, you need, in addition to the tiles themselves, some other materials. First of all this:
- stone or plastic border;
- cement grade PC 400;
- crushed stone, fractions no more than 40 mm;
- high quality sand;
- geotextiles.
Also for work you will need: a building level, a rubber hammer, a grinder, a concrete mixer if you plan to lay the tiles on a concrete base.
To determine where paths should be laid on a site, you should use a plan that would detail the location of all buildings and other objects. On this plan it will be necessary to build a path diagram.
The width of the path must be sufficient for two people to pass freely on it.
The size of the area that is planned to be paved, the design of the base, the nature of the soil on the site and the conditions for using the tiles determine the amount of materials for the work.
If you plan to travel by vehicle along the road, it is necessary to provide for the possibility of a person being on it who will not have to leave the path onto the lawn to give way to a passing car.
Also, when constructing a plan, be sure to pay attention to the direction of the slopes along which water will flow from the paths.
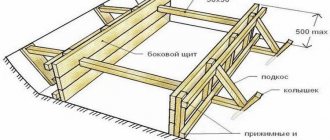
Stage No. 1 – marking and excavation
After drawing up the plan, you can begin marking the site. For this you need a tape measure and a cord. A series of pegs are driven along the proposed path, onto which the cord is pulled.
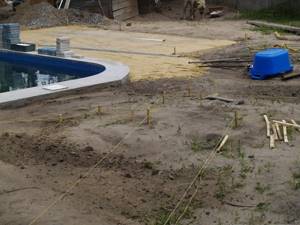
The pegs should be 10 centimeters from the edge of the future path - curbs will be installed on this narrow strip
After marking the site, excavation work begins. Its complexity is determined by the density of the soil on your site. If the soil is dense clay and in the future it is planned to bring bulk soil to the site, it is enough to simply level the surface of the clay.
If the soil is more complex, 30-35 cm should be removed from its surface throughout the entire area allocated for laying.
Having dug a trench, pour a thin layer of sand onto its bottom, level it and compact it properly. After this, you need to cover this layer with geotextiles. These precautions will protect the area from the germination of weeds and avoid the possibility of groundwater penetration.
Geotextiles must be laid tightly. Adjacent stripes should overlap each other by 15-20 centimeters. Along the edge of the trench, the canvas should be turned up at least 20 centimeters.
Stage No. 2 - arrangement of the drainage layer
To organize drainage for collecting and discharging water, it is necessary to pour a layer of crushed stone of a fraction of no more than 40 millimeters onto the bottom of the trench. The layer thickness should be 15-18 centimeters. This will avoid swelling of the track surface in the future.
Compact the crushed stone properly and pour another thin layer of sand on top of it. It is necessary to lay a second layer of geotextile on the sand, which would allow moisture to pass down, but not allow it to return back
After completing work on the drainage layer, it is customary to begin installing curbs. They are made from a variety of materials - stone, concrete, brick, plastic, wood, etc.
The most popular traditional type of curb is concrete, but recently curbs made of durable and inexpensive plastic have become widespread.
Concrete and stone curbs are secured using mortar, while plastic curbs are secured using special wedges sold with them.
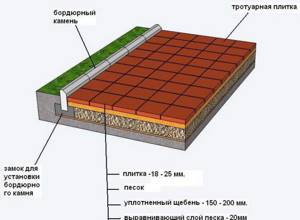
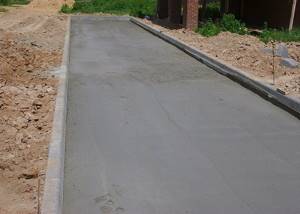
Stage No. 3 - foundation for masonry
There are three types of base used for laying paving slabs on walkways: concrete base; cement-sand base; base made of compacted sand.
A concrete base is more expensive than others, so it is used only when there are high loads on the tiles laid on the site. If the load is small and the soil itself is strong, you can make a simple sand base. But the most popular solution is a cement-sand base, suitable in almost any case.
Concrete base - expensive, but high quality
Laying the concrete foundation should begin with reinforcement. A ready-made welded metal mesh with a cell size of 100x100 millimeters is perfect for this. You can also use old pipes, wire, rods, etc. You need to lay out a lattice from them and tie the intersections with wire.
The resulting mesh should be installed above the drainage layer at a height of 3-5 centimeters; for this you can use stands made of stone or any metal. If the trench remains too deep at this stage of work, the excess space can be filled with compacted sand.
After this, the concrete mixture is prepared. Cement PC 400, sand and crushed stone are mixed in a ratio of 1:2:2. It’s better to order the concrete mixture from the manufacturer so that he delivers it directly to your site.
To create the most durable garden paths, it is recommended to use a concrete base. Concrete is poured at a time, its thickness should be 10-12 centimeters. As a result of pouring, the concrete surface should be below the surface of the ground by the thickness of the tile minus 3 centimeters
3-5 days after filling the trench with concrete, you can begin laying paving slabs.
Sand and cement - a base for every taste
If the tiles are laid on a mixture of cement and sand, they should be mixed in a ratio of 1:5. The thickness of the layer of dry sand-cement mixture is usually 12-15 centimeters. If the trench is too deep, you can do the same as in the case of a concrete base - add river sand under the base and compact it well.

This is what the base for paving slabs looks like. First, screenings are poured onto the ground, then there is a layer of crushed stone and only then the sand-cement mixture
When laying paving slabs, the base must be dry. It should not be installed in rainy weather, or after or before precipitation. After filling, the mixture must be compacted properly so that it is even. This will make the upcoming tile laying job much easier.
Sandy base - if the soil is strong
The sand for the foundation should not contain lime and clay. River sand is preferred for use. Sand from the quarry must be washed. After backfilling, such a base must be thoroughly watered, compacted and leveled.
Stage No. 4 – tile processing
Paving slabs are usually treated with a hydrophobic compound before starting the laying process. Tile treated in this way is not washed away by water, tolerates frost well and lasts longer than usual.
The treatment procedure also protects the tile from destruction of its surface by fungus and mold.
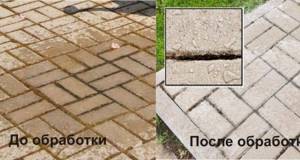
Treating paving slabs with a water repellent will protect the path from destruction. The photo clearly shows the difference between the treated tiles and those that were not treated.
The tiles should be dipped into a hydrophobic solution and dried twice. While doing this work, you can go through all the tile products you have and select the highest and lowest quality ones, so that you can then distribute them over the most and least noticeable areas of the area being laid out.
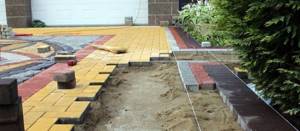
Stage No. 5 - laying paths
If the base of the paths is made of concrete, paving slabs are usually laid on a layer of cement mortar. The solution should fill the joints as much as possible, the thickness of which should not exceed three millimeters. The laid tiles are leveled with a rubber hammer.
You should start laying tiles from the beginning of the path, positioning yourself on an already laid area, laying out new tile products in front of you and thus moving higher and higher along the path. After installation is complete, all seams must be sealed with cement mortar.
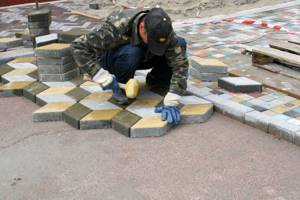
Laying tiles on cement-sand and simple sand bases is done differently. The person laying the tiles is on a section of the path free from tiles, places the tile products in front of him and, gradually, retreats back to the areas that have not yet been treated.
Each stone is tapped with a rubber hammer. This is necessary to secure it to the track. If the surface of the path is uneven before laying the tiles, you can add or remove a little sand or a cement-sand mixture. When the work is completed, the path is covered with a thin layer of the same mixture. Then this mixture is swept with a brush into the seams remaining after installation.
After all the tiles have been laid, all that remains is to water the path twice - immediately after the installation is completed and after two to three days.
Economy option - embankment paths
Although simple, compacted stone stitches offer the following benefits:
- cheap construction;
- absence of puddles on the surface - water goes through the gravel into the ground;
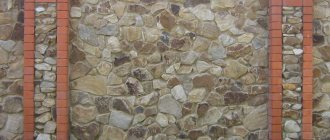
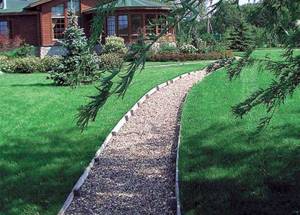
- a correctly laid embankment has an attractive appearance, which is reflected in the photo.
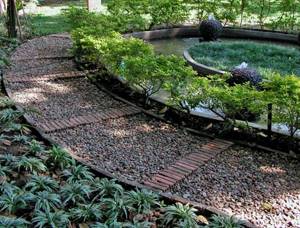
Nice gravel path near a pond
It is difficult to build a crushed stone path on a slope, so for a sloping landscape it is worth choosing a different solution. The second disadvantage is the need for constant care. Needs backfilling, leveling, removal of overgrown grass
These works are carried out annually, usually in the spring, after the snow melts. To implement this inexpensive option, you will need fine crushed stone or gravel, geotextiles and sand.
Foundation construction step by step
To begin, mark the paths on the site in any convenient way - using twine and pegs or sprinkling with lime. Then remove the turf and proceed to laying the base according to the instructions:
- Dig a hole at least 150-200 mm deep along the marking lines and compact the bottom with a tamper.
- Cover the dug profile with geotextile fabric and install borders along the edges.
- Fill the sand cushion to a height of 7-10 cm (a mixture of gravel and sand will also work). Tamp down thoroughly and water.
- Make a base of coarse crushed stone 80-100 mm thick, level and compact. It is allowed to use broken bricks and various natural stones. Large boulders should be broken.
Making the finishing fill
In order for the path to serve for a long time and not sag under load, it must be covered with an even layer of fine crushed stone and compacted thoroughly. Perform the operation in several stages, achieving maximum coating density. Mechanization tools - a manual roller and a vibrating plate - will be very helpful.
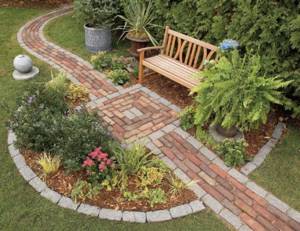
There are no more tricks in the construction of embankment paths. Homeowners often lay similar stitches between the beds in their vegetable gardens to ensure they can walk comfortably in wet weather. When laying in a country yard, there is a way to bring beauty: combine a gravel embankment with flat stones or decorative slabs, as done in the photo.