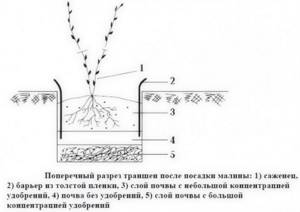
How to make beds for raspberries. The only correct way to grow raspberries
Raspberries should be planted in the spring in a bed 500mm wide in one row, the distance between seedlings is 700mm.
The seedlings are spring raspberry shoots from an old garden bed. We select the strongest shoots with a height of 200-300mm and dig them out with the root lobe. In the hole, the seedling should be at the same depth as it was in the old bed. We water daily for the first three days, then as needed. By the end of summer, powerful shoots 1.5-2 meters high grow. In the middle of summer, next to each shoot, we drive a support stake 1.5 meters high and tie the shoot to the support in 2-3 places. This is necessary so that the shoot does not become bent or broken by the wind. Throughout the summer, we remove young shoots that appear next to the seedlings, and we remove shoots from the seedlings that appear from the axils of the leaves. Under no circumstances do we cut off the tops of the seedlings, as this will lead to massive regrowth of shoots from the leaf axils, the seedlings will turn into bushes, which will lead to thickening of the planting and, as a consequence, to diseases and a small harvest. Before the onset of frost, we remove the supports, tilt the seedlings as low as possible to the ground and tie them to each other. You should not wait for the leaves to fall, with them the shoots overwinter better, the shoots remain flexible and do not break when bent down. It is necessary to take measures to retain snow. If possible, it is good to stick spruce branches along the bed; it will hold the snow and repel mice.
In the spring, when the buds begin to bloom, we tie the seedlings in a vertical position to two rows of stretched wire. The first row is at a height of 500-600mm, the second is at a height of 1500-1700mm, depending on the height of the seedlings. It is very important to tension the wire well, to place the supports no further than 4-5 m from each other, otherwise you cannot avoid lodging of the planting from the wind and the weight of the crop. We cut off the tops of the seedlings at a height of 100-150mm above the top wire. Trimming at the same height makes further care easier and gives the planting an aesthetic appearance. We use the young shoots that appear between the seedlings to plant the next bed for next year’s harvest. We remove the remaining growth throughout the summer. Thus, only fruit-bearing plants remain in the garden, they get all the nutrients from the soil, all the sunlight, they are easy to care for, the harvest is abundant with proper care, and the berries are large. The harvest from one bed 15-20 meters long is quite enough for one family of 3-4 people.
I did not dwell on the choice of varieties, soil preparation, fertilizing, disease and pest control, there is a lot of available information on this matter. However, it is worth dwelling on two points. Firstly, it is necessary to add wood ash to the soil. Secondly, the soil under raspberries should always be moist (not soggy, but damp).
Common raspberry varieties
The most common early varieties are:
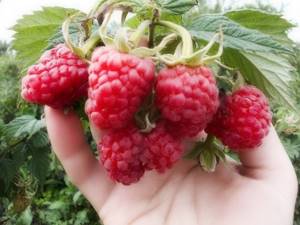
- "Companion". Early variety. The bush of this variety is straight and tall. They have round fruits with a sweet and sour taste. The color of the berries is dark crimson.
- "Balm". The bush has medium height, slightly spreading. The fruits are cone-shaped, bright crimson in color. The taste is sweet and sour, has a characteristic aroma.

- "Maroseyka". The variety is mid-season. The height of the bush reaches 1.5 meters, spreading, the stem is powerful, without thorns. The fruits are large in size, with a pronounced aroma, cone-shaped, double, sweet in taste.
- "Arbat". Mid-season variety of large-fruited raspberries. The berry is large in size, weighing up to 19 grams, the taste is sweet, juicy, and has a pronounced aroma. Harvest from one bush up to 4 kg.
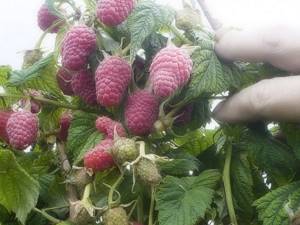
- "Stolichnaya". Late ripening variety. The shoots are powerful and have no thorns. The fruits are large and sweet in taste.

Raspberry-blackberry hybrids
Raspberry-blackberry hybrids are the result of the work of breeders. These hybrids have many advantages:
- high productivity;
- powerful bushes;
- absence of thorns;
- large berry size;
- ease of care;
- pronounced specific aroma;
- frost resistance.
The advantage of hybrids is that the ripening period is earlier than that of blackberries. The variety borrowed its taste and productivity from two varieties of berries.
Of the most famous varieties, the most commonly grown are:
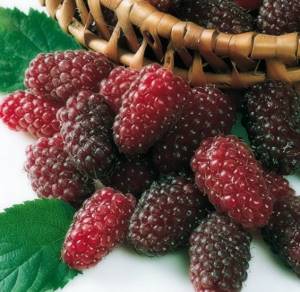
- "Loganberry." The fruits grow in clusters of 20-25 pieces and ripen in August. Productivity - 9 kg per bush. Propagated by cuttings, shoot tips.
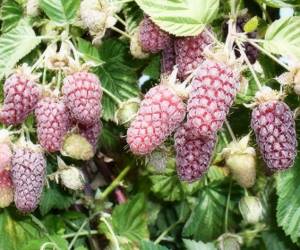
- "Tayberry." The variety is mid-season. The bushes are powerful, 1.5 meters high. The fruits are large in size, sweet and sour, and have a pronounced blackberry flavor. When fully ripe, the color of the berries is black. Ripen at the end of August. Productivity 12 kg per bush.
The only disadvantages include the fact that the bushes are tall, branched, and require obligatory gartering to a trellis.
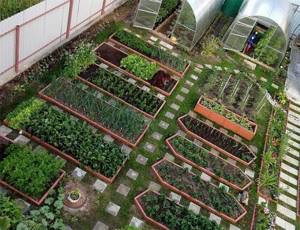
A hassle-free vegetable garden for the elderly, how to make smart beds. Types of lazy beds in the country
Fencing for such structures can be different: boards, plywood, slate, iron, brick, stones, ready-made plastic and metal structures. There is a separate type of lazy beds without sides. In general, their structure is the same, with the difference that they are not so tall. Depending on the material used, the production of smart beds takes different amounts of time.
The beds also differ in width, which depends on the personal preferences of the gardener and the size of the land plot. The narrower they are, the easier it is to process them. The minimum width is 40 cm. Wide ones have another advantage - they significantly save space and allow rational use of small plots of land. But they still shouldn’t be made wider than 100 cm.
Comment! In order for the garden to be truly smart, you need to reduce the width of the beds and increase the width of the paths between them. This will make it convenient to care for crops; you can place a chair or other stand on the path.
According to growing technology, smart beds are divided into the following types:
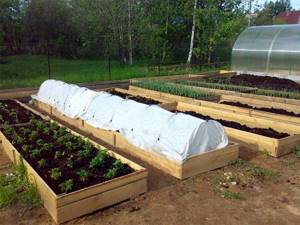
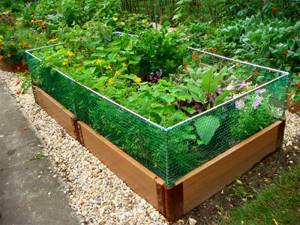
- Box Such smart beds can be made without hassle by anyone who knows how to use a saw and hammer a nail. They are located from north to south for better illumination. They can be from 20 to 40 cm in height, length and width are arbitrary. The higher they are, the better the earth will warm up, therefore, the harvest can be expected earlier.
- Container. It resembles a box, only much higher, from 50 cm to a meter. The width and length are approximately equal and do not exceed 100 cm. Such a container is used for early planting of zucchini, cucumbers, herbs and radishes, when the snow has just melted in the garden. The structure is made warm to create additional heating from below, filling it with organic matter. Since the dimensions are small, such a structure can be easily covered with film or spunbond.
- In a barrel. Such smart beds are used to obtain early production. The second goal is to obtain fertile soil, which is formed during the summer from the overheating of organic matter. Climbing plants from the pumpkin family, which require sufficient light, warmth and a large amount of fertilizers, are especially fond of such structures. All of the above is included in this method.
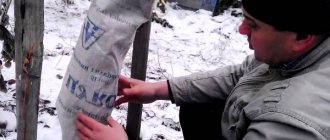
- Bags. This method of organizing smart beds is used mainly for planting potatoes and tomatoes. It has proven itself in conditions of sandy soil, lack of land, and a large number of pests such as mole crickets. Organic residues, manure, and soil are poured into durable bags in layers. Plantings are carried out as usual. During the season, soil is added to the bags.
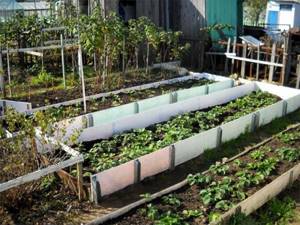
- Ditches and trenches. This method has proven itself in conditions of strong winds or low temperatures or when planting heat-loving crops such as grapes. Plants can be planted only on the sunny side, and during cold weather they can be covered with film or spunbond.
- Vertical. The method is used in small areas for low-growing plants and flowers.
Requirements for choosing a landing site
When choosing a site for planting raspberries, it is necessary to take into account that this crop is light-loving and in the shade gives a low yield, however, it does not tolerate heat. It prefers areas with moderate humidity; the root system reacts negatively to excess moisture in the soil; therefore, when planting, it is necessary that groundwater does not come closer than 1.5 meters to the surface of the earth. Otherwise, in winter the root system may freeze.
For growth, flat areas with large accumulation of snow are preferred. This will provide the raspberries with a good winter. You can also plant this crop on gentle slopes facing south and southwest. Excess moisture does not linger here, and there are no cold winds.
The soil is preferably clay-sandy with good permeability to moisture and air, rich in useful minerals. It can grow on sandy soil only if a large amount of organic fertilizer is added to the soil.
The soil should not be acidic. To normalize the acidity level, add lime or ash.
Good predecessors of raspberries are:
- carrot;
- beet;
- radish;
- parsley;
- dill.
How to tie raspberries correctly quickly and easily. Why tie up raspberries?
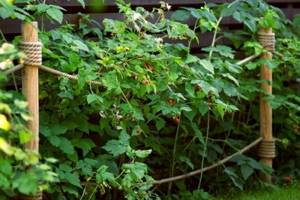
- Most of the raspberry stems are quite fragile and easily break under the influence of natural factors such as strong wind or rain, this especially often happens at the moment of ripening of the berries, when the raspberries begin to bend down to the ground under the weight of the harvest. Agree, it would be very disappointing to see only broken bushes in your garden after the next rain instead of the expected harvest.
- Raspberry garter is also a preventive measure against various infections and pests. After all, if the raspberry tree is thickened, gas exchange in it is disrupted, increased humidity occurs, and this, in turn, creates a favorable microclimate for the development of various infectious diseases, and the distribution area of all kinds of pests quickly increases in it.
- It has a beneficial effect on the quantity and quality of the harvest. Indeed, in properly tied bushes, the berries are illuminated evenly, which leads to their more amicable ripening, as well as improved taste. And besides, it is much more convenient for bees and other insects to pollinate tied bushes, and this means you will also not be deprived of the harvest.
- Raspberry garter makes harvesting easier. You won’t have to wade through thickets, scratching yourself on thorns, to pick the coveted berries. Not a single berry will be missed - everything is in sight, in addition, the time spent on picking will be significantly reduced.
- Next year's shoots develop better in tied bushes. Since they will be in the center of the bush, they will not lack space and light, and this will lead to a healthy crop next year.
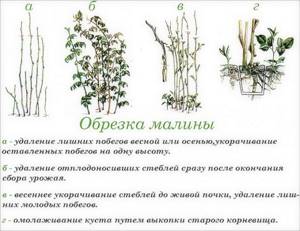
Formation of bushes
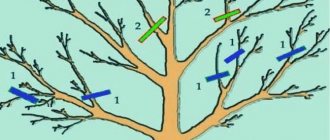
Tall varieties must be pruned, leaving branches 1.8 to 2 meters high. Low-growing bushes should be pruned at a level of 1.5-1.8 meters.
Stake formation method
It provides for the preservation of bush cultivation with the removal of shoots that have grown between the bushes. The shoots are removed when they grow to 10 cm. Those shoots that remain are tied to a stake at a level of 55 and 170 cm. The upper part is either cut off, leaving a bush 2 meters high, or bent into an arc and tied to a stake at a height of 170 cm.
Narrow fan formation method
The bush is divided into two parts. The stakes are driven in on the right and left sides at a distance of 25 cm from the bush. The divided bush is tied up, moving one side to the right and the other to the left. The height of the tie does not change. Shoots grow in the center of the bush. Side shoots must be cut out.
Arch-stake method
The stakes are located in the center of the bushes. The stems, divided into two sides, are tied as follows: the left stems are taken from the second bush, bent and tied to the stake of the first bush. The right stems should be tilted and tied to the stake of the third bush along with the left shoots of the fourth. And so on until the end of the row. With this method of tying, the lateral shoots should be removed, and a new bush should be formed from the shoots growing in the center.
How to make the soil loose and soft in the garden. What does agricultural technology and soil improvement include?
- Every time the earth is dug up, its inhabitants, in particular earthworms, are destroyed. And this is the only organic matter that is useful and safe for the soil after decomposition. Using a pitchfork, you can lift the soil, make small depressions at a distance of 20 cm from each other and throw the worms inside. This will be the first step in making the soil fertile again. Unrotted manure can burn the tender roots of plants. Only raspberry and currant bushes are not afraid of mullein. The manure must be 5-6 years old to fertilize the land using this method. Otherwise, it has a detrimental effect on all living things and will damage the structure of the soil.
- Improving the soil in the garden with mulch. And this is not only collected or mown grass, but also sawdust, husks, chaff, and withered tree leaves. If you are afraid that some type of mulch may oxidize the earth, use sawdust - a neutral material. If the soil is severely depleted, 5-7 days after fertilizing it with earthworms, you need to put a thin layer of rotted manure on top. Next, put mulch on it, which will allow the manure inside to remain wet all the time.
- You can disinfect the soil in your garden and completely get rid of weeds using pesticides, which will not benefit depleted soil. The area that you are healing needs to be planted with clover and cereal crops. Their roots should remain in the ground longer and enrich it with their decaying remains. This way you will get rid of weeds and protect the soil from rot and fungus. When vegetable crops grow in beds, to prevent weeds, mulch the rows and place grass clippings between plantings.
- Frequent loosening of the soil leads to drying out and destruction of internal microflora. Try to weed and loosen after rain, when the ground is soft and loose. It is good when the row spacing is initially filled with sand, pebbles and other natural materials.
- Depending on the composition of the soil, sand and compost are added to it in equal proportions. You can make fertilizer yourself from a compost pit. Place the worms in it, after moistening it, and then covering it with polyethylene for 2 weeks. Earthworms from the garden are slower than forest ones, so dig for better and faster formation of worm bio-manure in the forest. Humus becomes useful immediately and can be mixed with sand to fertilize loamy soils.
Planting raspberries
Raspberries are planted from September 20 to October 15. It is necessary to finish planting this crop 10 - 14 days before frost so that the plant has time to take root. In winter, snow-covered raspberries are reliably protected from freezing. Active growth and development of raspberries begins in early spring.
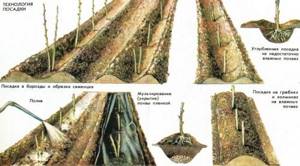
In the spring, you can plant seedlings that were dug in in the fall. They must be planted before the buds swell. Raspberries are planted using bush, tape and trench methods.
Bush method
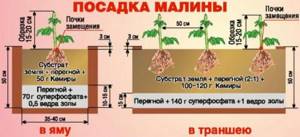
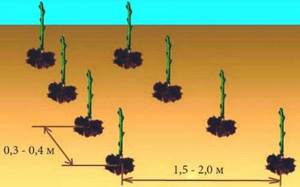
When planting using this method, it is necessary to dig round holes with a diameter of 40-42 cm and a depth of 35 cm. Holes in a row are dug at a distance of 0.8-0.9 meters from each other, and row spacing is left at 1.5-1.7 meters. Humus mixed with ash and superphosphate is poured into each hole and two seedlings are placed in it. Formed using a wooden stake.

Belt method
Seedlings are planted in a row at a distance of 0.5-0.8 meters from each other. The row spacing is 1.5-2 meters. This creates a continuous tape. Bushes are formed using a trellis.
Trench method
Using this method, plants are better provided with nutrients. Trenches must be prepared 25 days before planting. Dig a trench 35 cm deep, and the width should be at least 55 cm. A 15 cm thick layer of humus is laid at the bottom of the trench and ash is added. A distance of 1.8-2 meters is left between the trenches.
Next, the raspberries need to be watered. Water consumption is from 0.5 to 1 bucket for each bush. Then you need to mulch the bushes so that less moisture evaporates from the soil. In addition, mulching will slow down the growth of weeds and the proliferation of pests. Black polyethylene, peat, humus, and sawdust can be used as mulch.
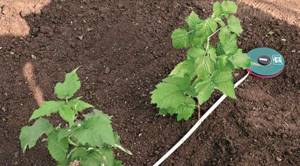
How to garden raspberries beautifully. Growing raspberries on a trellis
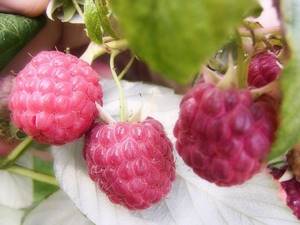
Raspberries are a favorite treat for many. It is considered one of the most popular berries in our country. It grows well, does not require much care, the harvest is regular and rich, and already in the second season gardeners can enjoy tasty and aromatic fruits.
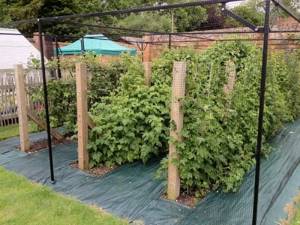
And if you put effort into growing, the harvest will be larger, tastier, and even earlier. The use of special supports - trellises - will help in caring for your garden pet. And, of course, this article. Let's understand how to care for raspberries.
We also advise you to look at the article about raspberry diseases.
How to plant raspberries
The first thing is to plant a bush. There are a number of mandatory rules for planting and care, and there are some recommendations and “life hacks” with which your harvest will become a real pride. Tying raspberries to a trellis is just one such tip. But everything is in order.
Choosing a landing site
Let's move on to the landing.
When choosing a place where your raspberry tree will grow, you need to take into account that the previous “inhabitants” of this area are not tomatoes or potatoes. They are susceptible to the same diseases and this can become a risk factor.
It is also important to monitor the acidity of the soil. Raspberries like a neutral pH.

There should be enough sun, but the raspberry bushes will not be very happy with the winds, so the best place on the site is low. And it’s good if in winter the bushes are covered with a large layer of snow.
Raspberries can be planted in spring and autumn, and green shoots can be planted in summer.
An article about feeding raspberries will be useful.
Soil preparation is required in a timely manner.
When planting raspberries in autumn, the place should be ready in a month, and in spring - in two weeks.
This preparation involves fencing the raspberry tree to prevent the roots from growing into adjacent areas, as well as fertilizing the holes.
Advice. It is recommended to fence the raspberry field with sheets of iron or slate. These sheets are immersed 30 - 40 centimeters into the ground. This way the root system will not climb into neighboring beds. You also need to leave at least a meter from the fence.
- Raspberries are planted in two main ways: bushes and trenches.
Planting with bushes involves planting shrubs with 5 - 10 shoots each in separate holes.
Trench type or trellis means planting the plant in one row.
Let's take a closer look at both methods.
Planting raspberry bushes
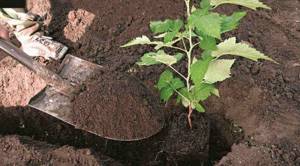
- For the bush method, you will need to make holes measuring 40-50 centimeters in width and depth.
- A mixture of soil, fertilizer and ash is placed at the bottom of the hole.
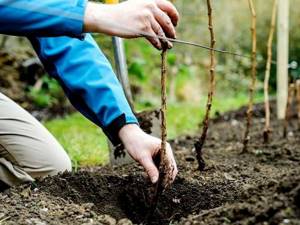
- Then the plant is placed in the hole, having first soaked the root in a special planting solution (planting mixture).
- After placing the bush, the hole is covered with earth, so that the root protrudes slightly from under the ground.
Bush method of planting raspberries
With this method, after watering and final shrinkage of the soil, the neck of the horse system will be exactly at soil level.
This is an important point, because deep planting will prevent root buds from developing.
For your information. It is necessary to calculate intervals of about a meter between bushes, and two meters between rows.
Ribbon planting of raspberries
- When belt planting, a trench is dug with a depth and width of about 50 centimeters.
- You should leave about a meter of distance between the rows, and about half a meter between the plantings themselves.
- The trench will need to be filled with fertilized soil, which includes: compost, manure or peat; top layer of earth; minerals such as phosphate or “superphosphate”.
- All components can be added layer by layer, or by making a mixture at the same time.
- Having planted the bushes, they will need to be watered and the soil covered with peat or humus mulch.
- If the soil is wet, do not water.
- It is not recommended to fertilize the soil with nitrogen-containing mixtures; this will prevent the roots from taking root. Instead, it is better to sprinkle with ash.
- After planting, it is recommended to trim the bushes, leaving no more than 30 - 40 centimeters.
Raspberry care
- The basis of raspberry care is sanitary pruning of fruit bushes. It is necessary to remove diseased or unnecessary shoots and leave only fruit-bearing, young and strong shoots. It is usually carried out in the spring or after picking berries.
In the first spring, the bush is pruned by 30 centimeters, as already mentioned, and from the second season they begin to sanitize it annually in the fall and shorten it to the top bud in the spring.
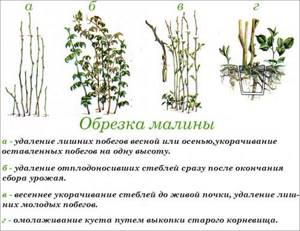
It is also necessary to remove all dry, diseased shoots, as well as weak branches, leaving only the strongest, largest young stems.
After sanitary pruning, it will be necessary to loosen the soil under the bush and remove all the grass.
If the soil is too dry, it is recommended to water the bush and also feed the raspberries.
- For wintering, you can dig up the ground, or you can lay sawdust or peat. It is also recommended, to prevent freezing, to bend the bushes, tilting them towards each other, and tie them.
Raspberry planting dates
The timing of planting raspberries is quite flexible and you can choose them at your discretion. Raspberries can be planted in both spring and autumn:
- In the spring, raspberries are planted after the threat of severe frosts has disappeared and the soil has warmed up, but before active plant growth begins. This is the safest option for the middle zone, but it delays the first fruiting.
- In autumn, raspberries are planted from the third decade of September to mid-October, at least a month before the expected onset of frost. This is the main method of planting raspberries in the southern regions. High-quality rooting allows plants to quickly begin to grow in the spring and reduces the waiting period for the first berries.
Due to unstable weather, choosing the right dates in both spring and autumn is becoming increasingly difficult. But if you do not violate the basic rules of planting bushes and do not be late with planting, success can be achieved with both options in any climate.
How to fence garden beds at your dacha cheaply. We make fences around the beds from various materials
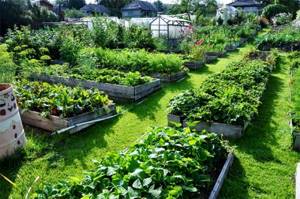
In the private sector, every housewife tries to maintain cleanliness and order not only in the yard, but also in the garden, weed weeds, and plant each type of plant separately. And if you fence the beds with a beautiful fence, the garden will take on a neat and well-groomed appearance.
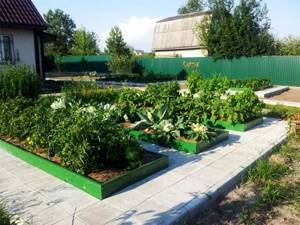
A creative approach to the manufacture and installation of fencing for garden beds will make them a decoration of the site.
The purpose of fences around the beds
There are many advantages of fencing individual areas with planted plants:
- They get clogged less and are easier to remove weeds from.
- Such beds are easier to water and fertilize.
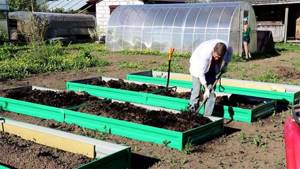
- The soil does not crumble, but is constantly kept at the same level.
- Less physical effort and time is spent on processing.
- They can be quickly converted into a greenhouse or greenhouse: insert metal arcs and cover the top with plastic film.
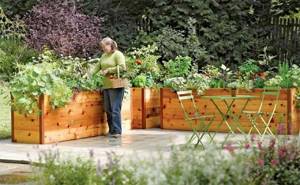
- High sides protect the bed from mechanical damage and pets.
- It is convenient to warm up the plants by placing layer-by-layer fertilizer in the soil.
- This results in a beautiful zoning of the garden.

Most often, fences are placed around beds with hot and sweet peppers, tomatoes, cucumbers, and herbs.
If the box is made from improvised materials, then you will be able to do it without spending anything at all. But if brick or stone is chosen as the material for the beds, then the foundation will need to be poured, which will require money.
What materials are used for fencing?
The list of suitable raw materials is unlimited. It all depends on the imagination and budget of the dacha owners.
Let's look at popular and easy-to-use materials for decorating edges.
Wood (picket fence, boards, pallets)
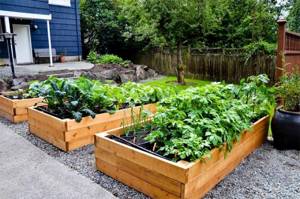
Wood and varieties of lumber are considered the most in demand. Owners often don’t even have to spend money on a purchase, since in the yard there will always be materials left over from the construction of a barn or shed.
Wooden elements are environmentally friendly, but they have disadvantages - susceptibility to rotting and damage by insects. You can extend the life of wood if you carefully treat the surface with antiseptics.
Wooden fences are made from:
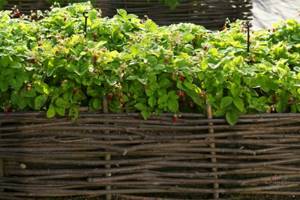
- Vetok. They are intertwined with each other, forming a wattle fence. The service life of such a fence is short (up to 7 years), but you do not need to spend money on purchasing materials.
- Brusa. Expensive material, but lasts a long time. Often sold already impregnated with antiseptics.
- Gorbylya. These are the remains of logs with bark. The material is considered wood waste. Very inexpensive. Before installation, it is recommended to remove the bark from it, otherwise insects will infest it and the croaker will quickly become unusable.
- Picket fence. Thin strips of the same size. Driven into the ground around the perimeter. They serve more of a decorative function.
- Edged and unedged boards. An edged board is cleared of bark, an unedged board has bark, but is much cheaper. They are convenient for knocking down a wooden box. The height of the sides is selected individually. The fence for each bed can be painted in its own color.
- Logs. They are rarely used due to the high cost of raw materials, more often if the remains of logs are left after construction.
- Pallets. Boards from pallets are knocked together to form a rectangular frame. Soil is added along the height of the sides. The advantage is that the pallets are impregnated with high-quality antiseptics and are made of good types of wood.
Metal (corrugated sheet, galvanized, forged)
After installing street fences, owners often end up with pieces of corrugated board. They find useful use in edging beds. Thin sheet metal withstands the external environment well, holds its shape, and does not require maintenance. Beds made of colored corrugated sheets will become bright elements of the garden.
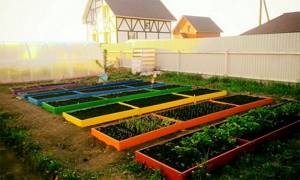
There are homemade galvanized fences. They are less attractive, but have excellent corrosion resistance.
The disadvantage of a metal fence is that in the sun the metal gets very hot, giving this temperature to the ground. The soil dries out, preventing the full growth of plants.
It is important that the upper edge of the metal is smooth and rolled so that none of the residents are injured.
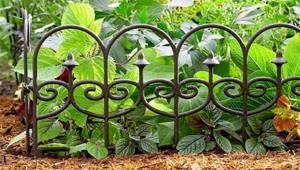
Wrought iron fences are rare for garden beds. They are often used for decorative purposes to frame flower beds and flower beds.
Polycarbonate
Polycarbonate is popular for cladding greenhouses. Therefore, its remains often become a fence for beds and flower beds. You need to be careful when installing the material in the ground - polycarbonate is quite fragile and can crack, but it does not need maintenance and is not afraid of moisture and ultraviolet radiation.
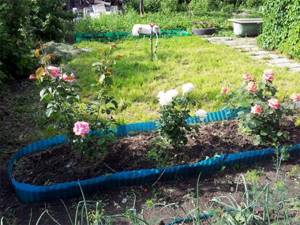
Plastic (sheets, pipes, mesh)
Plastic is a budget and lightweight material that is not afraid of moisture.
The downside of plastic fences is their fragility. They cannot withstand heavy loads and may crack.
Plastic is used more for the purpose of visual zoning of a vegetable garden or garden.
Suitable for fencing beds:
- panels;
- PVC mesh;
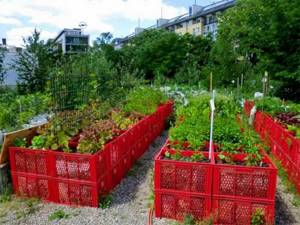
- plastic boxes;
- separate pieces.
If these are panels, then the material is dug to a shallow depth into the ground. The mesh is attached to small posts or combined with other materials.
Follow the link to see examples of finished fences and get acquainted.