Initially, architects began to plant vertical surfaces and used this method to create green recreation areas in the limited space of balconies and terraces.
The idea was so good that it was quickly borrowed by gardeners and farmers, because the height of the site is not limited in any way, which makes it possible to increase the usable space.
Nowadays, vertical beds are widely used by landscape designers, as they fit any created style.
In fact, any gardener can create such beauty on his own site. This does not require a lot of effort, skills or financial investment. And with a little ingenuity and imagination, you will create real Hanging Gardens of Babylon on your site.
A vertical bed has its advantages and disadvantages:
Advantages:
- ease of care. To plant, process and harvest, you do not need to bend down to the ground, all plants are at an accessible level
- plant leaves do not come into contact with the ground, therefore they are protected from fungal diseases
- saving useful site space
- when the temperature fluctuates sharply, such beds can be easily moved to the utility room
- the opportunity to decorate not only the landscape, but also the walls of buildings, fences, gazebos
- absence of weeds and pests in the soil
Flaws:
- Due to the small volumes of soil in vertical beds, nutrition of the root system is limited, so it is necessary to feed it with mineral fertilizers
- Perennial crops may not tolerate severe frosts; they should be brought indoors for the winter
- the soil dries out quickly, more frequent watering is required
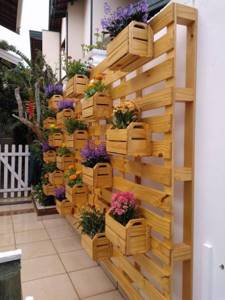
Vertical bed made from pallets or pallets
For the garden bed, choose whole pallets that are not affected by rot and mold.
Pay attention to the factory markings. Typically, to extend their service life, wood on pallets undergoes chemical or heat treatment. Both options are suitable for growing ornamental plants, but for the beds from which you will harvest, use only thermally treated pallets. Be sure to check them for nails and knots.
To create a bed you will need: a pallet, non-woven covering material (agrofibre), burlap, thick fabric, soil, seedlings.
Let's get started:
- Clean and treat the pallet with paint or a compound for exterior use.
- cover the back side with a double layer of agrofibre, burlap or fabric
- we plant plants starting from the bottom row
- compact the soil tightly and fill all available space
- We water the finished bed and leave it in a horizontal position for a month for better root germination and soil consolidation.
- hang the bed on the wall, fence, crossbar, you can lean it against the wall
Tip: you can make pockets from agrofibre for each row of the bed. And although it will take a little longer, the soil consumption will be much less.
Idea: Pallets can become the basis for vertical flower beds and herb plantings. Paint them with bright paint, attach existing containers (flower pots or containers, buckets, painted tin cans, linen bags) and plant plants there.
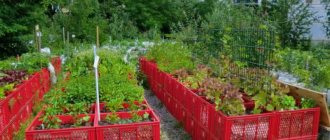
Green beds made from plastic boxes
This idea of plastic bottle boxes is perfect for small plants, flowers, salads, herbs. With the help of such a vertical bed, you will not only fill the table with tasty and vitamin-rich food, but you will also be able to create cozy relaxation areas.
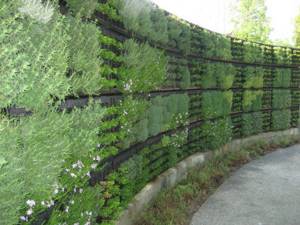
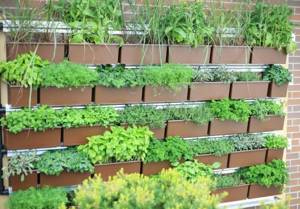
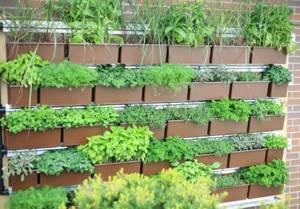
Pockets for greens
One of the popular options for a small dacha, which diversifies the design of a dacha plot, is a vertical bed in the form of pockets. It is especially popular for growing greens - parsley, cilantro, rosemary, dill, etc. Lavender and petunia grow great in pockets.
Vertical beds in the form of pockets can be easily made from tarpaulin or felt. Felt pockets are especially relevant, since they retain moisture in the soil longer, at the same time the earth “breathes” and plants grow quickly.
Pockets for greens (Photo from open source)
In winter, the earth is shaken out of the pockets after harvesting, the entire structure is demolished and packed for storage until spring. One of the conveniences of such a vertical bed is the ability to easily replace one plant with another.
Vertical bed of flower pots
Using ceramic or plastic pots of different sizes you can make a very simple but very beautiful garden bed. Everything is simple here: the structure is installed according to the pyramid principle.
Fill the pot with the largest diameter with soil, and place a pot of smaller diameter on top. So we install all the pots sequentially. You can make several tiers, depending on the number of pots.
From pots of the same diameter, you can make an original bed using a metal rod with a diameter slightly smaller than the hole at the bottom of the pot. Place the first pot on the ground and drive part of the rod into the ground through the hole for stability.
Fill the pot with soil, and then string each pot onto a rod and move them in different directions. The bed is ready, all that remains is to water it and plant the plants.
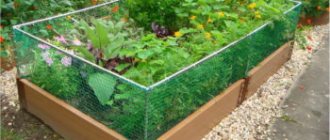
Vertical bed made of construction mesh
This bed is ideal for growing flowers, herbs, vegetables and even potatoes or mushrooms.
- the construction mesh must be rolled up in the shape of a pipe, with a diameter of 80 - 90 cm.
- We lay a layer of straw along the outer edge and a layer of compost inside.
- We fill the soil in layers of 10 cm, plant seeds or tubers of plants in each layer and water them abundantly.
Instead of straw, you can use polyethylene or burlap. This garden bed looks impressive, takes up little space, is mobile and easy to maintain.
Vertical gardening on a grid
An interesting option for creating flowerbeds and beds of this type can be a structure made from building mesh, which you can make yourself. So, make a vertical bed with your own hands using a mesh, which is available at every summer cottage.
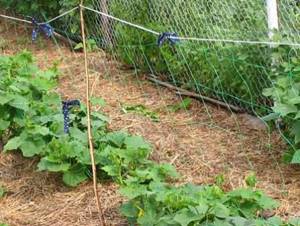
We know several ways to help you complete such a project:
- A bed in a special design . It can be done simply, for example, by rolling the mesh into a pipe of the required diameter. When this form is ready, you need to lay straw under the walls and fill the rest of the space with compost. In such a container you can grow several types of crops at once, for example, potatoes and annual flowers. It should only be clearly understood that many crops are not recommended to be grown in the same soil;
- Vertical stand made of mesh . To build a stand from mesh, you can use the mesh itself and dense polyethylene as a basis. We immediately warn you that due to the fragility of such materials, the structure will not last more than a few years, but this is quite enough, especially considering the minimal investment in beauty. You need to install the mesh by choosing a shape, put several layers of polyethylene inside, and sprinkle the substrate between them. Of course, it won’t be possible to grow strawberries or tomatoes this way, but you can very easily arrange original flower beds throughout the area;
- Mesh stand for hanging plants . You can also create a stand for small boxes and pots in which, for example, seedlings or herbs are grown. This mission will require a thicker mesh to support the weight of all the plants placed on it. Next, you can place absolutely any plants in small pots along its plane.
Vertical bed-bag
The bag bed can be placed both vertically and horizontally. Give preference to a bag made of natural material, since artificial fibers will collapse under the influence of moisture and sun without lasting even one season. Make a hanging loop on top, fill it with soil and secure it in place.
Make holes in the bag and plant seedlings or tubers in them.
By the way, you don’t have to hang the bag, but install it in a sunny area of the garden or yard. The main thing is to take care of the stability or fastening of your bed.
By analogy with a bag bed, you can build mini beds from a wooden, metal or plastic barrel.
DIY device types
Vertical beds are not suitable for planting all plants . It is best to plant light-loving plants with small roots in such structures. Perhaps, vertical beds for strawberries are most often built. It’s not at all difficult to make them with your own hands; it’s enough to have basic skills in working with simple tools.
The most affordable way
With this method, most likely, you will not have to spend any money. You will need the following materials:
- Plastic bottles with a capacity of at least 2 liters.
- Wire or twine.
- Wooden bars.
- Nails or screws.
Using a knife or scissors, plastic bottles are cut crosswise approximately in half. You will need all the top halves and some of the bottom halves, and the remaining bottom halves will not be used.
A frame of the required size is assembled from wooden blocks, and it is fastened with nails or self-tapping screws. The lower halves of the bottles are placed on the lower block and filled with a mixture of nutrient soil and hydrogel. The caps on the upper halves of the bottles are slightly opened; this is necessary so that when watering, excess water slowly flows from the upper rows of the halves to the lower ones. A mixture of soil and hydrogel is poured into the upper halves, after which they are placed with the plug down into the lower halves.
Each subsequent higher row is constructed similarly. The resulting horizontal rows are kept from falling by horizontal strips attached to the vertical slats of the bed frame on both sides. The bottle halves simply stand nestled one inside the other and are kept from moving sideways by wooden slats.
And now seedlings are planted in the bottle halves, immediately watered and the bed is placed in a sunny place. Such a bed can be hung on a fence or the wall of a summer shower, or placed in the aisle. Each plant will have to be watered separately.
Bottle option
With this method, the bottles in the row will be located horizontally, and the rows themselves will be vertical: one above the other. In plastic bottles, oval holes are cut with a knife of such a size that it is convenient to plant strawberries.
Then you need to put together a shelf from boards or bars, which will serve as the basis of the entire bed. A mixture of soil and hydrogel is poured into the homemade pots obtained from bottles and strawberries are planted, and the pots themselves are placed on a shelf.
From plastic pipes
This method is more progressive, but also more expensive. To create such a bed with your own hands for strawberries, you will need:
- Plastic pipes with a diameter of 11–15 centimeters.
- Plugs for plastic pipes with a diameter of 11–15 centimeters.
- PVC or metal-plastic pipe.
- Wire or twine.
- Agrofabric.
- Coarse gravel.
Pipes in such beds can be located both vertically and horizontally, hanging one above the other. For the first method, holes with a diameter of 7-10 cm are made in a plastic pipe with a diameter of 110 mm in a checkerboard pattern, the distance between the holes in a vertical row is 20-25 cm. These will be “windows” for strawberries growing in the pipe. One side is left without holes; the pipe will rest on it in winter, and when installing the bed, this side should face north. A plastic plug is put on the pipe; this end of the pipe will be the bottom.
The PVC or metal-plastic pipe will be located in the center of the large pipe, it is intended for drip watering of plants. To do this, holes are drilled in it using a drill with a diameter of 3 mm. Through them, moisture will flow to the root system of the plants, so you must immediately ensure that the holes approximately correspond to the location of the roots.
To prevent water from escaping through the lower end of the tube, a plug is placed at the bottom. The tube for drip irrigation is tightly wrapped in agro-fabric, which is secured with wire or twine. This will prevent the water drainage holes from becoming clogged. The tube is inserted into a large pipe. The smaller pipe should run through the center of the larger one. A 10-15 cm layer of gravel is immediately added below, and a small amount of soil above is added, which is necessary for planting the first, lowest row of strawberry seedlings. Strawberry seedlings are placed in the “windows” and immediately covered with soil on top. After this, the rest of the strawberries are planted from bottom to top in the same way.
If PVC pipes are suspended horizontally, holes for plants are made every 20-25 cm on only one side of the pipe, and the other side is left without holes. The length of the pipe in this case can be limited only by the size of the area, but every 1.5-2.0 m it is recommended to fasten the pipe to a vertical support to avoid it sagging under its own weight. Plugs are placed on the pipes on both sides. The pipe is filled with nutrient soil and installed with the holes facing up, and seedlings are planted in the holes. Drip irrigation is installed either from above, so that moisture reaches each plant, or inside the pipe, similar to the previous method.
Hanging beds for strawberries
The basis of this type of beds will be a very strong plastic bag. The bag is filled with soil and cuts are made in it using a knife at a distance of at least 20 cm from each other. Then the bag is tied very tightly at the top and hung, for example, from fence boards or from a specially driven hook on the wall of a building. You can also sew a strong handle to the top of the bag.
If there is no such bag, you can sew or solder it yourself from strong polyethylene with a thickness of at least 0.2 mm. The dimensions of the bag are arbitrary, the main thing is to take into account the weight of the future hanging bed: the bag should not tear under the weight of the soil.
Strawberries or wild strawberries are planted in the holes made. If the top of the bag is tied, then it is recommended to install a vertical tube with holes in the bag to water the strawberries. If the bag is hung by the handle and the top of the bag is open, then you can water the strawberries through it from a watering can.
Strawberries in “pockets”
Another way to create a hanging bed. The bed is made from soft materials. To create it, you will need to purchase insulation with foil, for example, penofol or aluf. Foil, due to its reflective properties, will significantly reduce the evaporation of moisture from the soil inside the “pockets”. The insulation will need to be sewn on a sewing machine or by hand with strong thread.
Having decided on the size of the bed, fold the insulation in half and cut it according to the required dimensions, leaving an allowance of 2-3 cm for the seams. The outer seams are sewn, and another seam is sewn at a distance of 5-7 cm below the uppermost horizontal seam. Twine or wire is subsequently threaded between these seams, with the help of which the finished bed is suspended. Then the “pockets” themselves are marked and stitched and cuts are made in the insulation for filling the soil inside and planting plants. It is recommended to make no more than three “pockets” per meter of insulation . This method is suitable not only for strawberries, but also for greens, low varieties of tomatoes, cucumbers, and ornamental plants.
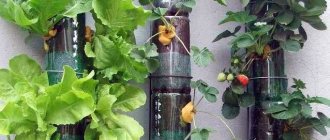
Vertical mini beds made from plastic bottles
One of the most inexpensive options, as waste is used.
Place the bottle with a screwed cap horizontally and cut off the top part, using a knife to make several holes on the opposite side. It turned out to be a wonderful planting container. Having made the required number of containers in this way, assemble them with a rope into one system, as described in the previous version.
By planting low-growing, bright flowers in such a vertical flower bed, you can create entire compositions, flowering walls, and also divide your yard into zones with colorful hedges.
Bed made of plastic pipes
Plastic pipes are affordable and easy to work with. For the beds you will need plastic pipes of small and large diameter, at least 11 cm, and possibly larger.
It all depends on the bed option you choose. A big plus here will be the possibility of creating drip irrigation, which greatly facilitates the care of seedlings. You can learn how to make a vertical bed from pipes and view the master class here.
Reasons for vertical arrangement of beds
The reasons that push gardeners to create vertical beds are different. Some people have a small plot, and placing them on it will increase the yield. Some people just can’t solve the problem of watering a plot with a large slope. And someone is worried about how to hide an unpresentable-looking fence or summer house. Some people just follow fashion - if they do everything, then I should too...
To create such beds, you can use both expensive modern materials and banal plastic bottles or plastic bags. The options for arranging such beds are very diverse, and can help solve the problem of placing your plants in a limited area.
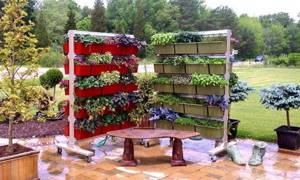
From cinder blocks
The height and dimensions of your bed in this case depend only on the number of blocks and free space on the site. All you have to do is show your architectural skills to build a stable structure oriented to the south.
This way your plants will receive maximum light and warmth . Try to immediately choose the most illuminated, heated and protected from the wind place for the garden bed, because moving it to another place will be quite troublesome.