RELATED MATERIALS
5
19
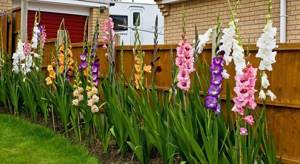
It's autumn, and the gladioli on your site have faded? It's time to send their corms...

4,5
7
No matter how much you love begonias and dahlias, freesias and gladioli, do not buy their tubers and bulbs in...

With the help of forcing, bulbous plants can be “forced” to bloom at almost any time of the year. For …

5
As autumn approaches, it is worth remembering that begonias are perennials and think about their future fate. ...
4,6
10
Winter storage is the weak point of dahlias; root tubers do not fit well in the apartment. But with the help...
5
46
In order for gladioli to please with generous flowering, you need to choose a suitable place and the right...
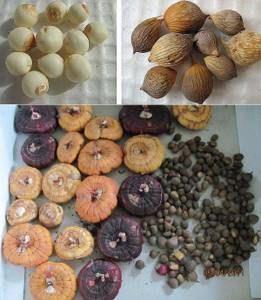
Possible storage problems
Most often they are associated with latent diseases and non-compliance with temperature and humidity parameters during storage. The reason may also be improper preparation of planting material - insufficient drying time, not treated against thrips and diseases.
- Under-dried onions. They can get botrythiosis - spots that are light brown in color. Diseased bulbs will have to be thrown away, and the rest will have to be treated with a fungicide and dried.
- Gray-green mold is how the penicillum fungus manifests itself. The reason and actions are the same as in the previous case.
- The bulbs dry out a lot. Too high a temperature is to blame. Perhaps the planting material simply did not have time to mature. Unripe bulbs are waxed.
- Thrips were observed on the planting material. They are fought by keeping the bulbs for 30 minutes in a solution of “Inta-vir” or “Tseneba”. Three days of drying will be required.
- Germination too early. High humidity and temperature are to blame for this. The bulbs are emerging from dormancy and preparing for the growing season. Reduce the temperature to 1 degree Celsius to slow down the process and reduce air humidity.
- The bulbs are softening - the temperature is too low, they are simply frozen.
In order to detect problems in time, a regular inspection of planting material is carried out - at least once a month, and if signs of diseases have already been identified, then more often.
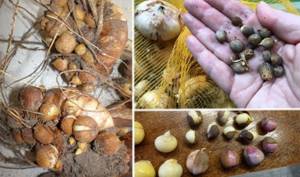
How to prepare gladioli for storage
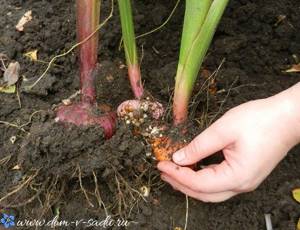
To prepare gladioli for storage, you first need to clear them of any remaining soil. If the contamination is too large, the tubers are washed under running water. It is more convenient to do this in a sieve.
- Plant stems are cut so that stumps no larger than 1 cm remain. In longer stems, a pest that is dangerous to bulbs—thrips—more often develops.
- You can reduce the drying time of planting material by removing the old bulb and roots.
- After pruning, the corms are placed in a fungicide solution. This procedure is necessary to prevent diseases before planting in open ground.
- The tubers should be dried thoroughly. To do this, they are laid out in a ventilated place with a temperature not lower than +25°C, and left there for 3 weeks. For another month, the planting material should be kept at room temperature (shelf, table). At the same time, it should be provided with frequent ventilation.
- The scales on the surface of the bulbs protect them from rapid evaporation of moisture with subsequent wilting. Therefore, there is no need to remove them.
If the affected areas on the tubers are small, they are removed with a sharp knife and then treated with brilliant green.
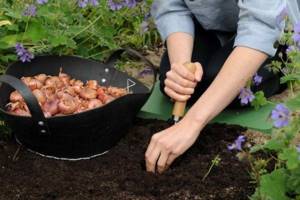
Digging up gladioli in the fall
What to do with gladioli after flowering in the fall? Of course, dig up the corms and put them in storage. To ensure proper digging and storage of gladioli in the fall, use our recommendations.
Gladioli need to be harvested after flowering; the harvesting time begins in the second half of September to mid-October. The exact timing of harvesting gladioli for storage depends on weather conditions, but here is our advice.
The exact time for harvesting gladioli occurs 35-45 days after the gladiolus blooms.

How to dig up gladioli in the fall and store them step by step
Step 1.
The time for harvesting gladioli in the fall begins in the second month of autumn, and the best time to pull out gladioli in the fall is September - October, 35 - 45 days after the end of flowering. Choose a dry and sunny day to harvest gladioli.
Step 2. Harvesting gladioli in the fall and storing
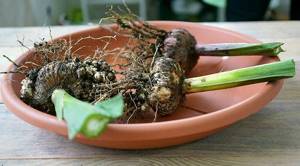
Carefully dig up the gladioli with a shovel or pitchfork and shake the corms off the soil.
When you dig gladioli from the garden, pay attention to the bulbs: they should be covered with brown scales. Children of gladioli are also covered with scales and the children are easily separated from the main bulb
This is the main sign that gladioli are ready for harvesting and storage.
Step 3. How to trim gladioli for storage
Now the dug up gladioli need to be trimmed. The stems of gladioli are trimmed at a height of 10–15 cm from the corms.
Step 4. Preparing to store gladioli
For better storage in winter, the bulbs can be immersed in a Fundazol solution for 20-30 minutes, then rinsed lightly with water and treated for the winter with a 3% solution of potassium permanganate for 30-60 minutes.
Step 5. How to store gladioli
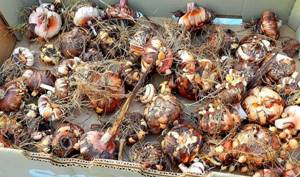
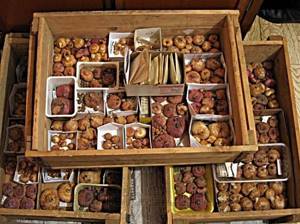
Place the dug up and trimmed gladioli in boxes or baskets in one or two rows and dry at a temperature of 20–25ºC indoors for 4–5 weeks. Then, dried and cleaned of old corms, roots and children, the corms are stored in winter in gauze bags at 4–6ºС, in well-ventilated areas.
The process of what to do with gladioli in the fall necessarily includes storing them. There are many different options for storing gladioli after digging, here are 8 ways to store gladioli in winter:
- Waxing
- Storing gladioli in a trench
- At home in the basement or cellar
- In the pantry
- In an insulated attic
- Glazed loggia or balcony
- In the apartment, near the window facing north
- In the refrigerator, in the lower vegetable compartment.
Also take into account that after harvesting gladioli, their corms will not germinate for 1-2 months, even if they are kept at home in favorable conditions for growth. Therefore, at first they can be stored in winter and in a fairly warm room.
After 1 - 2 months, the planting material should be transferred to a room where the temperature will be below 5°C. Otherwise, their root system will grow. Also, high humidity (more than 70%) leads to rotting of the bulbs.
The best solution for storing gladioli tubers in winter is a well-ventilated cellar. The bulbs are placed in wooden or plastic boxes with bars, which are then suspended from the ceiling. At home, gladioli are stored well on the bottom shelf of the refrigerator. Gladioli are simply wrapped in paper or newspaper, and they are stored this way all winter, until spring.
During the winter storage period, gladioli bulbs easily dry out and decrease in size. This is a common process for storing gladioli. In the spring, before the gladioli are soaked in water or in water with potassium permanganate, they wait for the bulb to take its original shape and the roots begin to grow, and then they are planted in a flowerbed. This proper care of gladioli in the fall will help you preserve your flowers and admire them next season.
How to store gladioli at home in winter?
To prevent the tubers from drying out during the winter months, you need to place them in a cool room that has a high level of humidity.
Temperature
In the room where gladioli corms are placed for preservation, the temperature should reach 8-9°C. At elevated temperatures, the tubers may begin to germinate, and the seedlings that stretch out by April will not be able to please with flowering.
Temperatures below 6 °C in the storage room provoke freezing of the planting material. The air humidity level should be at 78-80%.
Storage in apartment conditions
To ensure better preservation of gladioli tubers in the apartment, you will need to choose a place where there will be a suitable temperature regime.
The best places in this case would be:
Window sills on wooden frames due to lack of airtightness. Hallway. Common vestibule. Glazed balcony/loggia
It is very important to control the temperature in this room to prevent the soil from freezing. To maintain moisture, you will need to wrap all the bulbs with a triple layer of paper.
To avoid overheating, it is better to avoid storing in polyethylene.
To maintain moisture, you will need to wrap all the bulbs with a triple layer of paper. To avoid overheating, it is better to avoid storing in polyethylene.
Cellar storage
The cellar is considered the ideal place to store gladioli. This is where you can save all the bulbs without loss. Typically, the temperature in basements is between 3-8 °C, and the humidity level reaches 75-80%.
For storage, it is recommended to use mesh boxes that can be stacked one on top of the other up to the ceiling. This method takes up minimal space. At the same time, the tubers will be ventilated, which will avoid overheating.
It is unacceptable to store gladioli tubers and fruits in the same box. The latter release moisture, which will lead to rotting of the planting material.
Cold storage
To keep the corms in good condition until spring, you can use the refrigerator. It is here that the temperature regime is kept at a certain level. Tubers can be placed in the vegetable compartments by first wrapping the planting material in several layers of paper.
It is advisable to open the paper every 10-12 days and check the condition of the tubers. If dampness or mold appears, the bulbs are removed to dry again and then wrapped in dry paper.
Storage on the loggia
Often, dacha owners bring fennel bulbs for storage on a glazed balcony/loggia. In order to place planting material, you will need to prepare containers from heat-insulating materials in advance.
The containers are placed on boards that need to be used to lay the floor surface. The bulbs, wrapped in paper, are laid out in containers and covered with several layers of thick burlap.
Systematically monitor the temperature on the balcony so that it does not drop below 6°C. At this temperature, the risk of tubers freezing increases.
When to dig up gladioli bulbs in the fall for winter
To ensure normal germination of the bulbs, it is important to choose the correct timing for digging up gladioli. The fact is that the bulbs must be fully ripe
If you start digging too early, they may die. As a general rule, they need to be dug up 1–1.5 months after the end of flowering.
The early varieties are taken out of the ground first, then the late ones. But if the gardener does not remember where they were planted, you can act like this:
- Dig up brightly colored corms first - red, purple, violet, and also dark. They have weak immunity, so it’s better not to take risks.
- You also need to dig up plants with yellowed foliage. If the above-ground part withers, it means that the tubers are definitely ripe.
- Last of all, you need to dig up gladioli tubers that are grown from children, as well as those that did not produce flowers this season. They ripen within 1.5–2 months, so they can be stored only after this period.
The timing is also influenced by the climatic features of the region. If frosts are expected on the soil (0 degrees and below), then it is better to dig up the tubers in advance a few days before the expected cold snap:
- in the middle zone and Moscow region - in mid-October;
- in the south - in the second half of the month;
- in the Urals and the North-West - in early October;
- in Siberia and the Far East - at the end of September.

Gladioli tubers must be dug up for the winter and stored in a cool room.
If flowering has ended, for example, at the end of July, the material can be dug up and stored in early September. They focus on this particular period.
Planting material can be stored only after disinfection, the rules of which are described below.
When to dig up gladioli babies in the fall
Gladioli babies are vegetative buds that grow on corms. These are the reproductive organs from which new plants emerge in the spring. Children are much smaller than tubers, so digging and storing them is quite difficult. The fact is that they dry out a lot and, according to reviews from summer residents, seem to be “mummified.”
Experienced gardeners have also noticed that if you do not dig up the plants and store them directly in the soil (along with the corm itself), then some of them will survive and give rise to new plants. At the same time, the tubers themselves will inevitably freeze
Perhaps the survival of the children is due to the fact that they continue to receive nutrients from the tuber in the fall and, thanks to this, are better prepared for winter.
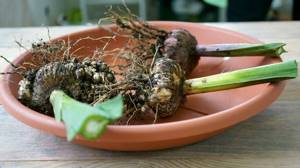
How to prepare bulbs for storage after digging
Calla lily bulbs, dahlia tubers, are removed from the soil very carefully so as not to cut the flesh with a bayonet. They dig up the plant in a circle, lift it with their hands along with a lump of earth and put it in a basket.
The resulting material is prepared for storage as follows:
- Ripening. Immediately after digging, the callas are placed in a cool place under the roof for preliminary drying along with the soil and leaves. Leave for 7-10 days until the green mass dries completely. It is not recommended to cut off the stems right away, because... when they die on their own, nutrients enter the tuber.
- Cleaning. Remove the tops and remove any remaining soil, being careful not to damage the roots. Wash in running water.
- Etching. To prevent mold and rot during storage, the tubers are dipped for 20-30 minutes in a fungicidal solution: “Maxim”, “Inta-vir”, “Fitosporin”, potassium permanganate.
- Drying. Clean, treated corms are laid out in one layer on newspapers at a temperature of +25..+28° for final drying. Leave for 7-14 days until a dense dark peel appears. A thick protective shell will keep the bulbs from drying out during hibernation.
The rhizomes of white Ethiopian calla lilies are dug and prepared in the same way as tuberous hybrids.
Indoor callas also need rest for at least 10 weeks. But they are not specially prepared and are not removed from the pots.
Growing corms from children
Babies are small tubers on the main bulb. Their size can vary from 1 mm to 15 mm. A strong bulb is able to produce 20-30 children at the same time. These small tubers will later become high-quality, young bulbs. How to grow bulbous gladioli babies?
Preparing the site for planting
For planting children, it is better to select a separate place with fertile soil. Often it is also called shkolka. The site should be sunny, protected from the north side from the winds. For southern regions with hot summers, light shading is allowed. For example, a tree or shrub growing nearby. This will prevent the soil from drying out and the foliage from being burned. It is recommended to change the location of the school annually.
The soil should be slightly acidic or neutral. Before planting, it must first be loosened, weeds removed, and moistened.
When to plant gladioli
Planting dates depend on the region, climatic features and weather conditions. A guideline for starting planting can be the temperature of the soil warming up at a depth of 8-10 cm. It should be at least 10°C. This is enough for the germination process to begin, and the baby is not damaged by rot in the cold soil.
The method of planting children is in rows. The recommended row spacing is from 20 to 30 cm. There should be enough space for the bulbs in the row itself. On average it is 15-25 cm, depending on their diameter. The planting depth is 8-10 cm. With this planting, the bulbs will quickly germinate, receive the necessary nutrition, and will not dry out.
Plant care

If planting conditions are met, seedlings will appear in 15-20 days. The next challenge is care. How to properly grow gladioli from bulbs in a schoolhouse to be strong and healthy? Care involves:
• removal of unwanted flower stalks;
• protection from diseases and pests.
Gladiolus is a moisture-loving plant. Therefore, you need to water at least once a week with deep soil moisture. In extreme heat - every other day to avoid drying out. Water should not get on the plant itself.
When plants develop 3-4 leaves, they need to be fertilized with fertilizers containing nitrogen and phosphorus. These are necessary components to enhance vegetation. Fertilizer application can be combined with watering. In dissolved form, they are more accessible and absorbed faster.
It is important to know: fresh manure cannot be applied to the plant. It could hurt him
During the entire period of growth of young flower growth, the soil must be loosened. This improves its structure, gas exchange and retains moisture. Be sure to remove weeds that deplete the soil and shade young shoots.
The appearance of flower stalks on shkolka plants is not desirable. But the strongest children can release a peduncle. It will not be complete, and the bulb will weaken. Therefore, it is removed with an oblique cut. The direction of the cut is from top to bottom, so as not to pull the bulb itself out of the ground.
Disease prevention and pest protection
Gladioli get sick no less than other plants. These are different types of rot caused by fungal infection. Infection with viruses in the form of a mosaic, yellowing of leaves. Bacterial scab and corm cancer are caused by bacteria. How to grow gladioli from bulbs so that they hurt less? A few recommendations:
1. According to the rules of flower order, you cannot plant a shrub where asters, phlox, and gladioli grew the previous year. Tagetes, calendula, nasturtium help protect against fusarium. Alternating planting sites and correct predecessors is a preventive measure against diseases.
2. Careful inspection of planting material and culling if there is a suspicion that there is a viral or fungal infection. To do this, you can remove the top scales. This makes it easier to detect fungal outbreaks. Planting material and the adult plant itself with signs of viral infection are destroyed. It is very difficult to get rid of a viral infection, and the danger of spreading the virus to healthy specimens is great.

3. Pre-soaking the planting material for 15 minutes in a 1% solution of potassium permanganate. The use of fungicides will be a win-win. Amateur flower growers who know how to grow gladioli from bulbs in the country are advised to use a solution of copper sulfate. To do this, 5 g of the substance is dissolved in 1 liter of water. We need hot water. After the product has cooled, the corms are immersed in it for 1-2 hours before planting.
4. Aphids, thrips, and mites oppress the young plant. Therefore, if they are detected, it is better to treat the school with special preparations against pests.
When to dig up gladioli bulbs
Heat-loving gladioli must be dug up; they will not survive wintering in open ground. Due to low temperatures and excess soil moisture, the bulbs become sick and rot. Soil pests can also cause irreparable damage to tubers.
One of the determining factors for timely cleaning is air temperature. You can start digging up bulbs if the temperature drops below plus 5-10 degrees.
Depending on the variety
It is also important to pay attention to the time when the gladiolus finishes flowering. Different varieties have different flowering times, so it is very difficult to name the exact date when to dig up gladioli in the fall. Usually, cleaning begins if at least 30 days have passed after the end of flowering.
During this period, the bulbs continue to ripen and gain strength for winter storage. Dig up plants while their leaves are green
Typically, harvesting begins if at least 30 days have passed after the end of flowering. During this period, the bulbs continue to ripen and gain strength for winter storage. Dig up plants while their leaves are green.
It is recommended to remove weakened and diseased gladioli with yellowed leaves earlier so that they do not infect healthy plants.
Important points:
- First, early and middle varieties are dug up, then later ones, and those that were grown from children.
- First of all, you need to remove dark varieties of plants - red, burgundy, purple and black. They are the ones who are more susceptible to various diseases than others.
- Young and non-flowering plants require more time for their bulbs to mature well. They are dug up after harvesting the remaining tubers. The flower arrow of young gladioli usually appears at the end of August.
It is better to dig up the bulbs when they are slightly unripe. This will help you select the rhizomes along with all the children. When dug up, corms that are too mature may crumble and the fallen children will be very difficult to find in the soil.
There are species of gladioli that are left to overwinter in the soil. Among them is the imbricated gladiolus, which successfully winters in open ground and does not need to be dug up. However, it is very rarely found on sale.
Depending on the region
In each area, the timing of when to dig up gladioli in the fall will vary. The basic rule is that the corm fully ripens 35-50 days after the plant blooms.
Important! If the peduncle of the gladiolus is cut off, the bulbs will ripen faster. In the Moscow region, most varieties of gladioli bloom at the end of July - August
Accordingly, plants are dug up during September
In the Moscow region, most varieties of gladioli bloom at the end of July - August. Accordingly, plants are dug up during September.
In Siberia and the Urals, the climate allows for growing only early varieties of gladioli, which manage to grow and bloom in a short summer. Often flowering occurs already in September, when the first frosts are not uncommon. Digging of bulbs is carried out before the daytime air temperature drops to zero.
Advice. If the weather did not allow the gladiolus tubers to remain in the soil for the required time, it does not matter. Together with a lump of earth and uncut stems, they are left in a frost-free room for a month to a month and a half, and only then they are processed.
In the south of the country, digging is carried out, focusing on the type of flower and the timing of its flowering. Early varieties are dug up earlier, late varieties - last. On average, work runs from August to October. There is no need to keep the tubers in the ground.
Similar weather conditions exist in Ukraine. Summer is long and hot. Gladioli bulbs that have ripened in the ground may suffer from the heat, so do not delay digging. If the weather is dry after the gladiolus blooms, water the flowers several times, thoroughly soaking the soil.
In Belarus, plants are dug up at the end of August - September. If the weather is rainy, the planting material needs to be thoroughly dried before storing.
Recommended works according to the lunar calendar
In 2021, the following dates will be favorable when digging up gladioli:
- August: 5-10
- September: 3-9, 15, 16, 19-21, 24-30
- October: 3-6, 8-11, 13-15, 36-28
- November: 5-9
Removal of gladioli tubers
Storing bulbs for the winter begins with digging up planting material from the soil. This procedure is best performed after the substrate has thoroughly dried. It should not be watered for several weeks before the event. Using a garden tool, you need to dig the ground to a depth of 30-40 centimeters and remove the bulb. First, large specimens should be removed from the soil, and then small ones. The remaining green stems are cut off before digging begins or during the process.

After this, the dug tubers are cleaned of soil residues using a dry cloth.
At this stage, it is important to make sure that they are healthy and free from such defects as:
- traces of mold;
- putrefactive formations;
- ulcers;
- affected by the disease.
Attention! It is important to understand that even one affected element can lead to the death of all the others. Inattention to seed material is a serious threat to the future flower plantation.
Drying the dug up bulbs can be done both at home and in an open space outside.
But this is only possible in dry and warm weather for several weeks. To dry gladioli, you must use cardboard boxes lined with paper. Under good weather conditions, the seed will dry in 14 days. Over this period of time, the skin will turn brown and become rough. If you touch it, you can hear rustling sounds
Drying the dug up bulbs can be done both at home and in an open space on the street. But this is only possible in dry and warm weather for several weeks. To dry gladioli, you must use cardboard boxes lined with paper. Under good weather conditions, the seed will dry in 14 days. Over this period of time, the skin will turn brown and become rough. If you touch it, you can hear rustling sounds.
When grown at home, the bulbs are dried at a temperature of 22-25 degrees Celsius. As the skin dries, the temperature can be changed to 17-18 degrees.
To avoid tubers being damaged by fungal diseases, they must be treated with fungicides before removal. For this, a solution of potassium permanganate or copper sulfate is used, which prevents the problem of pathogenic microorganisms on plants and forms a natural protection for the material from dangerous diseases and fungi. The mentioned product must be diluted in water, and then the tubers should be immersed in it for half an hour.
Ultimately, the treated bulbs are removed from the liquid and re-dried in the apartment. If the husks are completely dry and begin to rustle, the planting material can be placed in a suitable space for long-term storage.
Spring storage
In March, I take out the planting material and begin to clear the scales. The process is long and requires careful handling. In a hurry, you can break off the escaped shoot. If this trouble does happen, I don’t worry too much.
Removal of the main shoot promotes restructuring of the corm development. Dormant buds receive a signal to start growing, and then in the fall, instead of one bulb, you can get two.
Together with the bulbs, I peel the baby from the shell. Processing them is a masterful job, although there is an opinion that the children can be planted without being cleaned. The water will soften the shell and a shoot will break through it.
But for me it is important to accelerate growth and even though cleaning takes time, the result is worth it
Storage in the apartment
- After 1.5 months, I take out and inspect the corms. The rest of the barrel should break off easily.
- Another important point is breaking off the mother bulb. If when dug up it was wrinkled and small, now it has shrunk and become like a coin. To separate her from the young one, I take a knife and pry it up. A well-dried corm is easily separated along with the dried roots and the bottom remains.
Processing gladioli
As an experienced gardener, my friends often asked me when and how to process perennial bulbs. I can do without it. On the Internet, summer residents use paraffin.
Before processing the corms, you need to dry them thoroughly!
The paraffin is melted in a water bath and the bulbs are lowered there. The temperature should be no more than 35 degrees, otherwise there is a risk of damaging the planting material. After treatment with mineral wax, the bulbs are immersed in cold water. Paraffin creates a thin film that serves as protection. Such bulbs are stored at 10 - 15 degrees.
For tips on how to store and dig up gladioli bulbs, watch the video:
Storing bulbs in the refrigerator
Year after year, I store the bulbs in the fruit and vegetable drawer of the refrigerator. Before I put the gladioli there for the winter, I wrap them in cotton cloth. It will absorb excess moisture, and the planting material will be arranged according to variety.
Storing planting material in a caisson or underground
Utility rooms are also suitable for storing gladioli. There, in winter, the optimum temperature is 5-7 degrees Celsius, as well as a humidity of 60-70%.
- The bulbs need to be checked so that they are not chewed by mice.
- Another danger arises during a flood, when the underground is flooded. High humidity increases the risk of developing a fungal infection.
Useful tips
To avoid such unpleasant situations and make storing gladioli bulbs as productive as possible, you need to take into account several recommendations from experienced gardeners. There is an opinion that planting material can withstand a long winter if it is regularly ventilated and checked for the presence of putrefactive formations or damaged areas.
If rot appears in any place on the onion, there is no need to rush to throw the onion in the trash. You can solve the problem in another way. To do this, you need to get rid of the affected part and treat the tuber with a weak solution of potassium permanganate. Then it is sprinkled with ash and placed in another place to avoid contamination of healthy specimens.
Very often, gladioli tubers begin to dry out. If this happens, don't panic. You just need to soak them in cool water for half an hour before planting them in open ground. For more productive rooting, water can be diluted with a stimulating substance.
As the warmth returns in the spring, the tubers will begin to germinate too quickly. In order for this process to be carried out as quickly as possible, it is better to move them to an environment with good lighting and a higher ambient temperature and maintain it there for several weeks.
It is not difficult to protect gladioli bulbs from death in winter. To do this, it is enough to take into account the principles of storage, as well as provide them with proper care. In this case, the seed will move freely from year to year, and will also produce healthy and beautiful flowers for the next warm season. The immune system of perennials becomes stronger every year, which makes their reproduction possible. Soon your favorite plants will transform your garden plot beyond recognition.
https://youtube.com/watch?v=qz_uZ_NRp2U
https://sotka.guru/cvety/kak-hranit-lukovicy-gladiolusov-hranenie-zimoy-v-domashnih-usloviyah.htmlhttps://www.dom-v-sadu.ru/kak-xranit-gladiolusy-zimoj/ https://ogorod-bez-hlopot.ru/kak-xranit-gladiolusy-zimoj.html
Choosing storage locations
People have different roofs over their heads. There are more conditions in a private house. Attic, drying shed. Cellar for storage. How to store gladioli in the cellar in winter? Think about containers.
- Choose better wooden boxes.
- Are there no such people on the farm? Plastic ones are also suitable, although they are not made from natural material.
- You need a cellar that is not damp, with good ventilation, not freezing, and without apples.
- Fruit will add moisture. As a result, gladioli may rot.
But what if the condition of the basement is deplorable and not suitable for storage? In any case, there will be a way out. You are in your own home! Canopies, storage rooms, a vestibule in front of the front door, and other cool places are at your service.
Interesting on the topic: Planting gladioli - varieties and storage conditions for bulbs
Advanced gardeners who are serious about gladioli buy special industrial boxes with ideal conditions for storing gladioli at home in winter. As a result, they don't have to fuss with blankets and wrapping. Put it in, plug it in, forget it. Just remember to check at the appropriate time. True, this costs money, so homemade craftsmen try to save money and make boxes, lockers, and chests with their own hands.