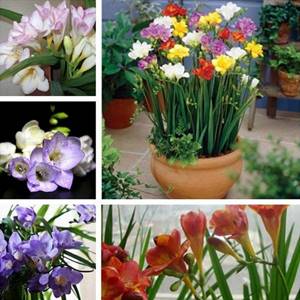
It is very difficult to describe the graceful and delicate flowers of freesia. Many gardeners are engaged in growing this corm plant in their plots. Unlike other bulbous plants, the Cape lily of the valley blooms in the second half of summer - early autumn. In order for the bulbs planted in the garden to form buds and freesia to bloom profusely, they should be planted on time and according to certain rules. Step-by-step instructions with photos and videos will help you learn about the features of planting freesia in open ground in spring and caring for flowers during and after flowering.
Description of a delicate flower
Freesia is a charming plant with graceful buds that exude the unique smells of summer:
- the freshness of the rain;
- ripe fruits;
- green foliage;
- lily of the valley;
- jasmine.
Growing freesia at home is truly worthwhile. The plant grows up to 60 cm in height. Large buds of various shades develop on long, erect shoots. The root system consists of bulbous tubers.
Freesia belongs to the Iris family (Irisaceae). Its homeland is considered to be the tropical part of Africa, as well as the Cape region of the South African Republic. At least one species was brought from Sudan. Being in their natural environment, freesia tubers are in a dormant state. And as soon as the rainy season begins, they come to life. During this period, the thirsty earth is filled with the indescribable beauty of blossoming buds. How you want to bring such a miracle into your home and turn it into an oasis of pleasure.
Experienced gardeners know how to achieve this goal.
Planting material (bulbs) should not be kept in the refrigerator to avoid rot.
Growing freesia at home: expert advice
Before you get started, you should choose a plant variety that can take root indoors. After all, the birthplace of the flower is the African continent, where the climate is far from ideal. The main thing is to create suitable conditions in the house, and it will turn into a valley of lush flowers.

To grow freesia at home, use a hybrid version. It combines 2 types - “Broken” and “Armstrong”. It was specially bred to decorate the premises. To date, more than 20 species of such specimens are known.
Before planting freesia in a pot, select high-quality, viable tubers. They are distinguished by the following characteristics:
- no rotten spots;
- elasticity and density;
- maximum size – 2.5 cm.
When the planting material is ready, it is placed in a dry and warm place for 14 days. Some flower lovers place them on a cabinet where the temperature does not drop below 25 degrees.

Before planting freesia bulbs, they are first soaked in a weak solution of foundationazole or potassium permanganate. The same product is used to spill the soil in which the African princess will “settle.”
During soaking, there is no need to remove the scales from the tubers so as not to damage the planting material.
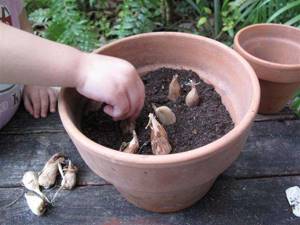
The following steps should be taken next:
- special holes are made at the bottom of the container for drainage;
- lay pebbles, brick chips or expanded clay:
- pour prepared soil;
- watered;
- place the bulbs at a distance of 3 or 5 cm with the sharp tip facing up;
- With a slight movement of your fingers, deepen the tubers into the soil by 2 cm;
- covered with earth.

In order for freesia to successfully take root in a pot, it is kept in a room with a minimum temperature of 18°C. After 3 weeks, sprouts will appear, which need to be provided with bright lighting.
Guest from Africa is a rather sociable plant, so it is better to grow several of it in one pot or container.
Landing dates
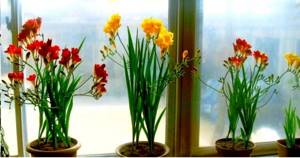
Freesia grown in pots blooms six months after planting. Taking this feature into account, you can calculate the time of planting the planting material. In order for the plant to bloom in January, the bulbs are planted in early September. If freesias should put out buds in February - in early October.
Preparing for landing
For winter flowering of freesia, it is necessary to carry out pre-planting preparation of the bulbs. In order for flower buds to form, in summer the tubers must be in warm +25–27˚С and humid 75–80% conditions for at least a month.
To ensure such air parameters, planting material is laid out on a surface with holes and placed in a warm place above a container of water. The bulbs are regularly checked to ensure that the bottoms do not rot.
A month before planting, the corms are transferred to a room protected from the sun’s rays, with a temperature no higher than +15˚С. Two weeks before planting, the temperature is raised to 25˚C. The appearance of root primordia at the bottom serves as a signal that the bulb is ready for planting.
Landing
The prepared soil is disinfected by spilling it with diluted phytosporin or steaming it in the oven at 100˚C for half an hour. Bulbs ready for planting are disinfected in a fungicide solution to prevent fungal diseases. The drug Maxim is well suited for plants of the bulbous family. The covering scales are not removed when soaking.
Disinfected corms are treated with solutions of growth stimulants Energen (10 drops diluted in half a liter of water) or Epin (1 drop per 1 liter of water).
Planting material must meet the following standards:
- corms are selected without dark spots of rot or mold;
- tubers should be elastic and dense;
- average size 2.5–3 cm.
5–7 bulbs are planted in a pot, evenly distributed over the area of the flowerpot. The planting depth depends on the size of the tuber: the height of the soil above it should be three times its size. On average, the bulbs are buried 5–7 cm.
Planting freesia bulbs
Landing sequence:
- check the presence of holes in the pot for water drainage;
- lay a drainage layer of vermiculite or expanded clay;
- pour a layer of soil and water;
- place the corms with their nose up;
- add soil and mulch with peat on top.
After planting, the pot with bulbs is kept for 1.5–2 months at a temperature no higher than +15˚С. It is convenient to store the planting container on the balcony, in an unheated terrace, or bury it in the garden. With the onset of cold weather, the pot is brought into the house without exposing it to light until the sprouts appear.
Planting freesia in a pot for a home greenhouse
One of the advantages of the African beauty is its cultivation in any climate zone at home. Depending on the time of planting, you can plan its flowering. If you plant freesia in a pot in the spring, it will bloom within 3 months. As a result, the room will turn into an oasis of pleasure. To ensure that the buds open in January, the plant is planted in the fall. The best option is October.

You can grow freesia on a windowsill in a container with a diameter of approximately 15 cm. Its bottom is covered with expanded clay and sprinkled with drainage charcoal on top. Next, prepare the soil:
- turf land (2 parts);
- sand (1 part);
- humus (1 part);
- Potassium phosphate supplement (1 serving).
The ingredients are mixed and the container is filled. About 6 tubers are planted in it, deepened into the soil by 6 cm. The plant is placed in a room with diffused lighting and a temperature of at least 15°C. When sprouts appear, moderate watering is carried out.
When the first stems become stronger, it is advisable to move the container to a place where the air temperature is not lower than 20°C.
Growing freesia from seeds

An original way to acquire a tropical beauty is to sow its seeds. The best period for this is March. To make the plant germinate faster, planting material is soaked for 12 hours in warm water. At this time, prepare the containers and soil.

Growing freesia from seeds begins with the following steps:
- a drainage layer is placed at the bottom of the container;
- a soil mixture of sand, peat and humus is poured over the expanded clay;
- Seeds are planted to a depth of 10 mm and covered with soil.
Next, the container is covered with glass or cling film to speed up the germination of freesia from seeds. The room temperature should be approximately 20-25°C. Periodically moisten the crops using a sprayer. Greenery will appear in approximately 10 days.
To avoid condensation, it is necessary to ventilate containers daily by removing glass or film.
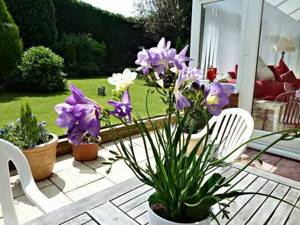
Planting freesias in open ground
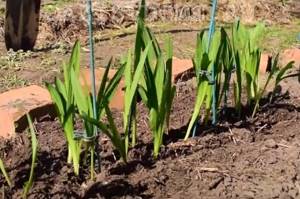
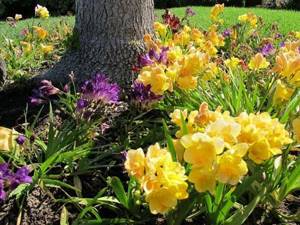
The photo shows freesias in the garden after planting the seedlings in the ground.
You can grow freesias in the garden in the same flower bed with irises, tulips , and hyacinths. After the spring flowers fade, the freesias will begin to bloom, and the flowerbed will no longer be empty and ugly.
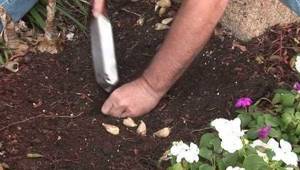
When in the spring the weather begins to please with positive temperatures during the day, and the soil warms up to +10 degrees, freesia seedlings can be planted in a flowerbed in open ground.
Step-by-step landing instructions:
- Dig up the soil using the bayonet of a shovel and make a hole 10-15 cm deep. The hole can be long or round.
- It is recommended to fill the bottom of the hole with drainage.
- Fill the planting hole in the flower garden with nutritious soil. This can be compost with sand and ash or a substrate for seedlings from the store. You can mix garden soil with peat and humus. The main thing is to get loose and nutritious soil.
- Add one teaspoon of Superphosphate granules per plant and mix them thoroughly with the soil.
- Plant freesias close to each other.
- Take the seedlings out of the pot along with a lump of earth and place them in the hole. The depth of the hole should be slightly larger than a clod of earth with roots.
- Cover the plantings with soil, place support sticks nearby and tie leaves to them.
- Water with warm water and sprinkle with mulch. This could be a layer of soil or compost.
After planting, cover the freesia seedlings with lutrasil or other non-woven material for two weeks. It will protect young plants from the sun and spring cold snaps.
Video of planting freesia in the ground
The video clip shows how to prepare a bed and properly plant freesia seedlings in a flower bed in the garden.
Rules for caring for freesia at home

Like all indoor plants, the African beauty requires special attention. Experienced flower fans have noticed that the plant develops better away from direct sunlight. At the same time, it needs diffused light for 14 hours. The optimal place for a flower is the western side.
Proper care of freesia at home involves a number of simple measures:
- selection of soil of any acidity;
- timely feeding;
- regular watering;
- keep the plant away from drafts.
In addition, freesia species that have spreading branches and foliage need to be planted in large pots and supported. For the plant to be lush, the room temperature must be maintained at approximately 22°C. Wilted buds must be cut off. This procedure helps strengthen neighboring peduncles.
As practice shows, watering a plant corresponds to its development phase. During the germination of tubers, freesia is watered moderately, and when it blooms - generously. Before each watering, you need to check the condition of the top layer of soil. It must be completely dry. Excessive moisture can lead to rotting of plant tubers.
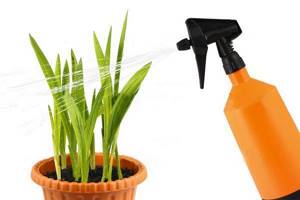
During hot periods of summer heat, freesia should be regularly sprayed with a spray bottle. This procedure promotes active growth and lush flowering of the African beauty. Every 14 days the plant needs feeding. For this, gardeners use special chemicals.
When the freesia has completely faded, there is no need to hastily trim the shoots and foliage. Over the course of 2-3 weeks, tubers form, after which the flower will release buds again.
Growing freesia for March 8 - video
One of the advantages of growing freesia in a pot is that it can be done in different climatic zones. A characteristic advantage of this particular flower is that it blooms in early spring or even winter. Its flowering time depends on when you plant the freesia bulbs.

How to care for freesia after flowering
At the end of summer or beginning of autumn, as soon as flowering ends and the leaves turn yellow, the corms are dug up for storage. Usually this procedure is performed two weeks after the flowers have faded.
The nodules are first cleaned of old scales, disinfected in a solution of fungicide or potassium permanganate, dried for several days at a temperature of +25 ° C, and then the necessary conditions are created for them - optimal temperature and humidity.
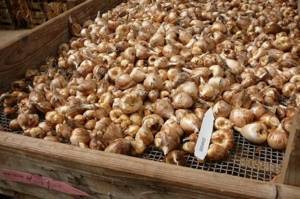
Photo: https://rastenievod.com/freziya.html
For potted freesia grown indoors, remove all the above-ground part and leave the bulb in the ground. It is necessary to maintain soil moisture for two months so that babies form on the corm. After a two-month period, the onion is dug up, soaked in a solution of potassium permanganate for disinfection, dried and sent for storage.
How to grow freesia at home
To grow this beautiful flower in a pot at home, two methods are used:
- Growing a plant from seeds;
- Planting bulbs directly in pots.
Seeds. As a rule, housewives plant hybrid freesia seeds in late spring. Keep in mind that the fresher the material you use, the faster the plant will begin to germinate. Very often housewives are faced with the fact that they do not know how to plant freesia in a pot using seeds.
So, to do this, you will initially need to keep the seeds in a solution of potassium permanganate for a little while; the liquid should be at room temperature. They need to be planted in large containers or special containers containing steamed compost. In principle, you can use special soil specifically for freesia.
After planting, the boxes should be tightly covered with polyethylene to create the effect of a mini-greenhouse. Don’t forget to open the film every day and ventilate the seeds a little. If you follow all the recommendations, the first shoots will begin to wilt within 2-3 weeks from the moment of planting. When you begin to notice the first shoots, you need to periodically loosen the soil and do not forget to fertilize them with potassium and phosphorus. Stronger shoulder straps need to be carefully picked and planted separately in different pots.
Watch a video on how to plant flower bulbs in pots.
Bulbs. Based on the time period for planting the bulbs, freesia can bloom even in winter. If you don’t know when freesia blooms at home, you can use these tips. In order for freesia to bloom for the New Year holidays, it is better to plant the bulbs in early September. And if you want to get flowering in February (for example, for Valentine's Day), then start planting in the first days of October. In order for freesia to bloom by the holiday of March 8, it should be planted in early November.
But still, do not forget that the timing of planting corms can vary greatly, since some types of freesia need a longer forcing period of five to six months. Before planting the bulbs, they need to be soaked in a disinfectant solution; by the way, it is better to choose the largest varieties.
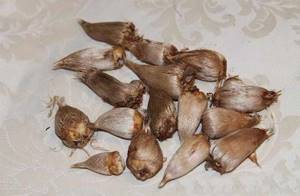
How to properly store freesia bulbs
It is better to use nets or wooden boxes to store bulbs. Humidity mode up to 80%, room temperature from 22 to 26 °C.
Once a month, inspect the material for disease or rotting. Experienced flower growers recommend keeping the bulbs in a box with dry peat. A month before planting, the bulbs are placed in cooler conditions of about 15 °C.
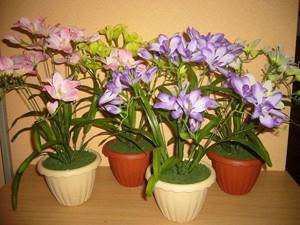
Not only rooms are decorated with freesia: the flower is planted in the garden, placed on the balcony (inside and outside). Bouquets with freesia do not fade for a long time and decorate any festive event. Freesia in a pot can be an original gift.
Stages of planting freesia in pots
Answering the question - how to plant freesia bulbs at home, it is also very important to use pots of the correct size. It is better to use deep containers with a diameter of 15-20 centimeters. Planting freesia bulbs in the country should be carried out in the following sequence:
- First, wash and disinfect the pot well;
- Place a small layer of expanded clay or some pebbles mixed with wood ash on the bottom of the container. Such soil litter will prevent possible acidification of the soil or its rotting;
- Pour soil into the pot. Some housewives recommend adding a small stick of potassium-phosphorus fertilizer to the place where the plant bulb will be planted. This stick will allow you to fertilize the plant less often in the future;
- When planting, the bulbs should be placed about five centimeters apart from each other. As for the depth, they also need to be buried five centimeters. Cover the top of the bulbs with loose soil. Pots with planted bulbs must be placed in a room with a temperature of at least +15 degrees.
Description of the plant
Freesia is a perennial corm plant representing the iris family and has more than 20 varieties grown in the garden. In its natural environment, the flower grows in African countries with a warm and humid climate. It is also called the Cape lily of the valley (due to its specific aroma) or the aristocratic flower (due to the elegant shape of the buds).
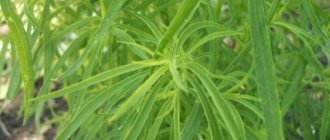
Depending on the type and variety, freesias can reach a height of 50 to 100 cm. They have long (about 20 cm) sword-shaped leaves that are bright green in color.
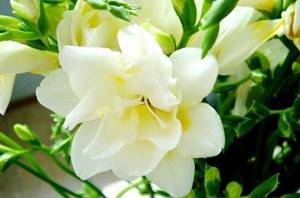
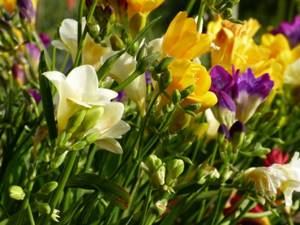
Freesia usually blooms in the second half of summer and lasts until mid-October. At this time, long flower stalks are formed, on which up to 15 buds are formed, united in a racemose inflorescence. Flowers can be either simple or double. Their diameter, depending on the variety, can reach 3-7 cm. The color of the petals is rich and bright, the color can be any.
In place of faded flowers, fruits form in the form of boxes filled with small seeds. However, they are not collected because the flowers grown from them will not have the same qualities as the mother plant. Only breeders are engaged in seed propagation of freesia in order to develop new varieties.
Reproduction
Freesias are propagated vegetatively using daughter root bulbs or seeds.
Seeds are sown in greenhouses after preliminary soaking for a day in a light solution of potassium permanganate from mid-April to June in light soil. Germination should take place at a temperature of 20 to 25 degrees.
The plants are grown to the second leaf, after which they are planted and kept in a greenhouse or hothouse throughout the summer, and in the fall they are planted in a permanent place in a greenhouse or winter garden.
In November and December, the temperature is kept at around 8-10 degrees, after the buds appear, it is increased to 15 and then the plant is grown with tying as the flower stalks grow. After flowering, plants obtained from seeds are dug up and stored like other bulbous plants.
Types, varieties
The following types of freesia are most often grown at home:
- broken;
- Armstrong;
- hybrid (obtained by crossing broken freesia and Armstrong).
Fractured freesia is very compact. It does not exceed 40 cm in height. It has very thin shoots and peduncles. On the latter, a spikelet of 2-5 buds is formed. This type of plant blooms in early spring (April). Popular varieties:
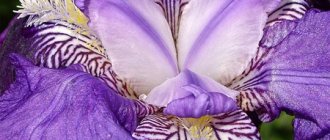
- Alba . The flowers of this variety are snow-white in color. But in the center of each flower there is a yellow spot, mottled with purple stripes.
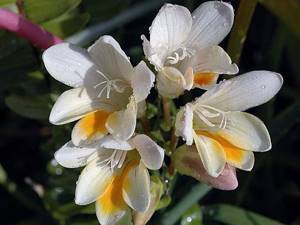
- Fragrant freesia . Flower color is yellow. There is an orange spot in the middle. The smell is reminiscent of the aroma of forest lily of the valley.

From Armstrong freesias, flower growers prefer to grow the Cardinal . It forms tall (up to 70 cm) bushes. Each bulb produces 3 peduncles, which produce up to 11 small buds. Flower color is red. There is a yellow spot in the center.
Here is a brief overview of hybrid varieties. These include:
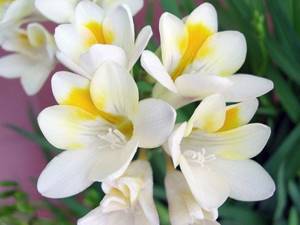
- Ballerina . Forms compact bushes and peduncles of medium length (no higher than 30 cm). They produce up to 12 large flowers (5-6 cm in diameter). They are painted white, but the base of the petals is bright yellow. There is a yellow stripe in the throat. The aroma is very delicate.
- Rose Marie . This is a small freesia that forms flower stalks about 20 cm high. Medium-sized flowers (4-5 cm in diameter) sit on them. The color of the petals is crimson. In the center of the flower there is a white spot with crimson stripes.
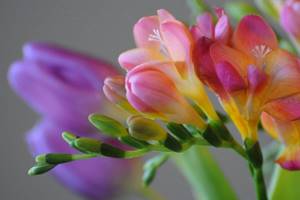
- Pimperina . Perhaps this is the smallest variety. On each peduncle, reaching a length of 15 cm, there are about 7 flowers, the diameter of which reaches 6 cm. They are painted dark red. But their center is yellow, although red stripes are visible on it (see photo).

Popular types and varieties
In natural conditions, you can count a couple of dozen species of freesia, as well as many of its varieties. But in decorative floriculture, three types .
- Freesia Armstrongii. A tall flower, reaching a height of half a meter to seventy centimeters. The stems are highly branched, the leaves are long, sword-shaped, and grow immediately from the tuber. Flowering usually begins in May-June. Flowers are collected in inflorescences of three to five pieces. There are many varieties, the most famous of which is “Cardinal” with bright scarlet petals and a yellow center.
- Broken freesia (freesia refracta). Low growing, compact appearance. The height of the bush is no more than 40 cm. The stems are thin and spreading. In inflorescences of two to five flowers, they are usually white or golden-orange in color. Flowering begins early, in mid-April (of course, in a greenhouse). The most popular varieties are the snow-white Alba and the bright yellow Odorata.
- Freesia hybrid. It has about 150 varieties with flowers of various colors and shapes, having a pronounced aroma of lilies of the valley. The mother plants for the hybrids were yellow broken freesia, pink Armstrong and white Leuchtlina.
These decorative freesias, bred by crossing and combining all the best qualities of their parents, grow up to one meter in height. The flowers are large and collected in inflorescences of 7-10 pieces.
The most popular hybrids are as follows.
- "Red Lion" with bright red double flowers.
- "Vinita Gold" - deep yellow.
- “Royal Blue” is a rare blue color for any flower.
Selection of location and conditions of detention

We will tell you in what conditions you need to keep freesia in order to make it bloom at home.
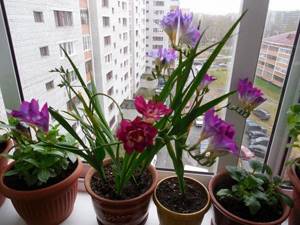
Lighting and location
Freesia loves light partial shade, so it should not be placed on a south-facing window. This is only permissible in shady conditions. The optimal location of the pot is near the window (on a shelf or on a table) or on a windowsill facing east or west. Flowers can be kept on the balcony, and in the warm season the pots can be taken outside.
Reproduction methods
It is not advisable to propagate Cape lily of the valley by seeds: it is difficult and ineffective, and the result is unimpressive. Therefore, freesias are propagated at home only by corms. They can be purchased at a flower shop.
Important! After flowering, the corm dies. But in return, 1 or several replacement bulbs grow. When planted, they will not bloom until they gain strength. When freesias are grown in open ground, in the first year they increase in mass, and in the second year they bloom and die.
When to plant freesias for seedlings and in the ground

In order for freesias to bloom early and flower abundantly, their bulbs must first be germinated. Seedlings are planted in the garden at a soil temperature of +10 degrees. No need to measure it. Just wait until the average daily air temperature reaches +10 degrees. At this temperature, you can safely plant sprouted bulbs. And if frosts are expected, cover them with covering material or build a greenhouse.
Freesia bulbs should be planted for seedlings 30-40 days before the shoots can be planted in open ground. The start of such activities depends on the climate in your region:
- In the Moscow region and other regions of the central zone, bulbs begin to be prepared in early April in order to plant them sprouted in a flowerbed around mid-May.
- In Siberia and the Urals, freesia seedlings can be planted in a flower garden in late May or early June. Therefore, they have been preparing the bulbs since the end of April.
- In the Krasnodar Territory and other southern regions, the Cape lily of the valley bulbs can not be germinated first, but can be planted directly into the garden in the spring in April. To obtain early flowering, planting material begins to germinate in March.
You may be interested to know the favorable days for planting freesias this year according to the Lunar calendar.
Landing

Planting freesias in a pot step by step:
- Prepare the pots: wash them and disinfect them with antibacterial soap or a weak solution of potassium permanganate.
- Place a 3-4 cm layer of drainage material (expanded clay, crushed red brick) on the bottom of the pot.
- Place disinfected soil (calcined for 2 hours in the oven) on top.
- Make small indentations (there are as many indentations as there are bulbs). Their depth should be about 5 cm.
- Plant the bulbs in the depressions and cover them with soil.
- Place the pot in a cool place (not higher than +15 o C). There is no need to water the soil.
After germination, moisten the soil generously and place the container in a warm and well-lit place.
Caring for freesia must be constant: it requires a lot of attention. It especially needs watering and fertilizing.
Watering
For watering and spraying, use tap water, standing in the room for 2 days. Water procedures are performed in the morning. You need to water whenever the top layer of soil begins to dry out. During the period of active growth and flowering, this happens every 2-3 days. But after the last flower has bloomed, watering is reduced, and after 1.5 months it is stopped completely.
Top dressing
Cape lilies of the valley should be fed once every 2 weeks during the period of active growth, flowering and until watering is stopped, with which feeding should be combined. Complex mineral fertilizers for bulbous flowers are chosen as fertilizers. The brands Kemira, Zdraven and Agricola have these.
Loosening, mulching
Freesias need loose soil so that fresh air can reach the roots and water does not stagnate in the pot. But loosening the soil is dangerous: the bulbs may be damaged. Therefore, it is better to cover the soil with a layer of decorative mulch or pieces of peat.
Pinching, pinching, pruning
Cape lily of the valley does not require pinching or pinching. Its bush does not need to be formed. But 1.5 months after the end of flowering, when you stop watering, cut off the flower stalks, leaving only a small stem.
Transfer
Freesias are replanted every year. Bulbs are not left in pots. They need to be dug out after the soil in the pot is completely dry. Store them in mesh bags until the next planting.
Landing dates
Freesia grown in pots blooms six months after planting. Taking this feature into account, you can calculate the time of planting the planting material. In order for the plant to bloom in January, the bulbs are planted in early September. If freesias should put out buds in February - in early October.
Preparing for landing
For winter flowering of freesia, it is necessary to carry out pre-planting preparation of the bulbs. In order for flower buds to form, in summer the tubers must be in warm +25–27˚С and humid 75–80% conditions for at least a month.
To ensure such air parameters, planting material is laid out on a surface with holes and placed in a warm place above a container of water. The bulbs are regularly checked to ensure that the bottoms do not rot.
A month before planting, the corms are transferred to a room protected from the sun’s rays, with a temperature no higher than +15˚С. Two weeks before planting, the temperature is raised to 25˚C. The appearance of root primordia at the bottom serves as a signal that the bulb is ready for planting.
Landing
The prepared soil is disinfected by spilling it with diluted phytosporin or steaming it in the oven at 100˚C for half an hour. Bulbs ready for planting are disinfected in a fungicide solution to prevent fungal diseases. The drug Maxim is well suited for plants of the bulbous family. The covering scales are not removed when soaking.
Disinfected corms are treated with solutions of growth stimulants Energen (10 drops diluted in half a liter of water) or Epin (1 drop per 1 liter of water).
Planting material must meet the following standards:
- corms are selected without dark spots of rot or mold;
- tubers should be elastic and dense;
- average size 2.5–3 cm.
5–7 bulbs are planted in a pot, evenly distributed over the area of the flowerpot. The planting depth depends on the size of the tuber: the height of the soil above it should be three times its size. On average, the bulbs are buried 5–7 cm.
Planting freesia bulbs
Landing sequence:
- check the presence of holes in the pot for water drainage;
- lay a drainage layer of vermiculite or expanded clay;
- pour a layer of soil and water;
- place the corms with their nose up;
- add soil and mulch with peat on top.
After planting, the pot with bulbs is kept for 1.5–2 months at a temperature no higher than +15˚С. It is convenient to store the planting container on the balcony, in an unheated terrace, or bury it in the garden. With the onset of cold weather, the pot is brought into the house without exposing it to light until the sprouts appear.
Diseases and pests
Freesias grown at home in a pot get sick and are affected by pests less often than plants that grow outside. But with improper care, you may encounter diseases such as:
- fusarium;
- root (bulb) rot;
- scab.
If dark or brown spots appear on the leaves, or if they are covered with a gray or whitish coating, treatment must be started immediately. It will also be needed if the bush begins to lag behind in development, and the leaves begin to bend like an accordion: this is a sign of rotting of the corms.
Parts of plants affected by fungi must be removed. If the bulb rots, the entire plant must be removed before the rot has spread to all the plants in the pot. The remaining flowers need to be treated with a 0.2% solution of Fundazol.
Freesias can be affected by the following pests:
Aphids can be destroyed by spraying freesia with a soap solution. And it is better to fight spider mites and thrips with the help of special preparations - insecticides. Actellik and Fitoverm help well against these pests.
Adviсe
Tips for growing freesia at home:
- Plant freesias 5-6 months before the significant date. Then they will definitely have time to bloom in time for the planned celebration. If you do this later, the buds may not be able to bloom yet. And if earlier, by that time the plant may have already finished flowering.
- If you want the Cape lily of the valley to bloom in winter or early spring, purchase special phytolamps for additional lighting. Flowers need long daylight hours (about 10-12 hours).
- To make the bulbs grow faster, soak them in a growth stimulator. Add 1 drop of Epin to 1 liter of water and soak the planting material there for 30 minutes.
Freesia is very beautiful. She is loved for her fragrant and delicate flowers with rich and bright colors. Despite all the vagaries of this exotic plant, gardeners continue to grow it in the garden and at home. And their labors are rewarded with long and abundant flowering at the most necessary moment.
Requirements for growing conditions
Let's find out what requirements freesia makes for soil, watering and other factors that directly affect its flowering and development.
The heat-loving plant is best suited for growing in a greenhouse. However, open ground is also suitable: but in this case, in this case, you will have to remove the bulbs from the ground for the winter, since they will not survive our frosts.
The plant loves light very much, so the shady, northern side of the site will not suit it. In this case, the flower should not be exposed to scorching, direct sunlight: choose a semi-shaded, well-lit place for the freesia.
The flower should not be in a draft either: pay attention to this point when you select a site for planting it.
Video: how to properly grow in open ground in spring
Video of freesia growing and care in open ground:
The soil should be sufficiently loose and well drained. The soil composition should include the following components:
- humus;
- peat;
- leaf soil;
- turf soil (but what to do when the ground on the site is covered with moss is described in great detail in this article)
The proportions of all components should be approximately equal. It is important that the acidity of the soil is not too strong. If this problem exists, the acidity level can be reduced by carefully introducing ash.
Plant freesia based on its variety: if the plant has wide, spreading leaves, then it requires a certain space and freedom. And if the freesia variety is compact, then you won’t need much space.
If you want freesia to bloom especially luxuriantly, you must maintain a certain temperature regime before it blooms: no more than + 22 degrees.
It is recommended to cut off the inflorescences only after at least two buds have fully blossomed on one plant. If an inflorescence wilts while on the plant, it must be cut off so that more nutrition and minerals can go to the remaining inflorescences.
If the plant stem is weak, it needs support in the form of a wooden support. It is even more necessary to follow this recommendation if the stem is already broken.
A mesh is best for support. The need for support arises in freesia when it reaches a height of 15-20 cm, not to mention taller specimens. It is best to tie the stems to the net with thin twine: but not too much, so as not to damage the tender shoots.
Since the plant is tropical, it loves fairly humid air. It is therefore recommended to spray the flower, however, being careful not to get it on the delicate buds and inflorescences: this precaution will help prevent the petals from burning out under the sun's rays. It is best to spray in the setting sun: at 17-18 hours.
Information from the article will help you understand how perennial salut is grown from Mallow seeds, and where you should plant it on your site.
It will also be interesting to learn about how the perennial daisy is planted and cared for, and how well it looks in the garden; the information and photos from the article will help you understand.
You can learn how to grow Perennial Daisy seeds from this video: https://2gazon.ru/ozelenenie/cvety/margaritki/vyrashhivanie-iz-semyan-kogda-sazhat-6.html
But you can see what the flowers of Astra perennial alpine mixture look like in the photo in the article.