Every owner of a country house or dacha strives to improve his possessions. Today this is not a problem. In addition to the usual flower beds, you can arrange a recreation area in other ways, for example, making a Japanese rock garden with your own hands at the dacha. Such a rocky lawn can become a center of relaxation, but with proper design.
What is a rock garden and why is it needed?
The rock garden, as a heritage of the East, carries a deep meaning. In Japan, the element of inanimate nature has long been a subject of worship, endowed with energy that gives peace and serenity.
Initially, stone compositions were located only at monasteries and temples, where each element had its own meaning:
- pebbles (sand) were a symbol of water;
- horizontally lying boulders represented islands and mountains, and vertically standing boulders represented the sky;
- plants and moss were identified as a prototype of the land covered with forests.
Attention!
In Japan, the reconstruction of a rock garden is entrusted to specially trained craftsmen. Today, a stone mini-garden is a way to decorate the landscape design of a dacha or personal plot. But the Japanese believe that such a composition allows them to achieve harmony and helps them cope with everyday hustle and bustle.
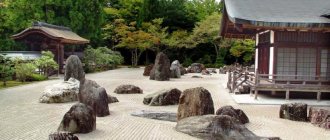
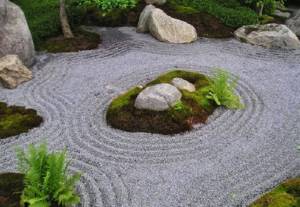
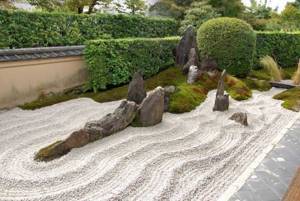
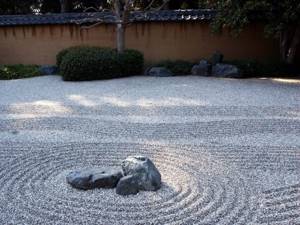
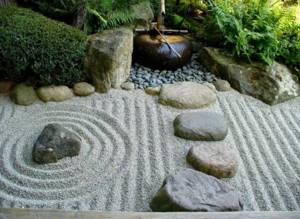
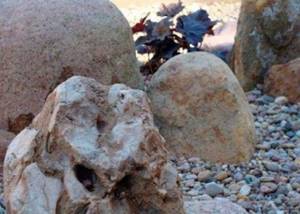
A traditional rock garden is a plain, the main part of which is covered with gravel or sand, with boulders of different sizes distributed on it. At first glance, their arrangement may seem chaotic, but each of them has its place.
When composing a composition from cobblestones, there are rules, for example, stones in a group must be placed in groups of 3, symbolizing the triad from Buddhist philosophy. On a base of pebbles (sand), furrows parallel to each other are made along one side of the garden and around the stones. Thus, the surface of pebbles symbolizes the ocean, and the boulders themselves are islands.
In addition to the specific arrangement of boulders in a group, the Japanese have another tradition - to lay out sacred representatives of the animal world from stones. The following are listed: the stork, as a symbol of the heights conquered by man, as well as the turtle, symbolizing long life.
Important! One of the features of the Japanese rock garden is that no matter what direction a person stands, his gaze always falls on an equal number of stones.
Addition of various elements
Stones are not the only elements of Japanese gardens. The landscape must be complemented by compositional structures. There is a place for paths, fences of various shapes and stone statues. All this is an original part of the garden, made in Japanese style.
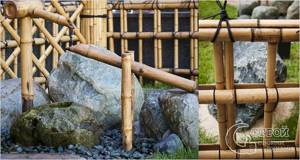
Bamboo waterfall
Paths of a soft winding shape only emphasize the harmony of the garden. Designers skillfully disguise the originality and beauty of the material, thereby not disturbing the balance of regal grandeur and simplicity.
winding path
The fence is designed to create a calm environment and the possibility of privacy. Opaque fencing is encouraged in Japanese stone gardens.
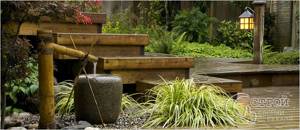
Tskubai
Tsukubai was originally used to wash hands before starting the tea ceremony. These are peculiar bowls made of stone, with a standard height of about 30 cm. Now tsukubai are just an additional decorative element.
What types of rock gardens are there?
The Japanese rock garden has two varieties:
- sekitei (stone garden);
- karesansui (dry mountains and waters).
Sekitei is a traditional stone garden, the basis of which is made only of stones. On a surface strewn with sand or gravel (pebbles), cobblestones are placed in a certain order, and furrows parallel to each other are drawn around. According to legend, if you look at a stone for a long time, you can see how it is buried in the sand.
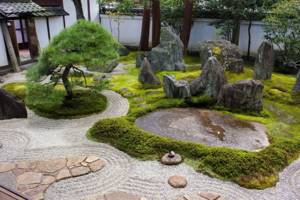
Karesansui is not just a stone garden, but a unique corner of nature, consisting of four elements:
- stones - depending on their shape, size, color, they can symbolize water, earth, islands and animals;
- water is a symbol of the birth and life path of a person, his purification (sand and pebbles are usually used as water);
- plants - they symbolize feelings and emotions; for these purposes, bamboo, plum, and pine are planted;
- architectural elements, which include figurines, lanterns, bridges, and mini-waterfalls.
- Principles of creating harmonious compositions
Many summer cottage owners do not know how to properly make a Japanese rock garden on their own property, but the process is quite fascinating.
The first thing you should start with is designing and sketching a diagram on paper, which takes into account the following principles:
- the composition should be distributed around a single point of contemplation, which is chosen taking into account what time of day the viewer visits the garden (usually it is located in the north side, but exceptions are possible);
- balance between the filled and empty parts of the site;
- maintaining asymmetry - Japanese masters even recommend maintaining it in the reflection of water and the shadow cast by boulders;
- it is important to maintain an odd number of large stones - in the traditional version they are placed in accordance with a regular heptagon;
- maintaining a balance between horizontal and vertical lines - in this case, there should be more boulders in the first position, because there are already enough standing objects in the dacha (trees, fence, building facade).
Adhering to these principles, a self-made Japanese rock garden at the dacha will fully meet the requirements, bringing peace and without disturbing the harmony with the surrounding nature.
Basic elements and principles of sekitei design
In the design of a rock garden, despite its seemingly chaotic and random arrangement, everything is subject to strict rules; each element of the ensemble has a sacred meaning and deep meaning.
Number of stones
Traditionally, stones are placed in groups of three, symbolizing the divine concept of the triad: body, speech, thought. The single stone in the center can represent an island, mountain, planet or sacred animal. Most often, 15 stones are used, but in modern compositions this rule is not strict, the main thing is that the number is odd, and visually one boulder is hidden from any angle. Processing should be minimal and look natural.
Location and arrangement of stones
The placement of rock blocks occurs according to several principles:
- combination of empty spaces and stones;
- choosing asymmetrical boulders and avoiding parallel lines and elements of the same shape and size;
- the number of horizontal stones should exceed vertical ones for the correct balance of energy;
- harmony in each group of three blocks is achieved by arrangement in the form of a triangle, where one element dominates and the other two have subordinate positions;
- cobblestones are buried in sand or pebbles to create the illusion of growth from the ground;
- the site is marked so that a beautiful view opens from seven observation points and one stone is hidden from view.
Sand and gravel
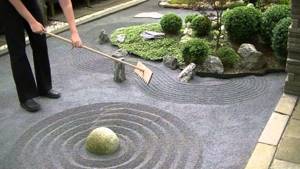
Small pebbles and sand create the impression of fluidity and symbolize water or the world's oceans. On a perfectly flat surface, special rakes are used to draw grooves that imitate waves and flows of water, and circles around the stones represent diverging circles from drops on the water.
Sand and small pebbles in a rock garden represent water and its movement.
To create the tranquility of the water surface, gardeners do not use dazzling white shades of minerals, but more neutral gray or brown ones. Smooth parallel lines throughout the garden mean peace and inner balance.
Wavy lines resemble a stormy river or stream and show the direction of water movement.
Is water acceptable?
In the classical sense, a rock garden should be dry. Even its name translated from Japanese means “dry landscape” (sekitei), that is, water is not allowed. But in the early versions, the paradise islands of boulders were placed precisely in small artificial ponds, and in the modern interpretation, you can sometimes find sekitei on the shore of a reservoir or right in a small pool. Of course, this violates the traditional principles of garden construction, but it looks very harmonious and beautiful, water has a beneficial effect on all living things around.
According to classical canons, a rock garden should be dry, but modern versions sometimes contain ponds
Moss
Moss is used in stone compositions throughout, its short height and dense texture of shoots perfectly imitating forest thickets on the paradise islands of the immortals. Muso Soseki, the great master and creator of the famous garden of 15 stones in Kyoto, is also known for the construction of a huge moss park, on the territory of which various types of spore-bearing plants grow, used in landscape design. The master shows the richness of nature with the help of a harmonious combination of shades and types of moss.
Moss perfectly complements and decorates a rock garden
Decorative elements
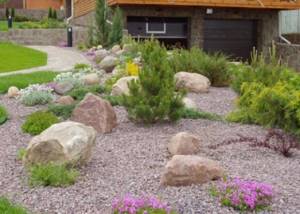
Modern landscape designers have moved away from strict canons and began to use various decorative elements in rock gardens, made in the Japanese style and adding interesting details to the landscape.
Modern landscape design often uses various decorative elements in the Japanese style.
The paths are laid out from flat stones and other natural materials so that there are gaps between them for grass, fitting as much as possible into the natural landscape; the same rule is followed when building bridges, fences, arranging sculptures and lanterns, and Japanese stone towers. A bridge made from a single piece of rock or stone of complex shape looks especially luxurious. In ancient Japanese gardens there are wooden bridges covered with moss; they merge with the surrounding nature, emphasizing the style of the park.
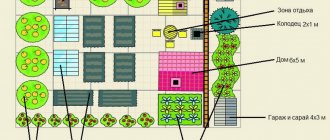
Rock garden plans
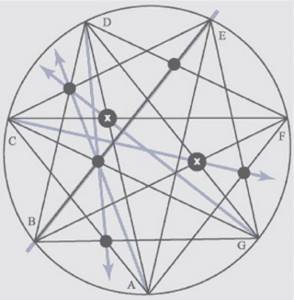
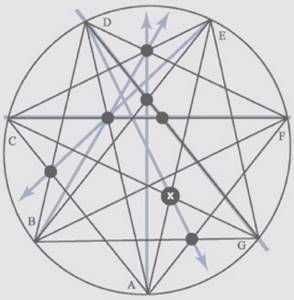
Following traditional concepts when creating a rock garden at home with your own hands, you can use the following schemes. The main stones, located in accordance with a regular heptagon, are indicated by dots, and the places of contemplation are indicated by letters.
In the first option, you can see all the located boulders from almost all places of contemplation. But from point C, the stone marked with a cross will be invisible.
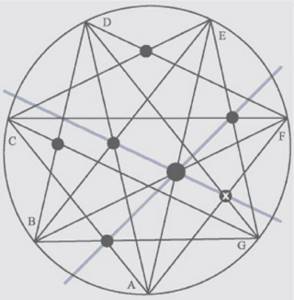
In the second option, you can observe all the cobblestones only from location F, while from other points it will be impossible to notice any stone (those that are not visible from certain points of contemplation are indicated by arrows). Those marked with crosses will be visible from any point.
In the third option, two boulders are inaccessible to view from viewing point D, while from other points one stone at a time is invisible (this is indicated by arrows in the diagram). The boulder marked with a cross is the main one, it is visible from all places of contemplation.
In addition to these schemes, there are options for creating stone gardens, shaped like representatives of wildlife, for example, a crane or a turtle.

History of origin
In ancient Japan, which is surrounded by rocks, stones have always had special powers. The accumulation of cobblestones and boulders has been considered sacred since ancient times. It was these places that were considered marked by the gods; rituals were performed here, they prayed and meditated. The original Japanese gardens were a pile of stones tied together with twine.
A little later, the Chinese made changes to the design of the gardens. There is a legend that in the Eastern Sea there are distant islands where immortals live. The Chinese created a new symbol - island stones in the endless sea. Using blocks and cobblestones, the land itself was depicted, and the sand around them was covered with a pattern of wavy lines that symbolized the sea and waves. Later, the stones were enclosed in a system depicting some kind of drawing or diagram.
And another legend about the emergence of rock gardens is associated with Buddhism. The monks believed that Buddha was hidden inside every stone. His face had to be extracted by processing the block. It was believed that each monk had his own special stone. If the Buddha could not be carved out of the rock, then the stone could not be returned back, much less thrown away, since the image of God was still in it. This is how a whole garden of stones and boulders was formed.
Initially, gardens were located in temples, and a little later they spread to private areas. However, their meaning has not changed.
How to make a rock garden with your own hands
Few people come up with the idea of creating a Japanese rock garden with their own hands at the dacha, but if the territory allows, why not organize something similar on the site. For example, recreate a decorative mini-rock garden in the Japanese style at the dacha or create something like karesansui (a small corner of nature).
Important! Regardless of the project, a Japanese-style rock garden, created with your own hands, must be in harmony with the environment, being part of the landscape design of the dacha.
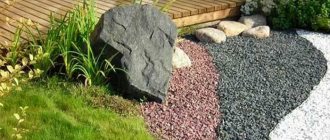
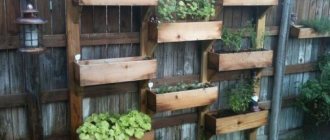
Decorative mini rock garden
Before starting work, preliminary planning and calculation of the required material are always carried out. Once these two points are completed, work begins, which is divided into the following stages:
- The very first step is to clean the area at the dacha. Then the surface is leveled.
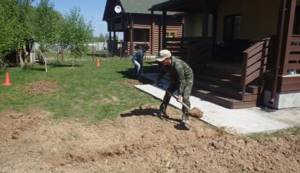
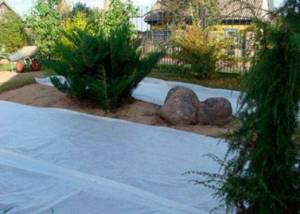
- Next, beams are laid along the contour of the future mini-garden, which are fixed and covered with a stain of natural wood color. A film (geotextile) is laid on the leveled surface inside the resulting area to prevent the growth of weeds. A layer of gravel or sand at least 5 cm thick is poured on top of it.
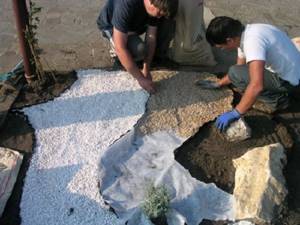
- After pouring a layer of gravel, you should begin installing boulders. Traditionally, their number should be from 3 to 15 pieces. (odd). It is better to give preference to cobblestones of the correct shape, but of different sizes. They are installed by immersing them in gravel.
- The surface around the perimeter, as well as around the boulders (main stone), should be leveled and, using a rake, furrows parallel to each other should be applied.
- The last step is additional decoration, where you can use figurines and various miniatures
Japanese rock garden as a corner embodying nature
As when creating a stone mini-garden in the country, in this case, the beginning of the work also lies in the design and preparation of materials. Afterwards, they begin to make the composition directly at the dacha with their own hands. This consists of the following steps:
- First, prepare the appropriate foundation on the territory of the dacha. Markings are made using rope and pegs along the contour of the future garden. It is best to create it in a natural shape.
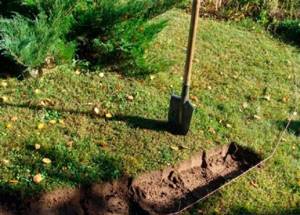
- After marking, the top layer of soil is removed to a depth of 10 cm. At the same time, weeds are removed and the soil is treated with herbicides to prevent their growth.
- In place of the removed layer of soil, a polyethylene film (geotextile) is laid. Then a layer of sand, gravel or pebbles is poured on top.
- After pouring a layer of fine gravel (sand, pebbles), they begin to install stones. One or more large boulders should be taken as a base. It is best if they are slightly different in size. At the same time, cobblestones are installed, deepening them by 5-7 cm.
- If necessary, the composition is supplemented with smaller stones and suitable plants are planted.
- The final stage is decorating the composition at the dacha; if desired, you can install lanterns or various figurines.
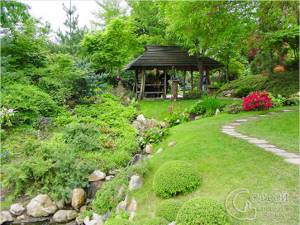
Rock garden with pond
Owners of large territories can combine a stone garden with a pond. These two elements of landscape design always perfectly complement each other, creating real corners of peace on your territory.
Making a rock garden or rock garden with a pond with your own hands is neither easy nor cheap. You will need to put in a lot of effort, but there are also advantages - the soil that you remove when digging a pit under the water will be suitable for filling the slide, so you won’t have to look for it somewhere else or carry it in a wheelbarrow from afar.
The process begins, as always, with markings. Try to make the slide and the pond comparable so that one does not get lost against the background of the other. Then remove the turf and top layer of soil from the entire area of the future composition and dig a hole under the pond.
To create a pond, you can use either film or ready-made molds made of plastic or fiberglass. In any case, the depression for the reservoir is dug 15-20 cm deeper to leave room for drainage.
After the place is prepared, laying and compacting of the drainage layer begins. At the bottom there is gravel or broken brick (10-15 cm), then a layer of sand (5-10 cm). The bottom is carefully leveled, and then covered with a waterproofing film or the pool bowl is placed on it, carefully leveling it relative to the ground level.
After the reservoir is prepared, the construction of the slide begins. It is done in the same way as a regular one, but the stones need to be buried a third so that they do not wobble or move.
It is better to start landscaping this area 3-4 weeks after water is poured into the reservoir. All this time, the soil will shrink and compact, and it may be necessary to rearrange the stones or add soil.
It is better not to lay out limestone at the very edge of the pond - it will negatively affect the hardness of the water and can lead to the formation of sediment on the bowl of the pond.
You can plant some of the plants just above the water's edge - they will cover the edges of the bowl and make the pond more natural. For growing in a rock garden with a pond, cypress, juniper, Japanese maple, saxifrage, cotoneaster, heather, yarrow, alyssum, breaker, anemone, columbine, chickweed, aster, cyclamen, etc. are suitable.
To give the panorama a complete look, the hill needs to be mulched with stone chips, pebbles or gravel.
Of course, there are many more options for creating cameo gardens. Maybe you have already done something unusual on your site?
Rock garden care
A stone garden created with your own hands at the dacha does not need much maintenance, but it is necessary to maintain its appearance. For these purposes, you can adhere to the following recommendations:
- One of the main problems for a stone garden in the country is fast-growing weeds. That is why it is important to get rid of all roots when preparing the base for it, then treat the soil with herbicides and lay geotextiles. If, however, the weeds were able to germinate, their timely removal will preserve the appearance of the composition.
- In addition to weeds, falling debris and leaves can add to the annoyance of the dacha owner. Therefore, when planning the layout of the future garden at the initial stage, you should consider access to any part of it. It is best to use a wire rake to remove fallen leaves and other debris.
- If there are plants in the composition at the dacha, it is important to think over a system for watering them, otherwise the plantings may die.
- Every 3-4 years it is necessary to update the gravel (sand) base to refresh the appearance.
Useful tips
There are many tips on how to make a rock garden at your dacha with your own hands, in accordance with all Eastern traditions. But some recommendations are still worth mentioning:
- boulders that are similar in size, shape, shade, or equal in height should not be placed close to each other;
- it is better to make a composition from stones of the same origin, for example, those found in the mountains, near a river or on the seashore;
- the color palette should be similar, or even better, monotonous; the cobblestones should not have a contrasting color.
We use materials provided by the sea
Crafts made from sea stones are especially popular. A holiday at sea makes it possible to deliver a huge amount of ornamental material. A little inspiration, desire, creative touch, the presence of plasticine, polymer clay, glue, colored paints will help decorate any room and open space.
Macrame
The work is not difficult, it requires regularity and perseverance. Available for both children and adults. The following actions must be taken:
- take dense threads of different shades (preferably bright) and braid them;
- several braids are intertwined;
- one large or several small pebbles are inserted into the center of the weaving;
- the braids are connected by knots, braiding stones;
- You can decorate macrame with glued rhinestones of a suitable color.

Sea pebbles differ from each other in their bizarre shape and shade. If there is a natural hole, you can simply thread a string and hang the jewelry around your neck. To make the stone more attractive, it can be varnished or painted in a bright color.
Photo
Finding a large flat stone on the sea coast is not a problem. Using a drill, several holes are made in it, and a thick silk thread is threaded. The bracelet is ready.
Small flat stones of different shades are suitable for making beads. A thin cord is threaded through the holes made. To add strength, you can separate all the stones into knots. Don't forget to attach a lock.

A simple but quite unique craft. How to make a refrigerator magnet with your own hands? It is enough to find a small flat pebble and draw an animal (chicken, dog, kitten) on it. Attach a small magnet to the back side.
Decoration of glass bottles
We use sea pebbles and shells. We use one of two options:
| Option one | Take a bottle and decorate it with small pebbles, creating simple designs or patterns. Glue should not be used. You need to cover the glass with a thin layer of plasticine, onto which you attach the ornamental material. |
| Option two | The transparent container is washed, dried, and small pebbles, shells, and pieces of glass are placed inside. The bottle is closed with a cap. |
Photos of rock gardens at the dacha with your own hands
Despite many rules and features, this composition has considerable popularity in many countries. Modern rock gardens, made with your own hands on a dacha plot, are a real work of art, as numerous photos prove.