Methods for constructing garden paths
One of the many classification options, which in our case will be the most convenient, is based on the method of constructing garden paths.
Garden paths
garden path
These are paths that appear naturally when people regularly move around the same place. As a rule, these spontaneously appeared paths connect the most important and popular points on the site along the shortest path. Despite the fact that this is the cheapest option for constructing garden paths, which, by the way, is not at all difficult to improve by laying a border of stones or paving slabs along the edges, the paths have some disadvantages . These include:
- dirt after rain;
- overgrown with grass.
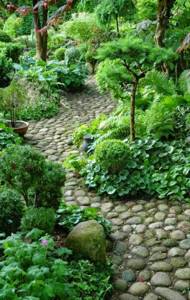
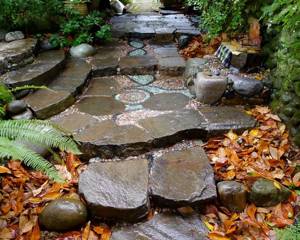
garden path paved with stones
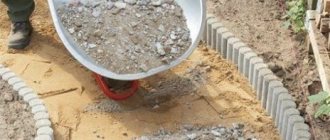
The garden path is most convenient for summer cottages located in dry places: hills and sandstones. It is a path with a base made of any bulk material: pebbles, crushed stone, marble chips, etc. Gardeners are captivated by the simplicity of creating such garden paths with their own hands:
- They dig a trench, the width of which is equal to the width of the path, to a depth of 10 centimeters.
- The bottom and walls of the trench are lined with geotextiles having a material density of 150 g/m², and the walls are also reinforced with curb tape.
- Afterwards the trench is filled with prepared material.
For decoration, large stones or slabs can be placed randomly or in any order among the backfill, sinking them flush into the material used for backfilling.
gravel path
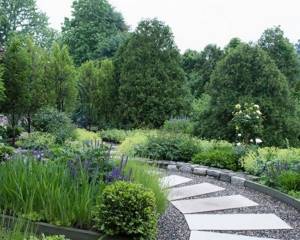
a garden path made of pebbles and artificial stone fits perfectly into the landscape design
Preparing for the construction of gravel garden paths with your own hands is carried out in the same way as preparing for the construction of a garden path. The main difference is that gravel is poured into the trench. With a certain amount of imagination, you can, by choosing materials of different colors, zoning the paths or simply decorate them.
Solid poured paths
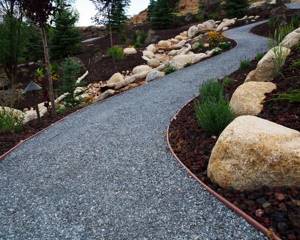
the undulating embankment garden path looks great in the overall landscape
These are paths with a relatively hard surface that can withstand significant loads. They are paved over a concrete pad by laying various decorative components: paving slabs, stone, etc. To diversify the decor, use multi-colored elements. To prevent the path from being washed away by rainwater, during construction using wooden formwork, their level is raised to a height of 5-7 centimeters above the ground.
We use curly shapes
An ordinary concrete path can be refined and made into an effective element of landscape design. To do this, you will need durable ready-made polystyrene molds, which can be purchased in both retail and online stores. They are inexpensive; to arrange the path you will need several forms with the same pattern (at least 4 pieces).
Work algorithm:
- We determine the location of the path, its width, and mark the outline using small pegs and a cord. The shapes used usually have a standard size of 60 x 60 cm and, like puzzles, are matched with sides. The width of one shape is enough to create a narrow garden path. If a wider path is required, make it by doubling the shapes.
- We dig a trench with a shovel along the bed marked with pegs, its depth should be 8-10 cm. Carefully compact the bottom of the trench; it is better to use an electric vibrator. We pour a layer of gravel 3-4 cm thick onto the compacted earth and cover it with a pillow of river sand (5-6 cm). Spray the prepared base generously with water from a hose with a dispersing nozzle. We lubricate the molds with machine oil; if this is not at hand, then vegetable oil will do, and then set them on damp sand.
- We prepare a concrete solution from 1 part cement, 3 parts sand and 4 parts crushed stone. We add the binding mixture used when laying foundations to the composition and, adding water, stir until the consistency of the sour cream is achieved. You can also add dye to make the path brighter and more impressive.
- Using a trowel, fill the greased molds to the brim with the prepared solution. We make sure that no air bubbles or voids form; we level the surface ahead of time with a plastic or metal strip prepared for this purpose. The solution in the molds will “set” after about 30-40 minutes, after which the molds are carefully removed, moved further along the path and the previously performed steps are repeated. Smeared forms can be removed from cement that has not completely hardened quite easily.
- While the solution is half-baked, you can press decorations for the path into its mass - fragments of multi-colored tiles, beautiful stones or other decor. After the path dries, they will firmly adhere to the concrete.
After all segments of the path have been formed, it is important to protect the not yet completely dry concrete from accidental damage as a result of children pampering, pets, etc. Two or three days, or even more if the weather lets you down and is not warm enough and sunny, it is necessary to protect and protect the new element of the estate. It might even make sense to install temporary fencing or write a warning sign.
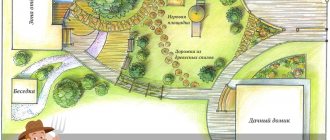
Planning the construction of garden paths with your own hands
Any construction begins with a plan (project), in which the design is written down, a thorough study of the site is carried out and an analysis of the influence of surrounding factors on the object being built is carried out. In this case, it is necessary to take into account the density of the soil, its moisture, the presence of flood waters, and the direction of rainwater flow. Planning the installation of garden paths with your own hands is no exception to the rule.
Before starting the construction phase, you should draw up a plan and markings
Based on the analysis, you need to outline the direction of laying future garden paths, decide on their length and width, determine the angles of inclination of the roadway for draining rain and melt water, sketch out their appearance and method of decoration on paper.
When designing paths, we must not forget about the following requirements for the materials used:
- they must be as resistant as possible to the effects of precipitation, alternating temperatures, moisture, and corrosive wear;
- withstand quite significant loads without deformation, for example, the passage of motorcycle or bicycle transport.
stone garden paths are resistant to external factors
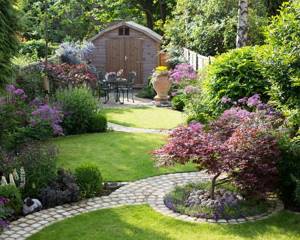
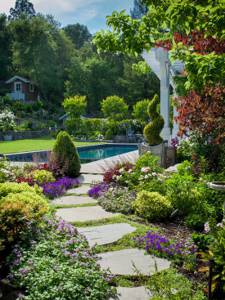
When creating your project, use the following advice from landscape designers: it is better to build undulating garden paths rather than straight ones. They visually increase the space and make it possible to create niches for plants.
Marking on the ground
All serious construction work begins with linking the project to the area, for which appropriate markings are made on it. This issue must be approached especially carefully when using a material with a clear geometric pattern, for example, ready-made paving slabs or bricks. To preserve the traces applied to the area, the top layer of soil is removed.
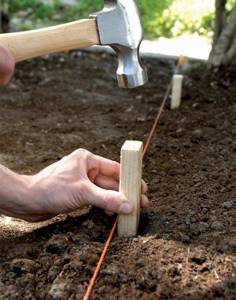
example of marking a garden path using pegs and strings
To mark, pegs are driven into the ground and a cord is pulled between them. In order to visually, on the ground, verify the correctness of the calculations and the harmony of the resulting path, its boundaries are sprinkled with lime along the cords. To create a complete picture on the site, it is better to immediately, simultaneously with the paths, mark with conventional signs (plates, stones, lime) the locations of flower beds, individual plants, and garden trees. It is on the ground that the gardener will see everything as it should be in reality and, perhaps, make some changes.
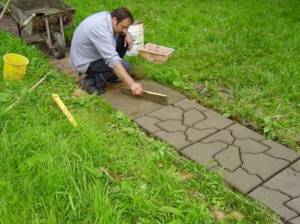
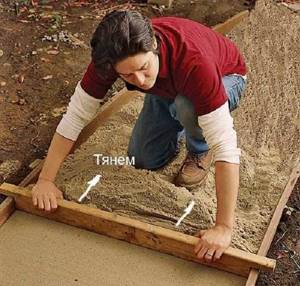
forming a garden path using ready-made forms along stretched threads
When marking, we must not forget that the trench for the path must be wider than itself, since to significantly increase the service life it will be fenced with curbs made of stone or concrete.
Having completed the marking, you can begin excavation work.
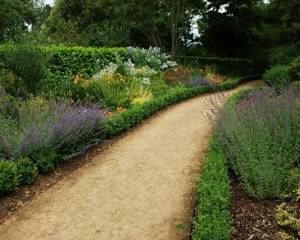
Material selection
Three pillars that determine the choice of material for the paths:
Practical - for each track, a material is selected that will ensure operation for the entire required time. That is, it is necessary to take into account the intensity of movement along each segment and the operating time of the track.
Paths between garden beds are laid out for one season with material that can be easily removed and moved to another place, and sidewalks for movement from the entrance to the site, between the house and outbuildings are laid out for decades.
Aesthetic – paths are an important decorative element of the garden and must correspond to the design concept of the space.
Economic is an extremely important component, but if you are guided only by the budget, then the output will be an object that will again require financial investments in a year. It is important to weigh the cost and practicality of using certain materials.
DIY garden path
“The simplicity of the work performed on the installation of garden paths allows even beginners to carry them out”
Construction of a garden path with your own hands can be divided into two stages:
- Preparing the base.
- Laying the road surface.
The base of the path is analogous to the foundation of a building. It is the high-quality performance of this work that will allow the path to maintain its integrity for many years.

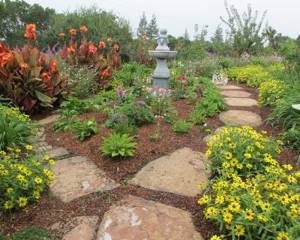
path made of slabs in the design of a site with an artificial pond
According to the previously marked width and length, a trench with a depth of at least 10 centimeters is torn off, taking into account the width of the path plus an allowance for the width of two curbs. The depth of the separation does not allow us to call it a trench; rather, it looks like an earthen trough, the bottom of which is covered with crushed stone to a height of 3 centimeters, which is carefully compacted using special devices. A layer of fine gravel wakes up on top, which is covered by a cushion of sand.
The builder approaches the stage of laying the roadway already having yellow sand paths throughout the site. The covering elements - and these are tiles, stone, bricks, and other materials - are compacted and adjusted to each other with a rubber mallet. A compactor is poured on top - sand, which fills the cracks and gaps. Excess sand from the coating is swept away.
paving slabs are an excellent material for garden paths
The simplicity of the work performed on the installation of garden paths allows even beginners to carry them out. The main thing is to use your imagination, be patient, and then your summer cottage will become an object of pilgrimage for your neighbors.
Planning a summer cottage
Planning a summer cottage consists of two stages: marking the site and excavation work. Marking the site consists of placing benchmarks (marks) that determine the contours of paths, platforms, planting holes for trees and the topography of the site. Benchmarks are placed based on the project; reference points for marks are references to the boundaries of the site, existing buildings and trees. Benchmarks can be wooden pegs or small pieces of reinforcement. The relief of the site is divided from reference marks. This breakdown can be done using a level or theodolite. When the entire area is marked, you can mark the contours of the paths and platforms. To do this, sprinkle sand along the contours. You will see real forms and, if you don’t like them, now is the time to correct them. Because next we start excavation work.
Materials used in construction
“A gardener who arranges garden paths with his own hands can use any available items: boards, wood cuts, river pebbles, stones, plastic bottles.”
Options for arranging garden paths at the dacha are a matter of taste and wallet for each author. But, no matter what, we must not forget about the mandatory formation of a high-quality foundation for the future sidewalk, on which you should not save.
granite garden paths are suitable for houses and landscapes in a simple classical style
The most popular materials for road surfaces:
- natural stone is a clot of solidity and nobility;
- artificial stone - a faceted analogue of natural stone;
- brick - will provide the opportunity for multi-colored design;
- The uniqueness of the path will be given by the use of pebbles or gravel;
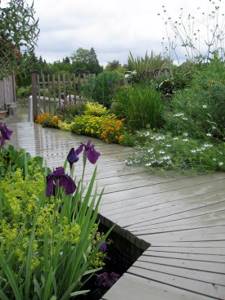
- wood is the most affordable, effective, but, alas, short-lived material;
- garden parquet made of plastic - decking, extremely resistant to adverse factors.
The exclusive appearance and decorativeness of the structure depend entirely on the imagination of the author, who, by varying the laying methods, can give it a continuous, even texture or lay out the road surface in the form of some patterns.

combined garden path made of wood and pebbles
A gardener who arranges garden paths with his own hands can use any available items: boards, wood cuts, river pebbles, stones, plastic bottles.
Below are options for using scrap materials.
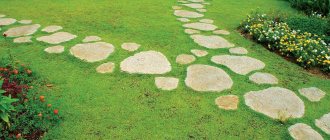
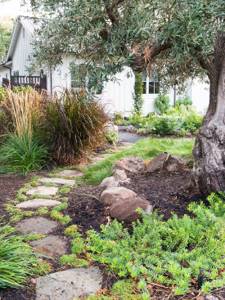
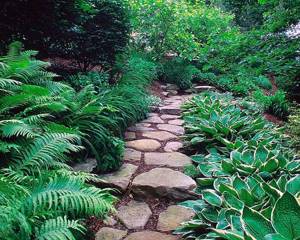
A natural stone
Paths made from it will harmoniously fit into the design of any site, and will look very impressive and presentable. If installation technologies are followed, garden paths paved with your own hands can honestly serve for several generations.
small stone path in garden landscape design
Stones are collected at construction sites: for example, a lot of suitable material remains after the construction of alpine slides. Possessing chaotically broken, uneven edges, stones are the best material for building a natural path, picturesquely winding among garden shrubs and trees.
The most difficult thing is to find, collect and deliver the required amount of building material to the site. After delivery, you need to carry out a rough layout of the stones, which will allow you to estimate their number and create the necessary mosaic pattern. Next, using an angle grinder, the stones are processed to more carefully fit them to each other, as well as grinding the top side of the stone to a flat state.
garden paths made of stone look presentable
Having created a cushion of sand and thoroughly compacted it, the stones are laid using a rubber hammer. Having laid out the entire path, they begin to grout the joints with cement-sand mortar.
Sandstone path
To install such garden paths, stones are either laid dry, which is similar in technology to laying stone paths, or cement pouring is used.
For laying using the cement pouring method, sand is poured into a pre-dug earthen trough and then compacted. Moreover, the middle part of the embankment should be higher than the edges, which will subsequently allow water to flow from the center to the edges of the path.
sandstone garden path
Then they begin to process the sandstone. It, like an ordinary stone, comes in a variety of shapes and sizes, so before processing, each stone must be tried on in place and, after processing with a grinder, the size of the gap between the elements must be minimized. Under each stone, a solution of a mixture with cement is poured onto a sand cushion so that the cement protrudes slightly beyond the boundaries of the cushion. The laid stone is pressed tightly to the surface. Having laid several sandstones in this way, the masonry is washed to remove cement residues. The seams are filled with sand or soil.
Gravel path
These are quite neat garden paths that harmoniously fit into almost any design and are easy to make with your own hands. Gravel is a natural material with good flowability. Consists of small pebbles with a diameter of up to 5 millimeters. Due to its round shape, gravel allows moisture to pass through well, and it is also relatively cheap.
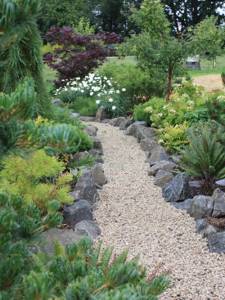
gravel garden paths can be arranged independently
Technology for creating a gravel sidewalk:
- Marking the area using pegs and cord.
- Preparing an “earth trough” 14–17 centimeters deep.
- Preparing gravel - removing foreign objects, the largest stones, selecting by color.
- Filling the trench with gravel and leveling it with a rake and with gloved hands.
- Carefully compact the laid gravel.
- Laying the curb stone just above the gravel level, securing it with cement mortar.
Sand paths are made in a similar way.
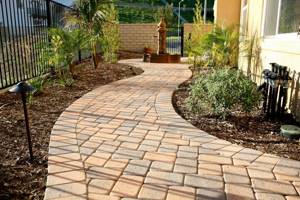
Brick garden paths
Brick, despite its hardness, is a very fragile material, so each copy needs to be tested for strength before laying.

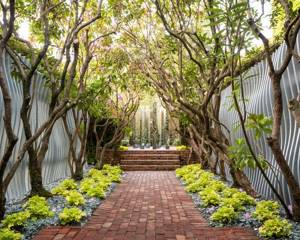
red brick garden path
Similarly, using pegs and a cord, the area is marked. Next, the soil is removed to a depth of 25 centimeters. The bottom of the “earth trough” is awakened by drainage. Along the edges of the path, boards are laid sideways to prevent the scattering of crushed stone, which is poured over the drainage, after which bricks are laid on top.
brick is a hard but not durable material
Using different colors of brick, you can build interesting decorative compositions. When installing brick garden paths, a huge number of decoration options are available: from simply combining colors to using broken bricks and brick chips along with other materials .
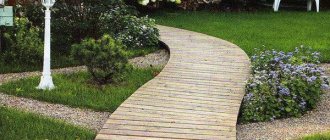
Wooden paths
Sidewalks made of wood look very good. This is the most budget option, as it allows you to use wooden products left over from the construction of the house. However, their service life is significantly inferior to other materials. To extend the life of wooden paths, it is necessary to carry out a number of manipulations with the wood to repel insects and make the wood more moisture resistant. For example, treat them with protective impregnations, bitumen mastic, and finally, used machine oil.
wooden garden paths
The easiest way to build wooden garden paths with your own hands is to install walkways from boards nailed to bars. For beauty and to extend the service life, a paint coating can be applied to the walkways.
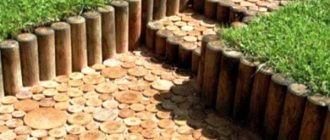
Round timber path
Round logs are wooden cylinders that are obtained by cross-cutting logs. The cut is performed very carefully, since the cut surface must be perfectly flat. If necessary, the top part is additionally sanded. To reduce the gaps between round timber when making sidewalks, logs of different diameters are used. The height of the round timber should be about 20-26 centimeters.
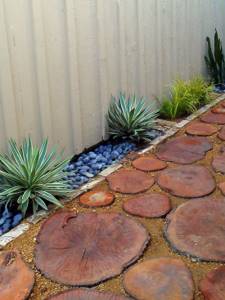
a garden path made of round timber adds a twist to the overall concept of landscape design
Option #1
Before installation in a pit previously dug and filled with compacted crushed stone, the wood is treated with an antiseptic that protects against microorganisms and ground moisture, for which it is dipped into a container with the preparation for several minutes. The rest of the surface is treated with a brush.
After processing, the workpieces are thoroughly dried. After drying, the lower part of the stumps is dipped for a few seconds in “Kuzbass varnish” or heated bitumen, creating additional waterproofing of the wood.
Before laying, the round timber is treated with an antiseptic
Having completed all the preparatory procedures, we begin to install garden paths:
- at the beginning of the path near the transverse wall of the trench, pour a little sand;
- the first row of round timber pre-selected to size is tightly installed so that the upper edge of the stumps rises approximately halfway above the ground level;
- sand is poured into the remaining cracks to the ground level;
- The next row of round timber is placed in the same way;
- the procedure is repeated until they reach the end of the pit, where the sand border is compacted.
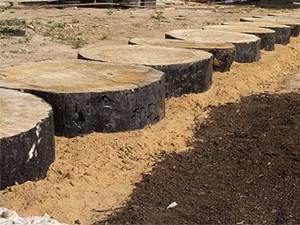
Option No. 2
installation of round timber
When building a path, instead of sand, crushed stone or gravel is filled in, while round timber is used only as a border. All stages of work are exactly the same as when making your own garden paths with a working surface made of stumps.
The technology is as follows:
- the bottom of the pit is covered with sand, which is carefully compacted;
- logs are placed tightly along the edges of the trench and sprinkled with sand, which is compacted at the base;
- the entire surface of the path is covered with geotextiles, the edges of which are placed on round timber to a height of up to 10 centimeters;
- gravel or medium-sized crushed stone is poured onto the geotextile, which is evenly distributed along the entire path at ground level. The material is, on one side, a road surface, and on the other, a support for a curb made of round timber;
- The upper cut of the round timber is coated with paint if desired.
after laying the round timber, the area can be covered with gravel or crushed stone
Sidewalk made of round river stone
Very beautiful paths are obtained when using Altai river stone to create garden paths. This decorative element has amazingly beautiful shades, from light gray to blue-gray, has a round shape, and is smooth to the touch.
To make a sidewalk you will need:
- the required number of different-sized stones;
- clean sand;
- rubber mallet;
- cement;
- sponge;
- level;
- water.
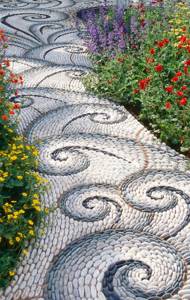
river stone allows you to show your creativity and create an original garden path
The technology for carrying out preparatory work is similar to preparing for the construction of brick garden paths with your own hands, only in this case it is necessary to sort the stones, weeding out the defective ones. If the flaw is not too noticeable, then when laying the stone you can put the conditioned side up.
After this, the stones are laid out on a prepared pattern along the width of the sidewalk.
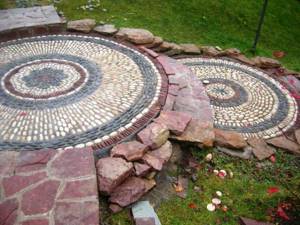
Option #1
- Having created a base of crushed stone at the bottom of the pit, a drawing is applied to it from the sketch with lime. It must be remembered that a mosaic made of stones can easily crumble, so it must be supported by edges on all sides.
- Having mixed sand with cement in a 3:1 ratio, add water and get a thick mixture, which is laid out along the lime pattern in the form of a side with a width equal to the size of the stone. These strips are not made very long so that they do not have time to dry - this will make it easier to level the pebbles with them.
- An oval-shaped stone is laid on its side and pressed into the mortar path. You can use a rubber mallet for leveling.
- After the whole strip has been laid out, it is necessary to check its evenness with a building level, correcting the protruding parts with a hammer.
- Thus, row by row, checking the sketch, the entire path is laid out. Here you can combine oval stones set on edge with round ones placed flat, and even with stones installed vertically - but only if this does not disturb the created composition.
- When laying, you can play with the shades of the stones, alternating their color in different stripes or making smooth color transitions.
- Having finished laying out a part of the mosaic, the resulting result is watered using a fine sprayer. Water washes away excess cement from the surface of the stones and strengthens the mortar.
- Thus, slowly, they gradually lay out the entire area of the garden path, ensuring that it is densely filled with stones.
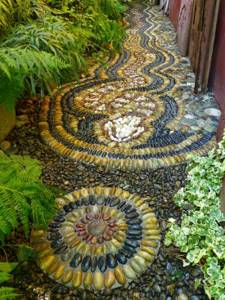
garden path made of pebbles and river stones
Option No. 2
This is a simpler option, in which no cement mortar is used, and the stones are laid directly in moistened sand. The downside of simplicity is the risk of destroying the composition, so it needs to be laid out in small parts.
To do this, they use borders to which temporary partitions are attached - analogues of wooden formwork, which can be removed after finishing part of the composition.
The technology for making garden paths with your own hands looks like this:
- Laying and leveling curbs and temporary partitions on a base with compacted crushed stone.
- Filling the resulting sectors with wet sand, compacting it and leveling it at a height of 2-3 centimeters below the formwork. This difference in height is needed to ensure that the top surface of the stones is flush with the curbs.
- Laying stones in the path and leveling them using a rubber hammer and a level placed on the curbs. Periodic additional moistening of the sand.
- Re-check the evenness of laying the stones until the sand dries, after which - filling the mosaic with dry sand or a mixture of sand and cement, followed by sweeping out the excess.
- Re-wet the mosaic using a sprayer.
- Repeat the procedure with dry sand and moisturizing after a few hours, when the sand dries, compacts and fills the space between the stones.
- Wiping all stones with a wet sponge after drying again.
- Wetting the entire mosaic daily for a week with water to form the necessary rigidity of the path.
- In addition, in order to avoid washing out the sand structure, it is advisable to cover the entire area of the path with thin foam rubber that allows moisture to pass through but does not allow the sand to wash away.
- Upon completion of the work, it is necessary to remove the formwork from the boards and strengthen the structure with stones or bricks, forming curbs.
Using river stone you can create a garden path with any design
concrete path
When constructing concrete garden paths with your own hands, it is necessary to carry out careful markings using the technology described above and excavate the soil according to the markings, forming a pit for the base of the sidewalk.
Along the boundaries of the pit, curbs or formwork made of boards are installed, which are leveled using a level and secured from the outside with pegs or reinforcement.

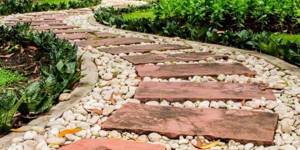
Combined paths made of gravel and square slabs are perfect for landscapes in a modern style.
The bottom of the trench is covered with sand, which, after moistening, is thoroughly compacted. The thickness of the resulting pillow should be at least 7 centimeters. Crushed stone is poured on top of the sand cushion, which is also compacted. A reinforcing grid is placed on top: it is thanks to it that the path will be very strong, capable of withstanding heavy loads.
Next, you can choose one of the construction options, depending on what kind of path is needed.
poured concrete path using a stencil
Option #1
If you need a flat, smooth surface, then prepare a liquid concrete solution, which is poured into the formwork on top of the reinforcing mesh.
- Concrete is leveled as a rule, using the sides of wooden formwork as beacons.
- If concrete is poured onto a path where curbs are already installed, then you will need to make a rule yourself so that its dimensions do not exceed the distance between the curbs.
- The concrete poured on the path is reinforced. To do this, the wet surface that has not had time to dry is sprinkled with a thin layer of dry cement, which is immediately rubbed in using grout. If desired, you can purchase special strengthening topping mixtures.
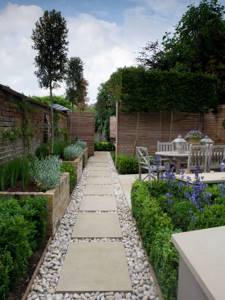
path made of small stones and slabs
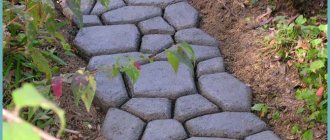
Option No. 2
When simulating masonry using an appropriate form, the concrete mixture is poured into the formwork in two layers.
- The first layer is laid at half the height of the formwork and leveled in the same way. To do this, use a rough solution obtained by mixing cement and gravel. It is necessary to achieve a flat surface, for which you need to install control beacons of the required height over the entire area and, when pouring, level the mixture according to them.
- After the concrete of the first layer has set, a mold is placed on its surface and filled with a liquid solution, without the use of gravel. Alignment is carried out along the surface of the mold. The concrete-filled form completely hardens within 3 to 5 days.
- Afterwards, the form is removed by gently shaking and pulling upwards. Place next to the previous frozen workpieces and completely repeat the pouring process.
garden path made of single concrete slabs
If the builder has only one mold, installing garden paths with your own hands can take months, or even years, so when starting such work, you need to take care of having several molds that allow you to lay and form several “stones” at once.
In a similar way, you can decorate the floors in gazebos and smoking rooms, as well as areas in front of the house and garage in an original way.
Plastic garden paths
They allow gardeners to quickly, in comparison with the construction of solid stone or tile borders, install paths using blanks specially sold for these purposes. They consist of modules, most often the same in size and color. They are assembled approximately like a Lego set and are considered a temporary version of the tracks. But, as they say, there is nothing more permanent than temporary.
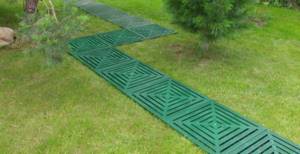
plastic is the most economical option for arranging garden paths
At a fairly affordable cost, hand-assembled plastic garden paths have a number of advantages:
- retain their shape and presentable appearance for a long time;
- wear resistant;
- equipped with technological holes that prevent the accumulation of water and allow it to freely pass into the soil, which is guaranteed to eliminate the formation of puddles and prevent the formation of unpleasant odors;
- not subject to rotting;
- easy to clean, do not require systematic maintenance, resistant to chemicals and corrosion;
- simple, intuitive installation based on the design principle;
- do not require preparatory work, as they fit equally well on any base - sand, turf, clay;
- can be quickly dismantled when redeveloping the site;
- In winter they can be washed, dried and stored in the utility room until the new season.
Paths made of plastic bottles and bottle caps
garden path made of plastic covers
One of the most original and interesting ways to create garden paths and paths with your own hands is to lay out the surface with plastic bottle caps. Multi-colored lids make it possible to create patterns, mosaics and even entire paintings.
The only disadvantage of this available material is its collection, because even a small path of covers will require a huge amount.
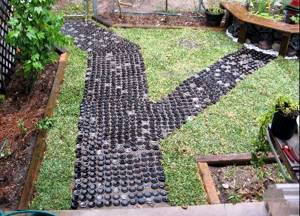
bottle path
Another interesting design method is to lay out garden paths with the bottoms of plastic bottles. The manufacturer took care of the ribbed bottoms, which gives them the necessary rigidity. You can verify this by trying to specifically deform the bottom of a plastic bottle. The bottom is quite strong and can easily withstand the weight of a person. To increase the strength characteristics, they must be laid on a sand cushion, pressing into the sand until it stops. The variety of colors will allow you to create various mosaic panels, and the larger size compared to lids will make the procedure for collecting raw materials easier.
How to make a tile path
If, when deciding what to make a garden path from , you chose tiles, you need to stock up on them, sand without impurities, water and cement mortar. The tools you will need are: a construction level, a hand tamper, a garden wheelbarrow, a rubber mallet, a bayonet and shovel, a tape measure, a screen and pegs with a rope.
To make a garden path from tiles, you need to calculate the width of the path so that the blocks do not need to be trimmed. This will simplify your work and save money by reducing waste.
Preparing the base for a tile garden path
The choice of the shape and size of the tiles determines the possibilities of their installation. The maximum number of schemes exists for rectangular blocks with a width of 10 and a length of 20 centimeters. You can lay the tiles like bricks, in a herringbone pattern, in a column, or combine patterns.
In addition to the tiles, the border material is selected. It is installed on a sandy, compacted and spilled base. The depth is determined depending on the configuration of the curb blocks. Excluding differences, measuring the distance with a cord. The border is attached with a liquid solution. The grade of cement must be at least M100.
It is necessary to water not only the base, but also the sides of the curb. It is customary to remove a 10-centimeter layer of soil from the main canvas. Along with it, the seeds and roots of herbs are eliminated. If you plan to grow them between the slabs, you just need to level them, pour water on them and compact the base.
After compaction, the base is laid out. Sand, its mixture with gravel or crushed stone is taken. They can also be mixed in any proportions. The height of the embankment is about 6 centimeters. The sand is compacted, spilled and left to dry for 4 hours.
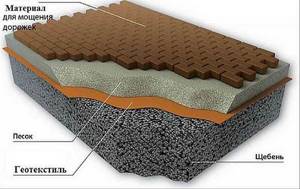
Diagram of soil layers for a garden path
While the base dries, prepare the cement mixture. Take 1 part of the cement itself. Another 8 add sand. He is the first to fall asleep. Cement is needed at least grade 400. The mixture is thoroughly mixed. You can use a trough with low sides as a container.
The cement mixture is laid out and leveled on the base in a 4-centimeter layer. You need to press the laid tile against it, trimming it with a mallet. A 3mm gap is left between the blocks. After laying, the seams are filled with cement mixture. Residues from the surface are swept away.
Useful tips
- The so-called walking paths look very funny, the surface of which is formed from various elements, for example, concrete squares or large-diameter round timber. You can stack them in a row, one after the other, creating a chain that is very fun to move around. You can arrange these parts in a checkerboard pattern - this will allow you to remember the children's game of hopscotch. Moving along such paths will intrigue household members and guests.
- Don't be afraid to combine and mix styles and methods! You need to confidently combine different materials. For example, wood will look beautiful with river pebbles or large pellets like sea pellets. This method will visually smooth out various transitions when designing paths.
- When planning work, special attention should be paid to the weather forecast. Almost all materials used and technologies used at the construction stage are afraid of rain. The most dangerous thing is water getting into an earthen trough. Precipitation during work can negate all the efforts and money spent, so in no case should you get down to business on the eve of bad weather. However, at the stage of completion of work, rain is very desirable, as it will help compact the top layer, wash away dirt from the stones and polish them.
- The use of natural stone is ideal for a curved path that winds through the garden. By arranging individual elements in a random order, you can easily make any, even the sharpest turns, not to mention smooth bends. When creating garden paths with your own hands, intricately winding throughout the garden, it is very advisable to opt for this noble, classic material of natural beauty, which will serve for decades.
garden path made of natural stone